当前位置:网站首页>零基础自学STM32-复习篇2——使用结构体封装GPIO寄存器
零基础自学STM32-复习篇2——使用结构体封装GPIO寄存器
2022-07-06 02:12:00 【Fecter11】
我们首先要了解寄存器的一个特点,他不是只针对一个外设,而是所有的外设都。
就拿GPIO的CRL,ODR寄存器来说
对于GPIOA——GPIOE都有一组功能相同的寄存器只是地址不一样而已A(主要是外设地址不同,比如GPIOA的外设地址和GPIOB的外设地址就不一样,即便寄存器的偏移量一样的),没必要每个寄存器都配置一遍。
这里就引入一个基本操作那就是:使用结构体对GPIO寄存器进行一次封装
主要参考:野火的《开发指南》
typedef unsigned  int uint32_t;
typedef unsigned short int uint16_t;
// unsigned int 占32位unsigned short int占16位
//下面使用结构体来封装
/*********************************/
//定义一个结构体变量使用关键字struct,并将这个结构体命名为GPIO_Typdef如下(不懂结构体的可以去找个视频看看看,不必深究会用就行。)
typedef struct
{

	uint32_t CRL;//GPIO端口配置低寄存器器
	uint32_t CRH;//GPIO端口配置高寄存器
	uint32_t IDR;//GPIO端口输入寄存器
	uint32_t ODR;//GPIO端口输出寄存器
	uint32_t BSRR;//GPIO端口位置位/清除寄存器
	uint32_t BRR;//GPIO端口位清除寄存器
	uint32_t LCKR;//GPIO端口配置锁定寄存器
}GPIO_TypeDef;
这里还使用了typedef关键字命名了所创建的结构体类型为GPIO_TypeDef
其中结构体成员有7个变量,变量名正是所对应的寄存器名字。
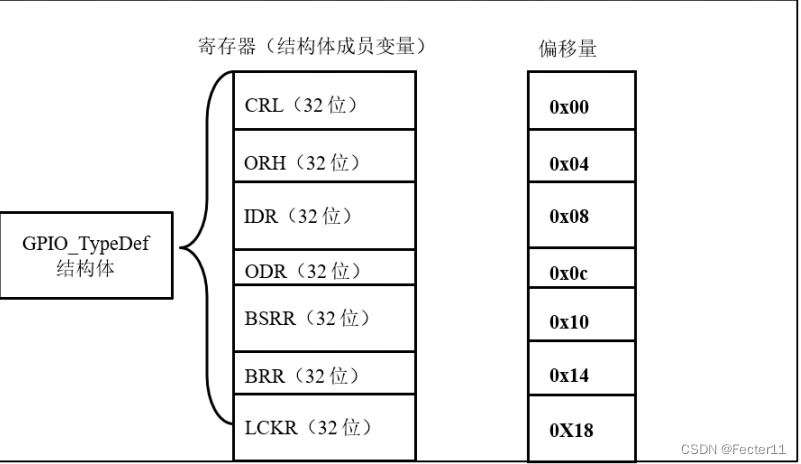
C语言规定了结构体变量的存储空间是连续的(这个正好和我们的寄存器的地址是连续的特点相对应起来。这一点很重要,我们在封装的时候一定要按顺序去封装)。
比如我们定义的这个结构体GPIO_TypeDef。这个结构体的首个寄存器的地址就是CRL寄存器的地址也就是0x4001 0C00(这个地址也是GPIOB这个外设的总线地址),那么结构体第二个成员CRH的地址就是0x4001 0C00再加上一个0x04这个偏移量,为什么?
我们的寄存器是32位的,也就是4个字节为一个寄存器的存储空间,从CRL到CRH加上0x04也就是CRH的地址。其他成员也是相应的去加上偏移量就可以。(注意这个偏移量是相对于总线APB2的基地址的偏移量)
我们这里依然以代码为分析对象
//这里是stm32f103.h头文件
//用来存放stm32寄存器映射的代码
//GPIOB

//外设基地址 peripheral

# define PERIPHBASE  ((unsigned int)0x40000000)   //片内外设基地址

//总线基地址

# define APB1PERIPH_BASE	PERIPHBASE   //APB1总线基地址与片内外设基地址是一样的
# define APB2PERIPH_BASE  (PERIPHBASE + 0x10000)   //APB2总线基地址
# define AHBPERIPH_BASE   (PERIPHBASE + 0x20000)    //AHB总线基地址(为了后面操作RCC时钟),这里采用的DMA1的地址作为基地址


# define RCC_BASE	(AHBPERIPH_BASE + 0x1000)	//RCC复位时钟控制地址,想让IO工作必须配置


# define GPIOB_BASE	(APB2PERIPH_BASE + 0x0C00)	//GPIOB地址,操作GPIO的前提是找到总线地址


# define RCC_APB2ENR	*(unsigned int* )(RCC_BASE + 0x18)  //APB2外设时钟使能,想让IO工作必须配置   0x18就是APB2使能寄存器相对于RCC时钟总线的偏移量


//下面的代码使用宏定义重新命名一个指针变量,并通过操作寄存器的绝对地址指针从而操作寄存器工作
//# define GPIOB_CRL *(unsigned int*)(GPIOB_BASE + 0x00) //端口配置地寄存器
//# define GPIOB_CRH *(unsigned int*)(GPIOB_BASE + 0x04) //端口配置高寄存器
//# define GPIOB_ODR *(unsigned int*)(GPIOB_BASE + 0x0C) //数据输出寄存器
//# define GPIOB_IDR *(unsigned int*)(GPIOB_BASE + 0x08) //输入数据寄存器
//# define GPIOB_BSRR *(unsigned int*)(GPIOB_BASE + 0x10) //端口位设置/清除寄存器
//# define GPIOB_BRR *(unsigned int*)(GPIOB_BASE + 0x14) //端口位清除寄存器
//# define GPIOB_LCKR *(unsigned int*)(GPIOB_BASE + 0x18) //端口配置锁定寄存器

typedef unsigned int uint32_t;//声明一个32位的变量类型
typedef unsigned short uint16_t;//声明一个16位的变量类型

typedef struct
{

	 /* 这里解释一下为什么可以直接操作而不需要加偏移量 我们的stm32是32位单片机,每次操作32位数,而寄存器也是每个寄存器占用4个字节,也正好是32位, 创建结构体本身就会分配一个连续的内存空间,而我们定义了每个成员作为32位的变量,那正好跟寄存器本身的地址相对应起来。 */
	uint32_t  CRL;
	uint32_t  CRH;
	uint32_t  IDR;
	uint32_t  ODR;
	uint32_t  BSRR;
	uint32_t  BRR;
	uint32_t  LCKR;

}GPIO_TypeDef;

//让GPIOB的地址GPIOB_BASE转化为一个结构体类类型的变量,并重新命名为GPIOB
# define GPIOB  ((GPIO_TypeDef*)(GPIOB_BASE))
//32部分
#include "stm32f10x.h"

void SystemInit(void);//不用管这条代码

int main (void)
{


	# if 0  //使用这个语句相当于注释掉下面的代码
	//使用寄存器绝对地址操作
	*(unsigned int *)0x40021018 |=((1)<<3);        //打开gpiob端口时钟
	//*(unsigned int *)0x40010C0C &=~(1<<0); //Data_Output CRL_REG 通用推挽输出模式

	*(unsigned int *)0x40010C0C &=~((1)<<0);	//Data_Output CRL_REG

	*(unsigned int *)0x40010C00 |=((1)<<(4*0));   //Set_Output ODR_REG //数据输出寄存器

	#elif 0   //注释掉下面的代码

	RCC_APB2ENR |= ((1)<<3);          //GPIOB时钟使能,在头文件中用宏定义声明过了

	GPIOB_CRL |= ((1)<<(4*0));         //端口配置低寄存器
	GPIOB_ODR &= ~(unsigned int)(1<<0);   			//数据输出寄存器
	//GPIOB_ODR |= (1<<0);

	#elif 1  //执行这部分代码,使用结构封装好的函数去配置寄存器的值(重点掌握)

	RCC_APB2ENR |= ((1)<<3);          //GPIOB时钟使能

	GPIOB->CRL |= ((1)<<(4*0));         //端口配置低寄存器
	GPIOB->ODR &= ~(unsigned int)(1<<0);   			//数据输出寄存器
	//GPIOB->ODR |= (1<<0);


	#endif
}
//置位 |=
//清零 &=~

void SystemInit(void)
{


	//函数体为空

}
这里不得不重新说明一下,什么是结构体。以便更好的理解和使用它:
这里我看的是B站UP主“杜远超官方频道”的视频,可以直接搜索结构体就能看到。我是很推荐这个视频的,希望帮到你!!
下面声明一个结构体类型:
# include <stdio.h>
//创建结构体使用关键字struct
//下面这种形式是创建了一个结构体类型,并且这个类型名为Student,我们可以将其看作是int这种的数据类型的形式,去创建多个变量。
struct Student   //结构体的名字为Student,建议首字母大写。这个是类型的名字而不是变量名。(这一点很重要)。比如说float是浮点类型的名称,flaot a,中的a是变量的名称。而struct是一个关键字。
{

	int id;//学号
	int age;//年龄
	char*name;//姓名
	float score;//成绩
};

//显然结构体的内容是基本数据类型组而合成
//我们也可以声明一个空的结构体
struct Emptystruct
{

	//空结构体
};


int main ()
{

	//基本数据类型 int,float,long, doubel...
	//如果我们要表示一个学生的信息,而学生的信息有学号信息等


}
下面声明一个匿名的结构体类型:
# include <stdio.h>
//我们可以创建一个没有名字的结构体,或者说匿名结构体
//匿名结构体的末尾一定跟着结构体变量的名称。
struct
{

	int id;//学号
	int age;//年龄
	char*name;//姓名
	float score;//成绩

}stu1,stu2;//这里声明了两个学生的变量。

int main ()
{


	return 0;
}
下面我们引入typedef:
第一种用法
# include <stdio.h>
//我们可以创建一个没有名字的结构体,或者说匿名结构体
//匿名结构体的末尾一定跟着结构体变量的名称。
struct Student
{

	int id;//学号
	int age;//年龄
	char*name;//姓名
	float score;//成绩

};//这里声明了两个学生的结构体变量,一定要注意这里的是变量而不是类型了。


typedef struct Stdent Stdent;
//上面这一行代码的还以是什么?
//说白了就是用最后的Student这个名字取代替我们的struct Student这个结构体,后面我们创建结构体变量的时候可以直接使用Student,而它所代表的含义就是一个结构体类型。

int main ()
{

	//定义变量的基本格式。数据类型+变量名;比如int a;char c
	//我们使用结构体比如上面创建的Student,去创建一个变量的话还需要加上一个变量的名字
	//struct Student stu;//注意这种创建结构体变量的方式中struct是不可以省略掉
	//我们可以使用typedef去定义一个新的数据类
	//我们就可以这样创建一个结构体变量
	Student stu1;//完美,简洁

	return 0;
}
第二种用法
# include <stdio.h>
//我们可以创建一个没有名字的结构体,或者说匿名结构体
//匿名结构体的末尾一定跟着结构体变量的名称。
typedef struct Stdent //可以不加结构体的名字,但是建议加上结构体名
{

	int id;//学号
	int age;//年龄
	char*name;//姓名
	float score;//成绩

}Student;
//说明一下,使用typedef就是将我们创建的sturct Student命名为Student,注意这里的STudent依然是类型的名字而不是变量。(重点)


int main ()
{

	//定义变量的基本格式。数据类型+变量名;比如int a;char c
	//我们使用结构体比如上面创建的Student,去创建一个变量的话还需要加上一个变量的名字
	//struct Student stu;//注意这种创建结构体变量的方式中struct是不可以省略掉
	//我们可以使用typedef去定义一个新的数据类
	//我们就可以这样创建一个结构体变量
	Student stu1;//完美,简洁

	return 0;
}
下面介绍结构体的嵌套
# include <stdio.h>

typedef struct Birthday
{

	int year;//年
	int month;//月
	int day;//日

}Birthday;


typedef struct Stdent //可以不加结构体的名字,但是建议加上结构体名
{

	int id;//学号
	int age;//年龄
	char*name;//姓名
	float score;//成绩
	Birthday bitthday;  //结构体的嵌套
}Student;
//说明一下,使用typedef就是将我们创建的sturct Student命名为Student,注意这里的STudent依然是类型的名字而不是变量。(重点)


int main ()
{

	Student stu;
	stu.birthday.year = 1996;//这里就是结构体的访问,我们就是在使用.去访问stu这个结构体下的birthday这个结构体下的year


	return 0;
}
结构体变量
声明结构体变量的方式
方式1
# include <stdio.h>

typedef struct Birthday
{

	int year;//年
	int month;//月
	int day;//日

}Birthday;


typedef struct Stdent //可以不加结构体的名字,但是建议加上结构体名
{

	int id;//学号
	int age;//年龄
	char*name;//姓名
	float score;//成绩
	Birthday bitthday;  //结构体的嵌套
}Student;
//说明一下,使用typedef就是将我们创建的sturct Student命名为Student,注意这里的STudent依然是类型的名字而不是变量。(重点)


int main ()
{

//注意我们如果不使用类型去创建变量的话是不会分配内存空间,说白了就是不占用任何内存。
//那么也就是说我们声明的结构体本身是不占用内存的。只有在声明结构体变量的时候才会分配内存。
Student stu1;
Student stu2;


	return 0;
}
声明结构体变量的方式
方式2
# include <stdio.h>

typedef struct Birthday
{

	int year;//年
	int month;//月
	int day;//日

}Birthday;


typedef struct Stdent //可以不加结构体的名字,但是建议加上结构体名
{

	int id;//学号
	int age;//年龄
	char*name;//姓名
	float score;//成绩
	Birthday bitthday;  //结构体的嵌套
}Student,stu3;//注意这里就是直接创建了一个stu3结构体变量,不建议这样创建,我是不习惯
//说明一下,使用typedef就是将我们创建的sturct Student命名为Student,注意这里的STudent依然是类型的名字而不是变量。(重点)

int main ()
{


Student stu1;
Student stu2;


	return 0;
}
结构体变量的赋值
# include <stdio.h>

typedef struct Birthday
{

	int year;//年
	int month;//月
	int day;//日

}Birthday;


typedef struct Stdent //可以不加结构体的名字,但是建议加上结构体名
{

	int id;//学号
	int age;//年龄
	char*name;//姓名
	float score;//成绩
	Birthday bitthday;  //结构体的嵌套
}Student,stu3;//注意这里就是直接创建了一个stu3结构体变量
//说明一下,使用typedef就是将我们创建的sturct Student命名为Student,注意这里的STudent依然是类型的名字而不是变量。(重点)

int main ()
{

	Student stu1 = {
    1001,26,"李明",100,
					{
    1996,10,20}};
	//这样就完成了结构体的赋值

	Student stu2 = {
    1002,22,"李华",99,
					{
    2000,10,20}};
	return 0;
}
如何去创建结构体变量
# include <stdio.h>

typedef struct Birthday
{

	int year;//年
	int month;//月
	int day;//日

}Birthday;


typedef struct Stdent //可以不加结构体的名字,但是建议加上结构体名
{

	int id;//学号
	int age;//年龄
	char*name;//姓名
	float score;//成绩
	Birthday bitthday;  //结构体的嵌套
}Student,stu3;//注意这里就是直接创建了一个stu3结构体变量,不建议这样创建,我是不习惯
//说明一下,使用typedef就是将我们创建的sturct Student命名为Student,注意这里的STudent依然是类型的名字而不是变量。(重点)

int main ()
{


Student stu1;
Student stu2;


	return 0;
}
结构体成员的调用
# include <stdio.h>

typedef struct Birthday
{

	int year;//年
	int month;//月
	int day;//日

}Birthday;


typedef struct Stdent //可以不加结构体的名字,但是建议加上结构体名
{

	int id;//学号
	int age;//年龄
	char*name;//姓名
	float score;//成绩
	Birthday bitthday;  //结构体的嵌套
}Student,stu3;//注意这里就是直接创建了一个stu3结构体变量
//说明一下,使用typedef就是将我们创建的sturct Student命名为Student,注意这里的STudent依然是类型的名字而不是变量。(重点)

int main ()
{

	Student stu1 = {
    1001,26,"李明",100,
					{
    1996,10,20}};
	//这样就完成了结构体的赋值

	Student stu2 = {
    1002,22,"李华",99,
					{
    2000,10,20}};
	//访问成员变量使用.操作符
	printf("学号:%d 姓名:%s 年龄:%d 成绩:%0.2f 生日:%d-%d-%d",stu1.id,stu1.name,stu1.age,stu1.score,stu1.Birthday.year,stu1.Birthday.month,syu1.Birthday.day);
	return 0;
}
显然,结构体的访问格式就是,“结构体名 . 结构体变量”的形式。
如果是嵌套的话也是使用.去调用。
程序优化:单独定义一个打印函数
# include <stdio.h>

typedef struct Birthday
{

	int year;//年
	int month;//月
	int day;//日

}Birthday;


typedef struct Stdent //可以不加结构体的名字,但是建议加上结构体名
{

	int id;//学号
	int age;//年龄
	char*name;//姓名
	float score;//成绩
	Birthday bitthday;  //结构体的嵌套
}Student,stu3;//注意这里就是直接创建了一个stu3结构体变量
//说明一下,使用typedef就是将我们创建的sturct Student命名为Student,注意这里的STudent依然是类型的名字而不是变量。(重点)


//此函数的目的是打印学生结构体的信息
//我们需要使用形参,传递需要打印的学生信息
void PrintfStudentInfo(Student stu)
{

	printf("学号:%d 姓名:%s 年龄:%d 成绩:%0.2f 生日:%d-%d-%d",stu.id,stu.name,stu.age,stu.score,stu.Birthday.year,stu.Birthday.month,syu.Birthday.day);

}


int main ()
{

	Student stu1 = {
    1001,26,"李明",100,
					{
    1996,10,20}};
	//这样就完成了结构体的赋值

	Student stu2 = {
    1002,22,"李华",99,
					{
    2000,10,20}};

	PrintfStudentInfo(Student stu1);
	return 0;
}
上面的代码还是有他的局限性,想想看我们即便是定义了一个打印函数,但是对于系统来说,我仍然是拷贝了一份打印的信息并封存在了函数中。
所以引出下面的使用结构体指针。
使用结构体指针
# include <stdio.h>

typedef struct Birthday
{

	int year;//年
	int month;//月
	int day;//日

}Birthday;


typedef struct Stdent //可以不加结构体的名字,但是建议加上结构体名
{

	int id;//学号
	int age;//年龄
	char*name;//姓名
	float score;//成绩
	Birthday bitthday;  //结构体的嵌套
}Student,stu3;//注意这里就是直接创建了一个stu3结构体变量
//说明一下,使用typedef就是将我们创建的sturct Student命名为Student,注意这里的STudent依然是类型的名字而不是变量。(重点)


//此函数的目的是打印学生结构体的信息
//我们需要使用形参,传递需要打印的学生信息
void PrintfStudentInfo(Student *p_stu)  //这里函数的形参就是一个结构体指针p_stu
{

	printf("学号:%d 姓名:%s 年龄:%d 成绩:%0.2f 生日:%d-%d-%d",p_stu.id,p_stu.name,p_stu.age,p_stu.score,p_stu.Birthday.year,p_stu.Birthday.month,p_stu.Birthday.day);

}


int main ()
{

	Student stu1 = {
    1001,26,"李明",100,
					{
    1996,10,20}};
	//这样就完成了结构体的赋值

	Student stu2 = {
    1002,22,"李华",99,
					{
    2000,10,20}};


	Student*pstu = &stu1;//这一步就是创建一个指针结构体pstu并且这个指针指向了stu1这个结构体变量的地址。


	PrintfStudentInfo(pstu);//注意这里传递的是地址(指针)
	return 0;
}
上面的代码存在一个致命错误!!!!!
void PrintfStudentInfo(Student *p_stu)  //这里函数的形参就是一个结构体指针p_stu
{

	printf("学号:%d 姓名:%s 年龄:%d 成绩:%0.2f 生日:%d-%d-%d",p_stu.id,p_stu.name,p_stu.age,p_stu.score,p_stu.Birthday.year,p_stu.Birthday.month,p_stu.Birthday.day);

}
注意上面这一行代码,我们的c语言规定了,如果我们使用的是结构体指针,要求我们在访问结构体成员的时候不再使用“.”。而是改用“->”
正确的写法如下所示:
void PrintfStudentInfo(Student *p_stu)  //这里函数的形参就是一个结构体指针p_stu
{

	printf("学号:%d 姓名:%s 年龄:%d 成绩:%0.2f 生日:%d-%d-%d",p_stu>id,p_stu->name,p_stu->age,p_stu->score,p_stu->Birthday.year,p_stu->Birthday.month,p_stu->Birthday.day);

}
//注意细节,我们在使用
p_stu->Birthday.month//在Birthday的后面使用的是“.”,因为这里是成员关系而不是指针。
# include <stdio.h>

typedef struct Birthday
{

	int year;//年
	int month;//月
	int day;//日

}Birthday;


typedef struct Stdent //可以不加结构体的名字,但是建议加上结构体名
{

	int id;//学号
	int age;//年龄
	char*name;//姓名
	float score;//成绩
	Birthday bitthday;  //结构体的嵌套
}Student,stu3;//注意这里就是直接创建了一个stu3结构体变量
//说明一下,使用typedef就是将我们创建的sturct Student命名为Student,注意这里的STudent依然是类型的名字而不是变量。(重点)


//此函数的目的是打印学生结构体的信息
//我们需要使用形参,传递需要打印的学生信息
void PrintfStudentInfo(Student *p_stu)  //这里函数的形参就是一个结构体指针p_stu
{

	printf("学号:%d 姓名:%s 年龄:%d 成绩:%0.2f 生日:%d-%d-%d",p_stu.id,p_stu.name,p_stu.age,p_stu.score,p_stu.Birthday.year,p_stu.Birthday.month,p_stu.Birthday.day);

}


int main ()
{

	Student stu1 = {
    1001,26,"李明",100,
					{
    1996,10,20}};
	//这样就完成了结构体的赋值

	Student stu2 = {
    1002,22,"李华",99,
					{
    2000,10,20}};


	Student*pstu = &stu1;//这一步就是创建一个指针结构体pstu并且这个指针指向了stu1这个结构体变量的地址。


	PrintfStudentInfo(pstu);//注意这里传递的是地址(指针)

	pstu = &stu2;
	PrintfStudentInfo(pstu);//打印另一个学生的信息

	return 0;
}
本篇完。。。
边栏推荐
- sql表名作为参数传递
- The ECU of 21 Audi q5l 45tfsi brushes is upgraded to master special adjustment, and the horsepower is safely and stably increased to 305 horsepower
- Multi function event recorder of the 5th National Games of the Blue Bridge Cup
- 2022 PMP project management examination agile knowledge points (8)
- 【机器人库】 awesome-robotics-libraries
- Unity learning notes -- 2D one-way platform production method
- Flowable source code comments (36) process instance migration status job processor, BPMN history cleanup job processor, external worker task completion job processor
- Visualstudio2019 compilation configuration lastools-v2.0.0 under win10 system
- How to improve the level of pinduoduo store? Dianyingtong came to tell you
- Sword finger offer 12 Path in matrix
猜你喜欢

Redis string type

Blue Bridge Cup embedded_ STM32 learning_ Key_ Explain in detail

Computer graduation design PHP college student human resources job recruitment network

Leetcode sum of two numbers

NumPy 数组索引 切片

Use the list component to realize the drop-down list and address list

Redis如何实现多可用区?

Using SA token to solve websocket handshake authentication

Formatting occurs twice when vs code is saved
![[robot library] awesome robots Libraries](/img/72/d3e46a820796a48b458cd2d0a18f8f.png)
[robot library] awesome robots Libraries
随机推荐
[Clickhouse] Clickhouse based massive data interactive OLAP analysis scenario practice
正则表达式:示例(1)
National intangible cultural heritage inheritor HD Wang's shadow digital collection of "Four Beauties" made an amazing debut!
It's wrong to install PHP zbarcode extension. I don't know if any God can help me solve it. 7.3 for PHP environment
同一个 SqlSession 中执行两条一模一样的SQL语句查询得到的 total 数量不一样
Unity learning notes -- 2D one-way platform production method
Global and Chinese markets of screw rotor pumps 2022-2028: Research Report on technology, participants, trends, market size and share
02. Go language development environment configuration
Use the list component to realize the drop-down list and address list
Regular expressions: examples (1)
竞价推广流程
SQL statement
【coppeliasim】高效传送带
The ECU of 21 Audi q5l 45tfsi brushes is upgraded to master special adjustment, and the horsepower is safely and stably increased to 305 horsepower
FTP server, ssh server (super brief)
Paper notes: limit multi label learning galaxc (temporarily stored, not finished)
Gbase 8C database upgrade error
Computer graduation design PHP college classroom application management system
Adapter-a technology of adaptive pre training continuous learning
GBase 8c数据库升级报错