当前位置:网站首页>YOLOX加强特征提取网络Panet分析
YOLOX加强特征提取网络Panet分析
2022-07-02 22:13:00 【牧羊女说】
在上一篇文章中,分享了YOLOX的CSPDarknet网络,详见YOLOX backbone——CSPDarknet的实现
在CSPDarknet中,有三个层次的输出, 分别是dark5(20x20x1024)、dark4(40x40x512)、dark3(80x80x256)。这三个层次的输出,会进入一个加强特征提取网络Panet,进一步进行特征提取,见下图红框标出来的部分:
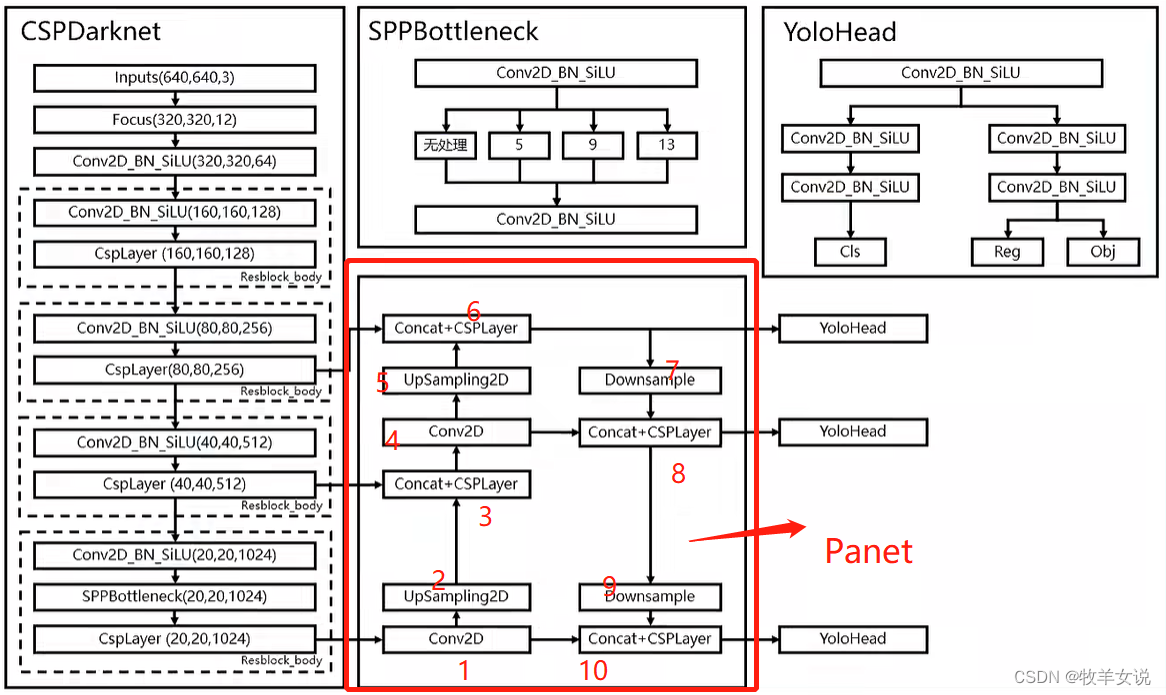
Panet基本思想是,将深层特征进行上采样,并与浅层特征进行融合(见图上1~6标注部分),融合后的浅层特征再进行下采样,然后再与深层特征融合(见图上6~10部分)。
在YOLOX的官方实现代码上,Panet的实现在yolo_pafpn.py文件中的。结合上面数字标注,对官方代码进行了注释:
class YOLOPAFPN(nn.Module):
    """
    YOLOv3 model. Darknet 53 is the default backbone of this model.
    """

    def __init__(
        self,
        depth=1.0,
        width=1.0,
        in_features=("dark3", "dark4", "dark5"),
        in_channels=[256, 512, 1024],
        depthwise=False,
        act="silu",
    ):
        super().__init__()
        self.backbone = CSPDarknet(depth, width, depthwise=depthwise, act=act)
        self.in_features = in_features
        self.in_channels = in_channels
        Conv = DWConv if depthwise else BaseConv

        self.upsample = nn.Upsample(scale_factor=2, mode="nearest")

        # 20x20x1024 -> 20x20x512
        self.lateral_conv0 = BaseConv(
            int(in_channels[2] * width), int(in_channels[1] * width), 1, 1, act=act
        )

        # 40x40x1024 -> 40x40x512
        self.C3_p4 = CSPLayer(
            int(2 * in_channels[1] * width),
            int(in_channels[1] * width),
            round(3 * depth),
            False,
            depthwise=depthwise,
            act=act,
        )  # cat

        # 40x40x512 -> 40x40x256
        self.reduce_conv1 = BaseConv(
            int(in_channels[1] * width), int(in_channels[0] * width), 1, 1, act=act
        )

        # 80x80x512 -> 80x80x256
        self.C3_p3 = CSPLayer(
            int(2 * in_channels[0] * width),    # 2x256
            int(in_channels[0] * width),        # 256
            round(3 * depth),
            False,
            depthwise=depthwise,
            act=act,
        )

        # bottom-up conv
        # 80x80x256 -> 40x40x256
        self.bu_conv2 = Conv(
            int(in_channels[0] * width), int(in_channels[0] * width), 3, 2, act=act
        )

        # 40x40x512 -> 40x40x512
        self.C3_n3 = CSPLayer(
            int(2 * in_channels[0] * width),     # 2*256
            int(in_channels[1] * width),         # 512
            round(3 * depth),
            False,
            depthwise=depthwise,
            act=act,
        )

        # bottom-up conv
        # 40x40x512 -> 20x20x512
        self.bu_conv1 = Conv(
            int(in_channels[1] * width), int(in_channels[1] * width), 3, 2, act=act
        )

        # 20x20x1024 -> 20x20x1024
        self.C3_n4 = CSPLayer(
            int(2 * in_channels[1] * width),      # 2*512
            int(in_channels[2] * width),          # 1024
            round(3 * depth),
            False,
            depthwise=depthwise,
            act=act,
        )

    def forward(self, input):
        """
        Args:
            inputs: input images.

        Returns:
            Tuple[Tensor]: FPN feature.
        """

        #  backbone
        out_features = self.backbone(input)
        features = [out_features[f] for f in self.in_features]
        [x2, x1, x0] = features

        # 第1步,对输出feature map进行卷积
        # 20x20x1024 -> 20x20x512
        fpn_out0 = self.lateral_conv0(x0)  # 1024->512/32

        # 第2步,对第1步中输出的feature map进行上采样
        # Upsampling, 20x20x512 -> 40x40x512
        f_out0 = self.upsample(fpn_out0)  # 512/16

        # 第3步,concat + CSP layer
        # 40x40x512 + 40x40x512 -> 40x40x1024
        f_out0 = torch.cat([f_out0, x1], 1)  # 512->1024/16
        # 40x40x1024 -> 40x40x512
        f_out0 = self.C3_p4(f_out0)  # 1024->512/16

        # 第4步,对第3步输出的feature map进行卷积
        # 40x40x512 -> 40x40x256
        fpn_out1 = self.reduce_conv1(f_out0)  # 512->256/16

        # 第5步,继续上采样
        # 40x40x256 -> 80x80x256
        f_out1 = self.upsample(fpn_out1)  # 256/8

        # 第6步,concat+CSPLayer,输出到yolo head
        # 80x80x256 + 80x80x256 -> 80x80x512
        f_out1 = torch.cat([f_out1, x2], 1)  # 256->512/8
        # 80x80x512 -> 80x80x256
        pan_out2 = self.C3_p3(f_out1)  # 512->256/8

        # 第7步,下采样
        # 80x80x256 -> 40x40x256
        p_out1 = self.bu_conv2(pan_out2)  # 256->256/16

        # 第8步,concat + CSPLayer, 输出到yolo head
        # 40x40x256 + 40x40x256 = 40x40x512
        p_out1 = torch.cat([p_out1, fpn_out1], 1)  # 256->512/16
        # 40x40x512 -> 40x40x512
        pan_out1 = self.C3_n3(p_out1)  # 512->512/16

        # 第9步, 继续下采样
        # 40x40x512 -> 20x20x512
        p_out0 = self.bu_conv1(pan_out1)  # 512->512/32

        # 第10步,concat + CSPLayer, 输出到yolo head
        # 20x20x512 + 20x20x512 -> 20x20x1024
        p_out0 = torch.cat([p_out0, fpn_out0], 1)  # 512->1024/32
        # 20x20x1024 -> 20x20x1024
        pan_out0 = self.C3_n4(p_out0)  # 1024->1024/32

        outputs = (pan_out2, pan_out1, pan_out0)
return outputs参考:Pytorch 搭建自己的YoloX目标检测平台(Bubbliiiing 深度学习 教程)_哔哩哔哩_bilibili
边栏推荐
- Use of recyclerview with viewbinding
- Learning Websites commonly used by circuit designers
- Tronapi-波场接口-源码无加密-可二开--附接口文档-基于ThinkPHP5封装-作者详细指导-2022年7月1日08:43:06
- 20220524_ Database process_ Statement retention
- MarkDown基本语法
- Jerry's built-in shutdown current is 1.2ua, and then it can't be turned on by long pressing [chapter]
- Win11麦克风测试在哪里?Win11测试麦克风的方法
- Xshell configuration xforward forwarding Firefox browser
- Win11如何开启目视控制?Win11开启目视控制的方法
- Tiktok actual combat ~ number of likes pop-up box
猜你喜欢

详解Promise使用
Explain promise usage in detail

数字图像处理实验目录

为什么RTOS系统要使用MPU?
ServletContext learning diary 1

Pandora IOT development board learning (HAL Library) - Experiment 4 serial port communication experiment (learning notes)

Go language sqlx library operation SQLite3 database addition, deletion, modification and query
Win11启用粘滞键关闭不了怎么办?粘滞键取消了但不管用怎么解决

The use of 8255 interface chip and ADC0809

力扣刷题(2022-6-28)
随机推荐
SQL advanced syntax
严守工期,确保质量,这家AI数据标注公司做到了!
The motivation of AES Advanced Encryption Protocol
[Yangcheng cup 2020] easyphp
内网渗透 | 手把手教你如何进行内网渗透
Simple square wave generating circuit [51 single chip microcomputer and 8253a]
@BindsInstance在Dagger2中怎么使用
Application of containerization technology in embedded field
Win11如何开启目视控制?Win11开启目视控制的方法
Win11启用粘滞键关闭不了怎么办?粘滞键取消了但不管用怎么解决
Talk about memory model and memory order
(stinger) use pystinger Socks4 to go online and not go out of the network host
Chow-Liu Tree
Warning: implicitly declaring library function 'printf' with type 'int (const char *,...)‘
“一个优秀程序员可抵五个普通程序员!”
Arduino - 字符判断函数
编辑卡顿
Go project operation method
Start from the bottom structure to learn the customization and testing of FPGA --- Xilinx ROM IP
用matlab调用vs2015来编译vs工程