当前位置:网站首页>潘多拉 IOT 开发板学习(RT-Thread)—— 实验3 按键实验(学习笔记)
潘多拉 IOT 开发板学习(RT-Thread)—— 实验3 按键实验(学习笔记)
2022-07-04 12:52:00 【小辉_Super】
本文代码参考 RT-Thread 官方 BSP
实验功能
例程源码:(main.c)
该实验实现的功能:按下 KEY0,LED_R 点亮,松开 KEY0,LED_R 熄灭。
/* * Copyright (c) 2006-2018, RT-Thread Development Team * * SPDX-License-Identifier: Apache-2.0 * * Change Logs: * Date Author Notes * 2018-08-23 balanceTWK first implementation */

#include <rtthread.h>
#include <rtdevice.h>
#include <board.h>

#define DBG_TAG "main"
#define DBG_LVL DBG_LOG
#include <rtdbg.h>

int main(void)
{

    unsigned int count = 1;

    /* 设置 RGB 红灯引脚的模式为输出模式 */
    rt_pin_mode(PIN_LED_R, PIN_MODE_OUTPUT);
    /* 设置 KEY0 引脚的模式为输入模式 */
    rt_pin_mode(PIN_KEY0, PIN_MODE_INPUT);

    while (count > 0)
    {

        /* 读取按键 KEY0 的引脚状态 */
        if (rt_pin_read(PIN_KEY0) == PIN_LOW)
        {

            rt_thread_mdelay(50); // 消除抖动
            if (rt_pin_read(PIN_KEY0) == PIN_LOW)
            {

                /* 按键已被按下,输出 log,点亮 LED 灯 */
                LOG_D("KEY0 pressed!");
                rt_pin_write(PIN_LED_R, PIN_LOW);
            }
        }
        else
        {

            /* 按键没被按下,熄灭 LED 灯 */
            rt_pin_write(PIN_LED_R, PIN_HIGH);
        }
        rt_thread_mdelay(10);
        count++;
    }
    return 0;
}
代码剖析
rt_pin_mode()
该函数的作用是 GPIO Pin 的初始化,定义为
/* RT-Thread Hardware PIN APIs */
void rt_pin_mode(rt_base_t pin, rt_base_t mode)
{

    RT_ASSERT(_hw_pin.ops != RT_NULL);
    _hw_pin.ops->pin_mode(&_hw_pin.parent, pin, mode);
}
参数 pin 是一个 rt_base_t 变量(long),下面的 GET_PIN() 是 STM32 的 pin 值宏定义,第一个参数填大写字母,第二个参数填数字。
#define GET_PIN(PORTx,PIN) (rt_base_t)((16 * ( ((rt_base_t)__STM32_PORT(PORTx) - (rt_base_t)GPIOA)/(0x0400UL) )) + PIN)

#define __STM32_PORT(port) GPIO##port // ## 是字符连接符,假如 port 为 A,则表示 GPIOA
例如实验中的
#define PIN_LED_R GET_PIN(E, 7),表示 GPIOE GPIO_Pin7
目前 RT-Thread 支持的引脚工作模式包括:
#define PIN_MODE_OUTPUT 0x00 /* 输出 */
#define PIN_MODE_INPUT 0x01 /* 输入 */
#define PIN_MODE_INPUT_PULLUP 0x02 /* 上拉输入 */
#define PIN_MODE_INPUT_PULLDOWN 0x03 /* 下拉输入 */
#define PIN_MODE_OUTPUT_OD 0x04 /* 开漏输出 */
在 bsp 的 drv_gpio.c 文件中,有底层 GPIO 驱动,下面是 STM32 的 GPIO 模式设置的驱动函数(大家应该很熟悉,就是用 HAL 库写的 GPIO 初始化代码)
static void stm32_pin_mode(rt_device_t dev, rt_base_t pin, rt_base_t mode)
{

    const struct pin_index *index;
    GPIO_InitTypeDef GPIO_InitStruct;

    index = get_pin(pin);
    if (index == RT_NULL)
    {

        return;
    }

    /* Configure GPIO_InitStructure */
    GPIO_InitStruct.Pin = index->pin;
    GPIO_InitStruct.Mode = GPIO_MODE_OUTPUT_PP;
    GPIO_InitStruct.Pull = GPIO_NOPULL;
    GPIO_InitStruct.Speed = GPIO_SPEED_FREQ_HIGH;

    if (mode == PIN_MODE_OUTPUT)
    {

        /* output setting */
        GPIO_InitStruct.Mode = GPIO_MODE_OUTPUT_PP;
        GPIO_InitStruct.Pull = GPIO_NOPULL;
    }
    else if (mode == PIN_MODE_INPUT)
    {

        /* input setting: not pull. */
        GPIO_InitStruct.Mode = GPIO_MODE_INPUT;
        GPIO_InitStruct.Pull = GPIO_NOPULL;
    }
    else if (mode == PIN_MODE_INPUT_PULLUP)
    {

        /* input setting: pull up. */
        GPIO_InitStruct.Mode = GPIO_MODE_INPUT;
        GPIO_InitStruct.Pull = GPIO_PULLUP;
    }
    else if (mode == PIN_MODE_INPUT_PULLDOWN)
    {

        /* input setting: pull down. */
        GPIO_InitStruct.Mode = GPIO_MODE_INPUT;
        GPIO_InitStruct.Pull = GPIO_PULLDOWN;
    }
    else if (mode == PIN_MODE_OUTPUT_OD)
    {

        /* output setting: od. */
        GPIO_InitStruct.Mode = GPIO_MODE_OUTPUT_OD;
        GPIO_InitStruct.Pull = GPIO_NOPULL;
    }

    HAL_GPIO_Init(index->gpio, &GPIO_InitStruct);
}
rt_pin_read()
GPIO 读函数,下面是函数的定义:
int  rt_pin_read(rt_base_t pin)
{

    RT_ASSERT(_hw_pin.ops != RT_NULL);
    return _hw_pin.ops->pin_read(&_hw_pin.parent, pin);
}
和 GPIO 模式配置函数类似,它会调用底层驱动里对应的函数,该底层函数是通过 HAL_GPIO_ReadPin() 来获取 GPIO 的电平。
static int stm32_pin_read(rt_device_t dev, rt_base_t pin)
{

    int value;
    const struct pin_index *index;

    value = PIN_LOW;

    index = get_pin(pin);
    if (index == RT_NULL)
    {

        return value;
    }

    value = HAL_GPIO_ReadPin(index->gpio, index->pin);

    return value;
}
rt_thread_mdelay()
这是 RT-Thread 的毫秒级延时函数,定义如下:
rt_err_t rt_thread_mdelay(rt_int32_t ms)
{

    rt_tick_t tick;

	// 获取需要的时钟节拍
    tick = rt_tick_from_millisecond(ms);

	// 阻塞相应的节拍时间
    return rt_thread_sleep(tick);
}
rt_tick_from_millisecond()
/** * 算出 ms 对应的时钟节拍数 * * * @param ms the specified millisecond * - Negative Number wait forever * - Zero not wait * - Max 0x7fffffff * * @return the calculated tick */
rt_tick_t rt_tick_from_millisecond(rt_int32_t ms)
{

    rt_tick_t tick;

    if (ms < 0)
    {

        tick = (rt_tick_t)RT_WAITING_FOREVER;  // -1
    }
    else
    {

    	// 将“每秒节拍数” / 1000 * ms,算出对应的秒节拍数
        tick = RT_TICK_PER_SECOND * (ms / 1000);

		// 加上小于 1000ms 部分的节拍数
        tick += (RT_TICK_PER_SECOND * (ms % 1000) + 999) / 1000;
    }

    /* return the calculated tick */
    return tick;
}
rt_thread_sleep()
线程睡眠(挂起)函数,参数是系统节拍数:
/** * 该函数能让当前线程挂起一段时间(由 tick 决定) * * @param tick the sleep ticks * * @return RT_EOK */
rt_err_t rt_thread_sleep(rt_tick_t tick)
{

    register rt_base_t temp;
    struct rt_thread *thread;

    /* set to current thread */
    thread = rt_thread_self();
    RT_ASSERT(thread != RT_NULL);
    RT_ASSERT(rt_object_get_type((rt_object_t)thread) == RT_Object_Class_Thread);

    /* disable interrupt */
    temp = rt_hw_interrupt_disable();

    /* suspend thread */
    rt_thread_suspend(thread);

    /* reset the timeout of thread timer and start it */
    rt_timer_control(&(thread->thread_timer), RT_TIMER_CTRL_SET_TIME, &tick);
    rt_timer_start(&(thread->thread_timer));

    /* enable interrupt */
    rt_hw_interrupt_enable(temp);

    rt_schedule();

    /* clear error number of this thread to RT_EOK */
    if (thread->error == -RT_ETIMEOUT)
        thread->error = RT_EOK;

    return RT_EOK;
}
LOG_D()
本实验中,我们可以将 LOG_D() 视为 rt_kprintf(),
#define dbg_log_line(lvl, color_n, fmt, ...) \ do \ {
       \ _DBG_LOG_HDR(lvl, color_n); \ rt_kprintf(fmt, ##__VA_ARGS__); \ _DBG_LOG_X_END; \ } \ while (0)
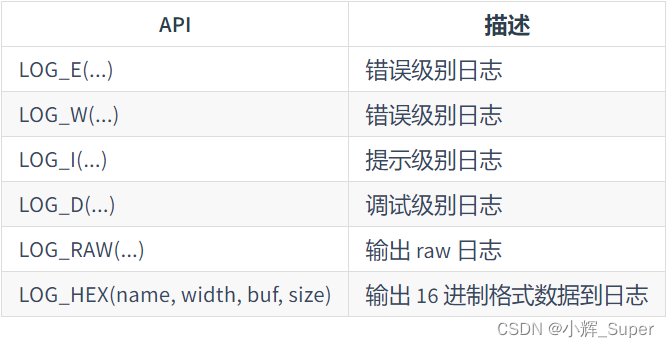
LOG_D 是 RT-Thread 内核里的一个日志打印函数,详情可见:《RT-Thread 文档中心——ulog 日志》
RT-Thread 的日志 API 包括:
rt_pin_write()
GPIO 写函数,下面是函数的定义,
void rt_pin_write(rt_base_t pin, rt_base_t value)
{

    RT_ASSERT(_hw_pin.ops != RT_NULL);
    _hw_pin.ops->pin_write(&_hw_pin.parent, pin, value);
}
和 GPIO 模式配置函数类似,它会调用底层驱动里对应的函数,该底层函数是通过 HAL_GPIO_WritePin() 来完成 GPIO Pin 的修改。
static void stm32_pin_write(rt_device_t dev, rt_base_t pin, rt_base_t value)
{

    const struct pin_index *index;

    index = get_pin(pin);
    if (index == RT_NULL)
    {

        return;
    }

    HAL_GPIO_WritePin(index->gpio, index->pin, (GPIO_PinState)value);
}
边栏推荐
- LiveData
- nowcoder重排链表
- One architecture to complete all tasks - transformer architecture is unifying the AI Jianghu on its own
- [antd] how to set antd in form There is input in item Get input when gourp Value of each input of gourp
- 尊重他人的行为
- R language uses follow up of epidisplay package The plot function visualizes the longitudinal follow-up map of multiple ID (case) monitoring indicators, and uses stress The col parameter specifies the
- Xcode 异常图片导致ipa包增大问题
- MySQL之详解索引
- sql优化之explain
- redis 日常笔记
猜你喜欢


![Incremental ternary subsequence [greedy training]](/img/92/7efd1883c21c0e804ffccfb2231602.png)

随机推荐
瑞吉外卖笔记
C# wpf 实现截屏框实时截屏功能
AI and Life Sciences
The font of markdown grammar is marked in red
ViewModel 初体验
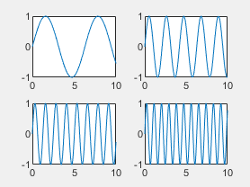
MATLAB中tiledlayout函数使用
docker-compose公网部署redis哨兵模式
nowcoder重排链表
Whether the loyalty agreement has legal effect
Xcode 异常图片导致ipa包增大问题
聊聊保证线程安全的 10 个小技巧
leetcode:6110. 网格图中递增路径的数目【dfs + cache】
Intelligence d'affaires bi analyse financière, analyse financière au sens étroit et analyse financière au sens large sont - ils différents?
[matlab] summary of conv, filter, conv2, Filter2 and imfilter convolution functions
R language ggplot2 visualization: gganimate package creates dynamic line graph animation (GIF) and uses transition_ The reveal function displays data step by step along a given dimension in the animat
R language dplyr package summary_ If function calculates the mean and median of all numerical data columns in dataframe data, and summarizes all numerical variables based on conditions
R language uses follow up of epidisplay package The plot function visualizes the longitudinal follow-up map of multiple ID (case) monitoring indicators, and uses stress The col parameter specifies the
GCC [6] - 4 stages of compilation
【Matlab】conv、filter、conv2、filter2和imfilter卷积函数总结
Golang uses JSON unmarshal number to interface{} number to become float64 type (turn)