当前位置:网站首页>[deep learning] AI one click to change the sky
[deep learning] AI one click to change the sky
2022-07-08 01:00:00 【InfoQ】
1. The goal of the experiment
2. The content of the case is introduced
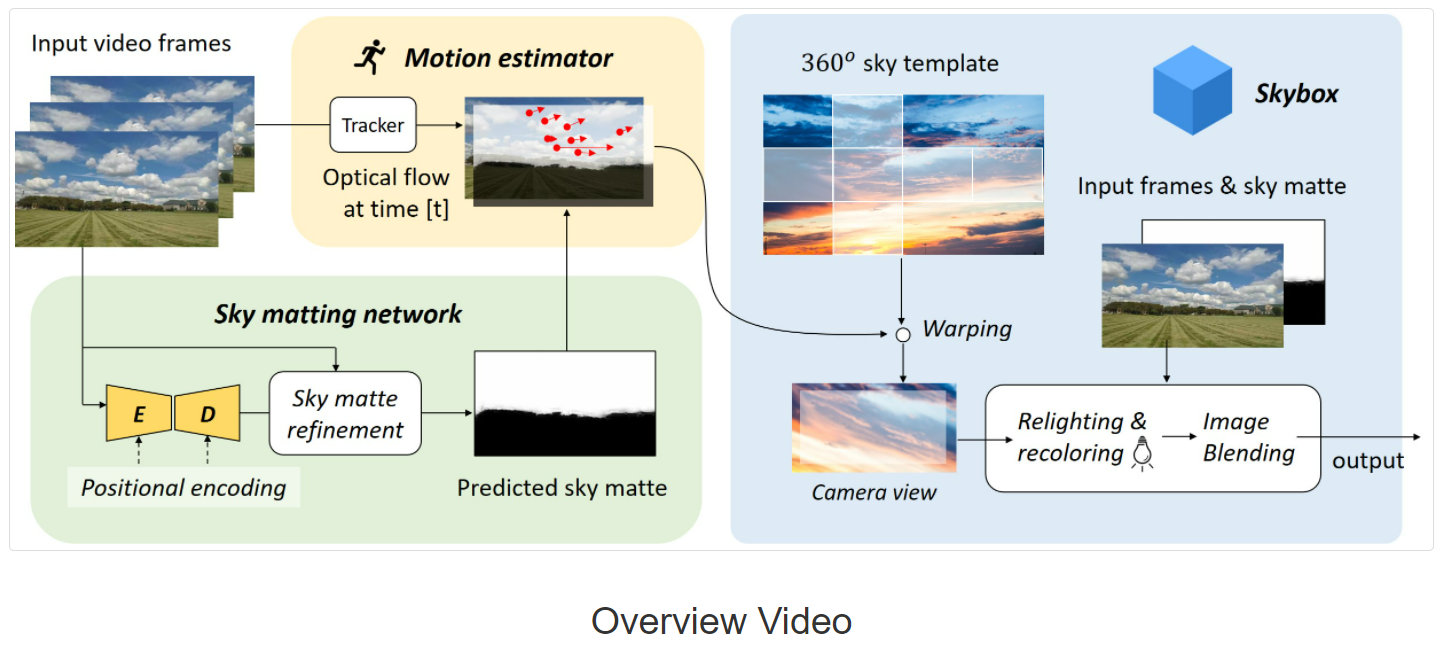
3. The experimental steps
3.1 Install and import dependent packages
import os
import moxing as mox

file_name = 'SkyAR'
if not os.path.exists(file_name):
 mox.file.copy('obs://modelarts-labs-bj4-v2/case_zoo/SkyAR/SkyAR.zip', 'SkyAR.zip')
 os.system('unzip SkyAR.zip')
 os.system('rm SkyAR.zip')
mox.file.copy_parallel('obs://modelarts-labs-bj4-v2/case_zoo/SkyAR/resnet50-19c8e357.pth', '/home/ma-user/.cache/torch/checkpoints/resnet50-19c8e357.pth')
!pip uninstall opencv-python -y
!pip uninstall opencv-contrib-python -y
!pip install opencv-contrib-python==4.5.3.56cd SkyAR/import time
import json
import base64
import numpy as np
import matplotlib.pyplot as plt
import cv2
import argparse
from networks import *
from skyboxengine import *
import utils
import torch
from IPython.display import clear_output, Image, display, HTML
%matplotlib inline
# If there is GPU It's in GPU Run above
device = torch.device("cuda:0" if torch.cuda.is_available() else "cpu")3.2 Set algorithm parameters
parameter = {
 "net_G": "coord_resnet50",
 "ckptdir": "./checkpoints_G_coord_resnet50",

 "input_mode": "video",
 "datadir": "./test_videos/sky.mp4", #  The original video path to be processed
 "skybox": "sky.jpg", #  The path of the sky picture to be replaced

 "in_size_w": 384,
 "in_size_h": 384,
 "out_size_w": 845,
 "out_size_h": 480,

 "skybox_center_crop": 0.5,
 "auto_light_matching": False,
 "relighting_factor": 0.8,
 "recoloring_factor": 0.5,
 "halo_effect": True,

 "output_dir": "./jpg_output",
 "save_jpgs": False
}

str_json = json.dumps(parameter)
3.3 Preview the original video
video_name = parameter['datadir']

def arrayShow(img):
 img = cv2.resize(img, (0, 0), fx=0.25, fy=0.25, interpolation=cv2.INTER_NEAREST)
 _,ret = cv2.imencode('.jpg', img)
 return Image(data=ret)

#  Open a video stream
cap = cv2.VideoCapture(video_name)

frame_id = 0
while True:
 try:
 clear_output(wait=True) #  Clear the previous display
 ret, frame = cap.read() #  Read a picture
 if ret:
 frame_id += 1
 if frame_id > 200:
 break
 cv2.putText(frame, str(frame_id), (5, 15), cv2.FONT_HERSHEY_SIMPLEX, 0.5, (0, 255, 0), 1) #  draw frame_id
 tmp = cv2.cvtColor(frame, cv2.COLOR_BGR2RGB) #  Convert color mode
 img = arrayShow(frame)
 display(img) #  display picture
 time.sleep(0.05) #  The thread sleeps for a period of time before processing the next picture
 else:
 break
 except KeyboardInterrupt:
 cap.release()
cap.release()
Preview the sky picture you want to replace
img= cv2.imread(os.path.join('./skybox', parameter['skybox']))
img2 = img[:, :, ::-1]
plt.imshow(img2)
3.4 Definition SkyFilter class
class Struct:
 def __init__(self, **entries):
 self.__dict__.update(entries)

def parse_config():
 data = json.loads(str_json)
 args = Struct(**data)

 return args

args = parse_config()
class SkyFilter():
def __init__(self, args):
self.ckptdir = args.ckptdir
self.datadir = args.datadir
self.input_mode = args.input_mode
self.in_size_w, self.in_size_h = args.in_size_w, args.in_size_h
self.out_size_w, self.out_size_h = args.out_size_w, args.out_size_h
self.skyboxengine = SkyBox(args)
self.net_G = define_G(input_nc=3, output_nc=1, ngf=64, netG=args.net_G).to(device)
self.load_model()
self.video_writer = cv2.VideoWriter('out.avi',
cv2.VideoWriter_fourcc(*'MJPG'),
20.0,
(args.out_size_w, args.out_size_h))
self.video_writer_cat = cv2.VideoWriter('compare.avi',
cv2.VideoWriter_fourcc(*'MJPG'),
20.0,
(2*args.out_size_w, args.out_size_h))
if os.path.exists(args.output_dir) is False:
os.mkdir(args.output_dir)
self.output_img_list = []
self.save_jpgs = args.save_jpgs
def load_model(self):
# Load the pre trained sky matting model
print('loading the best checkpoint...')
checkpoint = torch.load(os.path.join(self.ckptdir, 'best_ckpt.pt'),
map_location=device)
self.net_G.load_state_dict(checkpoint['model_G_state_dict'])
self.net_G.to(device)
self.net_G.eval()
def write_video(self, img_HD, syneth):
frame = np.array(255.0 * syneth[:, :, ::-1], dtype=np.uint8)
self.video_writer.write(frame)
frame_cat = np.concatenate([img_HD, syneth], axis=1)
frame_cat = np.array(255.0 * frame_cat[:, :, ::-1], dtype=np.uint8)
self.video_writer_cat.write(frame_cat)
# Define the result buffer
self.output_img_list.append(frame_cat)
def synthesize(self, img_HD, img_HD_prev):
h, w, c = img_HD.shape
img = cv2.resize(img_HD, (self.in_size_w, self.in_size_h))
img = np.array(img, dtype=np.float32)
img = torch.tensor(img).permute([2, 0, 1]).unsqueeze(0)
with torch.no_grad():
G_pred = self.net_G(img.to(device))
G_pred = torch.nn.functional.interpolate(G_pred,
(h, w),
mode='bicubic',
align_corners=False)
G_pred = G_pred[0, :].permute([1, 2, 0])
G_pred = torch.cat([G_pred, G_pred, G_pred], dim=-1)
G_pred = np.array(G_pred.detach().cpu())
G_pred = np.clip(G_pred, a_max=1.0, a_min=0.0)
skymask = self.skyboxengine.skymask_refinement(G_pred, img_HD)
syneth = self.skyboxengine.skyblend(img_HD, img_HD_prev, skymask)
return syneth, G_pred, skymask
def cvtcolor_and_resize(self, img_HD):
img_HD = cv2.cvtColor(img_HD, cv2.COLOR_BGR2RGB)
img_HD = np.array(img_HD / 255., dtype=np.float32)
img_HD = cv2.resize(img_HD, (self.out_size_w, self.out_size_h))
return img_HD
def process_video(self):
# Process video frame by frame
cap = cv2.VideoCapture(self.datadir)
m_frames = int(cap.get(cv2.CAP_PROP_FRAME_COUNT))
img_HD_prev = None
for idx in range(m_frames):
ret, frame = cap.read()
if ret:
img_HD = self.cvtcolor_and_resize(frame)
if img_HD_prev is None:
img_HD_prev = img_HD
syneth, G_pred, skymask = self.synthesize(img_HD, img_HD_prev)
self.write_video(img_HD, syneth)
img_HD_prev = img_HD
if (idx + 1) % 50 == 0:
print(f'processing video, frame {idx + 1} / {m_frames} ... ')
else: # If you reach the last frame
break3.5 Start processing video
sf = SkyFilter(args)
sf.process_video()
3.6 Compare the original video with the processed video
video_name = "compare.avi"

def arrayShow(img):
 _,ret = cv2.imencode('.jpg', img)
 return Image(data=ret)

#  Open a video stream
cap = cv2.VideoCapture(video_name)

frame_id = 0
while True:
 try:
 clear_output(wait=True) #  Clear the previous display
 ret, frame = cap.read() #  Read a picture
 if ret:
 frame_id += 1
 cv2.putText(frame, str(frame_id), (5, 15), cv2.FONT_HERSHEY_SIMPLEX, 0.5, (0, 255, 0), 1) #  draw frame_id
 tmp = cv2.cvtColor(frame, cv2.COLOR_BGR2RGB) #  Convert color mode
 img = arrayShow(frame)
 display(img) #  display picture
 time.sleep(0.05) #  The thread sleeps for a period of time before processing the next picture
 else:
 break
 except KeyboardInterrupt:
 cap.release()
cap.release()
3.7 Generate your own day changing video
边栏推荐
- Letcode43: string multiplication
- 大二级分类产品页权重低,不收录怎么办?
- 2.非线性回归
- Prediction of the victory or defeat of the League of heroes -- simple KFC Colonel
- 【GO记录】从零开始GO语言——用GO语言做一个示波器(一)GO语言基础
- 13.模型的保存和載入
- Cancel the down arrow of the default style of select and set the default word of select
- Handwriting a simulated reentrantlock
- Basic mode of service mesh
- Cascade-LSTM: A Tree-Structured Neural Classifier for Detecting Misinformation Cascades(KDD20)
猜你喜欢
Kubernetes static pod (static POD)
12.RNN应用于手写数字识别
CVE-2022-28346:Django SQL注入漏洞

Prediction of the victory or defeat of the League of heroes -- simple KFC Colonel

They gathered at the 2022 ecug con just for "China's technological power"
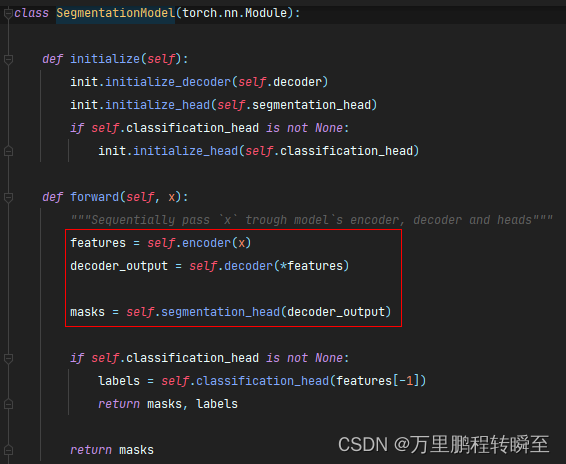
语义分割模型库segmentation_models_pytorch的详细使用介绍

New library launched | cnopendata China Time-honored enterprise directory
fabulous! How does idea open multiple projects in a single window?
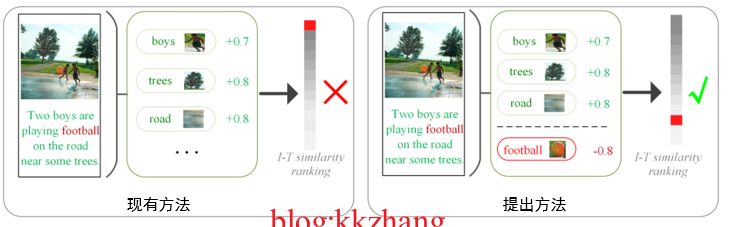
跨模态语义关联对齐检索-图像文本匹配(Image-Text Matching)
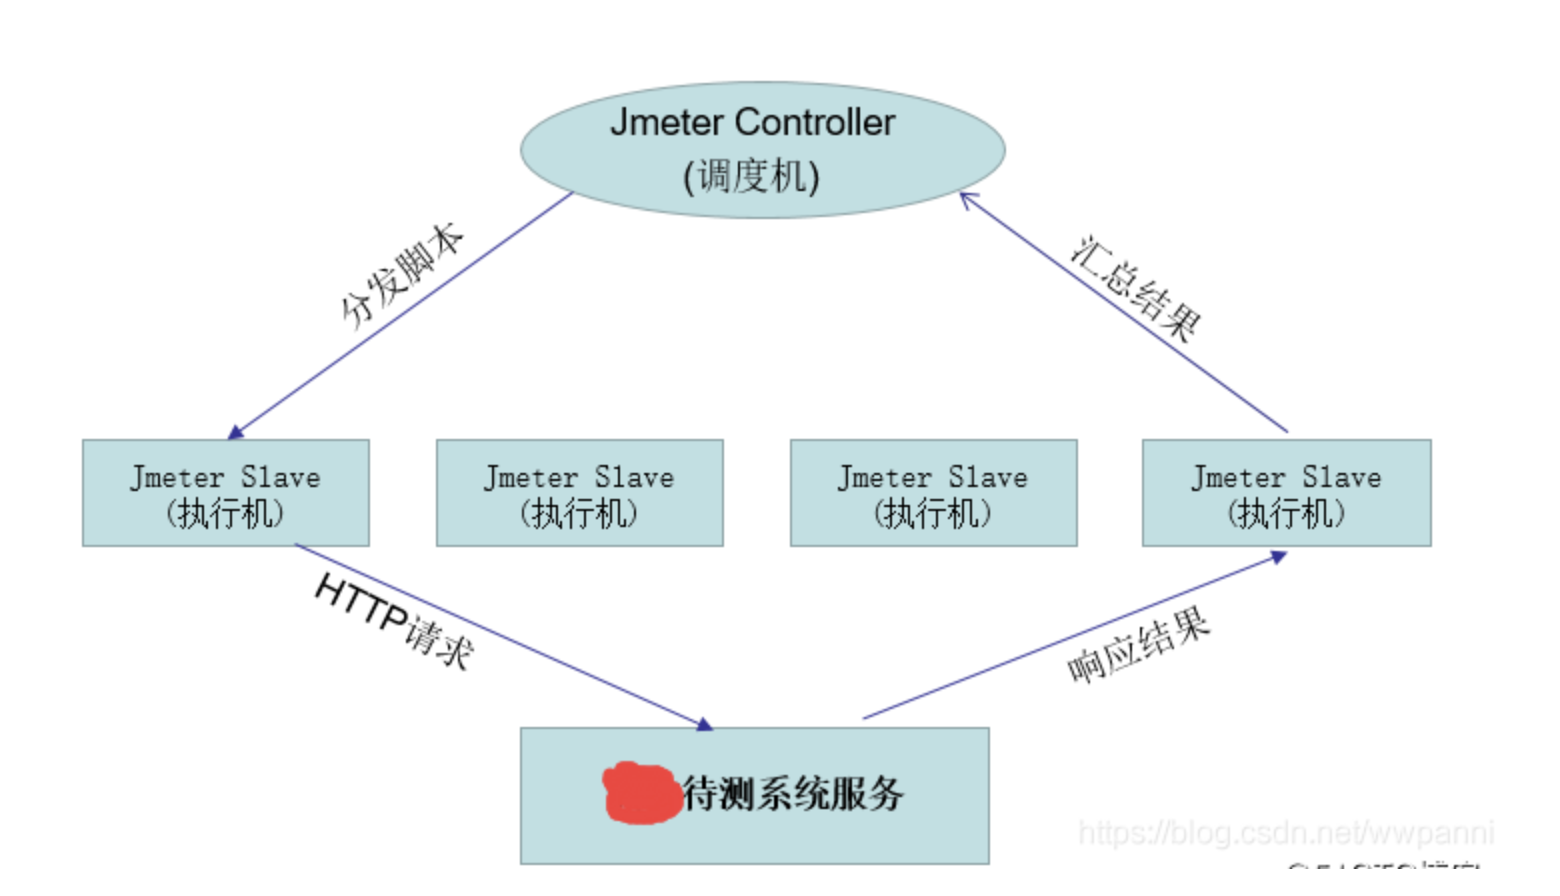
jemter分布式
随机推荐
Is it safe to open an account on the official website of Huatai Securities?
Interface test advanced interface script use - apipost (pre / post execution script)
Qt添加资源文件,为QAction添加图标,建立信号槽函数并实现
Analysis of 8 classic C language pointer written test questions
8.优化器
新库上线 | CnOpenData中华老字号企业名录
STL--String类的常用功能复写
New library launched | cnopendata China Time-honored enterprise directory
股票开户免费办理佣金最低的券商,手机上开户安全吗
The weight of the product page of the second level classification is low. What if it is not included?
德总理称乌不会获得“北约式”安全保障
完整的模型验证(测试,demo)套路
8道经典C语言指针笔试题解析
3.MNIST数据集分类
AI遮天传 ML-回归分析入门
Basic mode of service mesh
炒股开户怎么最方便,手机上开户安全吗
[Yugong series] go teaching course 006 in July 2022 - automatic derivation of types and input and output
The whole life cycle of commodity design can be included in the scope of industrial Internet
QT establish signal slots between different classes and transfer parameters