当前位置:网站首页>mmclassification 训练自定义数据
mmclassification 训练自定义数据
2022-07-05 11:49:00 【Coding的叶子】
1 mmclassification 安装
如果环境已安装mmclassification,请跳过该步骤。mmclassification框架安装与调试验证请参考博客:mmclassification安装与调试_Coding的叶子的博客-CSDN博客_mmclassification 安装。
2 数据集准备
mmclassification 的数据集目录主要由标注文件和图片样本组成,其中标注文件存储在meta文件夹中,图片样本存在train、val、test文件夹下,即分别是用于训练、验证和测试的图片样本。图片样本文件按照类别存储在train、val、test文件夹下,同一类别图片存储在同一个子文件夹中,子文件夹的名称为图片所属类别名称。
meta文件夹中主要包含了train.txt、val.txt和test.txt文件。txt文件中的每一行分别存储了图片样本路径和类别id,如下图所示。
如果没有meta标注文件,请参考博客:mmclassification 标注文件生成_Coding的叶子的博客-CSDN博客,生成meta文件夹及其文件夹下的txt文件。
本文示例数据来源于minist手写字体可视化数据集,已按照train、test文件夹进行存储,下载地址为:minist手写数字可视化数据集-深度学习文档类资源-CSDN下载。
将下载的数据集文件夹名称重名为Minist,并且mmclassification工程目录下新建data文件夹,将数据集放到data文件夹下即可。数据集的存储路径不限,需要在下方3.3节中配置相应的路径即可。
3 自定义数据集
3.1 新建MyDataset
在mmclassification工程目录下的mmcls/datasets/新建mydataset.py文件,自定义数据加载类MyDataset,文件名称mydataset和类名称MyDataset可以自行更改。mydataset.py文件中的内容如下:
# -*- coding: utf-8 -*-
"""
乐乐感知学堂公众号
@author: https://blog.csdn.net/suiyingy
"""
import numpy as np
from .builder import DATASETS
from .base_dataset import BaseDataset
@DATASETS.register_module()
class MyDataset(BaseDataset):
def load_annotations(self):
assert isinstance(self.ann_file, str)
data_infos = []
with open(self.ann_file) as f:
samples = [x.strip().split(' ') for x in f.readlines()]
for filename, gt_label in samples:
info = {'img_prefix': self.data_prefix}
info['img_info'] = {'filename': filename}
info['gt_label'] = np.array(gt_label, dtype=np.int64)
data_infos.append(info)
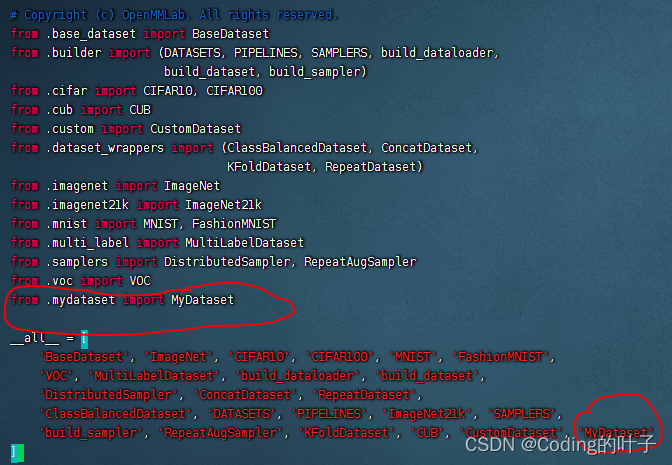
return data_infos3.2 将MyDataset注册到mmclassification框架
在mmcls/datasets/__init__.py文件中增加上面定义的类MyDataset,如下图所示:
3.3 新建数据集配置文件
在mmclassification工程目录configs/_base_/datasets/文件夹下,新建mydataset.py文件,主要用于设置数据集类型、数据增强方式、batch size (samples_per_gpu)、数据集路径和标注文件路径、模型保存周期(interval)。文件内容如下所示:
# -*- coding: utf-8 -*-
"""
乐乐感知学堂公众号
@author: https://blog.csdn.net/suiyingy
"""
dataset_type = 'MyDataset'
classes = ['cat', 'bird', 'dog']  # The category names of your dataset

img_norm_cfg = dict(
    mean=[123.675, 116.28, 103.53], std=[58.395, 57.12, 57.375], to_rgb=True)

train_pipeline = [
    dict(type='LoadImageFromFile'),
    dict(type='RandomResizedCrop', size=224),
    dict(type='RandomFlip', flip_prob=0.5, direction='horizontal'),
    dict(type='Normalize', **img_norm_cfg),
    dict(type='ImageToTensor', keys=['img']),
    dict(type='ToTensor', keys=['gt_label']),
    dict(type='Collect', keys=['img', 'gt_label'])
]
test_pipeline = [
    dict(type='LoadImageFromFile'),
    dict(type='Resize', size=(256, -1)),
    dict(type='CenterCrop', crop_size=224),
    dict(type='Normalize', **img_norm_cfg),
    dict(type='ImageToTensor', keys=['img']),
    dict(type='Collect', keys=['img'])
]

data = dict(
    train=dict(
        type=dataset_type,
        data_prefix='data/Minist/train',
        ann_file='data/Minist/meta/train.txt',
        classes=classes,
        pipeline=train_pipeline
    ),
    val=dict(
        type=dataset_type,
        data_prefix='data/Minist/test',
        ann_file='data/Minist/meta/test.txt',
        classes=classes,
        pipeline=test_pipeline
    ),
    test=dict(
        type=dataset_type,
        data_prefix='data/Minist/test',
        ann_file='data/Minist/meta/test.txt',
        classes=classes,
        pipeline=test_pipeline
    )
)
evaluation = dict(interval=1, metric='accuracy')
4 修改configs模型配置文件
以configs/resnet/resnet18_8xb16_cifar10.py配置文件为例,mmclassification的配置文件通常包含以下4个部分:
_base_ = [
    '../_base_/models/resnet18_cifar.py', '../_base_/datasets/cifar10_bs16.py',
    '../_base_/schedules/cifar10_bs128.py', '../_base_/default_runtime.py'
]../_base_/models/resnet18_cifar.py:定义模型参数,主要包括主干网络、neck、head和类别数量。
../_base_/datasets/cifar10_bs16.py:定义数据集增强方式和路径,也就是3.3节的配置文件,bs16表示batch size为16,即samples_per_gpu=16。
../_base_/schedules/cifar10_bs128.py:定义训练参数,主要包括优化器、学习率、训练总epoch数量。
../_base_/default_runtime.py:定义运行参数,主要包括模型保存周期、日志输出周期等。
configs主要修改的地方为数据配置文件,即把 '../_base_/datasets/cifar10_bs16.py'更换成3.3节中的配置文件'../_base_/datasets/mydataset.py'。即:

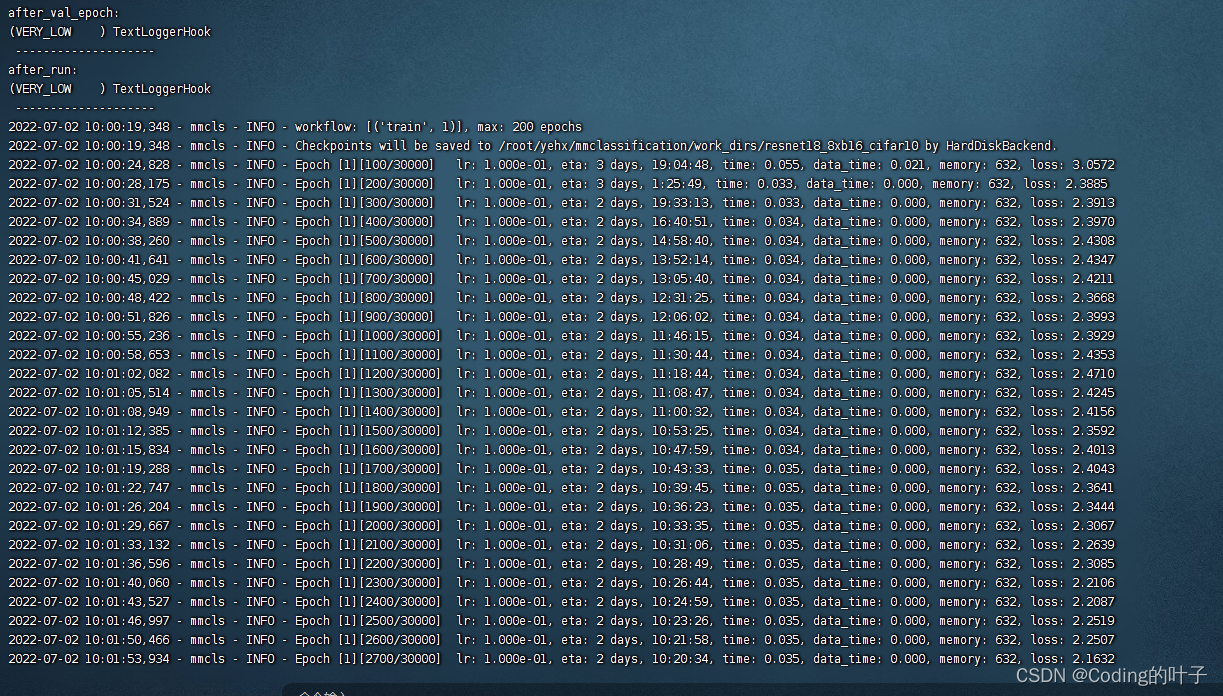
5 运行训练程序
mmcls基本的训练命令为:
python tools/train.py 模型配置文件示例:
python tools/train.py configs/resnet/resnet18_8xb16_cifar10.py这里已经把resnet18_8xb16_cifar10.py文件按照第4节进行了修改。
6 运行结果
7 【python三维深度学习】python三维点云从基础到深度学习_Coding的叶子的博客-CSDN博客_python 三维点云
更多三维、二维感知算法和金融量化分析算法请关注“乐乐感知学堂”微信公众号,并将持续进行更新。
边栏推荐
- [mainstream nivida graphics card deep learning / reinforcement learning /ai computing power summary]
- 【pytorch 修改预训练模型:实测加载预训练模型与模型随机初始化差别不大】
- 《增长黑客》阅读笔记
- Reading notes of growth hacker
- 【无标题】
- codeforces每日5题(均1700)-第五天
- Empêcher le navigateur de reculer
- How did the situation that NFT trading market mainly uses eth standard for trading come into being?
- HiEngine:可媲美本地的云原生内存数据库引擎
- XML解析
猜你喜欢
Sentinel sentinel mechanism of master automatic election in redis master-slave

Yolov5 target detection neural network -- calculation principle of loss function

Pytorch weight decay and dropout
Yolov 5 Target Detection Neural Network - Loss Function Calculation Principle
COMSOL -- three-dimensional graphics random drawing -- rotation
pytorch-权重衰退(weight decay)和丢弃法(dropout)
COMSOL -- establishment of geometric model -- establishment of two-dimensional graphics
![[cloud native | kubernetes] actual battle of ingress case (13)](/img/1a/9404f6dcedd15827fa45f8f6f4c093.png)
[cloud native | kubernetes] actual battle of ingress case (13)
iTOP-3568开发板NPU使用安装RKNN Toolkit Lite2
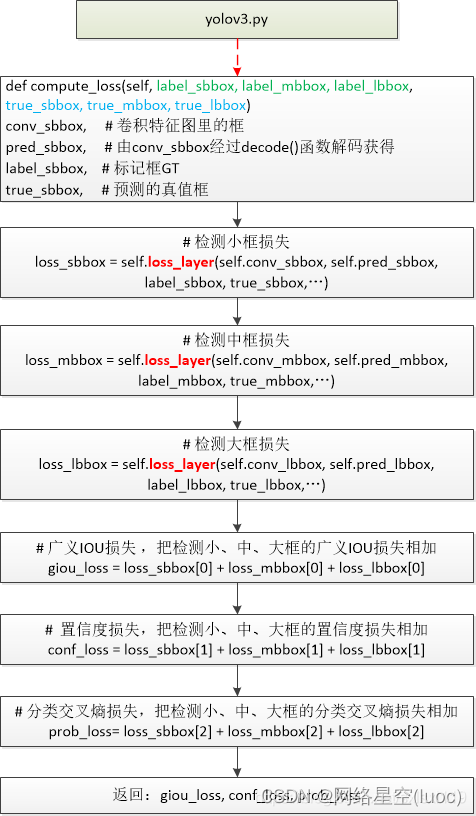
【yolov3损失函数】
随机推荐
查看多台机器所有进程
2022年国内云管平台厂商哪家好?为什么?
splunk配置163邮箱告警
vscode快捷键
石油化工企业安全生产智能化管控系统平台建设思考和建议
Troubleshooting of high memory usage of redis in a production environment
Sentinel sentinel mechanism of master automatic election in redis master-slave
[crawler] Charles unknown error
Pytorch MLP
一类恒等式的应用(范德蒙德卷积与超几何函数)
Redis cluster (master-slave) brain crack and solution
Redis集群(主从)脑裂及解决方案
iTOP-3568开发板NPU使用安装RKNN Toolkit Lite2
阻止瀏覽器後退操作
Redirection of redis cluster
MySQL statistical skills: on duplicate key update usage
[crawler] bugs encountered by wasm
【SingleShotMultiBoxDetector(SSD,单步多框目标检测)】
11. (map data section) how to download and use OSM data
Pytorch linear regression