当前位置:网站首页>[flask] official tutorial -part2: Blueprint - view, template, static file
[flask] official tutorial -part2: Blueprint - view, template, static file
2022-07-06 01:33:00 【Coriander Chrysanthemum】
Preface article :
The official tutorial (Tutorial)-part1: Project layout 、 Application settings 、 Define and access databases
The blueprint - View
View functions are the code you write to respond to application requests .Flask Use the pattern to send incoming requests URL Match the view that should handle it . View return Flask Data converted to outgoing response . Flask You can also change the way , Generate a view based on its name and parameters URL.
Create a blueprint
Blueprints are a way to organize a set of related views and other code . Instead of registering views and other code directly to the application , It's better to register them in the blueprint . Then the blueprint is registered with the application when it is available in the factory function .
Flaskr There will be two blueprints , An authentication function , A function for blog posts . The code for each blueprint will be placed in a separate module . Because blogs need to know about authentication , So you will write authentication first .
To write flaskr/auth.py Script .
import functools

from flask import (
    Blueprint, flash, g, redirect, render_template, request, session, url_for
)
from werkzeug.security import check_password_hash, generate_password_hash

from flaskr.db import get_db

bp = Blueprint('auth', __name__, url_prefix='/auth')
The above created a named auth The blueprint of . Similar to application object , Blueprints also need to know where to create , So we need to pass in __name__ As the second parameter . as for url_prefix Will be added to all associated with the blueprint URL.
Use app.register_blueprint() Import and register blueprints from the factory . Before returning to the application , Put the new code in the factory function (flaskr/__init__.py) At the end of . as follows :
def create_app():
    app = ...
    # existing code omitted

    from . import auth
    app.register_blueprint(auth.bp)

    return app
The authentication blueprint will have a view of registering new users and logging in and out .
The first view : register
When users access /auth/registerURL When linking , The registration view will return the form Forms html. When they submit this form is , It will validate their input and display the form with the error message again or create a new user and go to the login page . The corresponding view code is as follows :
flaskr/auth.py
@bp.route('/register', methods=('GET', 'POST'))
def register():
    if request.method == 'POST':
        username = request.form['username']
        password = request.form['password']
        db = get_db()
        error = None

        if not username:
            error = 'Username is required.'
        elif not password:
            error = 'Password is required.'

        if error is None:
            try:
                db.execute(
                    "INSERT INTO user (username, password) VALUES (?, ?)",
                    (username, generate_password_hash(password)),
                )
                db.commit()
            except db.IntegrityError:
                error = f"User {
      username} is already registered."
            else:
                return redirect(url_for("auth.login"))

        flash(error)

    return render_template('auth/register.html')
View function function works :
@bp.routelink URL/registerAnd this register view function . When Flask Accept/auth/registerThe request of , It will call this register View and use the return value as a response ;- If the user submits this form Forms ,
request.methodWill bePOST. In this case , Start verifying the input ; request.formIt's a special type of dict, It is form In the form key and value Mapping Dictionary . The user will fill in username and password- And then there's validation username and password Is it empty
- If the verification is successful : A new... Will be inserted into the database user;
db.executeUse ? As SQL Query placeholders for any user input , And value tuples for replacing placeholders . The database will be responsible for escaping values , So you won't suffer SQL Injection attack .- For safety's sake , Never store passwords directly in the database .
generate_password_hash()Used to hash passwords securely , And store the hash . Because this query modifies the data , Therefore, you need to calldb.commit()To save changes . - If the user name already exists , It will happen
sqlite3.IntegrityError, This should be shown to the user as another validation error .
- After storing users , They are redirected to the login page .
url_for()Generate login view based on its name URL. This is better than writing directly URL preferable , Because it allows you to change later URL, Without changing all the code linked to it .redirect()Generate the generated URL Redirection response for . - If validation fails , An error will be displayed to the user .
flash()Store messages that can be retrieved when rendering templates . - When the user initially navigates to
auth/registerOr when there is a validation error , The... With the registration form should be displayed HTML page .render_template()A containing HTML The template of , You will write this template in the next step of this tutorial .
land
The premise of this function is , You have completed the registration . The code is as follows :flaskr/auth.py
@bp.route('/login', methods=('GET', 'POST'))
def login():
    if request.method == 'POST':
        username = request.form['username']
        password = request.form['password']
        db = get_db()
        error = None
        user = db.execute(
            'SELECT * FROM user WHERE username = ?', (username,)
        ).fetchone()

        if user is None:
            error = 'Incorrect username.'
        elif not check_password_hash(user['password'], password):
            error = 'Incorrect password.'

        if error is None:
            session.clear()
            session['user_id'] = user['id']
            return redirect(url_for('index'))

        flash(error)

    return render_template('auth/login.html')
There are many and register Different views :
- First, query users and store them in variables for later use .
fetchone()Return a row from the query . If the query does not return any results , Then return to None. later , Will usefetchall(), It returns a list of all results . check_password_hash()Hash the submitted password in the same way as the stored hash , And safely compare them . If they match , The password is valid .- session Is a dictionary that stores cross request data . When the verification is successful , User id Stored in a new session . The data is stored in the cookie in , Then the browser sends it back with subsequent requests . Flask Sign the data securely , Make it impossible to tamper with .
Now the user's id Stored in the session , It will be available in subsequent requests . At the beginning of each request , If the user logs in , Their information should be loaded and provided to other views . The implementation is as follows (flaskr/auth.py):
@bp.before_app_request
def load_logged_in_user():
    user_id = session.get('user_id')

    if user_id is None:
        g.user = None
    else:
        g.user = get_db().execute(
            'SELECT * FROM user WHERE id = ?', (user_id,)
        ).fetchone()
bp.before_app_request() Register a function that runs before the view function , No matter what you ask URL.load_logged_in_user Check users ID Is it stored in the session , And get the user's data from the database , And store it in g.user in , The length of this data continuous request . If there are no users id, perhaps id non-existent ,g.user Will be for None.
Log off
To log out , You need to delete the user from the session ID. then load_logged_in_user Users will not be loaded in subsequent requests .
flaskr/auth.py Add the code as follows :
@bp.route('/logout')
def logout():
    session.clear()
    return redirect(url_for('index'))
Authentication is required in other views
Some view pages sometimes need to have requirements for login , establish 、 Editing and deleting blog posts requires user login . Decorator can be used to check every view it applies .
flaskr/auth.py
def login_required(view):
    @functools.wraps(view)
    def wrapped_view(**kwargs):
        if g.user is None:
            return redirect(url_for('auth.login'))

        return view(**kwargs)

    return wrapped_view
This decorator returns a new view function , It wraps the original view it applies to . The new function checks whether the user has loaded , Otherwise, redirect to the login page . If the user is loaded , Then call the original view and continue normally . You will use this decorator when writing blog views .
Endpoint and URL
url_for() Functions are based on Name and parameters To generate a view URL. The name associated with the view is also called endpoint , By default, it has the same name as the view function .
for example , Added to the application factory earlier in this tutorial hello() The view has a name “hello”, And you can use url_for('hello') link to . If it takes a parameter , You will see later , It will be used with url_for('hello', who='World') Related to .
When using blueprints , The name of the blueprint will be added in front of the function name , Therefore, the endpoint of the login function you wrote above is “auth.login”, Because you have added it to “auth” In the blueprint .
Templates Templates
You have written the authentication view for your application , But if you are running the server and trying to access any URL, You will see TemplateNotFound error . That's because the view is calling render_template(), But you haven't written a template yet . The template file will be stored in flaskr In the template directory in the package .
Templates are files that contain static data as well as placeholders for dynamic data . Use specific data rendering templates to generate final documents . Flask Use Jinja Template library to render templates .
In your application , You will use templates to render HTML, The HTML Will be displayed in the user's browser . stay Flask in ,Jinja Is configured to escape automatically HTML Any data presented in the template . This means that it is safe to render user input ; Anything they enter may be related to HTML Confused characters , for example < and > Will be escaped to a safe value , These values look the same in the browser , But it will not cause adverse effects .
Jinja Their appearance and behavior are mostly similar to Python. Special delimiters are used to distinguish Jinja Syntax and static data in templates .{ { and }} Anything in between is an expression that will be output to the final document . {% and %} It means similar if and for Control flow statement of . And Python Different , Blocks are represented by start and end markers rather than indents , Because the static text in the block may change the indentation .
Basic layout
Every page in the application will have the same basic layout around different subjects . Instead of writing the whole in every template HTML structure , Instead, each template will extend a basic template and cover specific parts .
flaskr/templates/base.html
<!doctype html>
<title>{% block title %}{% endblock %} - Flaskr</title>
<link rel="stylesheet" href="{
     { url_for('static', filename='style.css') }}">
<nav>
  <h1>Flaskr</h1>
  <ul>
    {% if g.user %}
      <li><span>{
   { g.user['username'] }}</span>
      <li><a href="{
     { url_for('auth.logout') }}">Log Out</a>
    {% else %}
      <li><a href="{
     { url_for('auth.register') }}">Register</a>
      <li><a href="{
     { url_for('auth.login') }}">Log In</a>
    {% endif %}
  </ul>
</nav>
<section class="content">
  <header>
    {% block header %}{% endblock %}
  </header>
  {% for message in get_flashed_messages() %}
    <div class="flash">{
   { message }}</div>
  {% endfor %}
  {% block content %}{% endblock %}
</section>
g Automatically available in the template . According to whether it is set g.user( come from load_logged_in_user), Or display the user name and logout link , Or display the registration and login links .url_for() It is also automatically available , Used to generate views URL, Instead of writing them out manually .
After the page title and before the content , Template loop get_flashed_messages() Every message returned . You used flash() To display error messages , This is the code that displays the error message .
The three blocks defined here will be overwritten in other templates :
- {% block title %} The title displayed in the browser label and window title will be changed .
- {% block header %} And title similar , But it will change the title displayed on the page .
- {% block content %} Is the location of the content of each page , For example, login form or blog post .
The basic template is directly located in the template directory . In order to keep others in order , The template of the blueprint will be placed in a directory with the same name as the blueprint .
Registration page
flaskr/templates/auth/register.html
{
    % extends 'base.html' %}

{
    % block header %}
  <h1>{
    % block title %}Register{
    % endblock %}</h1>
{
    % endblock %}

{
    % block content %}
  <form method="post">
    <label for="username">Username</label>
    <input name="username" id="username" required>
    <label for="password">Password</label>
    <input type="password" name="password" id="password" required>
    <input type="submit" value="Register">
  </form>
{
    % endblock %}
{% extends ‘base.html’ %} tell Jinja This template should replace the block in the basic template . All rendered content must appear in the block that overrides the basic template {% block %} In the mark .
A useful pattern used here is to {% block title %} Put it in {% block header %} in . This sets the title block , Then output its value to the title block , So that windows and pages share the same title , Without having to write twice .
input Labels are used here required attribute . This tells the browser not to submit the form before filling in these fields . If the user is using an old browser that does not support this attribute , Or if they use something other than the browser to make a request , You still need to Flask Validate data in view . It is important to always fully verify the data on the server , Even the client has done some validation .
Landing page
In addition to the title and submit button , This is the same as the registration template .
flaskr/templates/auth/login.html
{
    % extends 'base.html' %}

{
    % block header %}
  <h1>{
    % block title %}Log In{
    % endblock %}</h1>
{
    % endblock %}

{
    % block content %}
  <form method="post">
    <label for="username">Username</label>
    <input name="username" id="username" required>
    <label for="password">Password</label>
    <input type="password" name="password" id="password" required>
    <input type="submit" value="Log In">
  </form>
{
    % endblock %}
Register a user
Now the verification template has been written , You can register a user . Make sure the server is still running , Then go to http://target_server:5000/auth/register.
Continue to start the service on my virtual machine , as follows :
The host browser access is as follows :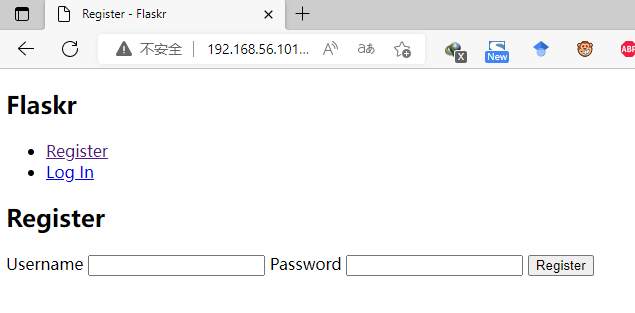
Fill in the registration information and submit it to the login interface :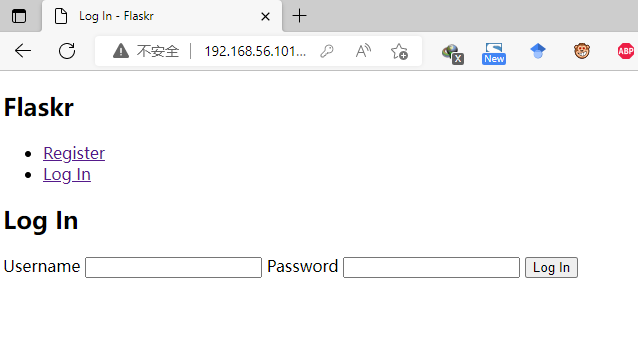
Of course , Try clicking... Without filling out the form “ register ” Button , Then check the browser to display the error message . Try from register.html Delete the required attributes from the template , Then click again “ register ”. The browser will not display errors , Instead, it reloads the page and displays the view from flash() Error of . I'm not going to do that here .
Fill in the user name and password , You will be redirected to the login page . Try entering the wrong user name , Or the correct user name and wrong password . If you log in, you will get an error , Because there is no indexed view that can be redirected to .
Static files
Authentication views and templates are valid , But they look simple now . You can add some CSS To build for you HTML Add style to layout . The style will not change , So it is a static file rather than a template .
Flask Automatically add a static view , This view is relative to flaskr/static The path of the directory and provide services for it . base.html The template already has a point style.css Link to file :
{
   { url_for('static', filename='style.css') }}
except CSS outside , Other types of static files may have JavaScript Function file or logo image . They are all placed in flaskr/static Under the table of contents , And use url_for('static', filename='...') quote .
This tutorial does not focus on how to write CSS, Therefore, you only need to copy the following content to flaskr/static/style.css In file :
html {
     font-family: sans-serif; background: #eee; padding: 1rem; }
body {
     max-width: 960px; margin: 0 auto; background: white; }
h1 {
     font-family: serif; color: #377ba8; margin: 1rem 0; }
a {
     color: #377ba8; }
hr {
     border: none; border-top: 1px solid lightgray; }
nav {
     background: lightgray; display: flex; align-items: center; padding: 0 0.5rem; }
nav h1 {
     flex: auto; margin: 0; }
nav h1 a {
     text-decoration: none; padding: 0.25rem 0.5rem; }
nav ul  {
     display: flex; list-style: none; margin: 0; padding: 0; }
nav ul li a, nav ul li span, header .action {
     display: block; padding: 0.5rem; }
.content {
     padding: 0 1rem 1rem; }
.content > header {
     border-bottom: 1px solid lightgray; display: flex; align-items: flex-end; }
.content > header h1 {
     flex: auto; margin: 1rem 0 0.25rem 0; }
.flash {
     margin: 1em 0; padding: 1em; background: #cae6f6; border: 1px solid #377ba8; }
.post > header {
     display: flex; align-items: flex-end; font-size: 0.85em; }
.post > header > div:first-of-type {
     flex: auto; }
.post > header h1 {
     font-size: 1.5em; margin-bottom: 0; }
.post .about {
     color: slategray; font-style: italic; }
.post .body {
     white-space: pre-line; }
.content:last-child {
     margin-bottom: 0; }
.content form {
     margin: 1em 0; display: flex; flex-direction: column; }
.content label {
     font-weight: bold; margin-bottom: 0.5em; }
.content input, .content textarea {
     margin-bottom: 1em; }
.content textarea {
     min-height: 12em; resize: vertical; }
input.danger {
     color: #cc2f2e; }
input[type=submit] {
     align-self: start; min-width: 10em; }
Refresh the previous page , The effect is dark purple .
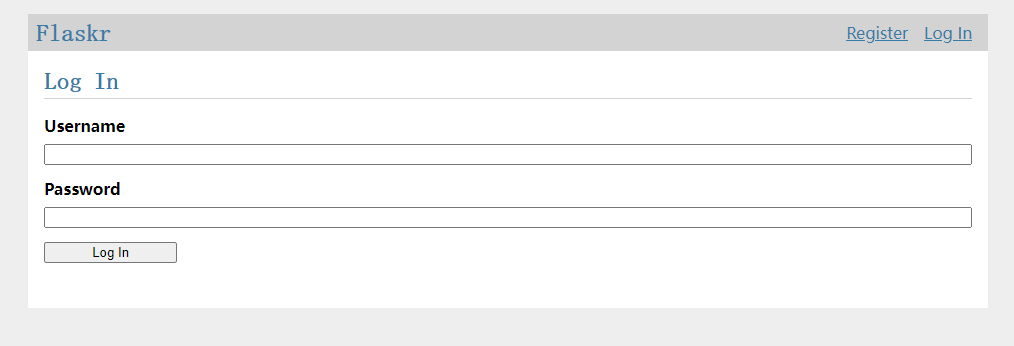
It should be better than the previous one .
边栏推荐
- SPIR-V初窺
- Alibaba-Canal使用详解(排坑版)_MySQL与ES数据同步
- Une image! Pourquoi l'école t'a - t - elle appris à coder, mais pourquoi pas...
- UE4 unreal engine, editor basic application, usage skills (IV)
- [ssrf-01] principle and utilization examples of server-side Request Forgery vulnerability
- Condition and AQS principle
- Electrical data | IEEE118 (including wind and solar energy)
- File upload vulnerability test based on DVWA
- [flask] obtain request information, redirect and error handling
- Paddle framework: paddlenlp overview [propeller natural language processing development library]
猜你喜欢
![[Jiudu OJ 09] two points to find student information](/img/35/25aac51fa3e08558b1f6e2541762b6.jpg)
[Jiudu OJ 09] two points to find student information

A Cooperative Approach to Particle Swarm Optimization
Idea sets the default line break for global newly created files
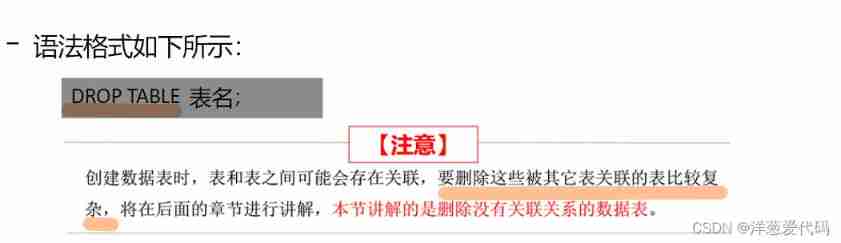
Basic operations of database and table ----- delete data table
MySQL learning notes 2
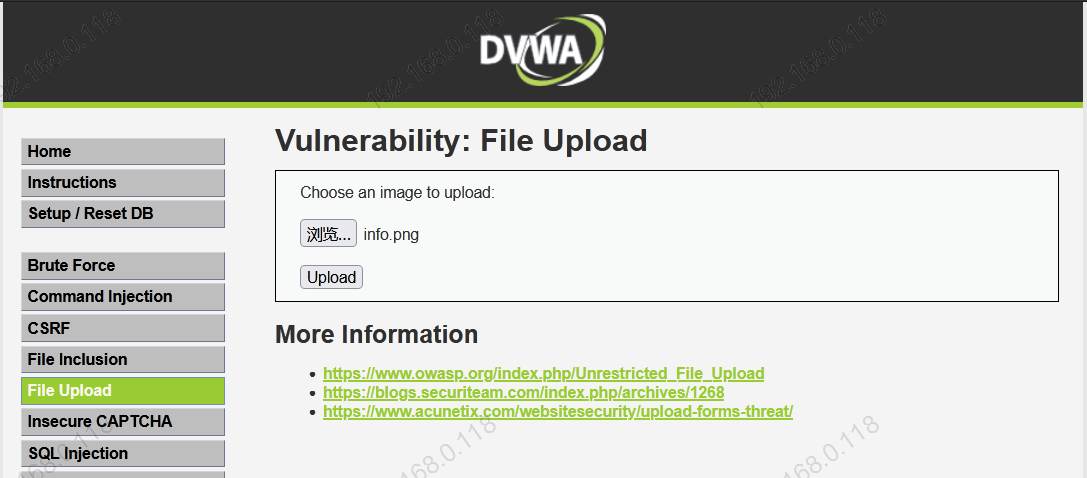
Test de vulnérabilité de téléchargement de fichiers basé sur dvwa

一圖看懂!為什麼學校教了你Coding但還是不會的原因...
yii中console方法调用,yii console定时任务
Cookie concept, basic use, principle, details and Chinese transmission
Leetcode skimming questions_ Sum of squares
随机推荐
3D视觉——4.手势识别(Gesture Recognition)入门——使用MediaPipe含单帧(Singel Frame)和实时视频(Real-Time Video)
JMeter BeanShell的基本用法 一下语法只能在beanshell中使用
leetcode刷题_平方数之和
[flask] obtain request information, redirect and error handling
安装Redis
037 PHP login, registration, message, personal Center Design
网易智企逆势进场,游戏工业化有了新可能
Threedposetracker project resolution
Unity | two ways to realize facial drive
Netease smart enterprises enter the market against the trend, and there is a new possibility for game industrialization
Luo Gu P1170 Bugs Bunny and Hunter
General operation method of spot Silver
CocoaPods could not find compatible versions for pod 'Firebase/CoreOnly'
Alibaba canal usage details (pit draining version)_ MySQL and ES data synchronization
剑指 Offer 12. 矩阵中的路径
False breakthroughs in the trend of London Silver
Paddle框架:PaddleNLP概述【飞桨自然语言处理开发库】
dried food! Accelerating sparse neural network through hardware and software co design
ORA-00030
Basic operations of databases and tables ----- non empty constraints