当前位置:网站首页>MNIST Handwritten Digit Recognition - From Perceptrons to Convolutional Neural Networks
MNIST Handwritten Digit Recognition - From Perceptrons to Convolutional Neural Networks
2022-08-04 06:19:00 【Learning Adventures】
A method to replace the model network structure,How to build a convolutional neural network.
The previous section implemented handwritten digit recognition using a ten-output node perceptron model,But training100个epoch之后,also only achieved0.8037的准确率,If try to adjustmax_epochs、损失函数、Gradient descent method or learning rate,It will be found that the accuracy rate is still difficult to increase.用一句俗话来说,The underlying logic remains unchanged,Just do some superficial work,It is always difficult to make a big improvement. 这种情况下,Perhaps you can consider replacing the underlying logic of the model——网络结构了.
本案例将使用CNN来实现.
1. 加载并处理数据集
Reuse what was saved in the previous sectionload_data_all函数和process_dataset函数,Load and process the full handwritten digit recognition dataset.
import os
import sys
import moxing as mox

datasets_dir = '../datasets'
if not os.path.exists(datasets_dir):
    os.makedirs(datasets_dir)

if not os.path.exists(os.path.join(datasets_dir, 'MNIST_Data.zip')):
    mox.file.copy('obs://modelarts-labs-bj4-v2/course/hwc_edu/python_module_framework/datasets/mindspore_data/MNIST_Data.zip',
                  os.path.join(datasets_dir, 'MNIST_Data.zip'))
    os.system('cd %s; unzip MNIST_Data.zip' % (datasets_dir))

sys.path.insert(0, os.path.join(os.getcwd(), '../datasets/MNIST_Data'))
from load_data_all import load_data_all
from process_dataset import process_dataset

mnist_ds_train, mnist_ds_test, train_len, test_len = load_data_all(datasets_dir)  # 加载数据集
mnist_ds_train = process_dataset(mnist_ds_train, batch_size= 60000)  # 处理训练集
mnist_ds_test = process_dataset(mnist_ds_test, batch_size= 10000)  # 处理测试集
训练集规模:60000,测试集规模:10000
2. 构建CNN网络和评价函数
The evaluation function directly reuses the code from the previous section,The network structure part needs to be adjusted greatly,代码如下,Please refer to the code comments for specific meanings.
import mindspore
import mindspore.nn as nn
import mindspore.ops as ops
from mindspore.common.initializer import Normal
class Network(nn.Cell):
"""
该网络只有三层网络,分别是卷积层1、卷积层2和全连接层1,ReLU和MaxPool2d由于不带参数,所以不计入网络层数
"""
def __init__(self, num_of_weights):
super(Network, self).__init__()
# Convolution 1
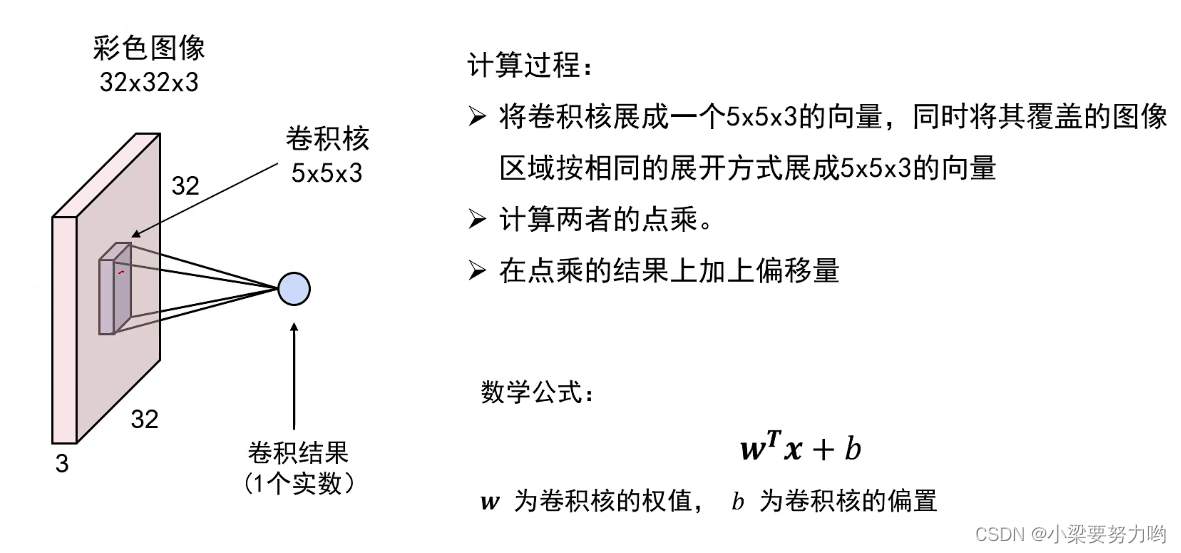
self.conv1 = nn.Conv2d(in_channels=1, out_channels=16,
kernel_size=5, pad_mode='valid',
stride=1, padding=0) # 卷积层1,输入为1个通道,输出为16个通道,卷积核大小为5,滑动步长为1,不做边缘填充
# Convolution 2
self.conv2 = nn.Conv2d(in_channels=16, out_channels=32,
kernel_size=5, pad_mode='valid',
stride=1, padding=0) # 卷积层2,输入为16个通道,输出为32个通道,卷积核大小为5,滑动步长为1,不做边缘填充
# Fully connected
self.fc = nn.Dense(32 * 4 * 4, 10, weight_init= Normal(0.02)) # 全连接层1,输入维度为32*4*4,输出维度为10
self.relu = nn.ReLU() # 激活层,使用卷积网络中最常用的ReLU激活函数
self.maxpool = nn.MaxPool2d(kernel_size=2, stride=2) # 最大池化层
self.flatten = nn.Flatten()
def construct(self, x):
"""
前向传播函数
"""
# Convolution 1
out = self.conv1(x) # 卷积
out = self.relu(out) # 激活
out = self.maxpool(out) # 池化
# Convolution 2
out = self.conv2(out) # 卷积
out = self.relu(out) # 激活
out = self.maxpool(out) # 池化
# Fully connected 1
# out = out.view(out.size(0), -1) # 输入到全连接层之前需要将32个4*4大小的特性矩阵拉成一个一维向量
out = self.flatten(out)
out = self.fc(out) # 计算全连接层
return out
def evaluate(pred_y, true_y):
pred_labels = ops.Argmax(output_type=mindspore.int32)(pred_y)
correct_num = (pred_labels == true_y).asnumpy().sum().item()
return correct_num3. 定义交叉熵损失函数和优化器
Reuse the previous section
# 损失函数
net_loss = nn.SoftmaxCrossEntropyWithLogits(sparse=True, reduction='mean')

# 创建网络
network = Network(28*28)
lr = 0.01
momentum = 0.9

# 优化器
net_opt = nn.Momentum(network.trainable_params(), lr, momentum)
4. 实现训练函数
Reuse the previous section
def train(network, mnist_ds_train, max_epochs= 50):
    net = WithLossCell(network, net_loss)
    net = TrainOneStepCell(net, net_opt)
    network.set_train()
    for epoch in range(1, max_epochs + 1):
        train_correct_num = 0.0
        test_correct_num = 0.0
        for inputs_train in mnist_ds_train:
            output = net(*inputs_train)
            train_x = inputs_train[0]
            train_y = inputs_train[1]
            pred_y_train = network.construct(train_x)  # 前向传播
            train_correct_num += evaluate(pred_y_train, train_y)
        train_acc = float(train_correct_num) / train_len

        for inputs_test in mnist_ds_test:
            test_x = inputs_test[0]
            test_y = inputs_test[1]
            pred_y_test = network.construct(test_x)
            test_correct_num += evaluate(pred_y_test, test_y)
        test_acc = float(test_correct_num) / test_len
        if (epoch == 1) or (epoch % 10 == 0):
            print("epoch: {0}/{1}, train_losses: {2:.4f}, tain_acc: {3:.4f}, test_acc: {4:.4f}".format(epoch, max_epochs, output.asnumpy(), train_acc, test_acc, cflush=True))
5. 配置运行信息
The hardware specification selected here is GPU
from mindspore import context
context.set_context(mode=context.GRAPH_MODE, device_target="GPU")  # 当选择GPU时mindspore规格也需要切换到GPU
6. 开始训练
import time
from mindspore.nn import WithLossCell, TrainOneStepCell

max_epochs = 100
start_time = time.time()
print("*"*10 + "开始训练" + "*"*10)
train(network, mnist_ds_train, max_epochs= max_epochs)
print("*"*10 + "训练完成" + "*"*10)
cost_time = round(time.time() - start_time, 1)
print("训练总耗时: %.1f s" % cost_time)
**********开始训练********** epoch: 1/100, train_losses: 2.3024, tain_acc: 0.1307, test_acc: 0.1312 epoch: 10/100, train_losses: 2.3004, tain_acc: 0.1986, test_acc: 0.1980 epoch: 20/100, train_losses: 2.2937, tain_acc: 0.3035, test_acc: 0.3098 epoch: 30/100, train_losses: 2.2683, tain_acc: 0.3669, test_acc: 0.3754 epoch: 40/100, train_losses: 2.1102, tain_acc: 0.4212, test_acc: 0.4290 epoch: 50/100, train_losses: 1.0519, tain_acc: 0.7415, test_acc: 0.7551 epoch: 60/100, train_losses: 1.3377, tain_acc: 0.7131, test_acc: 0.7190 epoch: 70/100, train_losses: 0.9068, tain_acc: 0.7817, test_acc: 0.7888 epoch: 80/100, train_losses: 0.4193, tain_acc: 0.8732, test_acc: 0.8843 epoch: 90/100, train_losses: 0.3339, tain_acc: 0.9000, test_acc: 0.9069 epoch: 100/100, train_losses: 0.2796, tain_acc: 0.9177, test_acc: 0.9219 **********训练完成********** 训练总耗时: 261.2 s
从上面输出可以看出,使用lenet网络,Train the same batch,准确率达到了92%,有了不小的提升.
边栏推荐
- [CV-Learning] Semantic Segmentation
- [Deep Learning Diary] Day 1: Hello world, Hello CNN MNIST
- 【论文阅读】Anchor-Free Person Search
- Thoroughly understand box plot analysis
- Various commands such as creating a new user in postgresql
- 深度学习理论——过拟合、欠拟合、正则化、优化器
- The pipeline mechanism in sklearn
- 语音驱动嘴型与面部动画生成的现状和趋势
- Transformer
- PCL窗口操作
猜你喜欢
【CV-Learning】Convolutional Neural Network

target has libraries with conflicting names: libcrypto.a and libssl.a.
YOLOV5 V6.1 详细训练方法

MFC读取点云,只能正常显示第一个,显示后面时报错

基于BiGRU和GAN的数据生成方法

动手学深度学习_softmax回归

光条提取中的连通域筛除

Jupyter Notebook installed library;ModuleNotFoundError: No module named 'plotly' solution.
YOLOV4流程图(方便理解)

MOOSE平台官方第二个例子分析——关于创建Kernel,求解对流扩散方程
随机推荐
基于BiGRU和GAN的数据生成方法
TypeError: load() missing 1 required positional argument: ‘Loader‘
亚马逊云科技Build On-Amazon Neptune基于知识图谱的推荐模型构建心得
Qt日常学习
如何用Pygame制作简单的贪吃蛇游戏
深度学习理论 —— 初始化、参数调节
剪映专业版字幕导出随笔
MNIST手写数字识别 —— 从感知机到卷积神经网络
【CV-Learning】语义分割
[Deep Learning 21-Day Learning Challenge] 3. Use a self-made dataset - Convolutional Neural Network (CNN) Weather Recognition
Install dlib step pit record, error: WARNING: pip is configured with locations that require TLS/SSL
空洞卷积
MNIST手写数字识别 —— 从零构建感知机实现二分类
Various commands such as creating a new user in postgresql
MFC 打开与保存点云PCD文件
ConnectionRefusedError: [Errno 111] Connection refused问题解决
代码庆端午--粽你心意
(导航页)OpenStack-M版-双节点手工搭建-附B站视频
Pytorch语义分割理解
MySQL leftmost prefix principle [I understand hh]