当前位置:网站首页>Rsync remote synchronization
Rsync remote synchronization
2022-07-07 08:22:00 【Kiro Jun】
One 、rsync brief introduction
A fast incremental backup tool
- Remote Sync, Remote synchronization
- Support local replication 、 Remote Replication 、 Remote daemon replication , Or with others SSH、rsync Host synchronization
- Official website :https://rsync.samba.org/
- With its delta-transfer Algorithm famous .
- rsync Listening port :873
- rsync Operation mode :C/S
Two 、rsync Synchronization source
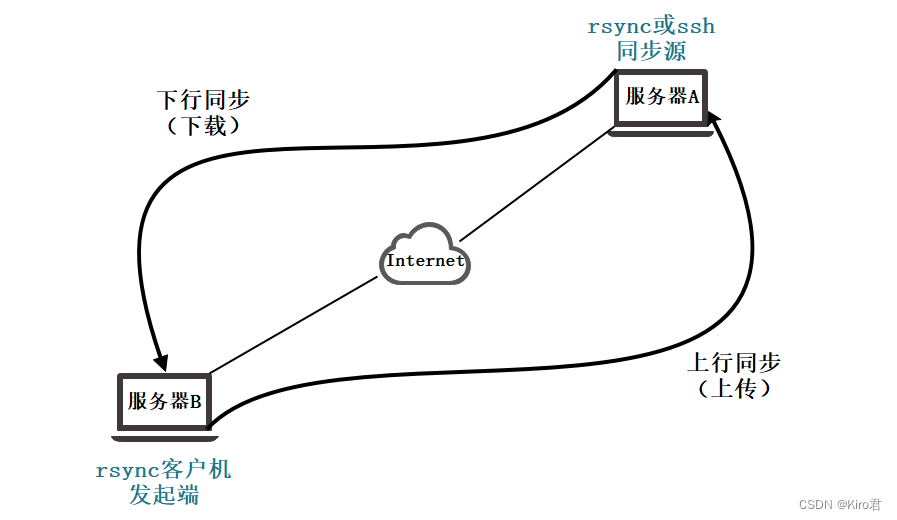
In the remote synchronization task , Responsible for initiating rsync The client of synchronous operation is called client , And responsible for Response from client rsync The server that synchronizes operations is called the backup source , Also known as Synchronization source ;
- Downlink synchronization ( download ) in , The synchronization source is responsible for providing documents Original location , The initiator has Read rights ;
- Uplink synchronization ( Upload ) in , The synchronization source is responsible for providing documents Target location , The initiator has Write rights ;
3、 ... and 、rsync characteristic
You can mirror and save the entire directory and file system
It is easy to maintain the permissions of the original file 、 Time 、 Hard and soft connection, etc
You can install without special permission
Fast
The first synchronization rsync It copies everything , But the next time only the modified files are transferred
rsync In the process of data transmission, compression and decompression operations can be implemented , Therefore, less broadband can be used
Security
have access to scp、ssh And so on to transfer files
Or through direct socket Connect
Support anonymous transmission , In order to facilitate the site image
Four 、 To configure rsync Source
1、 The basic idea
establish rsyncd.conf The configuration file 、 Independent account file
Enable rsync Of --daemon Pattern
2、 The configuration file rsyncd.conf
Authentication configuration auth users、secrets file, If not, it will be anonymous
3、 Independent account file
user name : password
One user record per line
Independent account data , Independent of the system account
4、 Enable rsync service
adopt --daemon Provide services alone ,rsync --daemon
perform kill $(cat /var/run/rsyncd.pid) Close the service
5、 ... and 、 Synchronization mode
① Full backup
Every backup is to back up all the files or directories from the backup source to the destination .
② Differential backup
Backup data that has changed since the last full backup ( For the last full backup , The archive attribute is not clear during the backup )
③ Incremental backup
Backup data that has changed since the last backup ( Know the storage properties )
6、 ... and 、rsync command
Commands use syntax
rsync 【 Options 】 Original location Target location
Common options
| Common options | explain |
|---|---|
| -r | Recursive mode , Contains all the files in the directory and subdirectories |
| -l | For symbolic link files, still copy as symbolic link files |
| -v | Show details of the synchronization process |
| -z | Compress when transferring files |
| -a | Archiving mode , Recurse and keep object properties , Equate to -rlptgoD |
| -p | Keep the permission tag of the file |
| -t | Keep the time stamp of the file |
| -g | Keep the group tag of the file ( For super users only ) |
| -o | Keep the owner tag of the file ( For super users only ) |
| -H | Keep hard link files |
| -A | Retain ACL Attribute information |
| -D | Keep equipment files and other special files |
| –delete | Delete files that exist in the target location but not in the original location |
| –checksum | Decide whether to skip files based on the checksums of objects |
7、 ... and 、 How to configure the source
Format 1 :
# user name @ The host address : : Share module name
rsync -avz [email protected]: :wwwroot /root

#backuper It refers to which user identity I use when synchronizing
#wwwroot It's a module , The default path of synchronization and some features will be written below the module , So we just need to write modules
#/root Refers to the local node
Format two :
#rsync:/ user name @ The host address / Share module name
rsync -avz rsync: //[email protected]/wwwroot /root


URL: Specific location point , for example :http://www.baidu.com./class1/men/id01.html
URI: Identifies a collection of features or types of the same class  , for example http://www.baidu.com./class1/men
8、 ... and 、 To configure rsync Downlink synchronization
Environment configuration
| host | operating system | IP Address | Software / Installation package / Tools |
|---|---|---|---|
| Master | CentOS7 | 192.168.61.22 | rsync |
| Slave | CentOS7 | 192.168.61.33 | rsync / inotify-tools-3.14.tar.gz |
- Install package Links :inotify-tools-3.14.tar.gz
- Downlink synchronization : take master Backup server data to slave The server
1、Master(192.168.61.22)
# Basic environment configuration
systemctl stop firewalld.service
setenforce 0

# To configure rsync The source server
rpm -q rsync
yum -y install rsync

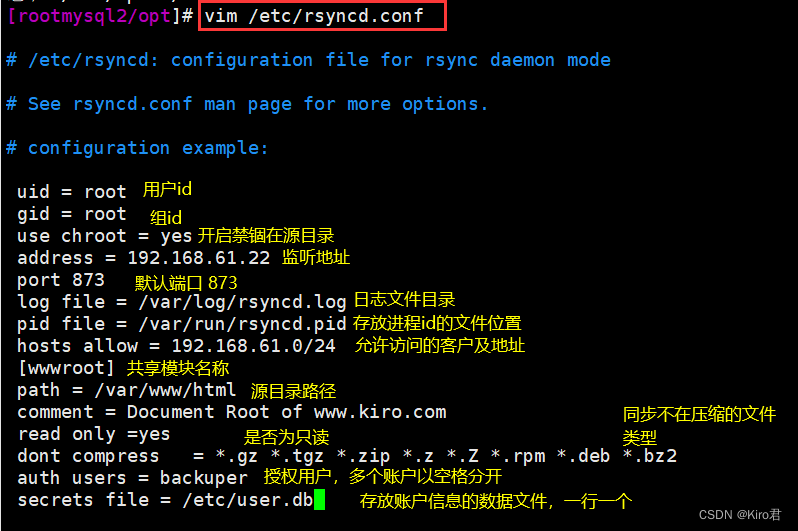
# establish /etc/rsyncd.conf The configuration file
vim /etc/rsyncd.conf      		# Add the following configuration

uid = nobody					#root
gid = nobody					#root
use chroot = yes				# Locked in the source directory
address = 192.168.184.50		# Monitor address
port 873                     	# Listening port  tcp/udp 873, It can be done by  cat /etc/services | grep rsync  see
log file = /var/log/rsyncd.log	# Log file location
pid file = /var/run/rsyncd.pid	# Store process ID File location of
hosts allow = 192.168.184.0/24	# The client address allowed to access
[wwwroot]
path = /var/www/html     		# The actual path to the source directory
comment = Document Root of www.ljm.com
read only = yes             	# Is it read-only
dont comperss = *.gz *.bz2 *.tgz *.zip *.rar *.z  	# File types that are no longer compressed during synchronization
auth users = backuper           # Authorized account , Multiple accounts are separated by spaces

## secrets file = /etc/rsyncd_users.db # Data file for storing account information

uid = nobody
gid = nobody
use chroot = yes
address = 192.168.61.22
port 873
log file = /var/log/rsyncd.log
pid file = /var/run/rsyncd.pid
hosts allow = 192.168.184.0/24
[wwwroot]
path = /var/www/html
comment = Document Root of www.wdc.com
read only = yes
dont comperss = *.gz *.bz2 *.tgz *.zip *.rar *.z
auth users = wdc
secrets file = /etc/user.db

# Such as anonymity , Just put one of them  “auth users”  and  “secrets file” The configuration item can be removed

# Create data file for backup account
vim /etc/user.db
wdc:123123		# There is no need to establish a system user with the same name

chmod 600 /etc/user.db

# Ensure that all users have access to the source directory  /var/www/html  Have read permission
mkdir -p /var/www/html
chmod +r /var/www/html/
ls -ld /var/www/html/

# start-up  rsync  Service program
rsync --daemon
netstat -natp | grep rsync

cd /var/www/html
touch aaa.html bbb.html
ls

# close  rsync  service
kill $(cat /var/run/rsyncd.pid)
rm -rf /var/run/rsyncd.pid
# Turn off the firewall and installation mechanism 
#rsync The system is generally installed by default , install httpd It's to generate /var/www/html Catalog ( It will be used later as a shared directory )
# edit rsync The configuration file
# Edit user account file , The fixed format is [ name : password ], A line of one 
# The official demand is , Better just empower 600!
# Opening service 、 Check port number , Confirm whether the service is successfully started 
# Switch to the shared directory , create a file 
2、slave(192.168.61.33)
systemctl stop firewalld
systemctl disable firewalld
setenforce 0
# Turn off the firewall and installation mechanism

yum install -y rsync
# install rsync

mkdir /abc
cd /abc/
# Create a directory /abc, Used to synchronize

rsync -avz [email protected]::wwwroot /abc
# Use rsync Synchronize the synchronization file of the backup source

ls
# Check whether the synchronization is successful


vim /etc/server.pass
20210311
# Edit the interaction free key file , The first line is password


chmod 600 /etc/server.pass
# Empower the key file 600

rsync -az --delete --password-file=/etc/server.pass [email protected]::wwwroot /abc
#rsync, Use key file /etc/server/pass Corresponding backuper user ,IP The address is 192.168.61.22 Compress the shared module file , And archive the data synchronized to the current server /abc Under the table of contents , Delete the difference content at the same time , If the original target has , Will increase , What the original target didn't have , Will delete . consistency .

ls /abc

# Check whether the downlink synchronization is successful
# Turn off the firewall and installation mechanism 
# install rsync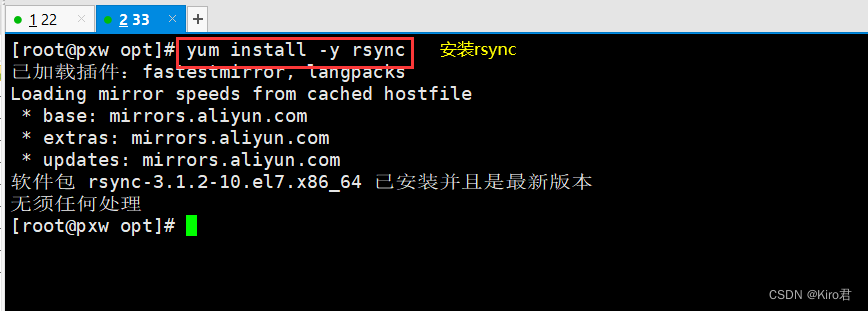
# Create a directory /abc, Used to synchronize 
# Use rsync Synchronize the synchronization file of the backup source , And see if it's done 
# Edit the interaction free key file , The first line is password 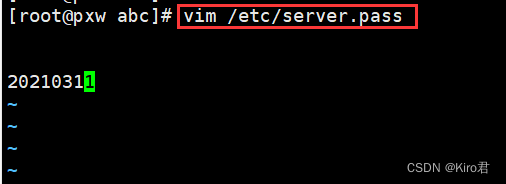
# Empower the key file 600
Nine 、 Originator ( client ) To configure rsync+inotify
- Use inotify Notification interface , It can be used to monitor various changes in the file system , Such as file access 、 Delete 、 Move 、 Modify etc. . Using this mechanism , It is very convenient to realize file change alarm 、 Incremental backup , And respond to changes in directories or files in a timely manner .
- take inotify Mechanism and rsync Combination of tools , You can achieve triggered backup ( Real time synchronization ), That is, as long as the document in the original location changes , Start the incremental backup operation immediately ; Otherwise, it will be in a state of silent waiting . such , This avoids the latency when backing up according to a fixed cycle 、 The period is too dense and so on .
- because inotify The notification mechanism consists of Linux Provided by kernel , Therefore, it is mainly used for local monitoring , It is more suitable for uplink synchronization when applied in triggered backup .
1.Master Turn off read-only mode and enable the shared directory
Master(192.168.61.22)
vim /etc/rsyncd.conf
read only = no
# Turn off read only mode , Otherwise, it will not be writable


kill `cat /var/run/rsyncd.pid`
# After modifying the configuration file, you need to restart the service , The method of directly killing the process number is adopted here

netstat -natp | grep rsync
# Check if the service has been terminated

rsync --daemon
netstat -natp | grep rsync
# Turn on the service again and check the port number to confirm
2. Optimize Slave Kernel parameters
Slave(192.168.61.33)
cat /proc/sys/fs/inotify/max_queued_events      # Monitor the event queue
cat /proc/sys/fs/inotify/max_user_instances     # The maximum number of monitoring instances
cat /proc/sys/fs/inotify/max_user_watches       # The maximum number of monitoring files per instance

vim /etc/sysctl.conf         # Increase each parameter
fs.inotify.max_queued_events = 16384
fs.inotify.max_user_instances = 1024
fs.inotify.max_user_watches = 1048576
# When you want to monitor the directory 、 When the amount of file data is large or changes frequently , It is recommended to increase the parameter value

sysctl -p
# Refresh
3. client (192.168.61.33): Compilation and installation inotify-tools
yum install -y gcc gcc-c++
# install gcc gcc-c++

cd /opt
# Switch to /opt Upload inotify-tools Installation package

tar zxf inotify-tools-3.14.tar.gz
# decompression

cd /opt/inotify-tools-3.14/
./configure
make -j 4 && make install
# Compilation and installation
4. The client starts listening
# Keep listening to /abc Of modify,create,move,delete operation
inotifywait -mrq -e modify,create,delete /abc
5、 Write a script to trigger synchronization
vim /opt/inotify.sh
#!/bin/bash
INOTIFY_CMD="inotifywait -mrq -e create,delete,move,modify,attrib /opt/abc/"
RSYNC_CMD="rsync -azH --delete --password-file=/etc/server.pass /opt/abc/ [email protected]::wwwroot"

$INOTIFY_CMD | while read DIRECTORY EVENT FILE
do
    if [ $(pgrep rsync | wc -l) -le 0 ] ; then
        $RSYNC_CMD
	fi
done
---- Detailed explanation ----
#!/bin/bash
INOTIFY_CMD="inotifywait -mrq -e create,delete,move,modify,attrib /opt/abc/"
#INOTIFY_CMD Variable : Continuous monitoring  /opt/abc Create in directory , Delete , Move , modify , The operation of changing time
RSYNC_CMD="rsync -azH --delete --password-file=/etc/server.pass /opt/abc/ [email protected]::wwwroot"
#RSYNC_CMD Variable : send  xixi  user ,/etc/server.pass  The key file , take  /opt/xcf1  Compress the files in the directory , file , Keep hard linked files synchronized to  192.168.61.22  The directory defined by the shared module  /var/www/html  Next , And delete the differences , consistency

$INOTIFY_CMD | while read DIRECTORY EVENT FILE		# Continuous monitoring ...
do
    if [ $(pgrep rsync | wc -l) -le 0 ] ; then		# If the service is not started , Then perform synchronization
        $RSYNC_CMD
	fi
done
----

cd /opt/
chmod +x inotify.sh
# Empowering scripts

chmod +x /etc/rc.d/rc.local
echo "/opt/inotify.sh" >> /etc/rc.d/rc.local
# Set power on self start

sh -x inotify.sh
# Execute the script

cd /opt/abc
touch jingjing.html
rm -rf jiang.html
# Create a new html Delete the previous file qwe
ls
# Confirm again
边栏推荐
- WARNING: Retrying (Retry(total=4, connect=None, read=None, redirect=None, status=None)) after conne
- BiSeNet的特點
- 柯基数据通过Rainbond完成云原生改造,实现离线持续交付客户
- MES系统,是企业生产的必要选择
- Openjudge noi 2.1 1752: chicken and rabbit in the same cage
- Interpreting the practical application of maker thinking and mathematics curriculum
- CDC (change data capture technology), a powerful tool for real-time database synchronization
- 一文了解如何源码编译Rainbond基础组件
- The largest 3 same digits in the string of leetcode simple question
- Blob 對象介紹
猜你喜欢
Automatic upgrading of database structure in rainbow
单元测试报告成功率低

发挥创客教育空间的广泛实用性

Open3D ISS关键点

Don't stop chasing the wind and the moon. Spring mountain is at the end of Pingwu
GFS分布式文件系统

One click installation of highly available Nacos clusters in rainbow
【无标题】

漏洞复现-easy_tornado

Leetcode medium question my schedule I
随机推荐
Complex network modeling (I)
Introduction à l'objet blob
Complete linear regression manually based on pytoch framework
DeiT学习笔记
The use of generics and vararg variable parameters in kotlin
【雅思口语】安娜口语学习记录 Part3
It's too true. There's a reason why I haven't been rich
雅思考试自己的复习进度以及方法使用【日更版】
饥荒云服管理脚本
Bayes' law
在 Rainbond 中一键安装高可用 Nacos 集群
Automatic upgrading of database structure in rainbow
Basic use of CTF web shrink template injection nmap
Pytoch (VI) -- model tuning tricks
Hisense TV starts the developer mode
ZCMU--1492: Problem D(C语言)
The reified keyword in kotlin is used for generics
Fast parsing intranet penetration escorts the document encryption industry
Blob object introduction
Rainbow combines neuvector to practice container safety management