Brief introduction
give the thumbs-up + Focus on + Collection = Learned to
This paper uses a simple demo Explain App End Half screen continuous code scanning How to implement , Include ( Bar code 、 QR codes and other codes ).
I will start from the realization idea , If you are in a hurry, you can jump directly to Do it Chapter get code .
Development and operation environment
- development tool :HBuilderX
- The front frame :uni-app I used it vue3 Pattern development
- Front end extension capability :HTML5+
- Running environment : OnePlus 8( The android mobile phone )
Demand collection
See someone on the forum want to App End Realization Continuous scanning code function .
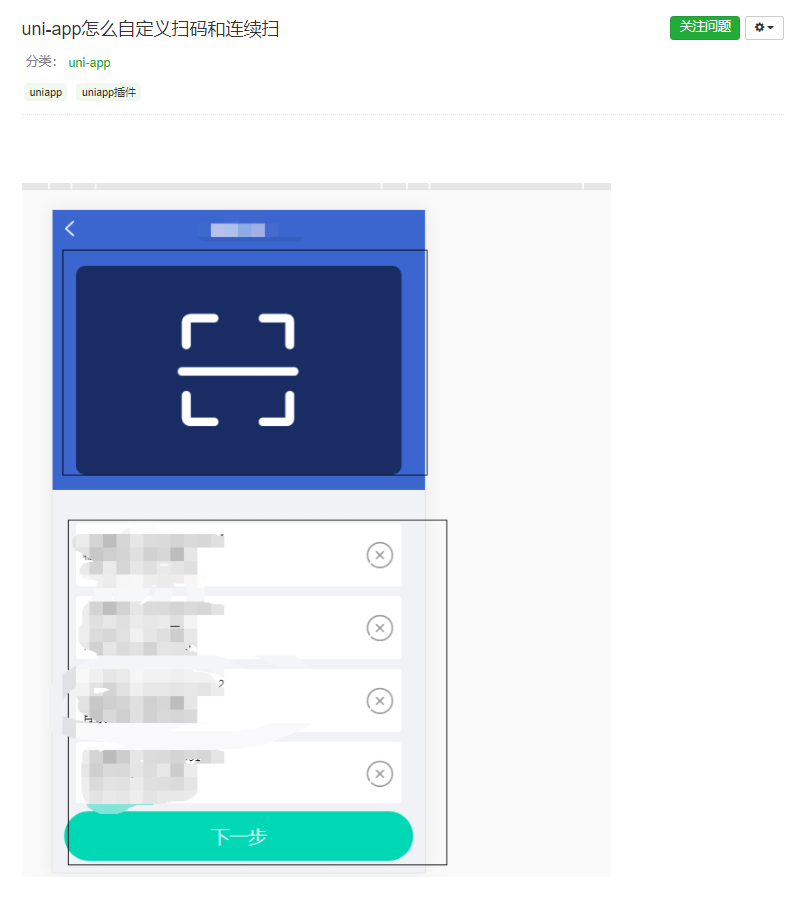
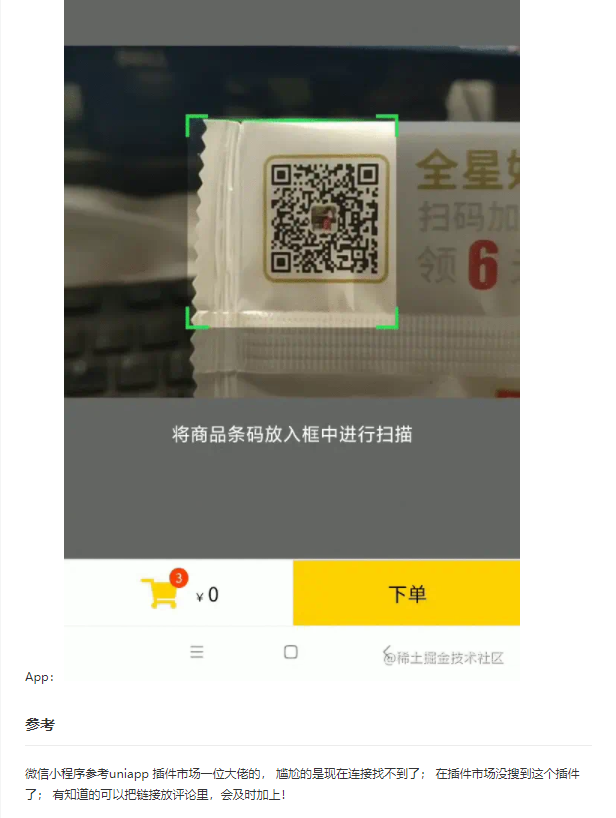
Take a closer look at the picture below , Or a half-size Code scanning box .
I just saw the demand , Didn't find many solutions .
So I went to uni-app Official website Looked at the , Find the relevant content :
but <camera> Component does not support App End use ( At least not at the time of writing );
uni.scanCode You can scan the code , But it will jump to another interface , And scan the code in full screen mode , Continuous code scanning is not supported .
Of course , use uni.scanCode You can execute it again after scanning the code successfully , In this way, the function of continuous code scanning can be realized , But the interface will jump around ( Skip to the code scanning interface , After success, you jump back to app The interface of , Then execute and jump to the code scanning interface ......).
Refining demand
According to the above information , Extract out 3 Key words :
- App End
- half-size
- Continuous scanning code
I used the DCLOUD Community 《uni-app How to customize code scanning and continuous scanning 》 Demand in . Roughly write down the layout ( I don't have a fine writing style )
The final effect is shown in the figure below
I used online tools to generate 2 QR codes , The contents are “ Thunder monkey ” and “ Shark chilli ”.
By scanning the QR code , Add content to the page .
Realize the idea
Look up the documents
since uni-app The components and API Did not provide help in this regard , I'll go. Plug in market Looked at the , Or only support applet , Or for a fee .
Rechargeable ? Forget it , We are all workers .
Now? uni-app Official documents and Plug in market Both roads are impassable ( Mainly because I'm poor ), There's another way :html5+
node.js It can be understood as the extension from the front end to the service end , html5+ It can be understood as front-end to App The extension of .
In order not to waste your time , I'll sort out what I'm going to use in this article API and modular .
open html5+ Can find barcode Code scanning module , The module has create Method Used to create code scanning identification control .
but plus.barcode.create() The method needs to use plus.webview , That is, it will involve webview modular .
webview modular It is used to manage the application window interface , You can also get a half screen window out .
Arrangement
Relevant methods have been found , Just sort out the logic and you can code .
- 【 step 1】 Get a window out ( half-size , Or you can set your own size and positioning )
- 【 step 2】 Get a code scanning control object out
- 【 step 3】 Add a code scanning control to the window
- 【 step 4】 After scanning the code successfully, add the result to the page
- 【 step 5】 Call the code scanning method again
Do it
I'll put it up 5 Each step is marked in the code comments .
<template>
  <view class="page">
    <view class="title"> Scan results </view>
	<view class="result_list">
	  <view v-for="item in list" :key="item" class="result_li">
		{{ item }}
	  </view>
	</view>
  </view>
</template>

<script setup>
import { onReady } from '@dcloudio/uni-app'
import { ref } from 'vue'

let webView = null // webview Containers
let barcode = null //  Scan code box

const list = ref([]) //  Scan results  -  list

//  Scan code successfully callback
function onmarked(type, result) {
  // 【 step 4】 Add scan results to  list  in
  list.value.push(result)

  // 【 step 5】1 Turn on code scanning again in seconds
  setTimeout(() => {
	barcode.start()
  }, 1000)
}

//  Create window and code scanning control
function createBarcode() {
  // 【 step 1】 Judge whether you have created  webview  Containers , If not, perform the create operation
  if (!webView) {
    webView = plus.webview.open(
	  '',
	  'barCodeBox',
	  {
		top: '60px',
		width: '100%',
		height: '200px'
	  }
	)
  }

  // 【 step 2】 Judge whether you have created   Scan code box , If not, perform the create operation
  if(!barcode){
	barcode = plus.barcode.create(
	  'barcode',
	  [plus.barcode.QR], //  Just scan QR code
	  {
		top:'0px',
		left:'0px',
		width: '100%',
		height: '200px',
		position: 'static',
		scanbarColor: '#f1c01f',
		frameColor: '#c0ff01'
	  }
	)

	barcode.onmarked = onmarked //  Code scanning result callback function

    // 【 step 3】 Add code scanning box to  webview  in
	plus.webview.getWebviewById('barCodeBox').append(barcode)
  }

  barcode.start() //  Start scanning
}

//  When the page loads , Delay 300 Execute the function of creating code scanning box in milliseconds
onReady(() => {
  setTimeout(() => {
	createBarcode()
  }, 300)
})
</script>

<style>
.page {
  height: 100vh;
  display: flex;
  flex-direction: column;
  box-sizing: border-box;
  padding: 200px 20rpx 0;
}

.title {
  font-size: 50rpx;
  color: #333;
}

.result_list {
  flex: 1;
  overflow-y: auto;
  box-sizing: border-box;
  padding-top: 20rpx;
}

.result_li {
  box-sizing: border-box;
  margin-bottom: 20rpx;
  padding: 10rpx 20rpx;
  border: 1px solid #7298c8;
  border-radius: 10rpx;
  font-size: 40rpx;
}
</style>
I didn't write the style very carefully , Just made a rough layout .
The related documents
The front-end guy uses uni-app Development App End , I suggest going through it roughly HTML5+ file , Then draw a few functions you are interested in to make a demo come out ( It saves money , Things in the plug-in market are not cheap ).
Code scanning correlation
plus.barcode.create The second argument to is an array , The barcode type to be identified can be set inside , It can support multiple barcodes at the same time .
barcode Support multiple bar codes :
- QR: QR QR code , Values for 0
- EAN13: EAN Bar code standard edition , Values for 1
- EAN8: ENA Bar code brief , Values for 2
- AZTEC: Aztec QR code , Values for 3
- DATAMATRIX: Data Matrix QR code , Values for 4
- UPCA: UPC Bar code standard edition , Values for 5
- UPCE: UPC Bar code shortened version , Values for 6
- CODABAR: Codabar Bar code , Values for 7
- CODE39: Code39 Bar code , Values for 8
- CODE93: Code93 Bar code , Values for 9
- CODE128: Code128 Bar code , Values for 10
- ITF: ITF Bar code , Values for 11
- PDF417: PDF 417 Two dimensional bar code , Values for 13
In this case, we mainly use barcode.create Method to create a code scanning control .
This article only uses Callback for successful code scanning , You may also need to use... In your business Callback for code scanning failure .
More configuration and style settings , It is recommended to consult the official documents by yourself . In this case, the color of the code scanning box is also adjusted ( Choose a random color ).
create a window
Recommended reading
《 perform vue create What did you do 》
《Vue3 too 10 Two component communication modes 》
《Vite build Vue2 project (Vue2 + vue-router + vuex)》
《 The front-end needs free online api Interface 》
If this article helps you , I also hope you can give the thumbs-up Focus on Collection ~ It's very useful to me ~
give the thumbs-up + Focus on + Collection = Learned to
![[interpretation of the paper] machine learning technology for Cataract Classification / classification](/img/0c/b76e59f092c1b534736132faa76de5.png)

![Happy sound 2[sing.2]](/img/ca/1581e561c427cb5b9bd5ae2604b993.jpg)