当前位置:网站首页>[stm32+esp8266 connect Tencent cloud IOT development platform 2] stm32+esp8266-01s connect Tencent cloud
[stm32+esp8266 connect Tencent cloud IOT development platform 2] stm32+esp8266-01s connect Tencent cloud
2022-07-07 23:32:00 【Little river god is tangled】
List of articles
- Preface
- One 、 Hardware preparation
- Two 、 Software preparation
- 3、 ... and 、STM32CubeMX Configuration Engineering
- Four 、 Serial port interrupt driver writing
- 5、 ... and 、ESP8266 Data show that
- 6、 ... and 、AT Instruction configuration ESP8266 Connect WiFi And Tencent cloud
- 7、 ... and 、 Handle JSON Data and control LED
- 8、 ... and 、 Tencent goes on and on App control LED Lamp demonstration
Preface
It was used yesterday ESP-12S Successfully connected to Tencent cloud IOT development platform , And it can be controlled by mobile phone , But after all, the connection is made on the upper computer , Not yet STM32 Connect . Bloggers have worked hard for a day . Success to STM32 Connected to Tencent cloud IOT development platform , Let me make a few points first :
1. Bloggers use RTOS Real-time operating system , In order to read cloud data more quickly ;
2. Bloggers also use it for the first time RTOS Real-time operating system , Yes, some API Not very familiar with ;
3. Although most of this article introduces how to realize the function , A small number of students need to have some hands-on ability , For example, change SOP Chips .
4. If you haven't seen Chapter one Classmate , Please move 【STM32+ESP-12S Connect Tencent cloud Internet of things development platform 1】 Creation and implementation of cloud platform AT Firmware burning , If you can successfully connect to Tencent cloud Internet of things platform, see this article , Otherwise, this blog post will be beneficial to everyone Connect to cloud platform It won't help much .
Make a statement : Bloggers are using it for the first time HAL Library to STAM32 Programming , So please forgive me for my shortcomings !!
One 、 Hardware preparation
1.ESP8266-01S
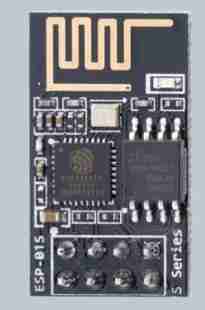
If you've seen STM32+ESP-12S Connect Tencent cloud Internet of things development platform 1 Should still remember :ESP8266-01S because Flash Too small a reason , Cannot burn at least 2M Flash(ESP8266-01S Usually only 1MFlash) Of AT The firmware , At this time, we need your hands-on ability .
No, it is. Flash Too small ? Just change to a big one , So you can put that 8 The chip of the foot was removed , Switch to 2M The above Flash chip . Then burn :QCloud_IoT_AT_ESP8266_v2.0.0_20200617_UART_1_3.bin This version of firmware , Remember not to burn mistakes , How to burn, please move : STM32+ESP-12S Connect Tencent cloud Internet of things development platform 1.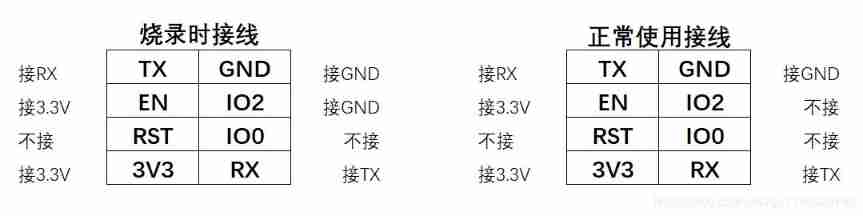
2. STM32F103C8T6 Core board or small development board and its program downloader
stay STM32 The era of soaring chip prices , use STM32 It's really embarrassing for everyone , however STM32F103C8T6 The price of the smallest development board is still acceptable , Bloggers recommend direct insertion ESP8266-01S Of , It saves everyone the trouble of wiring .
Program downloader you can choose according to the burning method :
1. Serial burning can be used USB turn TTL Module is OK ;
2 Simulation debugging mode download , You can use STLink, perhaps Jlink Will do .
Two 、 Software preparation
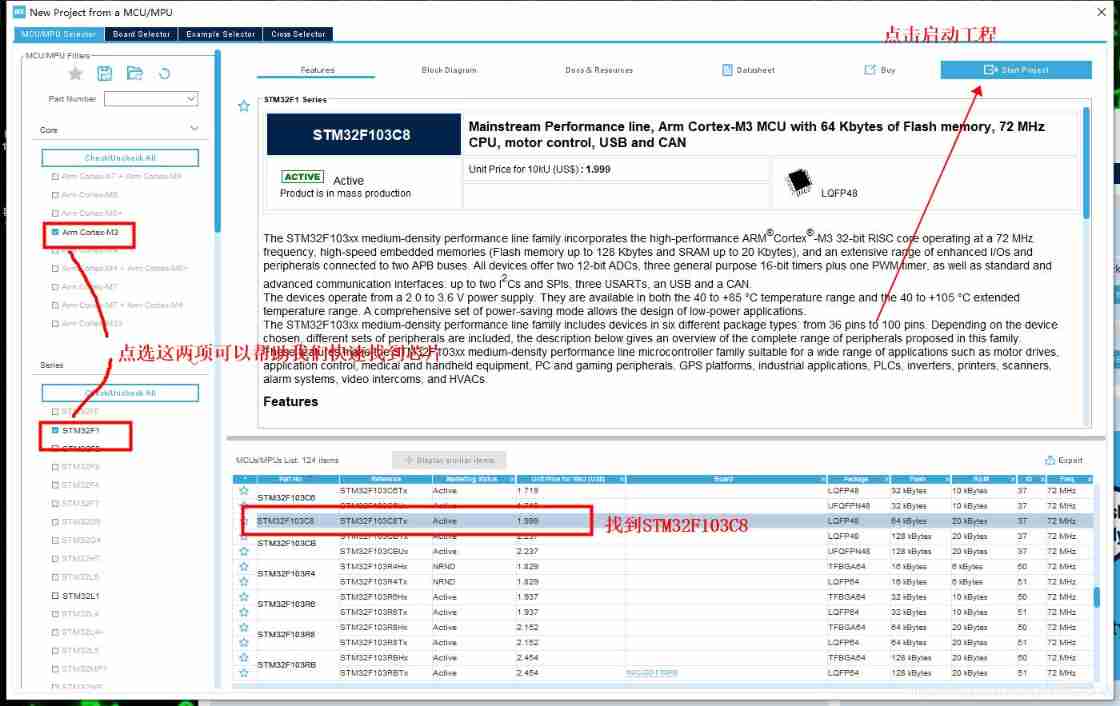
1.STM32CubeMX
` Bloggers have been playing for so many years STM32, It is also the first time to use this software , Have to say , Compared with setting up your own development environment , This really saves time .
2. MDK (Keil v5)
This software , Bloggers only use it to learn , Not for any commercial purpose . It is recommended to use the genuine version MDK.
3. Program implementation process
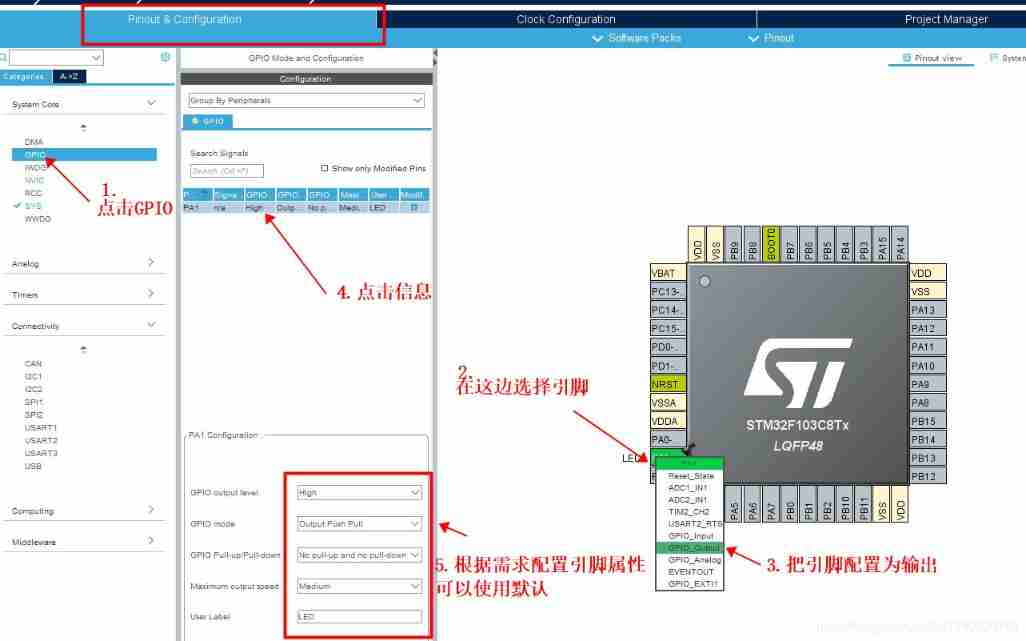
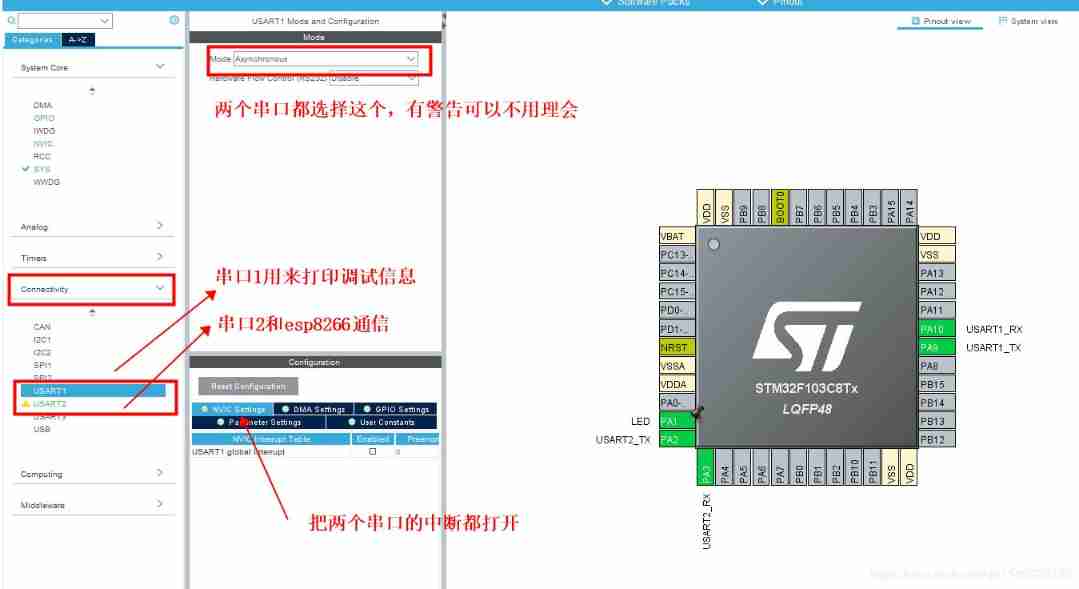
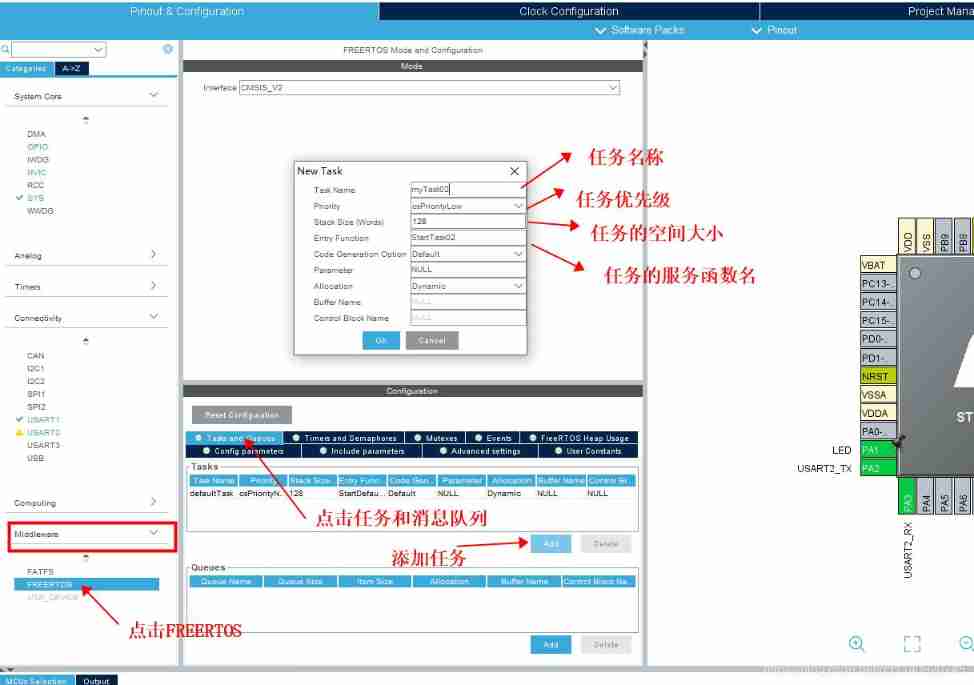
3、 ... and 、STM32CubeMX Configuration Engineering
Bloggers are also the first time to use this software to configure projects , If there are any deficiencies, you are welcome to correct ,
1. Create projects based on chip signals

Here you need to start configuring the function pins .
2. To configure LED Drive pin
3. Configure serial driver
4.FreeRTOS To configure
5.FreeRTOS The timer configuration of
FreeRTOS Is to use timers to manage the parallel relationship of tasks , So change the timer :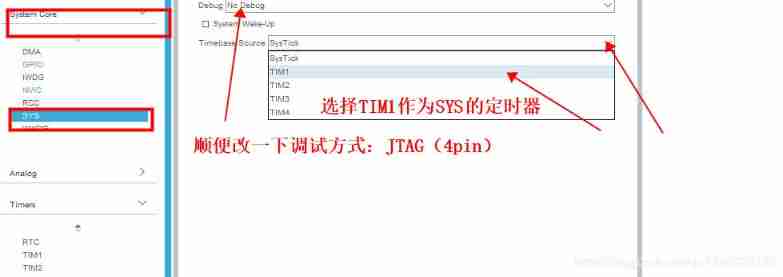
6. Engineering configuration
After configuring the pins , Also configure the project output :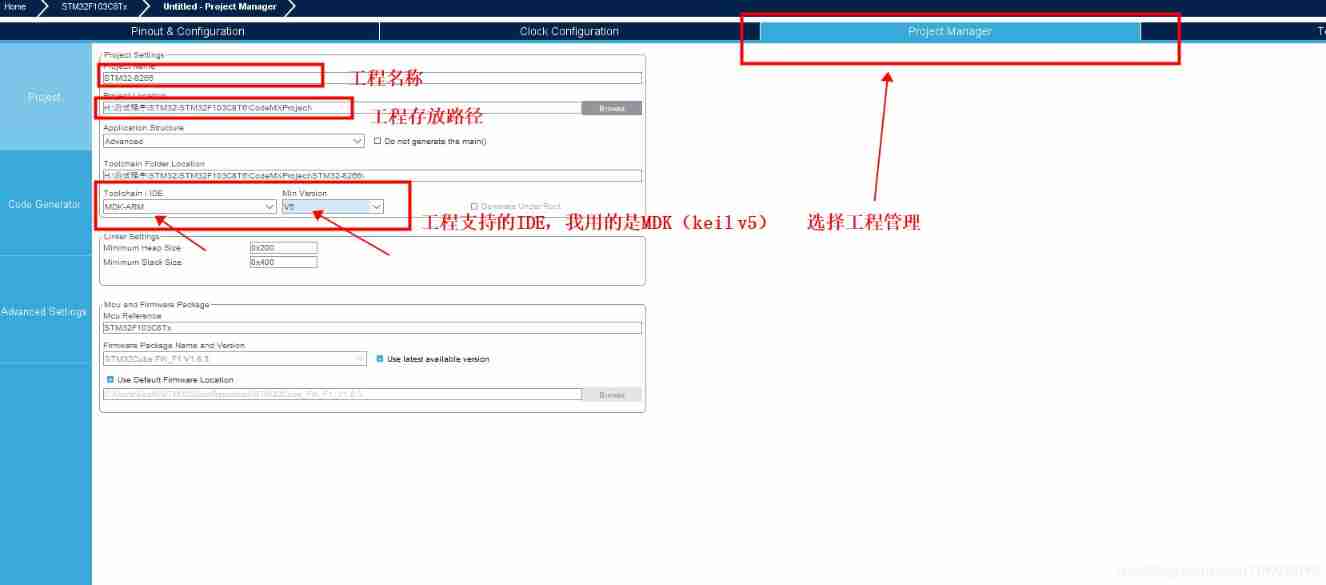
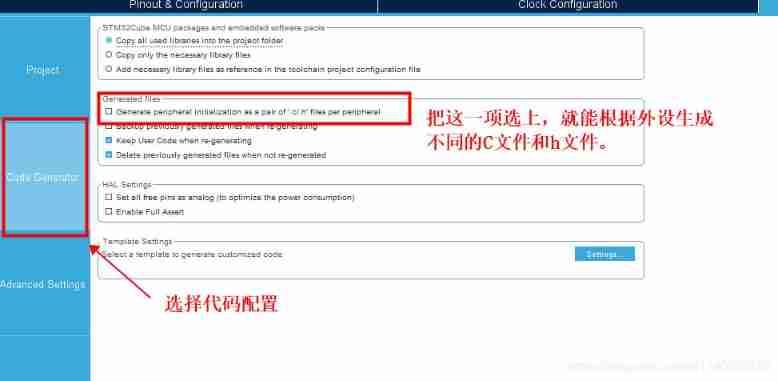
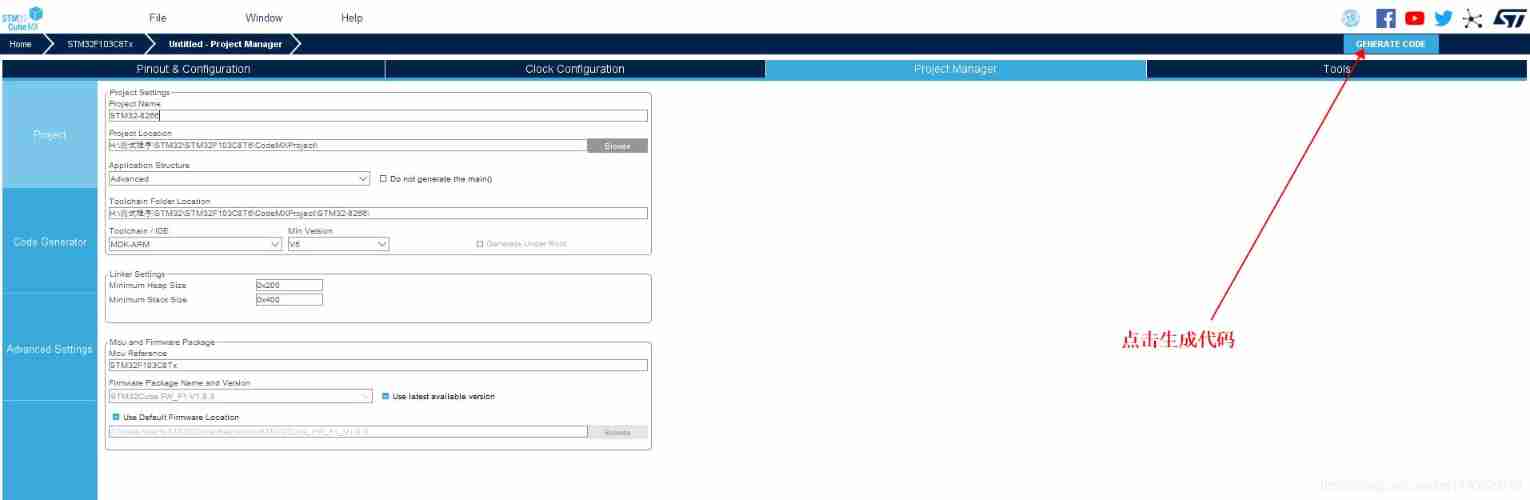
such , Our project is configured , Now you can write the function code .
Four 、 Serial port interrupt driver writing
STM32CubeMx The generated code uses HAL Library written , And the serial port interrupt has been changed , Now it's not that you can directly process data in the serial port interrupt function . at present , There is only one function in the serial port interrupt function :
void USART1_IRQHandler(void)
{

  /* USER CODE BEGIN USART1_IRQn 0 */

  /* USER CODE END USART1_IRQn 0 */
  HAL_UART_IRQHandler(&huart1);
  /* USER CODE BEGIN USART1_IRQn 1 */

  /* USER CODE END USART1_IRQn 1 */
}
This HAL_UART_IRQHandler(&huart1) The function just judges the interrupt type , There is no relevant code for processing data in it . Interested students can go to the function to have a look .
Since this function does not do data processing , There must be a function specially responsible for receiving serial port data :
Serial port interrupt receiving function :HAL_UART_Receive_IT(UART_HandleTypeDef *huart, uint8_t *pData, uint16_t Size);
The function of this function : This function is to put husart Received by serial port Size Bytes of data volume are stored in pData in , And turn off the interrupt .
That is to say , After we accept the data , To re-use this function to turn on interrupts . In addition, another function closely related to this function is also introduced :
Serial receive callback function :void HAL_UART_RxCpltCallback(UART_HandleTypeDef *huart);
This function will not be generated automatically by default , We need to write .
The functionality : When HAL_UART_Receive_IT After function ends , Will come into this function , Users can process data in this function .
For your convenience , Post my own function to all students HAL_UART_RxCpltCallback
 if(huart->Instance==USART2)
  {

   UART2_DATA.UART_Data[UART2_DATA.UART_Cnt] = *UART2_DATA.UART_DataBuf;
   UART2_DATA.UART_Cnt++;

    if(*UART2_DATA.UART_DataBuf==0X0A)
    {

      UART2_DATA.UART_Flag = 1;
    }
  }
  HAL_UART_Receive_IT(huart,(uint8_t *)UART2_DATA.UART_DataBuf,sizeof(UART2_DATA.UART_DataBuf));
Related macro structures :
typedef struct usart
{

    unsigned char UART_Data[512];
    unsigned char UART_Flag;
    unsigned int UART_Cnt;
    unsigned char UART_DataBuf[1];
}USART_DataBuf;
I store the received data in the structure for consent processing , And this structure is global , Easy to use .
5、 ... and 、ESP8266 Data show that
This function can take ESP8266 The received data passes through USART1 Print out , It is convenient for us to check, debug and understand AT Progress of instructions . I put this function in a separate thread , In this way, it can be read and displayed constantly .
ESP8266DATATypedef esp8266data;
// Get serial port data
uint8_t *Esp8266GetData(void)
{

  if (UART2_DATA.UART_Flag == 1)
  {

    strcpy((char *)esp8266data.data, (const char *)UART2_DATA.UART_Data);
    esp8266data.data_size = UART2_DATA.UART_Cnt;

    printf("%s", UART2_DATA.UART_Data);

    for (; UART2_DATA.UART_Cnt > 0; UART2_DATA.UART_Cnt--)
      UART2_DATA.UART_Data[UART2_DATA.UART_Cnt] = 0;

    esp8266data.flag += 1;
    if(esp8266data.flag>16) esp8266data.flag=16;
    UART2_DATA.UART_Flag = 0;
    return esp8266data.data;
  }
  return esp8266data.data;
}
void StartTask02(void *argument)
{

  /* USER CODE BEGIN StartTask02 */
  /* Infinite loop */
  uint8_t *sub_buf;
  HAL_UART_RxCpltCallback(&huart2);
  for (;;)
  {

    sub_buf = Esp8266GetData();
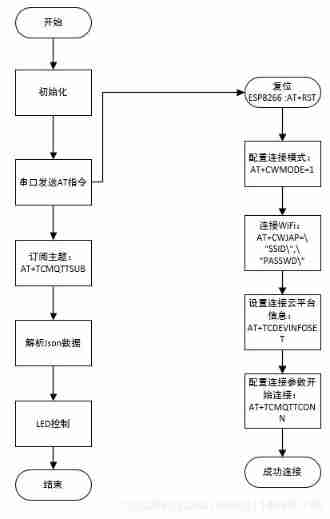
6、 ... and 、AT Instruction configuration ESP8266 Connect WiFi And Tencent cloud
With serial port interrupt and before AT Command flow , You can connect to Tencent cloud :
1. Connect WiFi
// Connect WiFi
void Esp8266LinkAp(uint8_t *ssid, uint8_t *passwd)
{

  uint8_t *linkap;

  linkap = (uint8_t *)malloc(128);
  HAL_UART_Transmit(&huart2, " \r\n", 3, 1000);
  do
  {

    switch (esp8266data.flag)
    {

    case 0: // Reset ESP8266
      HAL_UART_Transmit(&huart2, "AT+RST\r\n", strlen("AT+RST\r\n"), 5000);
      osDelay(2000);
      break;
    case 2: // Set connection mode
    case 3:
      HAL_UART_Transmit(&huart2, "AT+CWMODE=1\r\n", strlen("AT+CWMODE=1\r\n"), 5000);
      osDelay(1000);
      break;
    // Start connecting WiFi
    case 4:
    case 5:
      sprintf((char *)linkap, "AT+CWJAP=\"%s\",\"%s\"\r\n", ssid, passwd);
      HAL_UART_Transmit(&huart2, (uint8_t *)linkap, strlen((const char *)linkap), 5000);
      osDelay(5000);
      break;

    default:
      break;
    }
  } while (esp8266data.flag < 7);

  free(linkap);
}
2. Connect to Tencent cloud and subscribe to topics
void Esp8266LinkloTExplorer(void)
{

  uint8_t *device_massage;

  device_massage = (uint8_t *)malloc(128);
  do
  {

    switch (esp8266data.flag)
    {

      // case 7: // Set connection information
    case 7:
    case 8:
      sprintf((char *)device_massage, "AT+TCDEVINFOSET=1,\"%s\",\"%s\",\"%s\"\r\n", PRODUCT_ID, DEVUICE_NAME, DEVICE_SECRET);
      HAL_UART_Transmit(&huart2, device_massage, strlen((const char *)device_massage), 5000);
      osDelay(1000);
      break;
    case 9:
    case 10:
      HAL_UART_Transmit(&huart2, "AT+TCMQTTDISCONN\r\n", strlen("AT+TCMQTTDISCONN\r\n"), 5000); // First disconnect the existing link
      osDelay(500);
      break;
    case 11:
      HAL_UART_Transmit(&huart2, "AT+TCMQTTCONN=1,5000,240,0,1\r\n", strlen("AT+TCMQTTCONN=1,5000,240,0,1\r\n"), 5000);
      osDelay(500);
      break;
    case 12: // Check whether it is connected
      HAL_UART_Transmit(&huart2, "AT+TCMQTTSTATE?\r\n", strlen("AT+TCMQTTSTATE?\r\n"), 5000);
      osDelay(100);
      break;
    case 13: // Subscribe to topics
      sprintf((char *)device_massage, "AT+TCMQTTSUB=\"$thing/down/property/%s/%s\",0\r\n", PRODUCT_ID, DEVUICE_NAME);
      HAL_UART_Transmit(&huart2, device_massage, strlen((const char *)device_massage), 5000);
      osDelay(500);
      break;
    default:
      esp8266data.flag = 16;
      break;
    }
  } while (esp8266data.flag < 15);

  free(device_massage);
}
7、 ... and 、 Handle JSON Data and control LED
The data sent by the blogger's Tencent cloud is ESP8266 The print in is like this :
+TCMQTTRCVPUB:"$thing/down/property/C9N29PAEXK/LED",105,
"{"method":"control","clientToken":"clientToken-d4c2c848-b930-44e7-bc4f-55c0226b0907","params":{"led1":1}}"
1. Split out Topic and JSON data
According to the printed information, we can see , As long as you use string operation, you can easily split Topic and JSON:
void loTMessageHandler(void)
{

    char *pub_buf;
    unsigned int i = 0;

    if (TCMQTTRCVPUB != 0)
    {

        // Separate out Topic
        pub_buf = strstr((const char *)TCMQTTRCVPUB, "$thing/down/property");
        if (pub_buf != NULL)
        {

            while (*pub_buf != '\"')
            {

                Sub_Topic[i] = *pub_buf++;
                i++;
            }
            i = 0;
#if LOT_Debug
            printf("Topic=%s\r\n", Sub_Topic);
#endif
        }
        // Separate the data
        pub_buf = strstr((const char *)TCMQTTRCVPUB, "{\"method\":\"control\"");
        if (pub_buf != NULL)
        {

            while (*pub_buf != '\n')
            {

                Sub_Data[i] = *pub_buf++;
                i++;
            }
            // Remove the double quotation marks at the end
            Sub_Data[i - 2] = '\0';
#if LOT_Debug
            printf("Data=%s\r\n", Sub_Data);
#endif

            i = 0;
        }
    }
2.JSON Data processing
Handle JSON data , You can download it cJSON The library of , Just two documents ,cJSON.c and cJSON.h:cJson Download from the official website ; Add these two files to your project , Just quote the header file , Here is my code :
oid cJsonMessageHandler(uint8_t *cJsonDATA)
{

    if (cJsonDATA != NULL)
    {

        cJSON *_JsonRoot = cJSON_Parse((const char *)cJsonDATA);
        if (_JsonRoot == NULL)
            goto __cJSON_Delete;

        cJSON *cJSON_params = cJSON_GetObjectItem(_JsonRoot, "params");
        if (cJSON_params == NULL)
            goto __cJSON_Delete;

        cJSON *cJSON_led1 = cJSON_GetObjectItem(cJSON_params, "led1");
#if LOT_Debug
        printf("led1=%d\r\n", cJSON_led1->valueint);

#endif
        if (cJSON_led1->valueint == 1)
            HAL_GPIO_WritePin(LED_GPIO_Port, LED_Pin, GPIO_PIN_RESET);// Light up
        else
            HAL_GPIO_WritePin(LED_GPIO_Port, LED_Pin, GPIO_PIN_SET);// Turn off the lights
    __cJSON_Delete:
        cJSON_Delete(_JsonRoot);
        memset(Sub_Data, 0, sizeof(Sub_Data));
    }
}
8、 ... and 、 Tencent goes on and on App control LED Lamp demonstration

Please go to jump :
边栏推荐
- The 19th Zhejiang Provincial Collegiate Programming Contest VP记录+补题
- 建筑建材行业SRM供应商云协同管理平台解决方案,实现业务应用可扩展可配置
- Installing spss25
- [microservices SCG] gateway integration Sentinel
- Map operation execution process
- As a new force, chenglian premium products was initially injected, and the shares of relevant listed companies rose 150% in response
- USB (XVIII) 2022-04-17
- 包装行业智能供应链S2B2B商城解决方案:开辟电商消费新生态
- Illegal behavior analysis 1
- Matlab SEIR infectious disease model prediction
猜你喜欢
In the field of software engineering, we have been doing scientific research for ten years!

Add data analysis tools in Excel
The efficient s2b2c e-commerce system helps electronic material enterprises improve their adaptability in this way

SRM supplier cloud collaborative management platform solution for building materials industry to realize business application scalability and configuration
UE4_ Ue5 panoramic camera
0-1背包问题
在软件工程领域,搞科研的这十年!
js 获取对象的key和value
S2b2b mall solution of intelligent supply chain in packaging industry: opening up a new ecosystem of e-commerce consumption
KeePass realizes automatic input of web pages
随机推荐
Fibonacci number of dynamic programming
How to login and enable synchronization function in Google browser
2021icpc Shanghai h.life is a game Kruskal reconstruction tree
Puce à tension stabilisée LDO - schéma de bloc interne et paramètres de sélection du modèle
13、 System optimization
Ros2 topic (03): the difference between ros1 and ros2 [02]
LeeCode -- 6. Zigzag transformation
HDU 4747 Mex「建议收藏」
In the field of software engineering, we have been doing scientific research for ten years!
PHP uses Alibaba cloud storage
Technology at home and abroad people "see" the future of audio and video technology
Oracle-数据库的备份与恢复
Home appliance industry channel business collaboration system solution: help home appliance enterprises quickly realize the Internet of channels
Digital procurement management system for fresh food industry: help fresh food enterprises solve procurement problems and implement online procurement throughout the process
SAP 内存参数调优过程
Dynamic agent explanation (July 16, 2020)
B / Qurt Utilisateur Guide (36)
B_QuRT_User_Guide(38)
Adrnoid Development Series (XXV): create various types of dialog boxes using alertdialog
S2b2b mall solution of intelligent supply chain in packaging industry: opening up a new ecosystem of e-commerce consumption