当前位置:网站首页>shardingsphere分库分表示例(逻辑表,真实表,绑定表,广播表,单表)
shardingsphere分库分表示例(逻辑表,真实表,绑定表,广播表,单表)
2022-07-07 08:44:00 【铛铛响】
前言
1、使用版本 5.0.0
2、使用模式 - 内存模式
一、表名称说明
1、这个官方文档中也说明了,官方说明-表-中文
1.1、逻辑表
1、相同结构的水平拆分数据库(表)的逻辑名称,是 SQL 中表的逻辑标识。 例:订单数据根据主键尾数拆分为 10 张表,分别是 t_order_0 到 t_order_9,他们的逻辑表名为 t_order
2、后面在案例中会举例说明
1.2、真实表
1、在水平拆分的数据库中真实存在的物理表。 即上个示例中的 t_order_0 到 t_order_9
2、后面在案例中会举例说明
1.3、绑定表
1、指分片规则一致的主表和子表。 例如:t_order 表和 t_order_item 表,均按照 order_id 分片,则此两张表互为绑定表关系。 绑定表之间的多表关联查询不会出现笛卡尔积关联,关联查询效率将大大提升。 举例说明,如果 SQL 为
注意上面标黄的地方,是均,意思就是后面
t_order和t_order_item表的分片规则要一模一样,根据同一个字段分片。
SELECT
	i.*
FROM
	t_order o
	JOIN t_order_item i ON o.order_id = i.order_id
WHERE
	o.order_id IN ( 10, 11 );
2、在不配置绑定表关系时,假设分片键 order_id 将数值 10 路由至第 0 片,将数值 11 路由至第 1 片,那么路由后的 SQL 应该为 4 条,它们呈现为笛卡尔积:
SELECT i.* FROM t_order_0 o JOIN t_order_item_0 i ON o.order_id=i.order_id WHERE o.order_id in (10, 11);

SELECT i.* FROM t_order_0 o JOIN t_order_item_1 i ON o.order_id=i.order_id WHERE o.order_id in (10, 11);

SELECT i.* FROM t_order_1 o JOIN t_order_item_0 i ON o.order_id=i.order_id WHERE o.order_id in (10, 11);

SELECT i.* FROM t_order_1 o JOIN t_order_item_1 i ON o.order_id=i.order_id WHERE o.order_id in (10, 11);
3、在配置绑定表关系后,路由的 SQL 应该为 2 条:
SELECT i.* FROM t_order_0 o JOIN t_order_item_0 i ON o.order_id=i.order_id WHERE o.order_id in (10, 11);

SELECT i.* FROM t_order_1 o JOIN t_order_item_1 i ON o.order_id=i.order_id WHERE o.order_id in (10, 11);
4、其中 t_order 在 FROM 的最左侧,ShardingSphere 将会以它作为整个绑定表的主表。 所有路由计算将会只使用主表的策略,那么 t_order_item 表的分片计算将会使用 t_order 的条件。 因此,绑定表间的分区键需要完全相同
1.4、广播表
1、指所有的分片数据源中都存在的表,表结构及其数据在每个数据库中均完全一致。 适用于数据量不大且需要与海量数据的表进行关联查询的场景,例如:字典表。
2、后面在案例中会举例说明
1.5、单表
1、指所有的分片数据源中仅唯一存在的表。 适用于数据量不大且无需分片的表。
2、在shardingSphere5.0.0版本开始,单表不需要配置,其内部会路由到单表的数据源中。
3、后面在案例中会举例说明
二、基础项目架构
1、使用springBoot和mybatisPlus搭建一个基础的项目如下
<?xml version="1.0" encoding="UTF-8"?>
<project xmlns="http://maven.apache.org/POM/4.0.0" xmlns:xsi="http://www.w3.org/2001/XMLSchema-instance" xsi:schemaLocation="http://maven.apache.org/POM/4.0.0 https://maven.apache.org/xsd/maven-4.0.0.xsd">
    <modelVersion>4.0.0</modelVersion>
    <parent>
        <groupId>org.springframework.boot</groupId>
        <artifactId>spring-boot-starter-parent</artifactId>
        <version>2.3.1.RELEASE</version>
        <relativePath/> <!-- lookup parent from repository -->
    </parent>
    <groupId>cn.gxm</groupId>
    <artifactId>shardingSphere-test</artifactId>
    <version>0.0.1-SNAPSHOT</version>
    <name>shardingSphere-test</name>
    <description>shardingSphere-test</description>
    <properties>
        <java.version>1.8</java.version>
        <mybatis-plus.version>3.4.1</mybatis-plus.version>
        <shardingsphere.version>5.0.0</shardingsphere.version>
    </properties>


    <dependencies>
        <dependency>
            <groupId>org.springframework.boot</groupId>
            <artifactId>spring-boot-starter-web</artifactId>
        </dependency>

        <dependency>
            <groupId>com.baomidou</groupId>
            <artifactId>mybatis-plus-boot-starter</artifactId>
            <version>${mybatis-plus.version}</version>
        </dependency>
        <dependency>
            <groupId>org.apache.shardingsphere</groupId>
            <artifactId>shardingsphere-jdbc-core-spring-boot-starter</artifactId>
            <version>${shardingsphere.version}</version>
        </dependency>

        <!-- hutool工具 -->
        <dependency>
            <groupId>cn.hutool</groupId>
            <artifactId>hutool-all</artifactId>
            <version>5.3.5</version>
        </dependency>

        <dependency>
            <groupId>mysql</groupId>
            <artifactId>mysql-connector-java</artifactId>
            <version>8.0.20</version>
            <scope>runtime</scope>
        </dependency>

        <dependency>
            <groupId>org.springframework.boot</groupId>
            <artifactId>spring-boot-devtools</artifactId>
            <scope>runtime</scope>
            <optional>true</optional>
        </dependency>
        <dependency>
            <groupId>org.projectlombok</groupId>
            <artifactId>lombok</artifactId>
            <optional>true</optional>
        </dependency>
        <dependency>
            <groupId>org.springframework.boot</groupId>
            <artifactId>spring-boot-starter-test</artifactId>
            <scope>test</scope>
        </dependency>
    </dependencies>

    <build>
        <plugins>
            <plugin>
                <groupId>org.springframework.boot</groupId>
                <artifactId>spring-boot-maven-plugin</artifactId>
                <configuration>
                    <excludes>
                        <exclude>
                            <groupId>org.projectlombok</groupId>
                            <artifactId>lombok</artifactId>
                        </exclude>
                    </excludes>
                </configuration>
            </plugin>
        </plugins>
    </build>

</project>
三、使用案例–简单的分库分表
3.1、数据库格式
1、创建两个数据库,每个数据库中存有 t_problem 表,数据格式都是一样的。
注意主键是 bigint,并且不是自增的偶
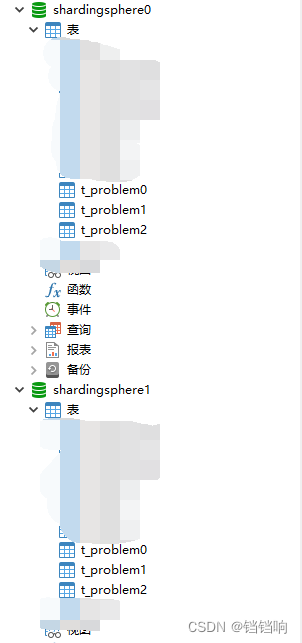
2、数据库脚本如下,然后在两个数据库都执行一遍
-- ----------------------------
-- Table structure for t_problem0
-- ----------------------------
DROP TABLE IF EXISTS `t_problem0`;
CREATE TABLE `t_problem0`  (
  `id` bigint(0) NOT NULL,
  `content` varchar(255) CHARACTER SET utf8mb4 COLLATE utf8mb4_general_ci NULL DEFAULT NULL,
  PRIMARY KEY (`id`) USING BTREE
) ENGINE = InnoDB CHARACTER SET = utf8mb4 COLLATE = utf8mb4_general_ci ROW_FORMAT = Dynamic;

-- ----------------------------
-- Table structure for t_problem1
-- ----------------------------
DROP TABLE IF EXISTS `t_problem1`;
CREATE TABLE `t_problem1`  (
  `id` bigint(0) NOT NULL,
  `content` varchar(255) CHARACTER SET utf8mb4 COLLATE utf8mb4_general_ci NULL DEFAULT NULL,
  PRIMARY KEY (`id`) USING BTREE
) ENGINE = InnoDB CHARACTER SET = utf8mb4 COLLATE = utf8mb4_general_ci ROW_FORMAT = Dynamic;

-- ----------------------------
-- Table structure for t_problem2
-- ----------------------------
DROP TABLE IF EXISTS `t_problem2`;
CREATE TABLE `t_problem2`  (
  `id` bigint(0) NOT NULL,
  `content` varchar(255) CHARACTER SET utf8mb4 COLLATE utf8mb4_general_ci NULL DEFAULT NULL,
  PRIMARY KEY (`id`) USING BTREE
) ENGINE = InnoDB CHARACTER SET = utf8mb4 COLLATE = utf8mb4_general_ci ROW_FORMAT = Dynamic;
3.2、项目代码
1、application.yml配置如下:
具体内容我就不再一一说明,里面相关配置都已经说明的很清楚了
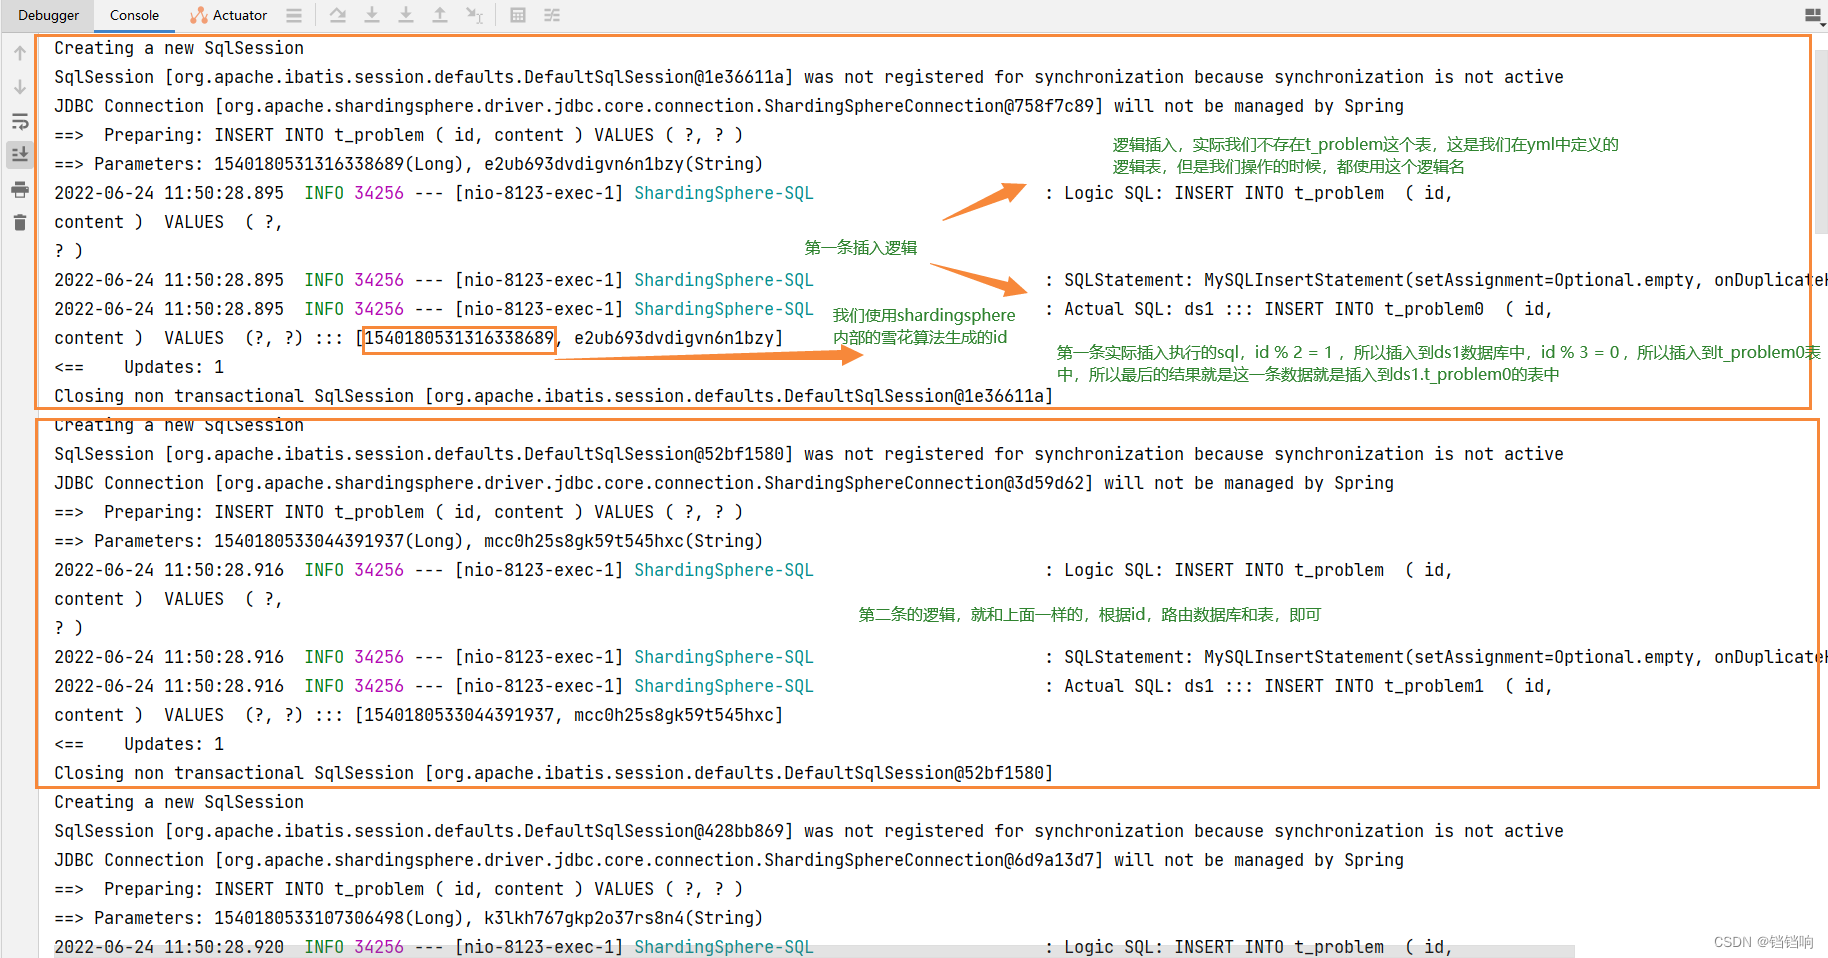
主要说明一下,分库分表的策略
分库ds$->{id % 2}说明根据t_problem表插入的id %2 ,那就是【ds0,ds1】,而ds0和ds1数据源是在上面定义好的
分表t_problem$->{id % 3}说明根据t_problem表插入的id %3,就是 【t_problem0,t_problem1,t_problem2】
spring:
  sharding-sphere: # mode.type 默认是内存模式启动
    props:
      # 展示sql
      sql-show: true  # 打印sql,控制台可以看到执行的逻辑表sql,和真实表sql(5.0.0版本之前另一个参数)
    datasource:
      ds0:
        driver-class-name: com.mysql.cj.jdbc.Driver
        jdbc-url: jdbc:mysql://localhost:3306/shardingsphere0?useUnicode=true&characterEncoding=utf-8&useSSL=false&serverTimezone=GMT&allowPublicKeyRetrieval=true
        password: 123456
        type: com.zaxxer.hikari.HikariDataSource
        username: root
      ds1:
        driver-class-name: com.mysql.cj.jdbc.Driver
        jdbc-url: jdbc:mysql://localhost:3306/shardingsphere1?useUnicode=true&characterEncoding=utf-8&useSSL=false&serverTimezone=GMT&allowPublicKeyRetrieval=true
        password: 123456
        type: com.zaxxer.hikari.HikariDataSource
        username: root
      names: ds0,ds1
    rules:
      sharding:
        sharding-algorithms:
          t-problem-db-inline: # 名为 t-problem-db-inline 的分库策略的算法
            props:
              algorithm-expression: ds$->{
    id % 2}
            type: INLINE
          t-problem-table-inline: # 名为 t-problem-table-inline 的分表策略的算法
            props:
              algorithm-expression: t_problem$->{
    id % 3}
            type: INLINE
        tables:
          t_problem:
            actual-data-nodes: ds$->{
    0..1}.t_problem$->{
    0..2}
            database-strategy: # 分库策略
              standard: # 用于单分片键的标准分片场景,(多个列标识区分是复杂情况,将standard换成 complex(即分片列名称,多个列以逗号分隔))
                sharding-algorithm-name: t-problem-db-inline # 名称,在上面使用
                sharding-column: id # 那个字段传到后面算法中
            table-strategy: # 分表策略
              standard:
                sharding-algorithm-name: t-problem-table-inline
                sharding-column: id # 那个字段传到后面算法中
            key-generate-strategy: # t_problem 表主键 id 生成的策略 https://blog.csdn.net/chinawangfei/article/details/114675854
              column: id  # t_order 表的主键id 需要使用雪花算法
              keyGeneratorName: t-problem-snowflake  # 关键这里修改后 似乎不生效,这是最离谱的,就是默认使用的是雪花算法
        key-generators:
          t-problem-snowflake:
            type: snowflake
            props:
              worker-id: 1
server:
  port: 8123

mybatis-plus:
  configuration:
    cache-enabled: false
    log-impl: org.apache.ibatis.logging.stdout.StdOutImpl
    map-underscore-to-camel-case: true
  mapper-locations: classpath:mapper/*.xml
  type-aliases-package: cn.gxm.shardingspheretest.model
2、model 定义,注意其中的注释说明
package cn.gxm.shardingspheretest.model;

import com.baomidou.mybatisplus.annotation.TableField;
import com.baomidou.mybatisplus.annotation.TableId;
import com.baomidou.mybatisplus.annotation.TableName;
import com.baomidou.mybatisplus.extension.activerecord.Model;
import lombok.AllArgsConstructor;
import lombok.Data;
import lombok.NoArgsConstructor;

/** * @author GXM * @version 1.0.0 * @Description TODO * @createTime 2022年06月24日 */
@TableName("t_problem")
@Data
@AllArgsConstructor
@NoArgsConstructor
public class Problem extends Model<Problem> {

    /** * 1、这里必须要使用Long,不能使用int 或者integer 因为 * 使用shardSphere 的雪花算法生成的数值很大,已经超过了 * Integer.MAX_VALUE(),只能使用Long来存储,而且数据库中也必须是bigint * 当然如果你选择使用字符串的类型,那这里就不没有那么多事情了 * <p> * 注意这里的 type是默认值IdType.NONE,不要设置,NONE就是【用户输入ID 该类型可以通过自己注册自动填充插件进行填充】 */
    @TableId(value = "id")
    private Long id;

    @TableField("content")
    private String content;
}
3、mapper和service就省略了,和平常配置的mybatis plus 差不多
4、新建一个controller用做测试,内容如下
package cn.gxm.shardingspheretest.controller;

import cn.gxm.shardingspheretest.model.Problem;
import cn.gxm.shardingspheretest.service.ProblemService;
import cn.hutool.core.util.RandomUtil;
import com.baomidou.mybatisplus.extension.plugins.pagination.Page;
import org.springframework.beans.factory.annotation.Autowired;
import org.springframework.web.bind.annotation.*;

import java.util.List;

/** * @author GXM * @version 1.0.0 * @Description TODO * @createTime 2022年06月24日 */
@RestController
@RequestMapping("/problem")
public class ProblemController {


    private final ProblemService problemService;


    @Autowired
    public ProblemController(ProblemService problemService) {

        this.problemService = problemService;
    }

    @GetMapping("/{id}")
    public Problem getById(@PathVariable Long id) {

        return this.problemService.getById(id);
    }

    @GetMapping("list")
    public List<Problem> list() {

        return this.problemService.list();
    }


    /** * 越获取偏移量位置靠后数据,使用 LIMIT 分页方式的效率就越低, * 这里有解决方案(有很多方法可以避免使用 LIMIT 进行分页) * 1、比如构建行记录数量与行偏移量的二级索引 * 2、或使用上次分页数据结尾 ID 作为下次查询条件的分页方式等(得禁止跳页查询) * <p> * 分页就很难受了,比如你现在分了两个数据库,每一个数据库分为3张表,相当于 一个t_order表,被分成6张表,而 * 如果此时你分页查询 第3页的100条数据(page=3,limit=100),其实相当于会查6张表的 3*100的数据,然后综合起来后,在分页取100条。 * 所以你约到后面查询越慢 * <p> * 注意,shardingSphere 在5.0.0版本之后,开启内存存限制模式 和连接限制模式 ,我们只需要配置 maxConnectionSizePerQuery ,会根据 * 公式来计算,使用内存限制模式还是使用链接限制模式 * 但shardingSphere 会进行一部分的处理 【以结果集游标下移进行结果归并的方式,称之为流式归并,它无需将结果数据全数加载至内存】 * * @param page page * @param limit limit * @return pojo */
    @GetMapping("page")
    public List<Problem> page(@RequestParam("page") Integer page, @RequestParam("limit") Integer limit) {

        Page<Problem> orderPage = this.problemService.page(new Page<>(page, limit));
        return orderPage.getRecords();
    }

    @GetMapping("/count")
    public Integer count() {

        return this.problemService.count();
    }

    @GetMapping("/mock")
    public String mock() {

        for (int i = 0; i < 12; i++) {

            final Problem problem = new Problem();
            problem.setContent(RandomUtil.randomString(20));
            this.problemService.save(problem);
        }
        return "SUCCESS";
    }

}
3.3、测试分析
3.3.1、mock接口
1、调用mock接口后,日志如下
2、数据库数据如下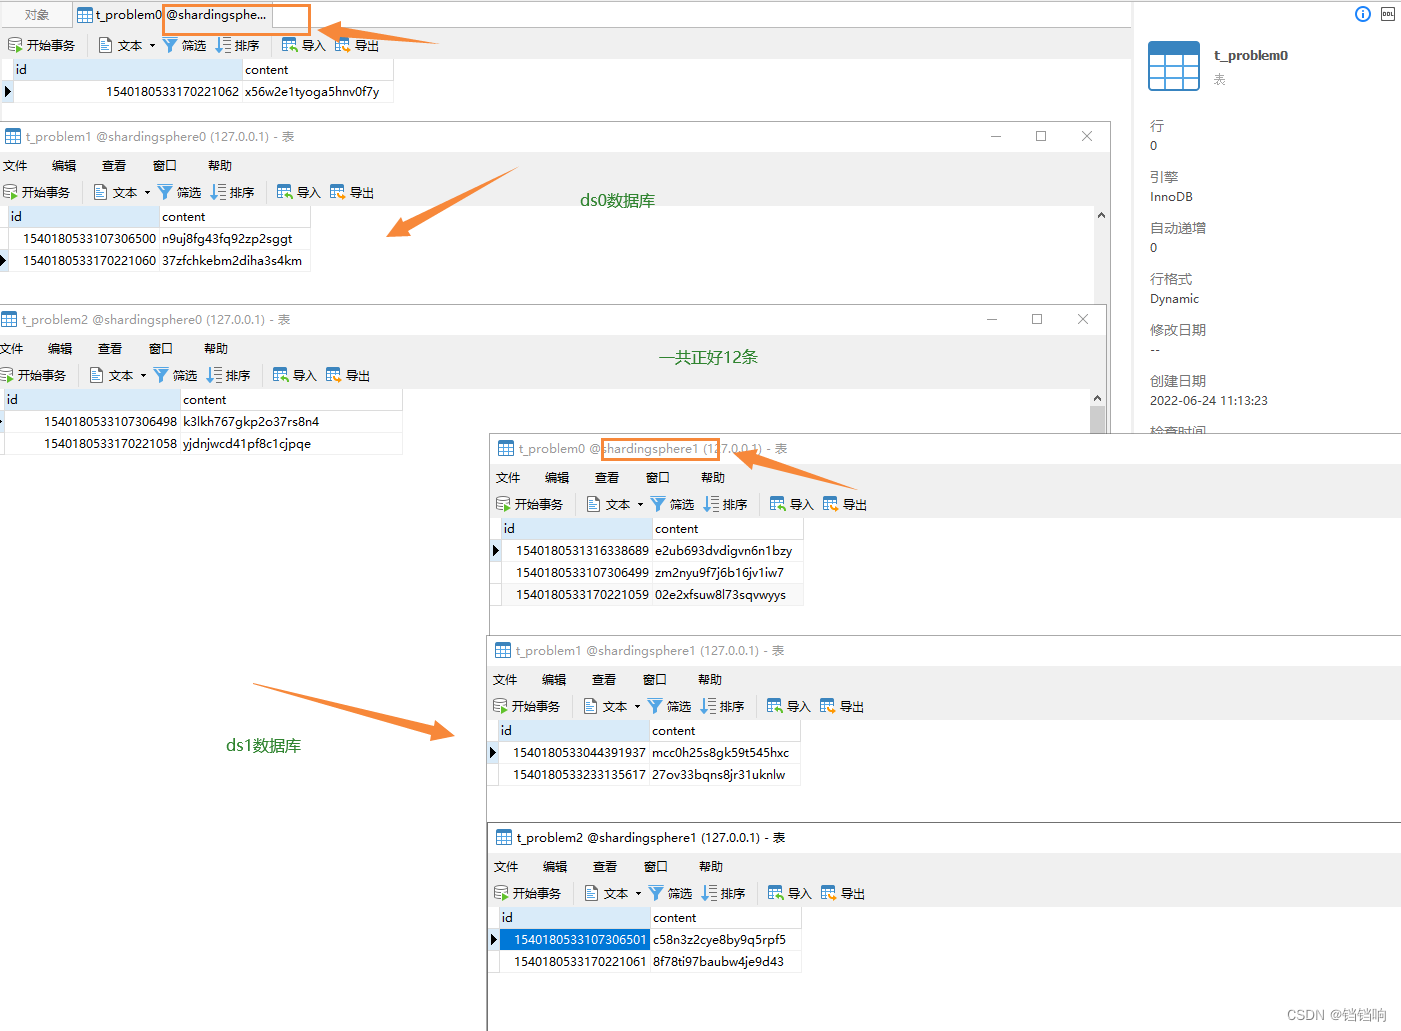
3.3.2、count接口
1、请求结果,就是 12 条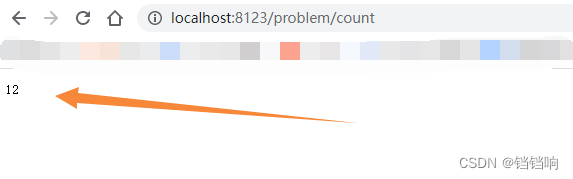
2、执行日志如下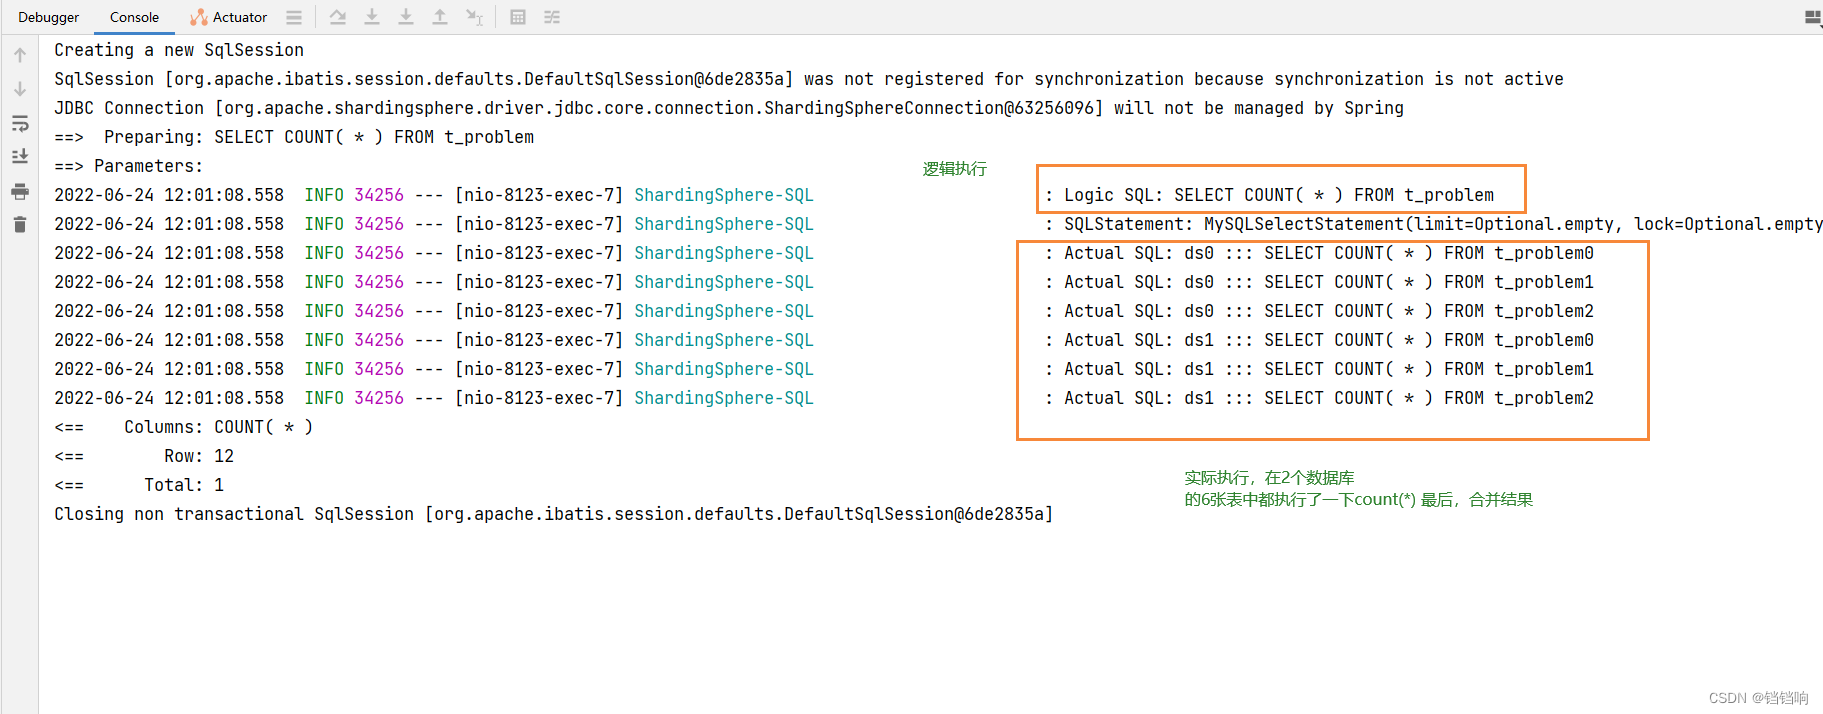
3.3.3、page接口
1、请求接口,,注意,其中一旦我们的页码越来越大,可能性能就会下降一部分,虽然shardingsphere帮忙我们做了一部分的优化,但是如果数据量还是很大,那性能还是不客观的,如下
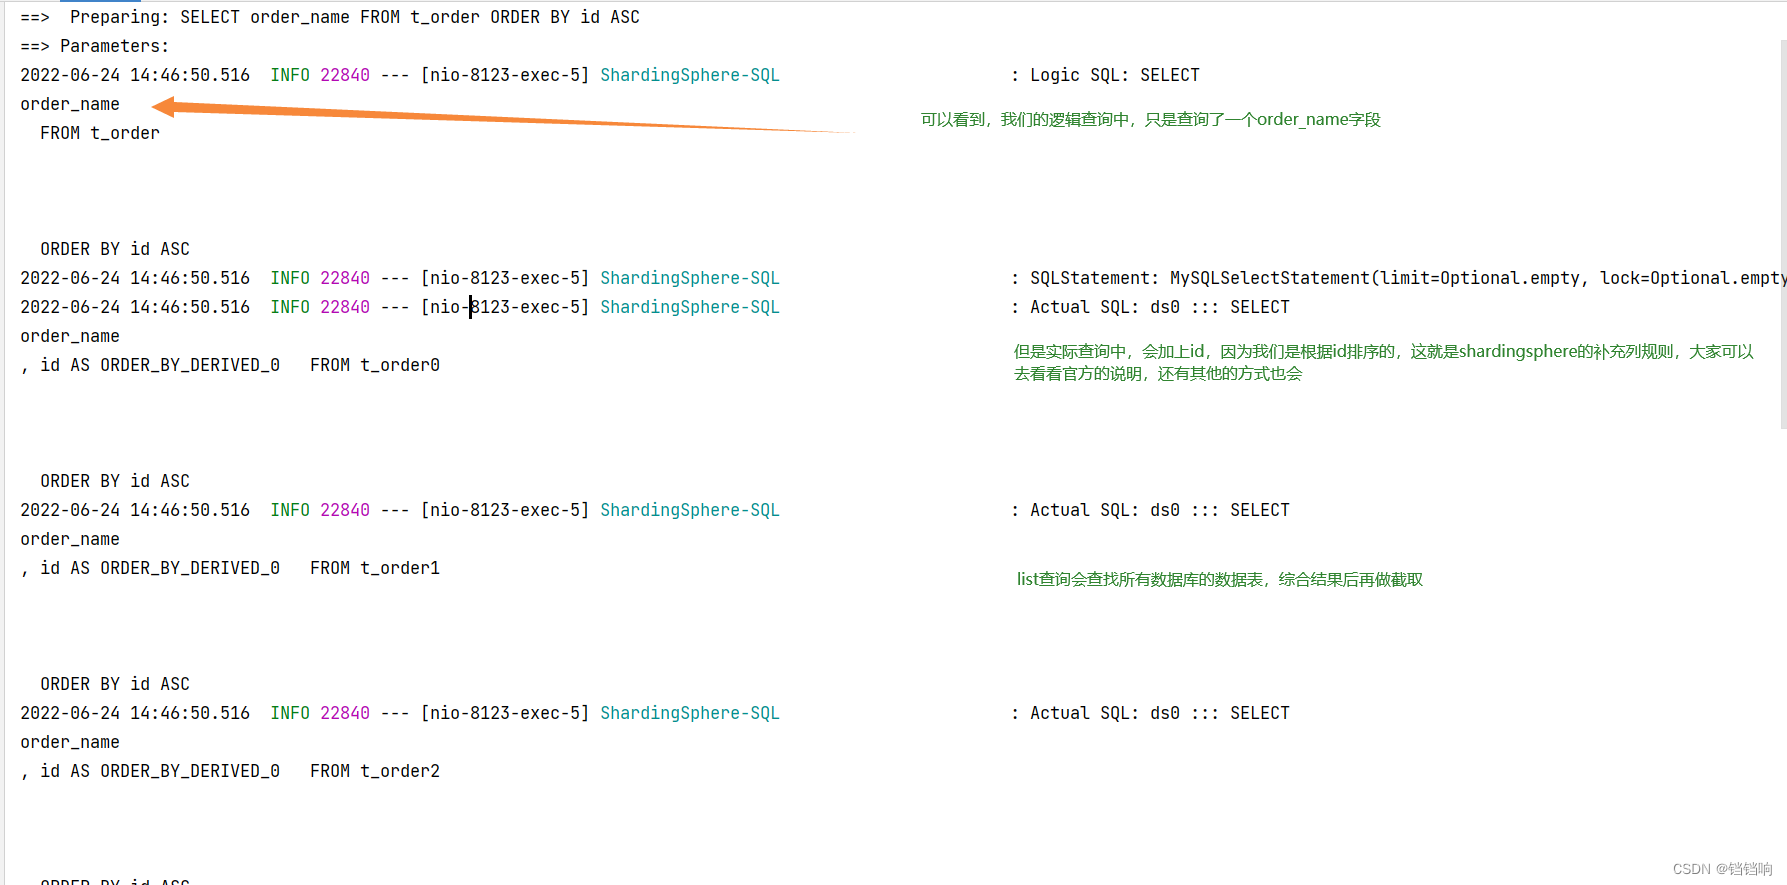
注意,这里是没有家排序规则的,如果加上排序规则,执行的sql会有一部分其他的逻辑,比如
shardingsphere补充列,这一部分大家可以去看看官方文档。
如果我查询第三页开始的10条,那么它会找所有数据库中的分表的第三页的10条,合并结果,然后截取数据。
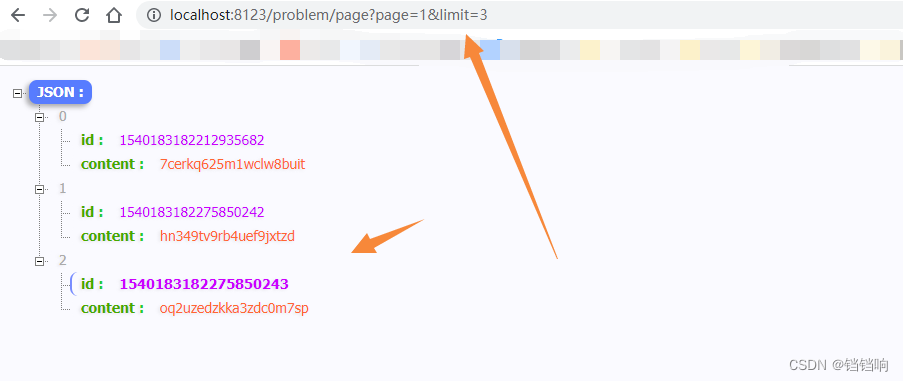
2、控制台日志如下:

3.3.4、id 接口
1、请求接口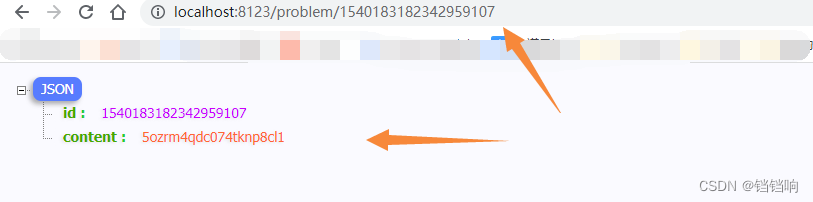
2、控制台日志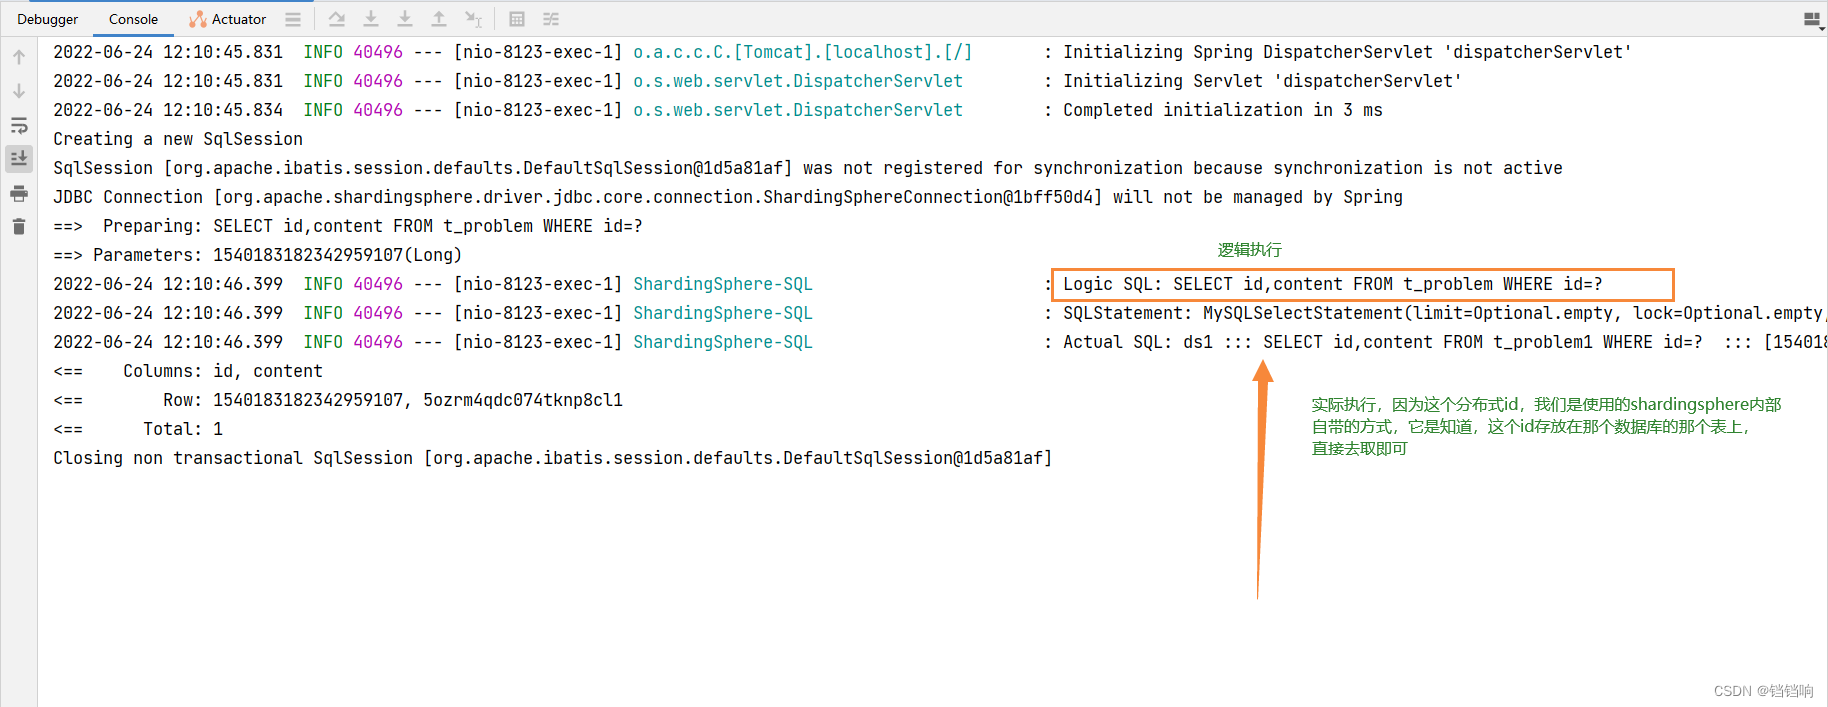
四、使用案例–绑定表(bindTable)
4.1、数据库格式
1、数据库创建,业务表t_order和其关联子表t_order_item,分别分布于2个数据库中,并且分表都是为3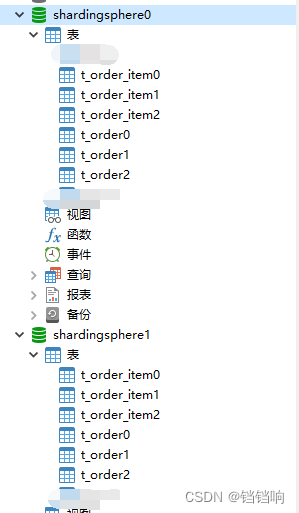
2、数据脚本
注意其中的相关主键id都是不设置自增的,并且类型是bigInt,因为后面使用
shardingsphere的内置分布式id生成的值会很大。
SET NAMES utf8mb4;
SET FOREIGN_KEY_CHECKS = 0;

-- ----------------------------
-- Table structure for t_order0
-- ----------------------------
DROP TABLE IF EXISTS `t_order0`;
CREATE TABLE `t_order0`  (
  `id` bigint(0) NOT NULL,
  `user_id` bigint(0) NULL DEFAULT NULL,
  `order_name` varchar(200) CHARACTER SET utf8mb4 COLLATE utf8mb4_general_ci NULL DEFAULT NULL,
  PRIMARY KEY (`id`) USING BTREE
) ENGINE = InnoDB CHARACTER SET = utf8mb4 COLLATE = utf8mb4_general_ci ROW_FORMAT = Dynamic;

-- ----------------------------
-- Table structure for t_order1
-- ----------------------------
DROP TABLE IF EXISTS `t_order1`;
CREATE TABLE `t_order1`  (
  `id` bigint(0) NOT NULL,
  `user_id` bigint(0) NULL DEFAULT NULL,
  `order_name` varchar(200) CHARACTER SET utf8mb4 COLLATE utf8mb4_general_ci NULL DEFAULT NULL,
  PRIMARY KEY (`id`) USING BTREE
) ENGINE = InnoDB CHARACTER SET = utf8mb4 COLLATE = utf8mb4_general_ci ROW_FORMAT = Dynamic;

-- ----------------------------
-- Table structure for t_order2
-- ----------------------------
DROP TABLE IF EXISTS `t_order2`;
CREATE TABLE `t_order2`  (
  `id` bigint(0) NOT NULL,
  `user_id` bigint(0) NULL DEFAULT NULL,
  `order_name` varchar(200) CHARACTER SET utf8mb4 COLLATE utf8mb4_general_ci NULL DEFAULT NULL,
  PRIMARY KEY (`id`) USING BTREE
) ENGINE = InnoDB CHARACTER SET = utf8mb4 COLLATE = utf8mb4_general_ci ROW_FORMAT = Dynamic;

-- ----------------------------
-- Table structure for t_order_item0
-- ----------------------------
DROP TABLE IF EXISTS `t_order_item0`;
CREATE TABLE `t_order_item0`  (
  `id` bigint(0) NOT NULL,
  `order_id` bigint(0) NOT NULL,
  `name` varchar(255) CHARACTER SET utf8mb4 COLLATE utf8mb4_general_ci NULL DEFAULT NULL,
  PRIMARY KEY (`id`) USING BTREE
) ENGINE = InnoDB CHARACTER SET = utf8mb4 COLLATE = utf8mb4_general_ci ROW_FORMAT = Dynamic;

-- ----------------------------
-- Table structure for t_order_item1
-- ----------------------------
DROP TABLE IF EXISTS `t_order_item1`;
CREATE TABLE `t_order_item1`  (
  `id` bigint(0) NOT NULL,
  `order_id` bigint(0) NOT NULL,
  `name` varchar(255) CHARACTER SET utf8mb4 COLLATE utf8mb4_general_ci NULL DEFAULT NULL,
  PRIMARY KEY (`id`) USING BTREE
) ENGINE = InnoDB CHARACTER SET = utf8mb4 COLLATE = utf8mb4_general_ci ROW_FORMAT = Dynamic;

-- ----------------------------
-- Table structure for t_order_item2
-- ----------------------------
DROP TABLE IF EXISTS `t_order_item2`;
CREATE TABLE `t_order_item2`  (
  `id` bigint(0) NOT NULL,
  `order_id` bigint(0) NOT NULL,
  `name` varchar(255) CHARACTER SET utf8mb4 COLLATE utf8mb4_general_ci NULL DEFAULT NULL,
  PRIMARY KEY (`id`) USING BTREE
) ENGINE = InnoDB CHARACTER SET = utf8mb4 COLLATE = utf8mb4_general_ci ROW_FORMAT = Dynamic;
4.2、项目代码
1、application.yml配置如下:
具体内容我就不再一一说明,里面相关配置都已经说明的很清楚了
主要说明一下,分库分表的策略
分库ds$->{id % 2}说明根据相关表插入的id %2 ,那就是【ds0,ds1】,而ds0和ds1数据源是在上面定义好的
分表t_order$->{id % 3}说明根据t_order表插入的id %3,就是 【t_order0,t_order1,t_order2】
而对于t_order_item来说,必须要和t_order表的分库分表的策略保持一致,所以,使用的是t_order_item的order_id字段来分库分表,并且规则和t_order保持一致,这是官方文档中说明的。
spring:
  sharding-sphere: # mode.type 默认是内存模式启动
    props:
      # 展示sql
      sql-show: true
    datasource:
      ds0:
        driver-class-name: com.mysql.cj.jdbc.Driver
        jdbc-url: jdbc:mysql://localhost:3306/shardingsphere0?useUnicode=true&characterEncoding=utf-8&useSSL=false&serverTimezone=GMT&allowPublicKeyRetrieval=true
        password: 123456
        type: com.zaxxer.hikari.HikariDataSource
        username: root
      ds1:
        driver-class-name: com.mysql.cj.jdbc.Driver
        jdbc-url: jdbc:mysql://localhost:3306/shardingsphere1?useUnicode=true&characterEncoding=utf-8&useSSL=false&serverTimezone=GMT&allowPublicKeyRetrieval=true
        password: 123456
        type: com.zaxxer.hikari.HikariDataSource
        username: root
      names: ds0,ds1
    rules:
      sharding:
        sharding-algorithms:
          t-order-db-inline:
            props:
              algorithm-expression: ds$->{
    id % 2}
            type: INLINE
          t-order-table-inline:
            props:
              algorithm-expression: t_order$->{
    id % 3}
            type: INLINE
          t-order-item-db-inline:
            props:
              algorithm-expression: ds$->{
    order_id % 2}
            type: INLINE
          t-order-item-table-inline:
            props:
              algorithm-expression: t_order_item$->{
    order_id % 3}
            type: INLINE
        tables:
          t_order:
            actual-data-nodes: ds$->{
    0..1}.t_order$->{
    0..2}
            database-strategy: # 分库策略
              standard: # 用于单分片键的标准分片场景,(多个列标识区分是复杂情况,将standard换成 complex(即分片列名称,多个列以逗号分隔))
                sharding-algorithm-name: t-order-db-inline # 名称,在上面使用
                sharding-column: id # 那个字段传到后面算法中
            table-strategy: # 分表策略
              standard:
                sharding-algorithm-name: t-order-table-inline
                sharding-column: id # 那个字段传到后面算法中
            key-generate-strategy: # t_order 表主键order_id 生成的策略 https://blog.csdn.net/chinawangfei/article/details/114675854
              column: id  # t_order 表的主键id 需要使用雪花算法
              keyGeneratorName: t-order-snowflake  # 关键这里修改后 似乎不生效,这是最离谱的,就是默认使用的是雪花算法
          t_order_item:
            actual-data-nodes: ds$->{
    0..1}.t_order_item$->{
    0..2}
            database-strategy:
              standard:
                sharding-algorithm-name: t-order-item-db-inline
                sharding-column: order_id
            table-strategy:
              standard:
                sharding-algorithm-name: t-order-item-table-inline
                sharding-column: order_id
            key-generate-strategy:
              column: id
              keyGeneratorName: t-order-item-snowflake
        key-generators:
          t-order-snowflake:
            type: snowflake
            props:
              worker-id: 1
          t-order-item-snowflake:
            type: snowflake
            props:
              worker-id: 1
        binding-tables:
          - t_order,t_order_item  # 绑定表,可以避免在关联查询的时候形成笛卡儿积,注意绑定表之间的分库和分表算法必须保持一致,比如上面t_order和t_order_item都是使用order_id作为分库分表的基础【其中t_order在FROM的最左侧,ShardingSphere将会以它作为整个绑定表的主表。 所有路由计算将会只使用主表的策略,那么t_order_item表的分片计算将会使用t_order的条件。故绑定表之间的分区键要完全相同】
server:
  port: 8123

mybatis-plus:
  configuration:
    cache-enabled: false
    log-impl: org.apache.ibatis.logging.stdout.StdOutImpl
    map-underscore-to-camel-case: true
  mapper-locations: classpath:mapper/*.xml
  type-aliases-package: cn.gxm.shardingspheretest.model
2、model 定义,注意其中的注释说明
- Order 对象
package cn.gxm.shardingspheretest.model;

import com.baomidou.mybatisplus.annotation.TableField;
import com.baomidou.mybatisplus.annotation.TableId;
import com.baomidou.mybatisplus.annotation.TableName;
import com.baomidou.mybatisplus.extension.activerecord.Model;
import lombok.AllArgsConstructor;
import lombok.Data;
import lombok.NoArgsConstructor;

/** * (Order)表实体类 * * @author GXM * @date 2022-06-21 15:07:00 */
@TableName("t_order")
@Data
@AllArgsConstructor
@NoArgsConstructor
public class Order extends Model<Order> {


    /** * 1、这里必须要使用Long,不能使用int 或者integer 因为 * 使用shardSphere 的雪花算法生成的数值很大,已经超过了 * Integer.MAX_VALUE(),只能使用Long来存储,而且数据库中也必须是bigint * 当然如果你选择使用字符串的类型,那这里就不没有那么多事情了 * <p> * 注意这里的 type是默认值IdType.NONE,不要设置,NONE就是【用户输入ID 该类型可以通过自己注册自动填充插件进行填充】 */
    @TableId(value = "id")
    private Long id;

    @TableField("user_id")
    private Long userId;

    @TableField("order_name")
    private String orderName;
}
- OrderItem 对象
package cn.gxm.shardingspheretest.model;

import com.baomidou.mybatisplus.annotation.TableField;
import com.baomidou.mybatisplus.annotation.TableId;
import com.baomidou.mybatisplus.annotation.TableName;
import lombok.AllArgsConstructor;
import lombok.Data;
import lombok.NoArgsConstructor;

/** * @author GXM * @version 1.0.0 * @Description 订单关联表(当前表和order表是关联表,也是需要配置分库分表的,以及和 order表一起设置为绑定表) * @createTime 2022年06月23日 */
@TableName("t_order_item")
@Data
@AllArgsConstructor
@NoArgsConstructor
public class OrderItem {


    /** * 1、这里必须要使用Long,不能使用int 或者integer 因为 * 使用shardSphere 的雪花算法生成的数值很大,已经超过了 * Integer.MAX_VALUE(),只能使用Long来存储,而且数据库中也必须是bigint * 当然如果你选择使用字符串的类型,那这里就不没有那么多事情了 * <p> * 注意这里的 type是默认值IdType.NONE,不要设置,NONE就是【用户输入ID 该类型可以通过自己注册自动填充插件进行填充】 */
    @TableId(value = "id")
    private Long id;

    @TableField("order_id")
    private Long orderId;

    @TableField("name")
    private String name;
}
3、mapper和service就省略了,和平常配置的mybatis plus 差不多,但是补充一下对应的xml文件内容
<?xml version="1.0" encoding="UTF-8" ?>
<!-- ~ Licensed to the Apache Software Foundation (ASF) under one or more ~ contributor license agreements. See the NOTICE file distributed with ~ this work for additional information regarding copyright ownership. ~ The ASF licenses this file to You under the Apache License, Version 2.0 ~ (the "License"); you may not use this file except in compliance with ~ the License. You may obtain a copy of the License at ~ ~ http://www.apache.org/licenses/LICENSE-2.0 ~ ~ Unless required by applicable law or agreed to in writing, software ~ distributed under the License is distributed on an "AS IS" BASIS, ~ WITHOUT WARRANTIES OR CONDITIONS OF ANY KIND, either express or implied. ~ See the License for the specific language governing permissions and ~ limitations under the License. -->

<!DOCTYPE mapper PUBLIC "-//mybatis.org//DTD Mapper 3.0//EN" "http://mybatis.org/dtd/mybatis-3-mapper.dtd">
<mapper namespace="cn.gxm.shardingspheretest.mapper.OrderMapper">
    <resultMap id="baseResultMap" type="cn.gxm.shardingspheretest.model.Order">
        <result column="order_id" property="orderId" jdbcType="BIGINT"/>
        <result column="user_id" property="userId" jdbcType="BIGINT"/>
        <result column="order_name" property="orderName" jdbcType="VARCHAR"/>
    </resultMap>


    <!-- 自定义插入的时候,主键的返回可以这样写 -->
    <insert id="selfInsert" useGeneratedKeys="true" keyProperty="orderId" parameterType="cn.gxm.shardingspheretest.model.Order">
        INSERT INTO t_order (user_id, order_name)
        VALUES (#{userId,jdbcType=INTEGER}, #{orderName,jdbcType=VARCHAR});
    </insert>


    <!-- 查看绑定表是否生效 对应sql -->
    <select id="bindTableByOrderId" parameterType="java.lang.Long" resultType="cn.gxm.shardingspheretest.dto.OrderDTO">
        SELECT a.id as order_id, a.user_id, a.order_name, b.id as item_id, b.`name` as item_name
        from t_order a
                 LEFT JOIN t_order_item b on a.id = b.order_id
        where a.id = #{orderId,jdbcType=BIGINT};
    </select>

    <select id="bindTableByOrderIdWithIn" parameterType="java.lang.Long" resultType="cn.gxm.shardingspheretest.dto.OrderDTO">
        SELECT a.id as order_id, a.user_id, a.order_name, b.id as item_id, b.`name` as item_name
        from t_order a
                 LEFT JOIN t_order_item b on a.id = b.order_id
        where a.id in (#{orderId,jdbcType=BIGINT})
    </select>
</mapper>
4、新建一个controller用做测试,内容如下
package cn.gxm.shardingspheretest.controller;

import cn.gxm.shardingspheretest.dto.OrderDTO;
import cn.gxm.shardingspheretest.model.Order;
import cn.gxm.shardingspheretest.model.OrderItem;
import cn.gxm.shardingspheretest.service.OrderItemService;
import cn.gxm.shardingspheretest.service.OrderService;
import cn.hutool.core.util.RandomUtil;
import cn.hutool.json.JSONUtil;
import com.baomidou.mybatisplus.core.conditions.query.LambdaQueryWrapper;
import com.baomidou.mybatisplus.extension.plugins.pagination.Page;
import org.springframework.beans.factory.annotation.Autowired;
import org.springframework.web.bind.annotation.*;

import java.util.List;

/** * @author GXM * @version 1.0.0 * @Description TODO * @createTime 2022年06月21日 */
@RestController
@RequestMapping("/order")
public class OrderController {


    private final OrderService orderService;
    private final OrderItemService orderItemService;

    @Autowired
    public OrderController(OrderService orderService, OrderItemService orderItemService) {

        this.orderService = orderService;
        this.orderItemService = orderItemService;
    }


    @GetMapping("/{id}")
    public Order getById(@PathVariable String id) {

        return this.orderService.getById(id);
    }

    @GetMapping("list")
    public List<Order> list() {

        return this.orderService.list();
    }


    /** * 越获取偏移量位置靠后数据,使用 LIMIT 分页方式的效率就越低, * 这里有解决方案(有很多方法可以避免使用 LIMIT 进行分页) * 1、比如构建行记录数量与行偏移量的二级索引 * 2、或使用上次分页数据结尾 ID 作为下次查询条件的分页方式等(得禁止跳页查询) * <p> * 分页就很难受了,比如你现在分了两个数据库,每一个数据库分为3张表,相当于 一个t_order表,被分成6张表,而 * 如果此时你分页查询 第3页的100条数据(page=3,limit=100),其实相当于会查6张表的 3*100的数据,然后综合起来后,在分页取100条。 * 所以你约到后面查询越慢 * <p> * 注意,shardingSphere 在5.0.0版本之后,开启内存存限制模式 和连接限制模式 ,我们只需要配置 maxConnectionSizePerQuery ,会根据 * 公式来计算,使用内存限制模式还是使用链接限制模式 * 但shardingSphere 会进行一部分的处理 【以结果集游标下移进行结果归并的方式,称之为流式归并,它无需将结果数据全数加载至内存】 * * @param page page * @param limit limit * @return pojo */
    @GetMapping("page")
    public List<Order> page(@RequestParam("page") Integer page, @RequestParam("limit") Integer limit) {

        Page<Order> orderPage = this.orderService.page(new Page<>(page, limit));
        return orderPage.getRecords();
    }

    @GetMapping("/count")
    public Integer count() {

        return this.orderService.count();
    }

    @GetMapping("/mock")
    public String mock() {

        for (int i = 0; i < 12; i++) {

            final Order order = new Order();
            order.setUserId((long) i);
            order.setOrderName(RandomUtil.randomString(20));
            this.orderService.save(order);
        }
        return "SUCCESS";
    }

    /** * order by 会存在一种情况就是补列的情况 * 可以参考官方文档 https://shardingsphere.apache.org/document/5.0.0/cn/reference/sharding/rewrite/ * * @param page page * @param limit limit * @return json string */
    @GetMapping("/orderBy")
    public String orderBy(@RequestParam(value = "page", required = false) Integer page,
                          @RequestParam(value = "limit", required = false) Integer limit) {

        LambdaQueryWrapper<Order> lambdaQueryWrapper = new LambdaQueryWrapper<>();
        // 比如我这里只是查询 order_name列,但是因为你排序用到的是OrderId,而且最后要合并6张表的数据,再根据order_id排序,所以,
        // 即使你没有说查询这个列,sharding-sphere 也会加上这个字段的。 如下
        // SELECT
        // order_name
        // , order_id AS ORDER_BY_DERIVED_0 FROM t_order0
        //
        // ORDER BY order_id ASC LIMIT ?,? ::: [0, 12]
        lambdaQueryWrapper.select(Order::getOrderName);
        lambdaQueryWrapper.orderByAsc(Order::getId);
        if (page == null || limit == null) {

            return JSONUtil.toJsonStr(this.orderService.list(lambdaQueryWrapper));
        }
        return JSONUtil.toJsonStr(this.orderService.page(new Page<>(page, limit), lambdaQueryWrapper));
    }


    public String testXA() {

// xas
// XAShardingSphereTransactionManager
        return "ok";
    }

    /** * 测试加解密字段 * * @return */
    public String testCipher() {

        return "ok";
    }

    /** * 测试绑定表 使用 t_order 和 t_order_item * 绑定表之间的多表关联查询不会出现笛卡尔积关联,关联查询效率将大大提升 * * @return */
    @GetMapping("/bindTable/mock")
    public String mockWithBindTable() {

        for (int i = 0; i < 1; i++) {

            // 1、插入order 表
            Order orderMock = new Order();
            // 这个order id 不用我们设置,我们在shardingSphere 时设置了该表的主键使用 shardingSphere 内置的雪花算法
// orderMock.setOrderId();
            orderMock.setUserId((long) i);
            orderMock.setOrderName(RandomUtil.randomString(20));
            orderService.save(orderMock);
// orderService.selfInsert(orderMock);


            // 2、插入t_order_item 表
            OrderItem orderItemMock = new OrderItem();
            // id 也不需要我们设置,我们在shardingSphere 时设置了该表的主键使用 shardingSphere 内置的雪花算法
// orderItemMock.setItemId();
            orderItemMock.setOrderId(orderMock.getId());
            orderItemMock.setName(RandomUtil.randomString(20));
            orderItemService.save(orderItemMock);
        }
        return "ok";
    }

    /** * 关联查询order 和order_item * * @param orderId * @return */
    @GetMapping("bindTable/{orderId}")
    public OrderDTO bindTableByOrderId(@PathVariable("orderId") Long orderId) {

        OrderDTO orderDTO = orderService.bindTableByOrderId(orderId);
        return orderDTO;
    }

    /** * 【此时因为我们配置了绑定表,是不会出现笛卡儿积的】 * * @param orderId * @return */
    @GetMapping("bindTableWithIn/{orderId}")
    public OrderDTO bindTableByOrderIdWithIn(@PathVariable("orderId") Long orderId) {

        List<OrderDTO> orderDTOS = orderService.bindTableByOrderIdWithIn(orderId);
        return orderDTOS.get(0);
    }
}
4.3、测试分析
4.3.1、/bindTable/mock 接口
1、调用/bindTable/mock接口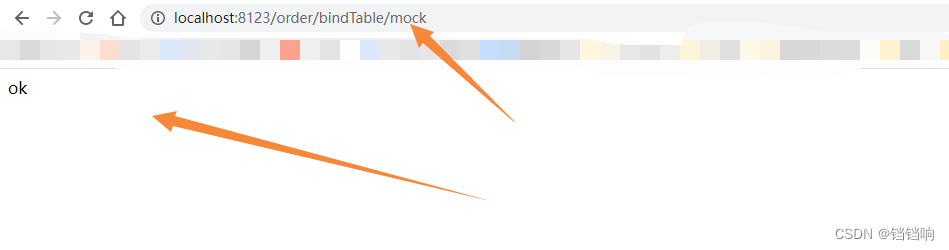
2、控制台日志如下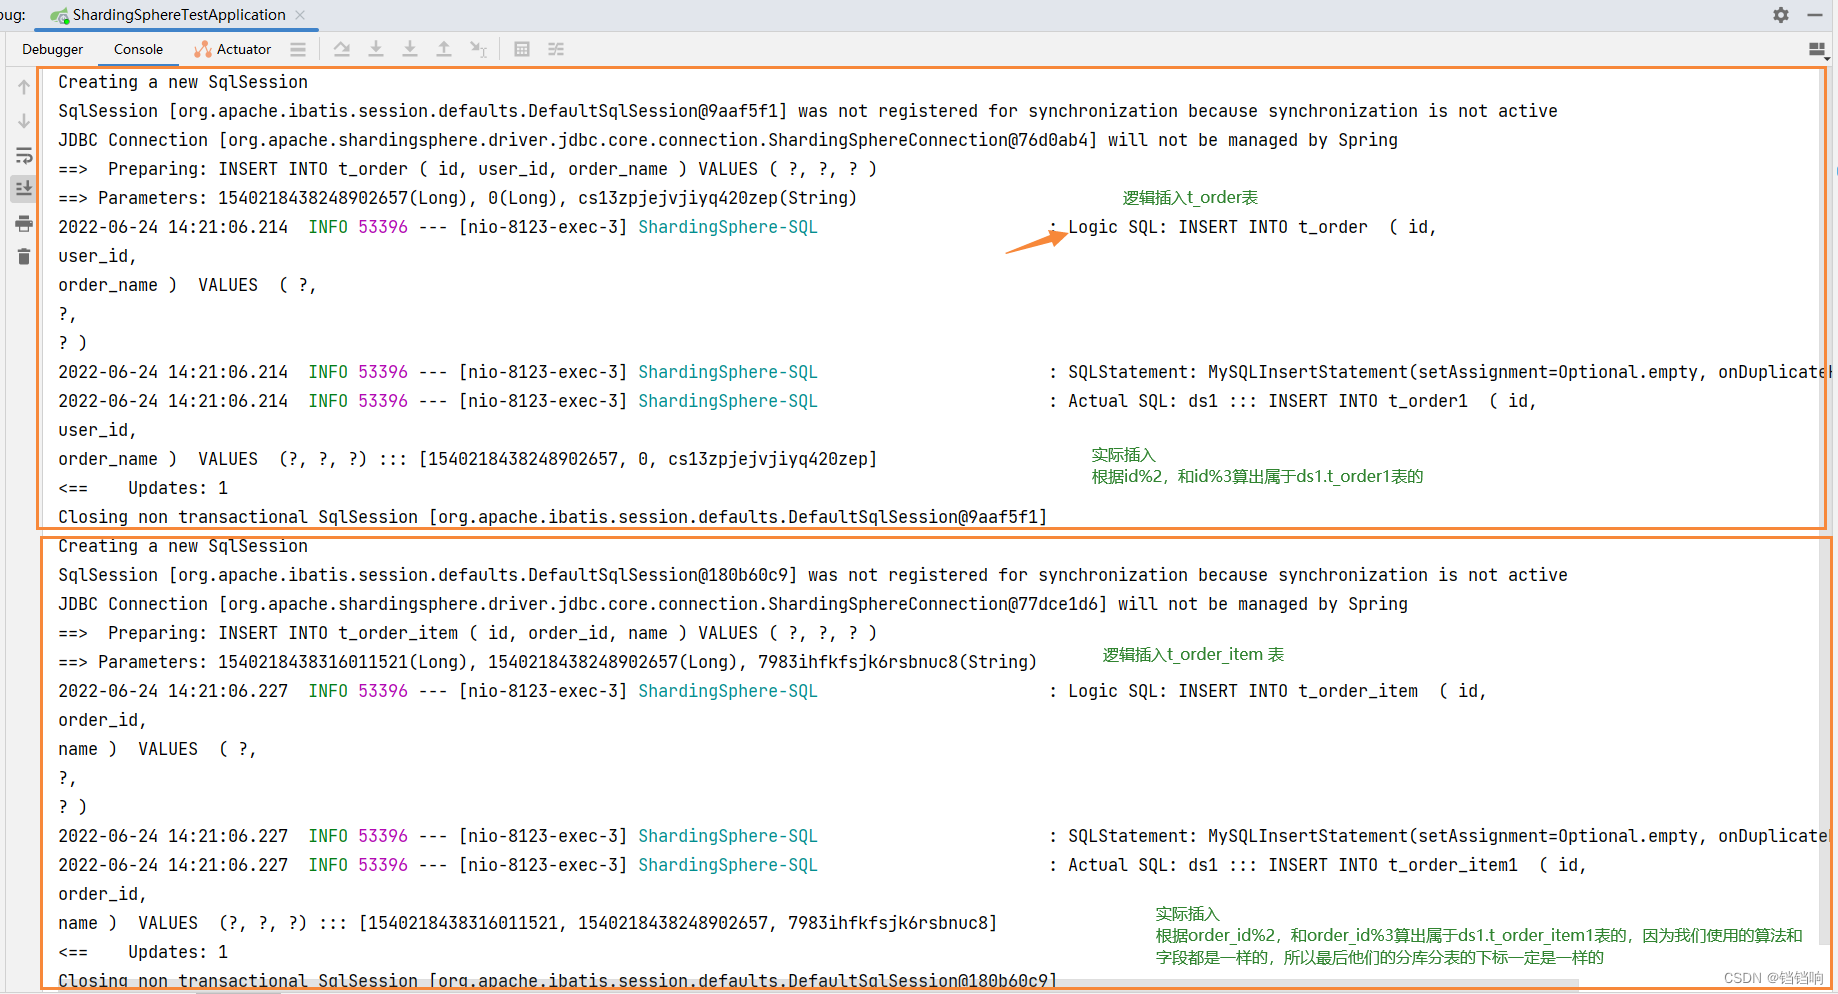
3、数据库数据
4.3.2、bindTable/{orderId} 接口(使用==)
1、根据前面mock生成的order_id请求,获取详情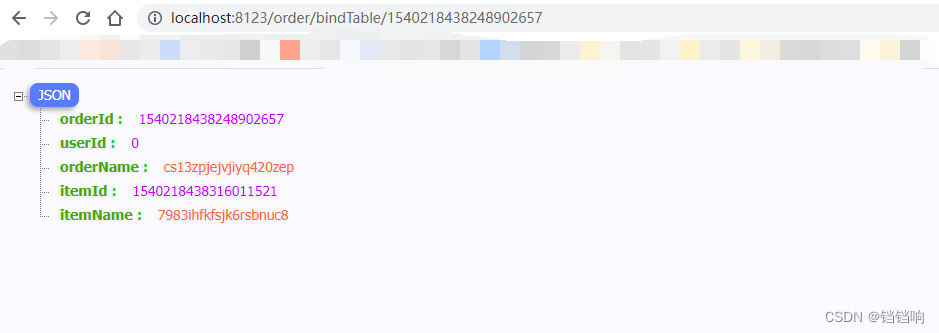
2、控制台日志
4.3.3、bindTableWithIn/{orderId} 接口(使用in)
1、根据前面mock生成的order_id请求,获取详情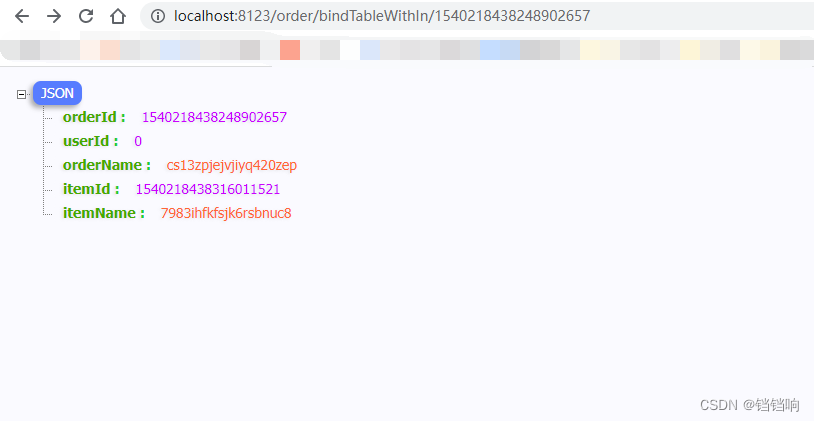
2、控制台日志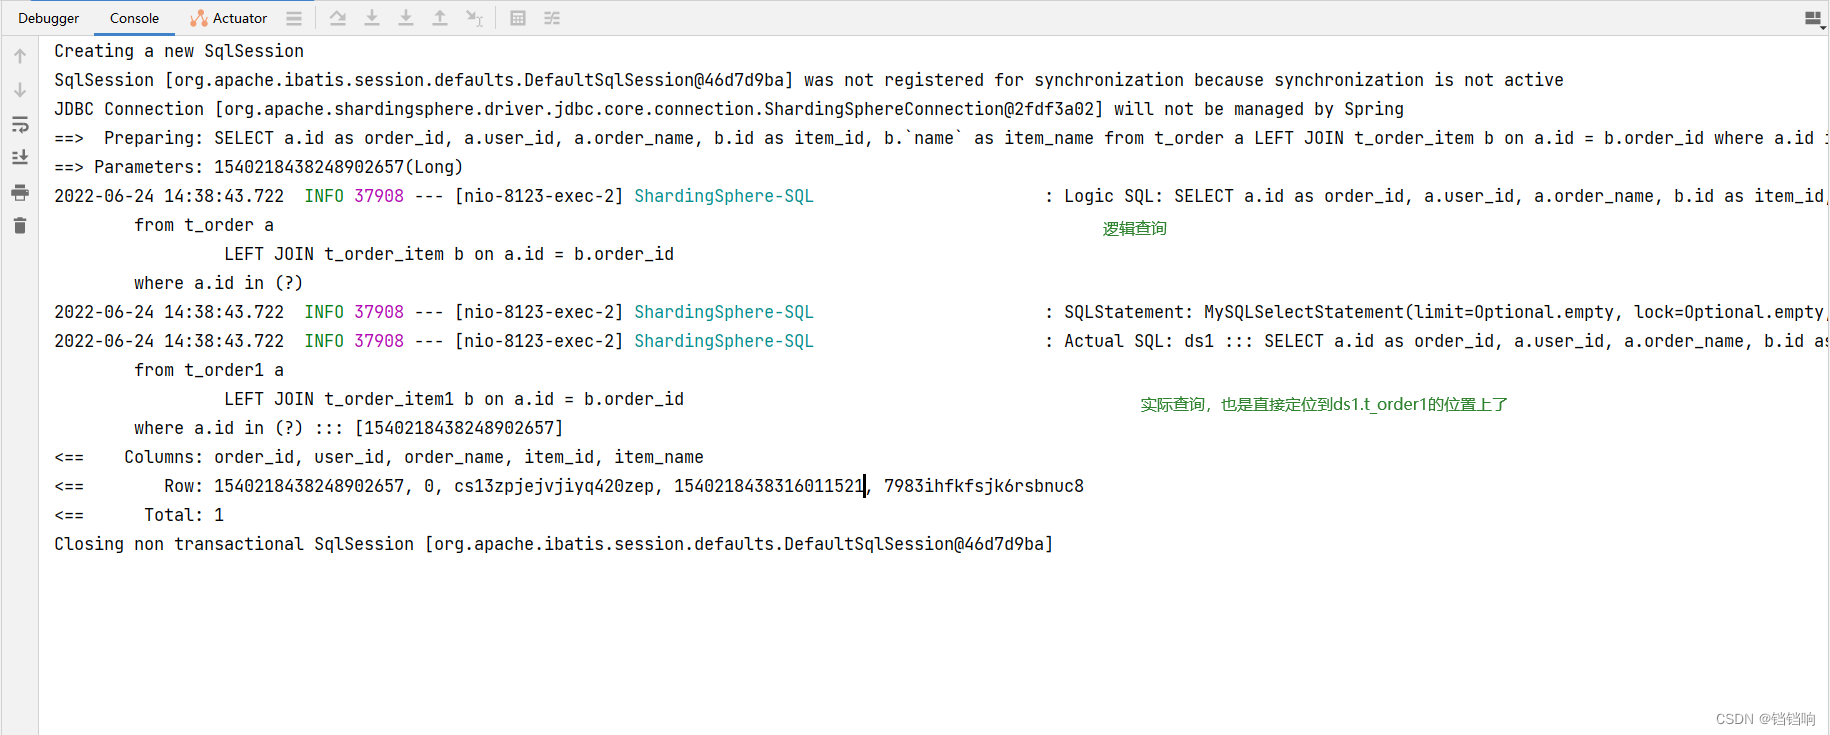
4.3.3、orderBy 接口
1、我们先调用一下mock接口,生成对应的12条数据,再根据id排序查询
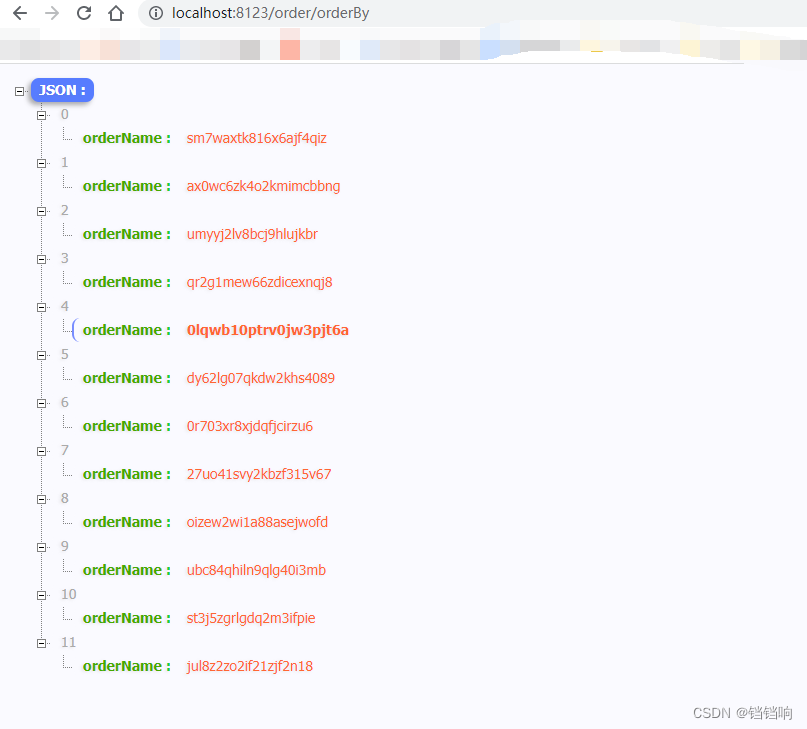
2、控制台日志如下
五、使用案例–广播表(bindTable)
5.1、数据库格式
1、数据库创建,业务表t_user,分别分布于2个数据库中,并且数据结构都一样,并且不分表
广播表的定义前面已经说过了,就是每一个分库都有,但是不分表。

2、数据脚本
注意其中的相关主键id都是不设置自增的,并且类型是bigInt,因为后面使用
shardingsphere的内置分布式id生成的值会很大。
CREATE TABLE `t_user` (
  `id` bigint NOT NULL,
  `name` varchar(255) COLLATE utf8mb4_general_ci DEFAULT NULL,
  `sex` varchar(255) COLLATE utf8mb4_general_ci DEFAULT NULL,
  PRIMARY KEY (`id`)
) ENGINE=InnoDB DEFAULT CHARSET=utf8mb4 COLLATE=utf8mb4_general_ci;
5.2、项目代码
1、application.yml配置如下,可以看到,我们不需要为这个广播表配置分库和分表二点规则,因为,默认就是两个数据库的表数据都是一样的,唯一一点要注意的是这个主键id还是需要让shardingSphere来产生
spring:
  sharding-sphere: # mode.type 默认是内存模式启动
    props:
      # 展示sql
      sql-show: true
    datasource:
      ds0:
        driver-class-name: com.mysql.cj.jdbc.Driver
        jdbc-url: jdbc:mysql://localhost:3306/shardingsphere0?useUnicode=true&characterEncoding=utf-8&useSSL=false&serverTimezone=GMT&allowPublicKeyRetrieval=true
        password: 123456
        type: com.zaxxer.hikari.HikariDataSource
        username: root
      ds1:
        driver-class-name: com.mysql.cj.jdbc.Driver
        jdbc-url: jdbc:mysql://localhost:3306/shardingsphere1?useUnicode=true&characterEncoding=utf-8&useSSL=false&serverTimezone=GMT&allowPublicKeyRetrieval=true
        password: 123456
        type: com.zaxxer.hikari.HikariDataSource
        username: root
      names: ds0,ds1
    rules:
      sharding:
        tables:
          t_user: # 广播表不会对数据进行分片,所以配置分库,分表规则是不会生效的
            key-generate-strategy:
              column: id
              keyGeneratorName: t-user-snowflake
        key-generators:
          t-user-snowflake:
            type: snowflake
            props:
              worker-id: 1
        broadcast-tables:
          - t_user # 【指所有的分片数据源中都存在的表】,表结构及其数据在每个数据库中均完全一致。 适用于数据量不大且需要与海量数据的表进行关联查询的场景,例如:字典表。
server:
  port: 8123

mybatis-plus:
  configuration:
    cache-enabled: false
    log-impl: org.apache.ibatis.logging.stdout.StdOutImpl
    map-underscore-to-camel-case: true
  mapper-locations: classpath:mapper/*.xml
  type-aliases-package: cn.gxm.shardingspheretest.model
2、model 代码
package cn.gxm.shardingspheretest.model;

import com.baomidou.mybatisplus.annotation.TableField;
import com.baomidou.mybatisplus.annotation.TableId;
import com.baomidou.mybatisplus.annotation.TableName;
import com.baomidou.mybatisplus.extension.activerecord.Model;
import lombok.AllArgsConstructor;
import lombok.Data;
import lombok.NoArgsConstructor;

/** * @author GXM * @version 1.0.0 * @Description 用户表(当作广播表使用) * @createTime 2022年06月24日 */
@TableName("t_user")
@Data
@AllArgsConstructor
@NoArgsConstructor
public class User extends Model<User> {


    /** * 1、这里必须要使用Long,不能使用int 或者integer 因为 * 使用shardSphere 的雪花算法生成的数值很大,已经超过了 * Integer.MAX_VALUE(),只能使用Long来存储,而且数据库中也必须是bigint * 当然如果你选择使用字符串的类型,那这里就不没有那么多事情了 * <p> * 注意这里的 type是默认值IdType.NONE,不要设置,NONE就是【用户输入ID 该类型可以通过自己注册自动填充插件进行填充】 */
    @TableId(value = "id")
    private Long id;

    @TableField("name")
    private String name;

    @TableField("sex")
    private String sex;
}
3、mapper和service就省略了,和平常配置的mybatis plus 差不多,
4、增加一个controller,来测试一下
package cn.gxm.shardingspheretest.controller;

import cn.gxm.shardingspheretest.model.User;
import cn.gxm.shardingspheretest.service.UserService;
import cn.hutool.core.util.RandomUtil;
import lombok.extern.slf4j.Slf4j;
import org.springframework.beans.factory.annotation.Autowired;
import org.springframework.web.bind.annotation.GetMapping;
import org.springframework.web.bind.annotation.PathVariable;
import org.springframework.web.bind.annotation.RequestMapping;
import org.springframework.web.bind.annotation.RestController;

/** * @author GXM * @version 1.0.0 * @Description TODO * @createTime 2022年06月24日 */
@Slf4j
@RestController
@RequestMapping("/user")
public class UserController {


    private final UserService userService;

    @Autowired
    public UserController(UserService userService) {

        this.userService = userService;
    }

    @GetMapping("/mock")
    public String mock() {

        for (int i = 0; i < 100; i++) {

            User user = new User();
            user.setName(RandomUtil.randomString(10));
            user.setSex(RandomUtil.randomString(1));
            userService.save(user);
            log.info("insert success");
        }
        return "ok";
    }

    @GetMapping("{userId}")
    public User getById(@PathVariable("userId") Long userId) {

        return userService.getById(userId);
    }

    @GetMapping("update/{userId}/{sex}")
    public String update(@PathVariable("userId") Long userId,
                         @PathVariable("sex") String sex) {

        User user = new User();
        user.setId(userId);
        user.setSex(sex);
        userService.updateById(user);
        return "ok";
    }
}
5.3、测试分析
5.3.1、mock 接口
1、调用mock接口
2、控制台日志如下: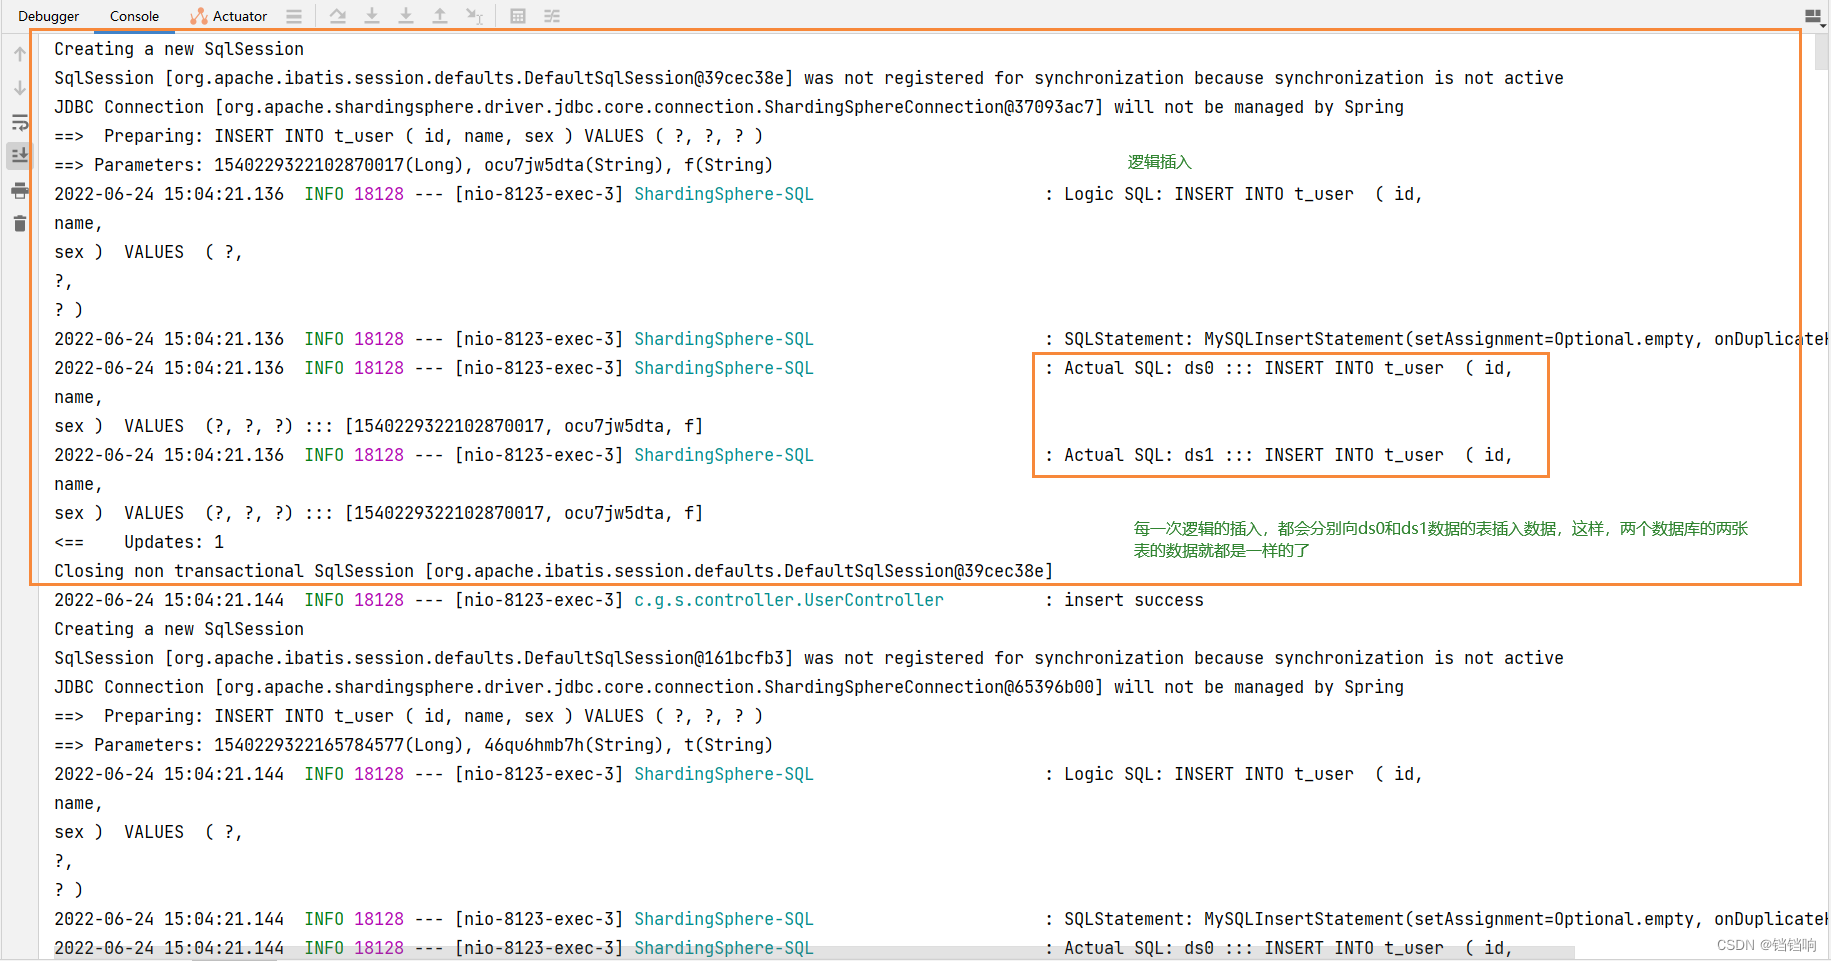
3、数据库数据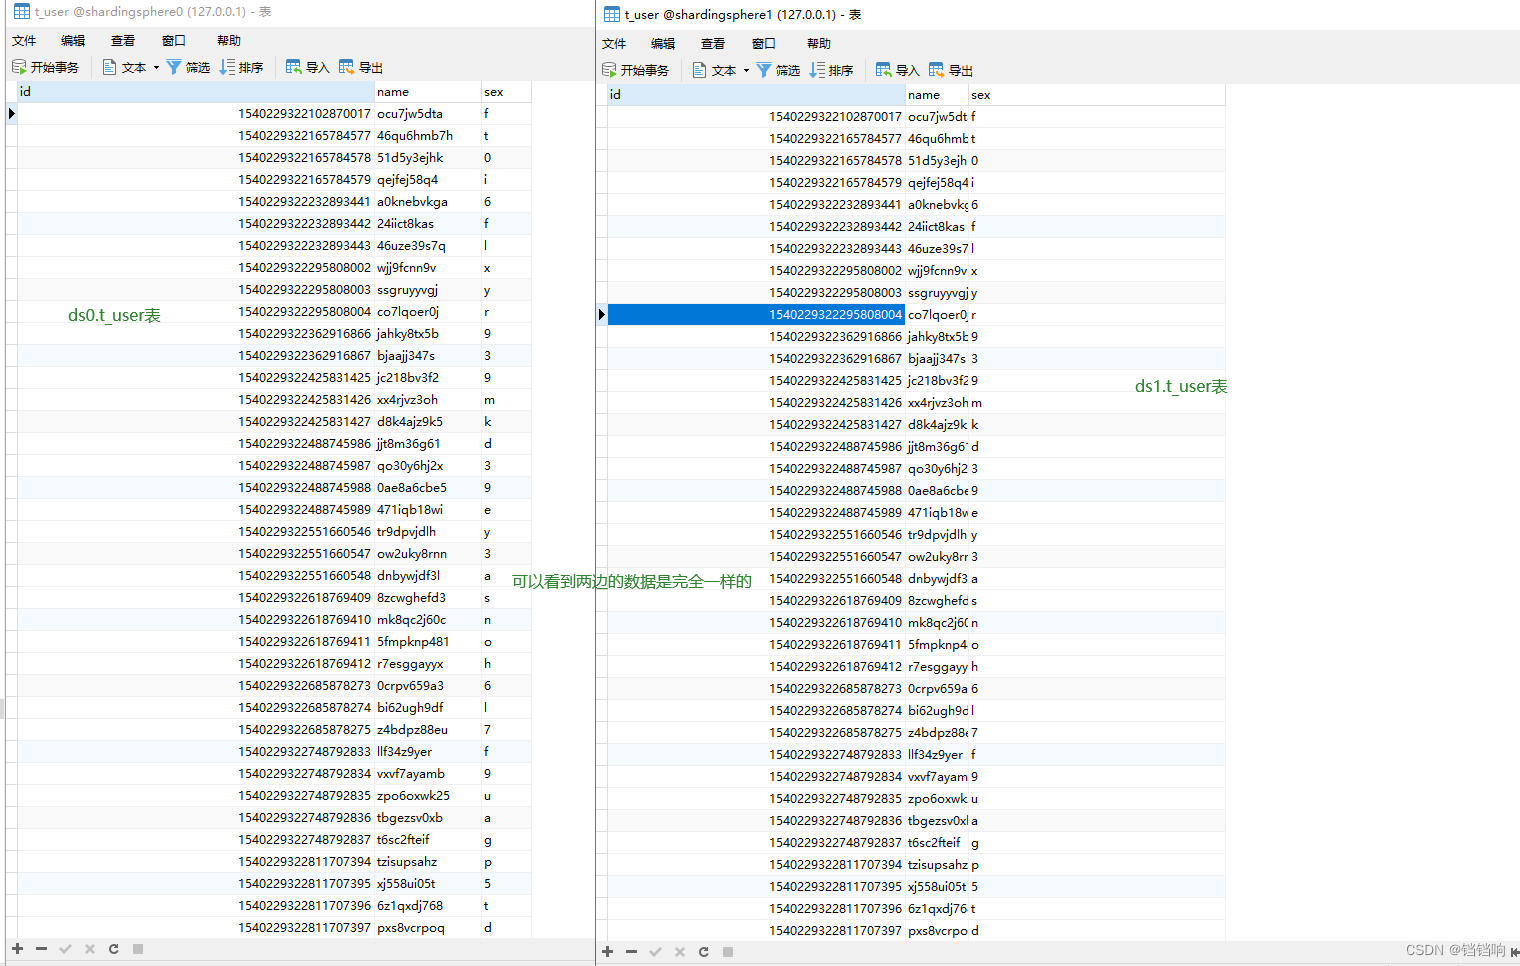
5.3.1、{userId} 接口
1、调用{userId}接口
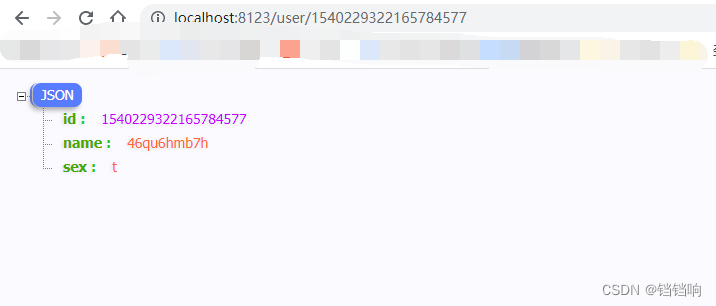
2、控制台日志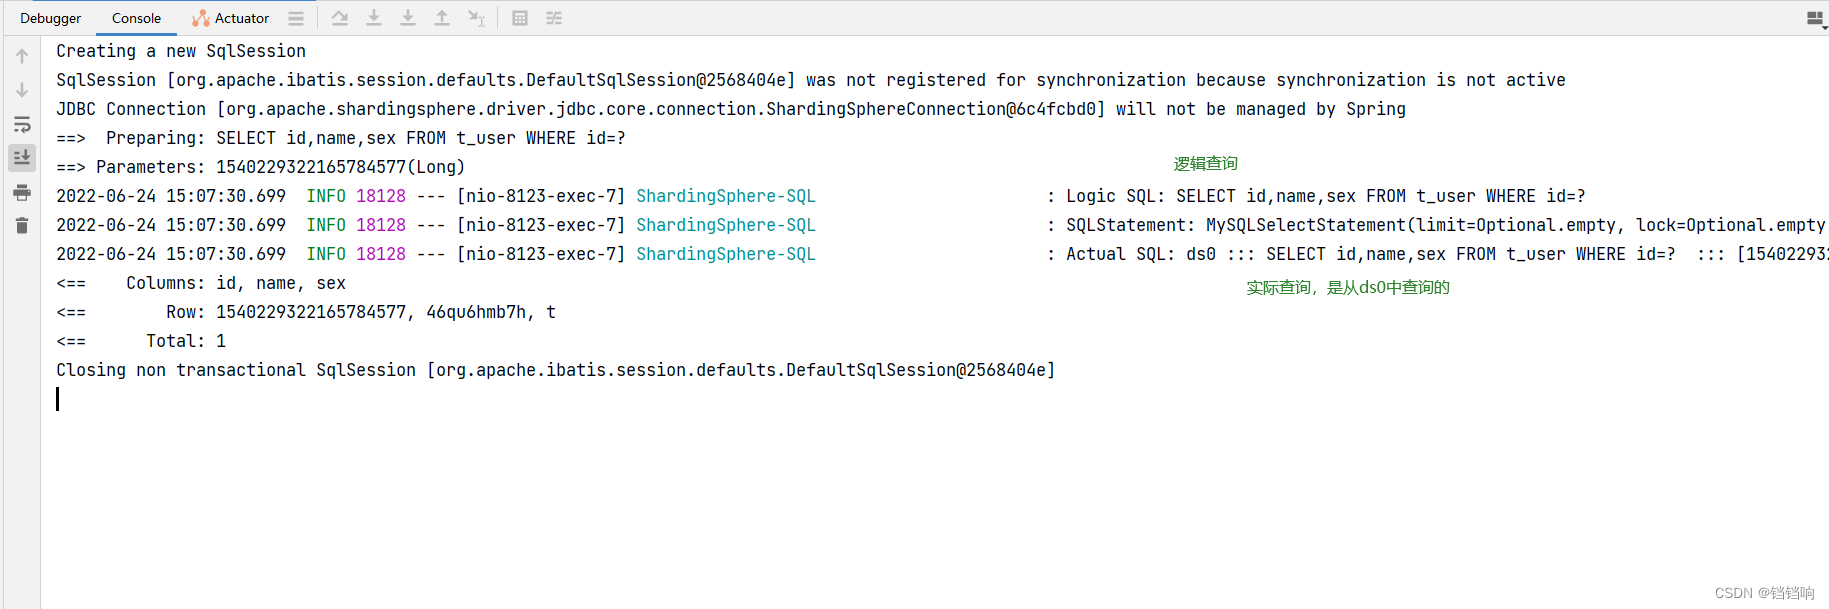
5.3.1、update/{userId}/{sex} 接口
1、调用update/{userId}/{sex}接口

2、控制台日志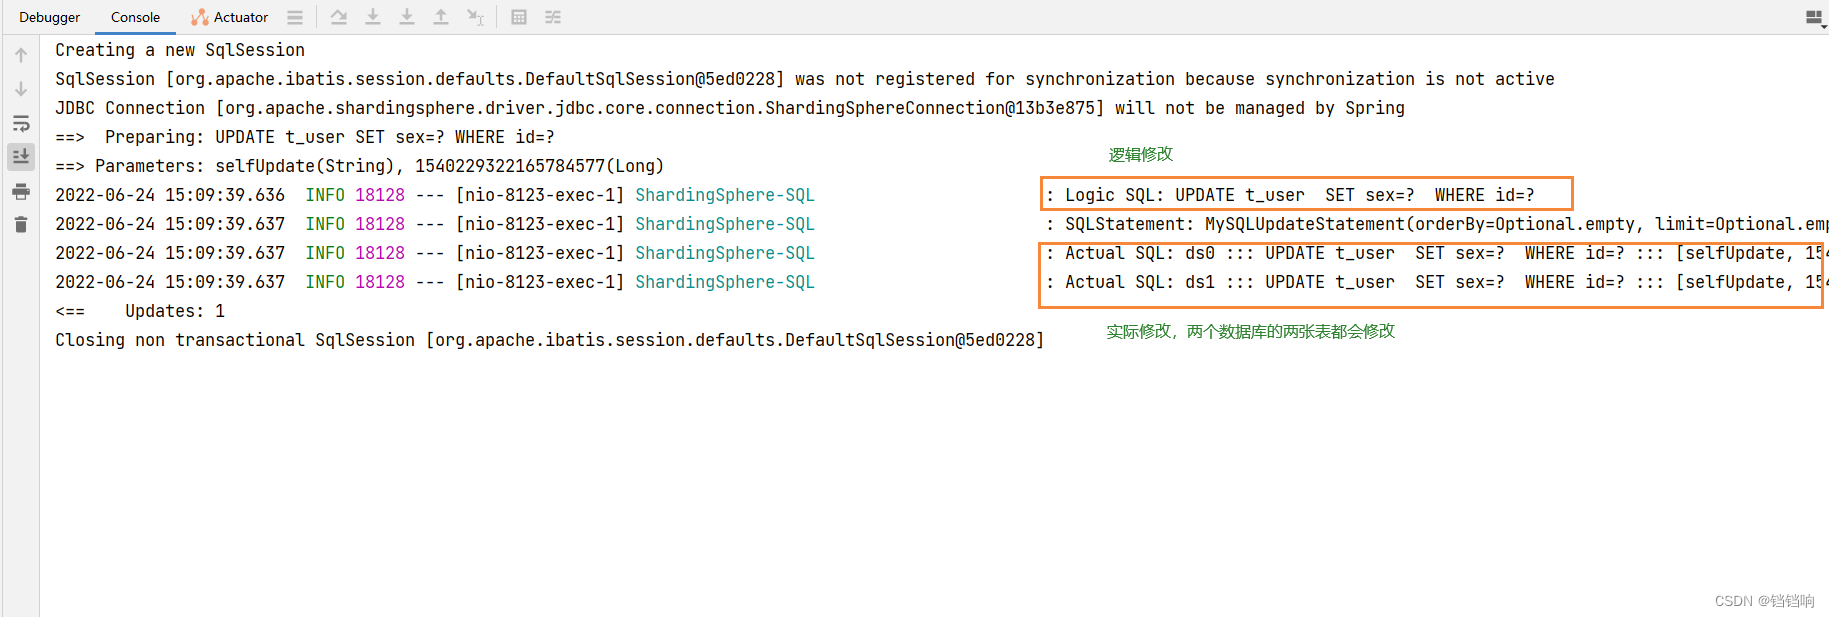
3、数据库数据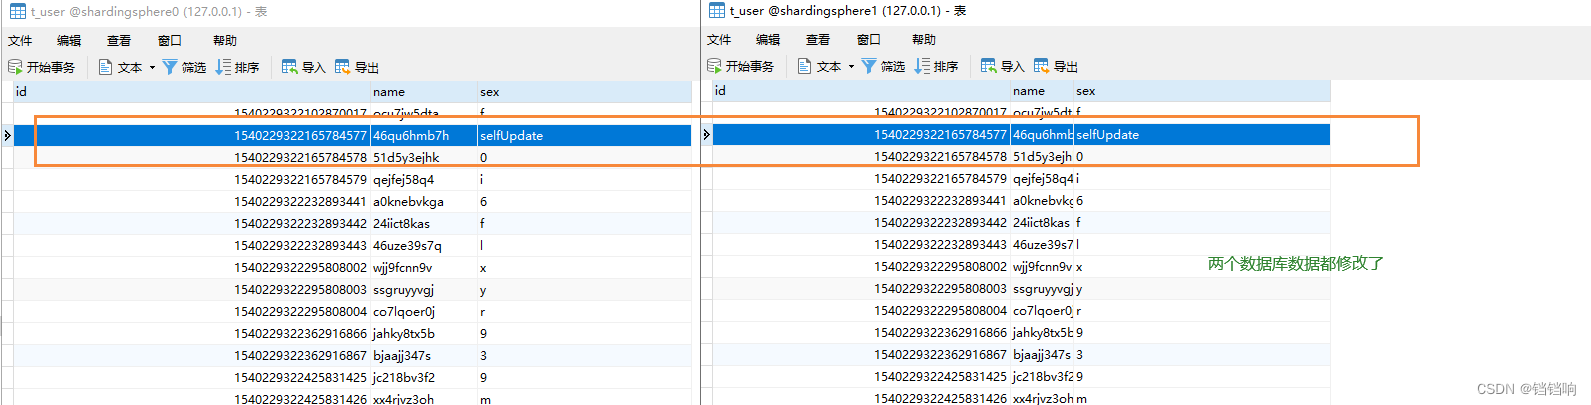
六、使用案例–单表(singleTable)
6.1、数据库格式
1、数据库创建,业务表t_dict,分别分布于ds0这一个个数据库中,
指所有的分片数据源中仅唯一存在的表。 适用于数据量不大且无需分片的表。
2、可以看到,只有在ds0数据库中有这一张表,ds1数据库是没有的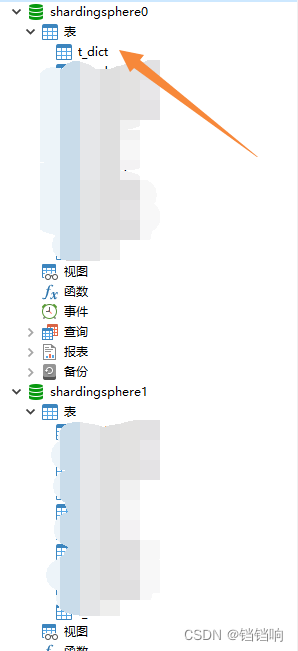
3、注意这里的主键id,我设置为数据库自增,因为它就是我们的一张普通的表,不参与shardingsphere的业务,所以,你平时这样的表怎么做,就这么做,即可
CREATE TABLE `t_dict` (
  `id` bigint NOT NULL AUTO_INCREMENT,
  `type` varchar(255) CHARACTER SET utf8mb4 COLLATE utf8mb4_general_ci DEFAULT NULL,
  PRIMARY KEY (`id`) USING BTREE
) ENGINE=InnoDB DEFAULT CHARSET=utf8mb4 COLLATE=utf8mb4_general_ci ROW_FORMAT=DYNAMIC;
6.2、项目代码
1、application.yml配置如下,其实单表在shrdingsphere的5.0.0版本以后,都是不用做任何配置的,它会自动寻找到,那理论上来说,我直接配置ds0和ds1数据源即可,其他都不用配置了啊,但是如果你这样配置,就说明你的项目没有用到shardingsphere的任何一个功能,它就会报错,所以意思就是你用了shardingsphere就得有分库分表的表,所以,即使我这里演示用不到广播表的配置(当然这个配置你换成其他的都行,你得让shardingsphere知道你用到了某些功能),我还是配置一下,这样它启动就不会报错。
spring:
  sharding-sphere: # mode.type 默认是内存模式启动
    props:
      # 展示sql
      sql-show: true
    datasource:
      ds0:
        driver-class-name: com.mysql.cj.jdbc.Driver
        jdbc-url: jdbc:mysql://localhost:3306/shardingsphere0?useUnicode=true&characterEncoding=utf-8&useSSL=false&serverTimezone=GMT&allowPublicKeyRetrieval=true
        password: 123456
        type: com.zaxxer.hikari.HikariDataSource
        username: root
      ds1:
        driver-class-name: com.mysql.cj.jdbc.Driver
        jdbc-url: jdbc:mysql://localhost:3306/shardingsphere1?useUnicode=true&characterEncoding=utf-8&useSSL=false&serverTimezone=GMT&allowPublicKeyRetrieval=true
        password: 123456
        type: com.zaxxer.hikari.HikariDataSource
        username: root
      names: ds0,ds1
    rules:
      sharding:
        tables:
          t_user: # 广播表不会对数据进行分片,所以配置分库,分表规则是不会生效的
            key-generate-strategy:
              column: id
              keyGeneratorName: t-user-snowflake
        key-generators:
          t-user-snowflake:
            type: snowflake
            props:
              worker-id: 1
        broadcast-tables:
          - t_user # 【指所有的分片数据源中都存在的表】,表结构及其数据在每个数据库中均完全一致。 适用于数据量不大且需要与海量数据的表进行关联查询的场景,例如:字典表。
server:
  port: 8123

mybatis-plus:
  configuration:
    cache-enabled: false
    log-impl: org.apache.ibatis.logging.stdout.StdOutImpl
    map-underscore-to-camel-case: true
  mapper-locations: classpath:mapper/*.xml
  type-aliases-package: cn.gxm.shardingspheretest.model
2、model,注意这里使用的了@TableId(value = "id", type = IdType.AUTO),因为这就是一个普通的业务表,主键我选择让数据库生成,shardingsphere 不参与处理
package cn.gxm.shardingspheretest.model;

import com.baomidou.mybatisplus.annotation.IdType;
import com.baomidou.mybatisplus.annotation.TableField;
import com.baomidou.mybatisplus.annotation.TableId;
import com.baomidou.mybatisplus.annotation.TableName;
import com.baomidou.mybatisplus.extension.activerecord.Model;
import lombok.AllArgsConstructor;
import lombok.Data;
import lombok.NoArgsConstructor;

/** * @author GXM * @version 1.0.0 * @Description TODO * @createTime 2022年06月22日 */
@TableName("t_dict")
@Data
@AllArgsConstructor
@NoArgsConstructor
public class Dict extends Model<Dict> {


    @TableId(value = "id", type = IdType.AUTO)
    private Long id;

    @TableField("type")
    private String type;
}
3、mapper和service就省略了,和平常配置的mybatis plus 差不多,
4、增加一个controller,来测试一下
package cn.gxm.shardingspheretest.controller;

import cn.gxm.shardingspheretest.model.Dict;
import cn.gxm.shardingspheretest.service.DictService;
import org.springframework.beans.factory.annotation.Autowired;
import org.springframework.web.bind.annotation.GetMapping;
import org.springframework.web.bind.annotation.RequestMapping;
import org.springframework.web.bind.annotation.RestController;

/** * @author GXM * @version 1.0.0 * @Description TODO * @createTime 2022年06月22日 */
@RequestMapping("/dict")
@RestController
public class DictController {


    private final DictService dictService;

    @Autowired
    public DictController(DictService dictService) {

        this.dictService = dictService;
    }

    /** * 这个表只存在于 shardingsphere0 数据库 * shardSphere 5.0.0 版本不用配置 default-datasource,它会自动判断这个表在那个数据库 * 之前版本( < 5.0.0)的需要配置该参数,标识单个表的默认数据库位置 * * @return */
    @GetMapping("/mock")
    public String mock() {

        for (int i = 0; i < 100; i++) {

            Dict dict = new Dict();
            dict.setType(String.valueOf(i));
            this.dictService.save(dict);
            System.out.println();
        }
        return "ok";
    }
}
6.3、测试
6.3.1、mock 接口测试
1、请求接口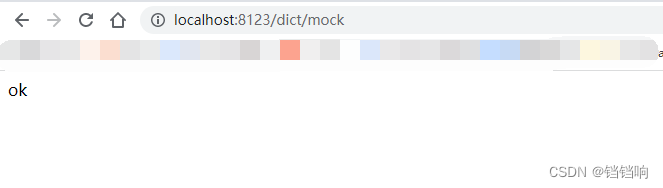
2、控制台日志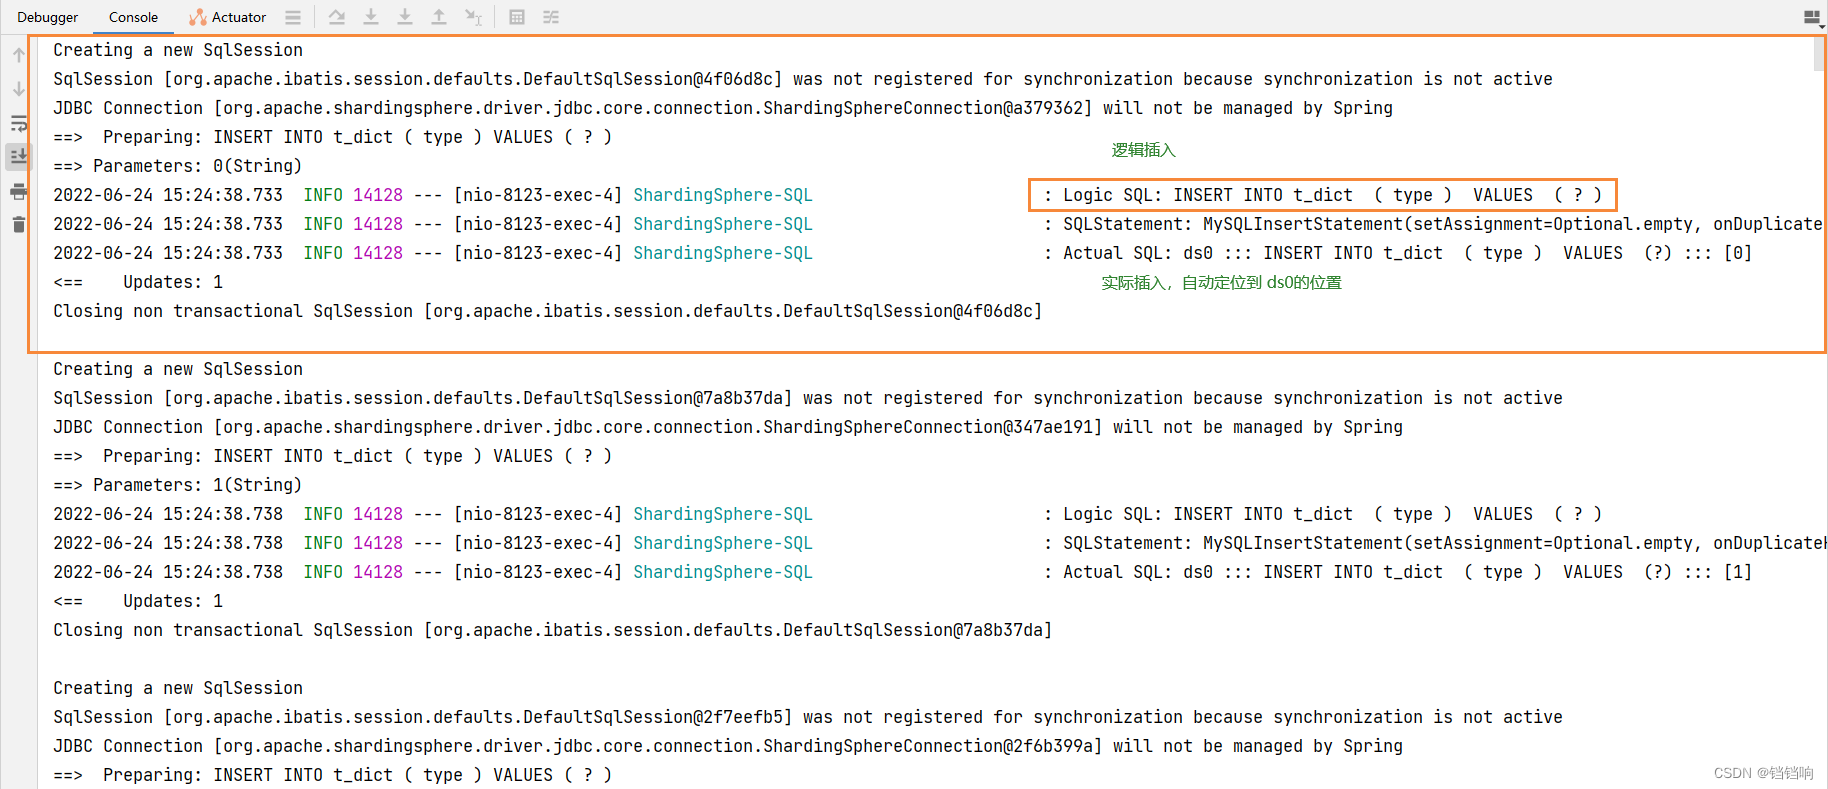
3、数据库内容

七、使用案例–混合以上情况使用
1、yml文件如下
spring:
  sharding-sphere: # mode.type 默认是内存模式启动
    props:
      # 展示sql
      sql-show: true
    datasource:
      ds0:
        driver-class-name: com.mysql.cj.jdbc.Driver
        jdbc-url: jdbc:mysql://localhost:3306/shardingsphere0?useUnicode=true&characterEncoding=utf-8&useSSL=false&serverTimezone=GMT&allowPublicKeyRetrieval=true
        password: 123456
        type: com.zaxxer.hikari.HikariDataSource
        username: root
      ds1:
        driver-class-name: com.mysql.cj.jdbc.Driver
        jdbc-url: jdbc:mysql://localhost:3306/shardingsphere1?useUnicode=true&characterEncoding=utf-8&useSSL=false&serverTimezone=GMT&allowPublicKeyRetrieval=true
        password: 123456
        type: com.zaxxer.hikari.HikariDataSource
        username: root
      names: ds0,ds1
    rules:
      sharding:
        sharding-algorithms:
          t-problem-db-inline: # 名为 t-problem-db-inline 的分库策略的算法
            props:
              algorithm-expression: ds$->{
    id % 2}
            type: INLINE
          t-problem-table-inline: # 名为 t-problem-table-inline 的分表策略的算法
            props:
              algorithm-expression: t_problem$->{
    id % 3}
            type: INLINE
          t-order-db-inline:
            props:
              algorithm-expression: ds$->{
    id % 2}
            type: INLINE
          t-order-table-inline:
            props:
              algorithm-expression: t_order$->{
    id % 3}
            type: INLINE
          t-order-item-db-inline:
            props:
              algorithm-expression: ds$->{
    order_id % 2}
            type: INLINE
          t-order-item-table-inline:
            props:
              algorithm-expression: t_order_item$->{
    order_id % 3}
            type: INLINE
        tables:
          t_problem:
            actual-data-nodes: ds$->{
    0..1}.t_problem$->{
    0..2}
            database-strategy: # 分库策略
              standard: # 用于单分片键的标准分片场景,(多个列标识区分是复杂情况,将standard换成 complex(即分片列名称,多个列以逗号分隔))
                sharding-algorithm-name: t-problem-db-inline # 名称,在上面使用
                sharding-column: id # 那个字段传到后面算法中
            table-strategy: # 分表策略
              standard:
                sharding-algorithm-name: t-problem-table-inline
                sharding-column: id # 那个字段传到后面算法中
            key-generate-strategy: # t_problem 表主键 id 生成的策略 https://blog.csdn.net/chinawangfei/article/details/114675854
              column: id  # t_order 表的主键id 需要使用雪花算法
              keyGeneratorName: t-problem-snowflake  # 关键这里修改后 似乎不生效,这是最离谱的,就是默认使用的是雪花算法
          t_order:
            actual-data-nodes: ds$->{
    0..1}.t_order$->{
    0..2}
            database-strategy: # 分库策略
              standard: # 用于单分片键的标准分片场景,(多个列标识区分是复杂情况,将standard换成 complex(即分片列名称,多个列以逗号分隔))
                sharding-algorithm-name: t-order-db-inline # 名称,在上面使用
                sharding-column: id # 那个字段传到后面算法中
            table-strategy: # 分表策略
              standard:
                sharding-algorithm-name: t-order-table-inline
                sharding-column: id # 那个字段传到后面算法中
            key-generate-strategy: # t_order 表主键order_id 生成的策略 https://blog.csdn.net/chinawangfei/article/details/114675854
              column: id  # t_order 表的主键id 需要使用雪花算法
              keyGeneratorName: t-order-snowflake  # 关键这里修改后 似乎不生效,这是最离谱的,就是默认使用的是雪花算法
          t_order_item:
            actual-data-nodes: ds$->{
    0..1}.t_order_item$->{
    0..2}
            database-strategy:
              standard:
                sharding-algorithm-name: t-order-item-db-inline
                sharding-column: order_id
            table-strategy:
              standard:
                sharding-algorithm-name: t-order-item-table-inline
                sharding-column: order_id
            key-generate-strategy:
              column: id
              keyGeneratorName: t-order-item-snowflake
          t_user: # 广播表不会对数据进行分片,所以配置分库,分表规则是不会生效的
            key-generate-strategy:
              column: id
              keyGeneratorName: t-user-snowflake
        key-generators:
          t-order-snowflake:
            type: snowflake
            props:
              worker-id: 1
          t-order-item-snowflake:
            type: snowflake
            props:
              worker-id: 1
          t-user-snowflake:
            type: snowflake
            props:
              worker-id: 1
          t-problem-snowflake:
            type: snowflake
            props:
              worker-id: 1
        binding-tables:
          - t_order,t_order_item  # 绑定表,可以避免在关联查询的时候形成笛卡儿积,注意绑定表之间的分库和分表算法必须保持一致,比如上面t_order和t_order_item都是使用order_id作为分库分表的基础【其中t_order在FROM的最左侧,ShardingSphere将会以它作为整个绑定表的主表。 所有路由计算将会只使用主表的策略,那么t_order_item表的分片计算将会使用t_order的条件。故绑定表之间的分区键要完全相同】
        broadcast-tables:
          - t_user # 【指所有的分片数据源中都存在的表】,表结构及其数据在每个数据库中均完全一致。 适用于数据量不大且需要与海量数据的表进行关联查询的场景,例如:字典表。
server:
  port: 8123

mybatis-plus:
  configuration:
    cache-enabled: false
    log-impl: org.apache.ibatis.logging.stdout.StdOutImpl
    map-underscore-to-camel-case: true
  mapper-locations: classpath:mapper/*.xml
  type-aliases-package: cn.gxm.shardingspheretest.model
边栏推荐
猜你喜欢

【推薦系統 01】Rechub
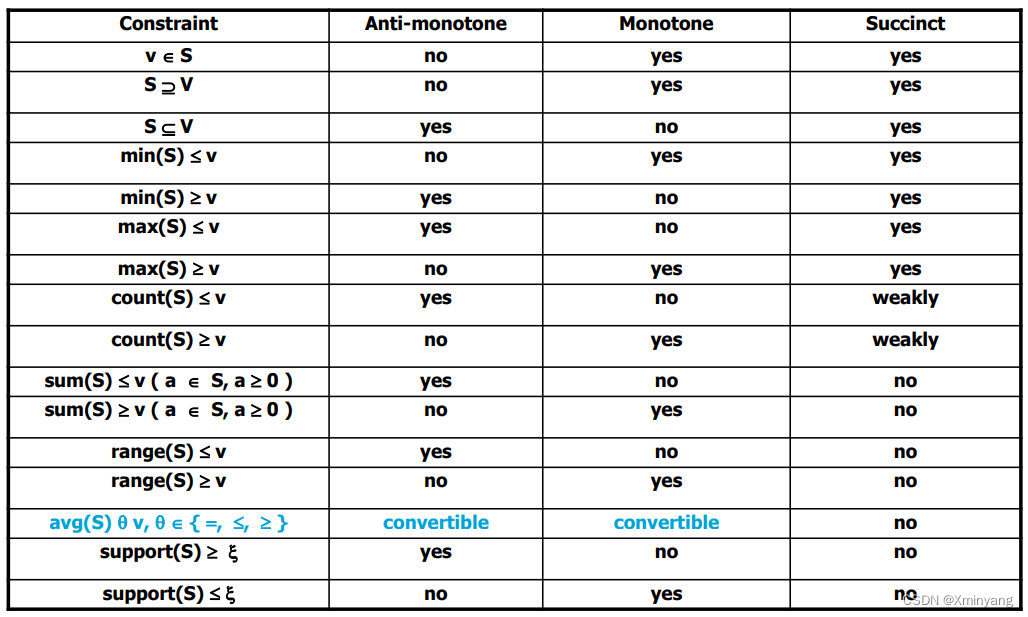
Différences entre les contraintes monotones et anti - monotones
ADB utility commands (network package, log, tuning related)
Socket communication principle and Practice

枪出惊龙,众“锁”周之
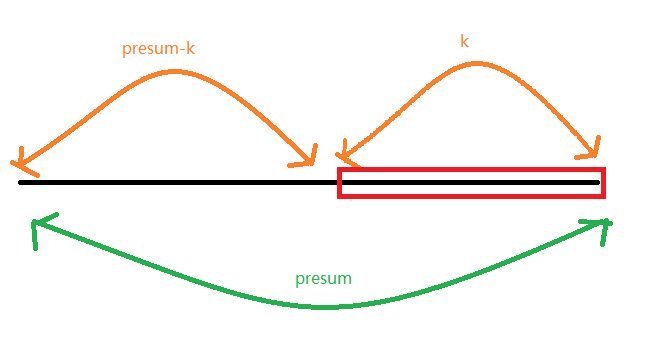
leetcode-560:和为 K 的子数组

中级软件评测师考什么
MONAI版本更新到 0.9 啦,看看有什么新功能
![[OneNote] can't connect to the network and can't sync the problem](/img/28/9a02b1da0f43889989a9539c9fb6b6.png)
[OneNote] can't connect to the network and can't sync the problem
![[recommendation system 02] deepfm, youtubednn, DSSM, MMOE](/img/d5/33765983e6b98235ca085f503a1272.png)
[recommendation system 02] deepfm, youtubednn, DSSM, MMOE
随机推荐
Realize ray detection, drag the mouse to move the object and use the pulley to scale the object
Operation method of Orange Pie orangepi 4 lts development board connecting SATA hard disk through mini PCIe
无法打开内核设备“\\.\VMCIDev\VMX”: 操作成功完成。是否在安装 VMware Workstation 后重新引导? 模块“DevicePowerOn”启动失败。 未能启动虚拟机。
Network engineer test questions and answers in May of the first half of 2022
Unity script visualization about layout code
[OneNote] can't connect to the network and can't sync the problem
CAS mechanism
优雅的 Controller 层代码
软考一般什么时候出成绩呢?在线蹬?
[système recommandé 01] rechub
深入理解Apache Hudi异步索引机制
【OneNote】无法连接到网络,无法同步问题
CSAPP bomb lab parsing
Multithreaded asynchronous orchestration
Schnuka: working principle of robot visual grasping machine visual grasping
I'd rather say simple problems a hundred times than do complex problems once
关于easyflash v3.3使用过程的记录
那些易混淆的概念(三):function和class
SQL Server knowledge gathering 9: modifying data
About hzero resource error (groovy.lang.missingpropertyexception: no such property: weight for class)