当前位置:网站首页>Numpy --- basic learning notes
Numpy --- basic learning notes
2022-07-07 15:50:00 【madkeyboard】
Numpy and List
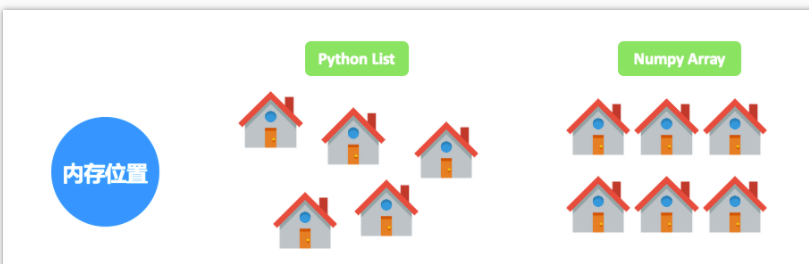
List The functions that can be done are roughly the same as Numpy It's almost the same , however Numpy The advantage of is that the operation is very fast , because Numpy In storage, a piece of continuous physical address of the computer is used to store data , It takes less time to search data , and List The stored data is scattered in different physical spaces .
So when dealing with large-scale data ,Numpy than List The effect is good .
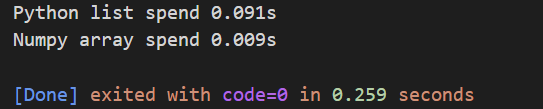
An example is given to demonstrate the time they spend processing data separately , As you can see from the results , Let a random input increase 10000 Time ,Numpy The calculation speed of is about 10 times , If there's more data , The effect should be better .
import time
import numpy as np

t0 = time.time()
# python list
l = list(range(100))
for _ in range(10000):
    for i in range(len(l)):
        l[i] += 1

t1 = time.time()
# numpy array
a = np.array(l)
for _ in range(10000):
    a += 1

print("Python list spend {:.3f}s".format(t1-t0))
print("Numpy array spend {:.3f}s".format(time.time()-t1))
dimension
Numpy One of its advantages is that it can handle multidimensional data , In machine learning and artificial intelligence, the calculation of multidimensional data often occurs .
Create multidimensional data
For example, it takes time for us to test a car to accelerate for hundreds of miles , First create a list of hundred mile accelerations
car = np.array([5,12,3,13])
print(" Time consuming : ",car,"\n dimension :",car.ndim)
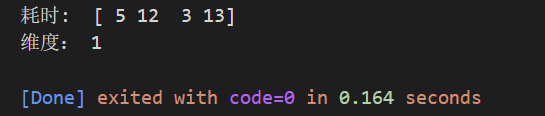
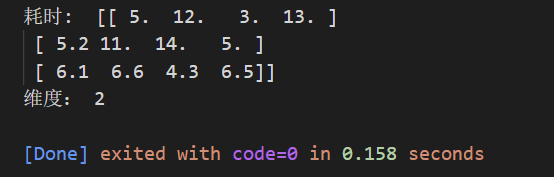
You can see that the output is one-dimensional , Then if you add several groups of data, it means multiple tests , You create two-dimensional data
car = np.array(
  [[5,12,3,13],
  [5.2,11,14,5],
  [6.1,6.6,4.3,6.5]])
print(" Time consuming : ",car,"\n dimension :",car.ndim)
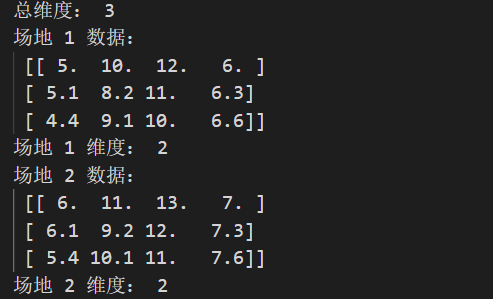
Empathy , Create a three-dimensional representation to test the vehicle on different sites .
car = np.array([
[
    [5, 10, 12, 6],
    [5.1, 8.2, 11, 6.3],
    [4.4, 9.1, 10, 6.6]
],
[
    [6, 11, 13, 7],
    [6.1, 9.2, 12, 7.3],
    [5.4, 10.1, 11, 7.6]
],
])
print(" The total dimension :", car.ndim)
print(" site  1  data :\n", car[0], "\n site  1  dimension :", car[0].ndim)
print(" site  2  data :\n", car[1], "\n site  2  dimension :", car[1].ndim)
Add data
Add one-dimensional data .np.concatenate()
cars1 = np.array([5, 10, 12, 6])
cars2 = np.array([5.2, 4.2])
cars = np.concatenate([cars1, cars2])
print(cars) #[ 5. 10. 12. 6. 5.2 4.2]
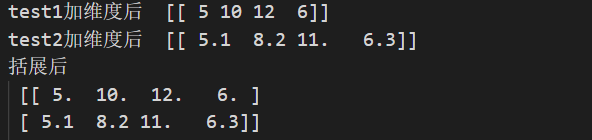
Add 2D data
test1 = np.array([5, 10, 12, 6])
test2 = np.array([5.1, 8.2, 11, 6.3])

#  First, we need to turn them into two dimensions , The following two methods can add dimensions
test1 = np.expand_dims(test1, 0)
test2 = test2[np.newaxis, :]

print("test1 After adding dimensions  ", test1)
print("test2 After adding dimensions  ", test2)

#  Then superimpose on the first dimension
all_tests = np.concatenate([test1, test2])
print(" After the exhibition \n", all_tests)
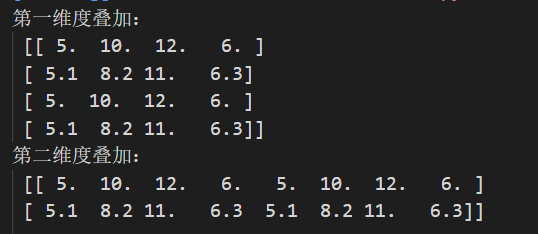
Merge data
As long as the dimensions can be aligned , You can merge on any dimension .
import time
import numpy as np

test1 = np.array([5, 10, 12, 6])
test2 = np.array([5.1, 8.2, 11, 6.3])

#  First, we need to turn them into two dimensions , The following two methods can add dimensions
test1 = np.expand_dims(test1, 0)
test2 = test2[np.newaxis, :]

all_tests = np.concatenate([test1, test2])

print(" The first dimension is superimposed :\n",np.concatenate([all_tests,all_tests],axis=0))
print(" The second dimension is superimposed :\n",np.concatenate([all_tests,all_tests],axis=1))
np.hstack() Horizontal merger
np.vstach() Vertical merge
- Observation form
test1 = np.array([
[5, 10, 12, 6],
[5.1, 8.2, 11, 6.3],
[4.4, 9.1, 10, 6.6]
])

print(" According to the total :",test1.size)
print(" The first dimension ",test1.shape[0]) #  Indicates how many tests have been performed
print(" The second dimension ",test1.shape[1]) #  Indicates the number of vehicles tested
print(" All dimensions ",test1.shape)

# The first dimension : 3
# The second dimension : 4
# All dimensions : (3, 4)
Data selection
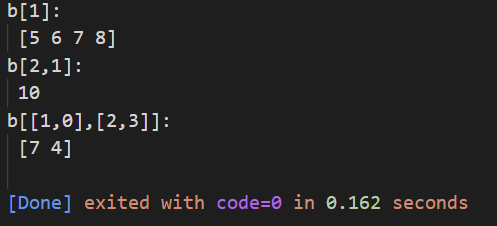
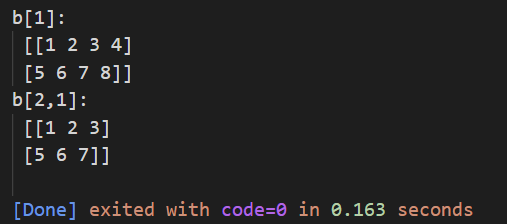
- Single choice
import numpy as np

b = np.array([
[1,2,3,4],
[5,6,7,8],
[9,10,11,12]
])

print("b[1]:\n",b[1]) #  Select all numbers in the second row
print("b[2,1]:\n",b[2,1]) #  Select the number of the third row and the second column
print("b[[1,0],[2,3]]:\n",
b[[1,0],
[2,3]]) #  The two numbers taken are [1,2]  and  [0,3]
- section
print("b[1]:\n",b[:2]) #  Select all the numbers in the first and second rows
print("b[2,1]:\n",b[:2,:3]) #  Select the first and second rows , front 3 Number of columns
- To choice
import numpy as np

b = np.array([
[1,2,3,4],
[5,6,7,8],
[9,10,11,12]
])

condition = (b < 5) & (b != 2)
print(b[condition]) # 1 3 4
print(np.where(condition,-2,b)) #  Replace the value satisfying the condition with -2
print(np.where(condition,-2,-1)) #  Replace the value satisfying the condition with -2, If not, replace with -1
Basic operation
import numpy as np

a = np.array([
  [1,2],
  [3,4]
])
b = np.array([
  [5,6],
  [7,8]
])
print(a.dot(b)) #  Matrix dot product  print(np.dot(a, b))

np.max() #  Maximum
np.min() #  minimum value
np.sum() #  Sum up
np.prod() #  Multiplicative multiplication
np.size() #  total
np.count_nonzero() #  Nonzero total
np.mean() #  The average
np.median() #  Median
np.std() #  Standard deviation
np.argmax() #  The subscript of the maximum value
np.argmin() #  Subscript of minimum value
np.ceil() #  Rounding up
np.floor() #  Rounding down
np.clip(a,b) #  Define a rounded upper 、 Lower bound
a = np.array([150.1, 166.4, 183.7, 170.8])
print("clip:", a.clip(160, 180))
# clip: [160. 166.4 180. 170.8]

#  Official documents  https://numpy.org/devdocs/user/quickstart.html#basic-operations
Change the data form
Add dimensions
a_2d = a[np.newaxis, :]
a_none = a[:, None]
a_expand = np.expand_dims(a, axis=1)
#  These three methods can achieve the same effect
Reduce dimensions
a_squeeze = np.squeeze(a_expand)
a_squeeze_axis = a_expand.squeeze(axis=1)
# squeeze  Only dimensions can be reduced shape Up for 1 Dimensions , Ensure that the data structure does not change

#  If you want to change the dimension, you can use  reshape
a = np.array([1,2,3,4,5,6])
a1 = a.reshape([2, 3])
a2 = a.reshape([3,1,2]) #  I don't understand here
#
a1 shape: (2, 3)
[[1 2 3]
 [4 5 6]]
a2 shape: (3, 1, 2)
[[[1 2]]
 [[3 4]]
 [[5 6]]]
#

#  Matrix transposition
np.transpose()
np.T
Merge
np.column_stack() #  columns
np.row_stack() #  merger

#  The above two merge methods are similar to  vstack and hstack The difference is that : Use vstack and hstack You need to process dimension information first , and column_stack and row_stack Automatic processing
feature_a = np.array([1,2,3,4,5,6])[:, None]
feature_b = np.array([11,22,33,44,55,66])[:, None]
c_stack = np.hstack([feature_a, feature_b])

# np.concatenate()  It is suitable for merging in different situations
np.concatenate([a, b], axis=0)
Take apart
a = np.array(
[[ 1, 11, 2, 22],
 [ 3, 33, 4, 44],
 [ 5, 55, 6, 66],
 [ 7, 77, 8, 88]]
)
print(np.vsplit(a, indices_or_sections=2))  #  In two parts
print(np.vsplit(a, indices_or_sections=[2,3]))  #  Slice into  [:2],[2:3], [3:]

np.hsplit() #  Crosscut   The function is similar to
a = np.array(
[[ 1, 11, 2, 22],
 [ 3, 33, 4, 44],
 [ 5, 55, 6, 66],
 [ 7, 77, 8, 88]]
)
print(np.split(a, indices_or_sections=2, axis=0))  #  In two parts
print(np.split(a, indices_or_sections=[2,3], axis=1))  #  In the second dimension , Slice into  [:2],[2:3],[3:]

#  Use split  Custom segmentation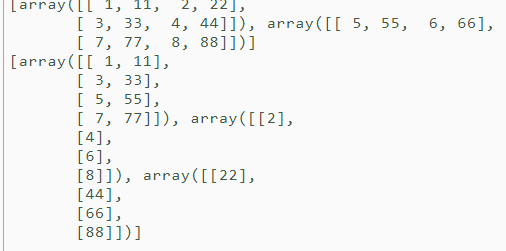
边栏推荐
- Getting started with webgl (4)
- [quick start of Digital IC Verification] 19. Basic grammar of SystemVerilog learning 6 (thread internal communication... Including practical exercises)
- L'application à l'échelle de la normalisation mature des produits ai des compagnies maritimes, cimc, leader mondial de l'intelligence artificielle portuaire et maritime / intelligence artificielle des
- 【数字IC验证快速入门】19、SystemVerilog学习之基本语法6(线程内部通信...内含实践练习)
- Zhongang Mining: Fluorite continues to lead the growth of new energy market
- 【数字IC验证快速入门】24、SystemVerilog项目实践之AHB-SRAMC(4)(AHB继续深入)
- Using eating in cocos Creator
- Cut ffmpeg as needed, and use emscripten to compile and run
- [quick start of Digital IC Verification] 29. Ahb-sramc (9) (ahb-sramc svtb overview) of SystemVerilog project practice
- Use cpolar to build a business website (2)
猜你喜欢
【數字IC驗證快速入門】20、SystemVerilog學習之基本語法7(覆蓋率驅動...內含實踐練習)
10 schemes to ensure interface data security
【数字IC验证快速入门】23、SystemVerilog项目实践之AHB-SRAMC(3)(AHB协议基本要点)
Tkinter after how to refresh data and cancel refreshing
A wave of open source notebooks is coming

航運船公司人工智能AI產品成熟化標准化規模應用,全球港航人工智能/集裝箱人工智能領軍者CIMC中集飛瞳,打造國際航運智能化標杆
Actually changed from 408 to self proposition! 211 North China Electric Power University (Beijing)

Create lib Library in keil and use lib Library
Postman generate timestamp, future timestamp
Starting from 1.5, build a microservice framework link tracking traceid
随机推荐
Implementation of crawling web pages and saving them to MySQL using the scrapy framework
LeetCode3_ Longest substring without duplicate characters
一大波开源小抄来袭
Getting started with webgl (4)
【数字IC验证快速入门】24、SystemVerilog项目实践之AHB-SRAMC(4)(AHB继续深入)
Ue4/ue5 multi thread development attachment plug-in download address
TS as a general cache method
2022山东智慧养老展,适老穿戴设备展,养老展,山东老博会
The rebound problem of using Scrollview in cocos Creator
A wave of open source notebooks is coming
The download button and debug button in keil are grayed out
Function: JS Click to copy content function
Three. JS introductory learning notes 18: how to export JSON files with Blender
Virtual memory, physical memory /ram what
Three. JS introductory learning notes 00: coordinate system, camera (temporarily understood)
Keil5 does not support online simulation of STM32 F0 series
银行需要搭建智能客服模块的中台能力,驱动全场景智能客服务升级
Ida Pro reverse tool finds the IP and port of the socket server
Excerpted words
【数字IC验证快速入门】19、SystemVerilog学习之基本语法6(线程内部通信...内含实践练习)