当前位置:网站首页>Navigation - are you sure you want to take a look at such an easy-to-use navigation framework?
Navigation - are you sure you want to take a look at such an easy-to-use navigation framework?
2022-07-07 14:26:00 【InfoQ】
Preface
Use Navigation What's the advantage ?
- Handle Fragment Business
- By default , Can correctly handle round-trip operations
- Provide standardized resources for animation and transformation
- Implement and handle deep links
- Including navigation interface mode , For example, drawer navigation bar and bottom navigation , We only need to complete a small amount of code
- Safe Args - Provides type safe navigation and data transfer between targets Gradle plug-in unit
- ViewModel Support - You can use ViewModel The scope of is limited to the navigation map , To share data related to the interface between the targets of the icon
How to use Navigation Well ?
NavigationNavigation- Navigation graph: One that contains all navigation related information
XMLresources
- NavHostFragment: A special kind
Fragment, Container used to hold navigation content
- NavController: Manage application navigation objects , Realization
FragmentBetween the jump and other operations
First step : Add dependency
//project Of Navigation Dependency settings
dependencies {
// The latest stable version when the article is released :
def nav_version = "2.4.2"
// Use java Add the following two lines as the development language :
implementation "androidx.navigation:navigation-fragment:$nav_version"
implementation "androidx.navigation:navigation-ui:$nav_version"
// Kotlin:
implementation "androidx.navigation:navigation-fragment-ktx:$nav_version"
implementation "androidx.navigation:navigation-ui-ktx:$nav_version"
}
//Compose edition :
implementation "androidx.navigation:navigation-compose:$nav_version"
The second step : Create a navigation map
resNewAndroid Resource DirectoryNew Resource DirectoryDirectory namenavigationResource typenavigationnavigationnewNavigation Resource FileFile name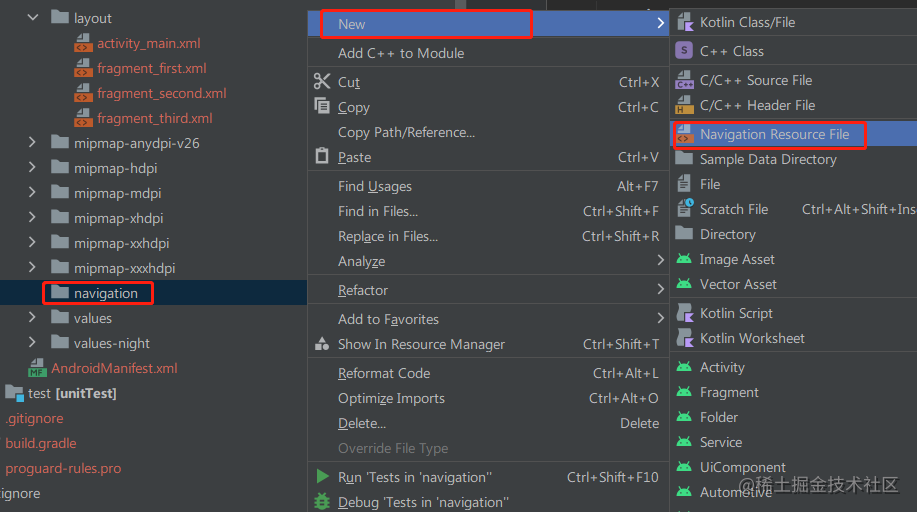
The third step : establish Fragment
Fragment<?xml version="1.0" encoding="utf-8"?>
<FrameLayout xmlns:android="http://schemas.android.com/apk/res/android"
xmlns:tools="http://schemas.android.com/tools"
android:layout_width="match_parent"
android:layout_height="match_parent"
tools:context=".FirstFragment">
<TextView
android:layout_width="match_parent"
android:layout_height="match_parent"
android:gravity="center"
android:text="hello world" />
</FrameLayout>
class FirstFragment : Fragment() {
 override fun onCreateView(
 inflater: LayoutInflater, container: ViewGroup?,
 savedInstanceState: Bundle?
 ): View? {
 return inflater.inflate(R.layout.fragment_first, container, false)
 }
}
FirstFragementSecondFragmentThirdFragmentNavigation graphnav_graph_main.xmlDesignNavigation EditorCreate new destinationFragmentFinishFragment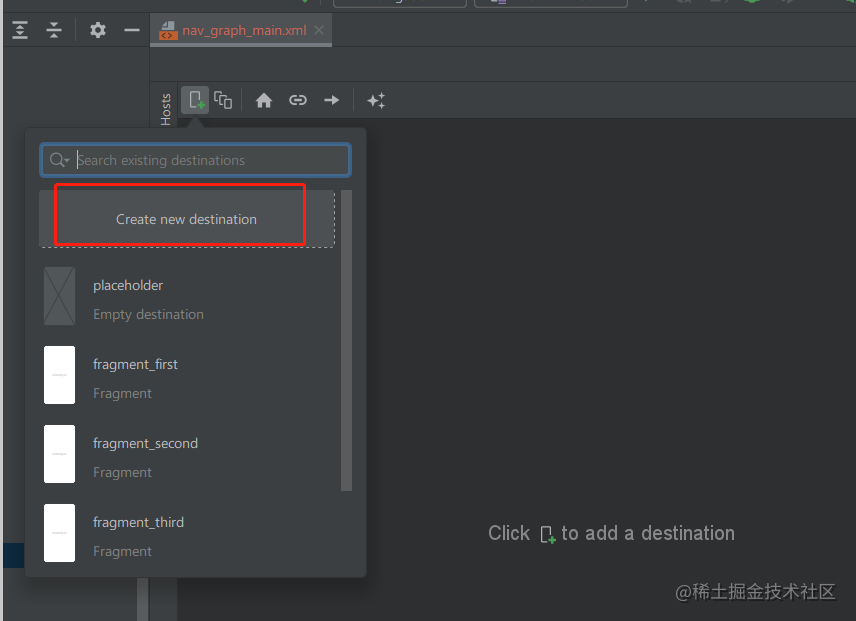
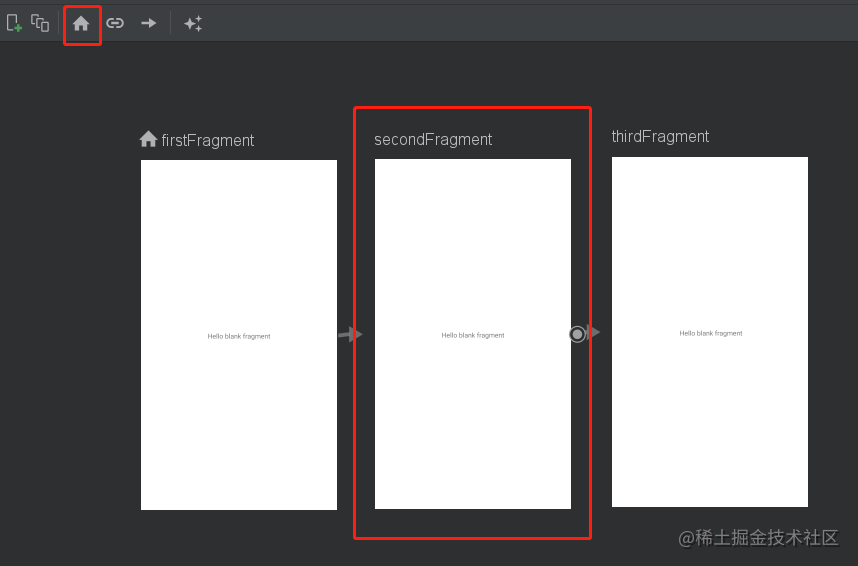
Step four : take Fragment Drag into the panel and configure the jump
Navigation EditorFragmentFragmentFragmentFirstFragmentSecondFragmentThirdFragmentFirstFragment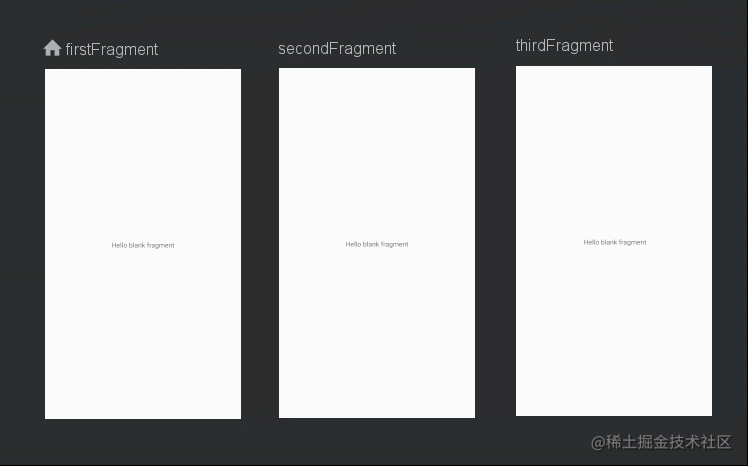
nav_graph_main.xmlCodexml<?xml version="1.0" encoding="utf-8"?>
<navigation xmlns:android="http://schemas.android.com/apk/res/android"
xmlns:app="http://schemas.android.com/apk/res-auto"
xmlns:tools="http://schemas.android.com/tools"
android:id="@+id/nav_graph_main"
app:startDestination="@id/firstFragment">
<fragment
android:id="@+id/firstFragment"
android:name="com.taxze.jetpack.navigation.FirstFragment"
android:label="fragment_first"
tools:layout="@layout/fragment_first" >
<action
android:id="@+id/action_firstFragment_to_secondFragment2"
app:destination="@id/secondFragment" />
</fragment>
<fragment
android:id="@+id/secondFragment"
android:name="com.taxze.jetpack.navigation.SecondFragment"
android:label="fragment_second"
tools:layout="@layout/fragment_second" >
<action
android:id="@+id/action_secondFragment_to_thirdFragment2"
app:destination="@id/thirdFragment" />
</fragment>
<fragment
android:id="@+id/thirdFragment"
android:name="com.taxze.jetpack.navigation.ThirdFragment"
android:label="fragment_third"
tools:layout="@layout/fragment_third" >
<action
android:id="@+id/action_thirdFragment_to_firstFragment"
app:destination="@id/firstFragment" />
</fragment>
</navigation>
navigationIt's a label , adoptstartDestinationConfigure the first page launched by default , The configuration here isfirstFragment, We can change it manually in the codemainFragment( The first one at startup Fragment), You can also clickFragment, Click againAssign Start Destination, You can also modifymainFragment
fragmentThe label means this is a Fragment
actionTags define the behavior of page jumps , Each line in the above figure ,destinationDefine the target page for jump , You can also add animation during jump
Step five : Handle MainActivity
MainActivityNavHostFragmentNavigationActivityFragmentNavHostFragment<?xml version="1.0" encoding="utf-8"?>
<androidx.constraintlayout.widget.ConstraintLayout xmlns:android="http://schemas.android.com/apk/res/android"
xmlns:app="http://schemas.android.com/apk/res-auto"
xmlns:tools="http://schemas.android.com/tools"
android:layout_width="match_parent"
android:layout_height="match_parent"
tools:context=".MainActivity">
<fragment
android:id="@+id/nav_host_fragment"
android:layout_width="0dp"
android:layout_height="0dp"
android:name="androidx.navigation.fragment.NavHostFragment"
app:layout_constraintBottom_toBottomOf="parent"
app:layout_constraintLeft_toLeftOf="parent"
app:layout_constraintRight_toRightOf="parent"
app:layout_constraintTop_toTopOf="parent"
app:defaultNavHost="true"
app:navGraph="@navigation/nav_graph_main" />
</androidx.constraintlayout.widget.ConstraintLayout>
fragmentLabel underandroid:nameIs used to designateNavHostFragment
app:navGraphIs used to specify the Navigation view
app:defaultNavHost=trueEvery timeFragmentWhen switching , Save the click record in the stack , When you need to exit , After pressing the back key , You'll get it from the stack last timeFragmentDisplay . But in some cases , Such operation is not very friendly , But fortunately, we just need toapp:defaultNavHost=trueChange it toapp:defaultNavHost=falseOr delete this line . When it isfalseUnder the circumstances , No matter how you switchFragment, Click the back button again and exit directlyapp. Of course, we can also listen to its stack , So as to achieve , Click the back button once to return to the home page , Click the back button again to exitapp.
MainActivityonSupportNavigateUpActivitybackclass MainActivity : AppCompatActivity() {
override fun onCreate(savedInstanceState: Bundle?) {
super.onCreate(savedInstanceState)
setContentView(R.layout.activity_main)
}
override fun onSupportNavigateUp(): Boolean {
return findNavController(R.id.nav_host_fragment).navigateUp()
}
}
Step six : Handle Fragment Corresponding jump event of
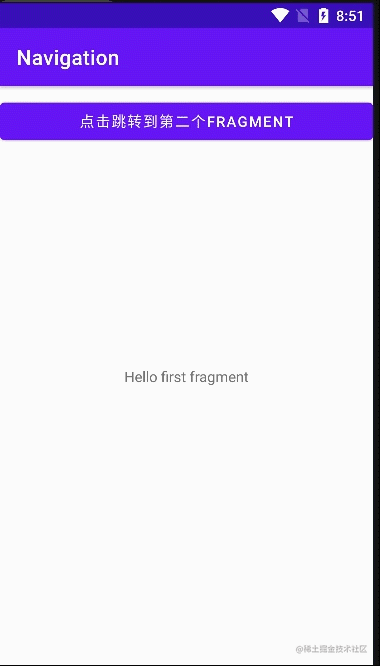
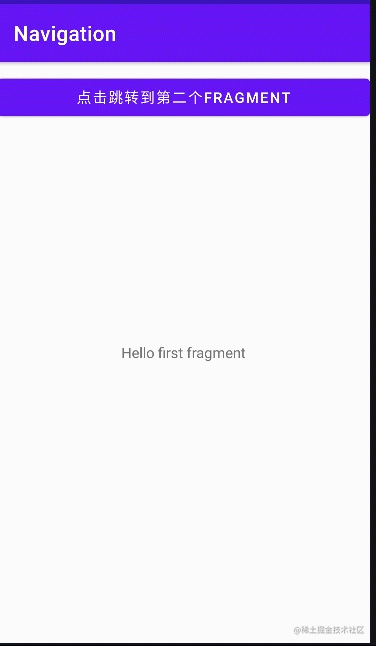
FragmentTextViewFragment<?xml version="1.0" encoding="utf-8"?>
<FrameLayout xmlns:android="http://schemas.android.com/apk/res/android"
xmlns:tools="http://schemas.android.com/tools"
android:layout_width="match_parent"
android:layout_height="match_parent"
tools:context=".FirstFragment">
<Button
android:id="@+id/firstButton"
android:layout_width="match_parent"
android:layout_height="wrap_content"
android:layout_marginTop="10dp"
android:text=" Click to jump to the second fragment" />
<TextView
android:layout_width="match_parent"
android:layout_height="match_parent"
android:gravity="center"
android:text="@string/hello_first_fragment" />
</FrameLayout>
//secondFragment Add :
<Button
android:id="@+id/firstButton"
android:layout_width="match_parent"
android:layout_height="wrap_content"
android:layout_marginTop="10dp"
android:text=" Click to jump to the third fragment" />
//thirdFragment Add :
<Button
android:id="@+id/firstButton"
android:layout_width="match_parent"
android:layout_height="wrap_content"
android:layout_marginTop="10dp"
android:text=" Return to the first fragment" />
class FirstFragment : Fragment() {
override fun onCreateView(
inflater: LayoutInflater, container: ViewGroup?,
savedInstanceState: Bundle?
): View? {
return inflater.inflate(R.layout.fragment_first, container, false)
}
override fun onViewCreated(view: View, savedInstanceState: Bundle?) {
super.onViewCreated(view, savedInstanceState)
view.findViewById<Button>(R.id.firstButton).apply {
setOnClickListener {
it.findNavController().navigate(R.id.action_firstFragment_to_secondFragment2)
}
}
}
}
//secondFragment Add :
override fun onViewCreated(view: View, savedInstanceState: Bundle?) {
super.onViewCreated(view, savedInstanceState)
view.findViewById<Button>(R.id.firstButton).apply {
setOnClickListener {
it.findNavController().navigate(R.id.action_secondFragment_to_thirdFragment2)
}
}
}
//thirdFragment Add :
override fun onViewCreated(view: View, savedInstanceState: Bundle?) {
super.onViewCreated(view, savedInstanceState)
view.findViewById<Button>(R.id.firstButton).apply {
setOnClickListener {
it.findNavController().navigate(R.id.action_thirdFragment_to_firstFragment)
}
}
}
R.id.action_firstFragment_to_secondFragment2nav_graph_main.xmlaction<action
android:id="@+id/action_firstFragment_to_secondFragment2"
app:destination="@id/secondFragment" />
Jump animation & Custom animation
nav_graph_main.xmlDesignFragmentAnimationsenterAnimPick a Resourenav_default_enter_animexitAnimnav_default_exit_animaction<fragment
android:id="@+id/firstFragment"
android:name="com.taxze.jetpack.navigation.FirstFragment"
android:label="fragment_first"
tools:layout="@layout/fragment_first" >
<action
android:id="@+id/action_firstFragment_to_secondFragment2"
app:destination="@id/secondFragment"
app:enterAnim="@anim/nav_default_enter_anim"
app:exitAnim="@anim/nav_default_exit_anim"
/>
</fragment>

enterAnim: Animation of the target page when jumping
exitAnim: The original page animation when jumping
popEnterAnim: Animation of the target page when backing back
popExitAnim: Back to the original page animation
resNewAndroid Resource FileNew Resource FileFile nameslide_from_leftResource typeAnimationresanim// Left slide effect
<?xml version="1.0" encoding="utf-8"?>
<set xmlns:android="http://schemas.android.com/apk/res/android">
<translate
android:duration="300"
android:fromXDelta="-100%"
android:toXDelta="0%">
</translate>
</set>
// Right slide effect
<?xml version="1.0" encoding="utf-8"?>
<set xmlns:android="http://schemas.android.com/apk/res/android">
<translate
android:duration="300"
android:fromXDelta="0%"
android:toXDelta="100%">
</translate>
</set>
// Rotation effect
<?xml version="1.0" encoding="utf-8"?>
<set xmlns:android="http://schemas.android.com/apk/res/android">
<scale
android:duration="1000"
android:fromXScale="0.0"
android:fromYScale="0.0"
android:pivotX="50%"
android:pivotY="50%"
android:toXScale="1.0"
android:toYScale="1.0" />
<rotate
android:duration="1000"
android:fromDegrees="0"
android:pivotX="50%"
android:pivotY="50%"
android:toDegrees="360" />
</set>
How to pass data ?
nav_graph_main.xmlDesignFragmentAttributesArgumentsActionArgument Default ValuesuserId// Pseudo code , Do not directly cv
<fragment
...
>
...
<argument
android:name="userId"
android:defaultValue="1"
app:argType="integer" />
</fragment>
// By default   arrow  Action  Pass the parameters set in
it.findNavController().navigate(R.id.action_firstFragment_to_secondFragment2)
Transfer data dynamically
// Pseudo code , Do not directly cv
view.findViewById<Button>(R.id.firstButton).setOnClickListener {
val bundle = Bundle()
bundle.putString("userId", "1")
val navController = it.findNavController()
navController.navigate(R.id.action_firstFragment_to_secondFragment2, bundle)
}
val tv = view.findViewById<TextView>(R.id.textView)
tv.text = arguments?.getString("userId")
stay Activity Use setGraph Switch between different Navigation
navigationsetGraphNavigationactivity_mainfragmentapp:navGraph<fragment
android:id="@+id/nav_host_fragment"
android:name="androidx.navigation.fragment.NavHostFragment"
android:layout_width="0dp"
android:layout_height="0dp"
app:layout_constraintBottom_toBottomOf="parent"
app:layout_constraintLeft_toLeftOf="parent"
app:layout_constraintRight_toRightOf="parent"
app:layout_constraintTop_toTopOf="parent"
app:defaultNavHost="true"/>
setGraphapp:navGraphclass MainActivity : AppCompatActivity() {
override fun onCreate(savedInstanceState: Bundle?) {
super.onCreate(savedInstanceState)
setContentView(R.layout.activity_main)
initNav(1)
}
private fun initNav(id: Int) {
var controller = Navigation.findNavController([email protected], R.id.nav_host_fragment)
if (id == 1) {
// Set the corresponding app:navGraph
controller.setGraph(R.navigation.first)
}
if (id == 2) {
controller.setGraph(R.navigation.second)
}
[email protected]()
}
}
NavigationNavController
NavigationFragmentfindNavControllerNavigationNavControllerapiNavControllerNavigationFragmentFragmentFragmentTabLayoutNavigationHow to get
NavController
What's the example? ?
// Pseudo code , Do not directly cv
//activity:
//Activity.findNavController(viewId: Int)
findNavController(R.id.nav_host_fragment).navigateUp()
//Fragment:
//Fragment.findNavController()
//View.findNavController()
findNavController().navigate(R.id.action_thirdFragment_to_firstFragment)
Navigation Common operations :
①popBackStack eject Fragment
oneFragmentsecondFragmentthirdFragmentthirdFragmentsecondFragmentpopBackStackoverride fun onCreate(savedInstanceState: Bundle?) {
super.onCreate(savedInstanceState)
setContentView(R.layout.activity_main)
.....
btn.setOnClickListener{
// eject Fragment
controller.popBackStack()
}
}
② Pop up to the specified Fragment
popBackStack//xxxFragment Pop up to the specified Fragment.
// If the Boolean value of the second parameter is true It means that our parameter one Fragment Pop up together , It means that if it is false Just popBackStack To
//xxxFragment, If it is true, It's just xxxFragment stay popBackStack() once
controller.popBackStack(xxxFragment,true)
③navigateUp() Up Navigation
findNavController(R.id.nav_host_fragment).navigateUp()
navigateUpFragmentpopBackStacknavigateUppopBackStacknavigateUpNavigationFragmentpopBackStack()navigateUp()④ Add navigation monitoring
val listener: NavController.OnDestinationChangedListener =
 object : OnDestinationChangedListener() {
 fun onDestinationChanged(
 controller: NavController,
 destination: NavDestination,
 @Nullable arguments: Bundle?
 ) {
 Log.d(TAG, "onDestinationChanged: id = ${destination.getId()}")
 }
 }
// Add listening
controller.addOnDestinationChangedListener(listener)
// Remove monitor
controller.removeOnDestinationChangedListener(listener)
⑤ Get the current navigation destination
getCurrentDestination// obtain
val destination = controller.getCurrentDestination()
Log.d(TAG, "onCreate: NavigatorName = ${destination.getNavigatorName()}")
Log.d(TAG, "onCreate: id = ${destination.getId()}")
Log.d(TAG, "onCreate: Parent = ${destination.getParent()}")
⑥ Judge what is displayed on the current page Fragment Is it a goal Fragment
// Directly cv
fun <F : Fragment> isActiveFragment(fragmentClass: Class<F>): Boolean {
 val navHostFragment = this.supportFragmentManager.fragments.first() as NavHostFragment
 navHostFragment.childFragmentManager.fragments.forEach {
 if (fragmentClass.isAssignableFrom(it.javaClass)) {
 return true
 }
 }
 return false
}
Use Safe Args Make sure the type is safe
Safe Argsbuild.gradle// Put it on plugins{} Before
buildscript {
repositories {
google()
}
dependencies {
def nav_version = "2.4.2"
classpath "androidx.navigation:navigation-safe-args-gradle-plugin:$nav_version"
}
}
appmodulebuild.gradleJavaJavaKotlinJavaapply plugin: "androidx.navigation.safeargs"
KotlinKotlinapply plugin: "androidx.navigation.safeargs.kotlin"
android.useAndroidX=true
android.enableJetifier=true
// Pseudo code , Do not directly cv
<fragment
android:id="@+id/blankFragment"
android:name="com.taxze.jetpack.navigation.BlankFragment"
android:label="fragment_blank"
tools:layout="@layout/fragment_blank" >
<action
android:id="@+id/toSecond"
Modify here id
app:destination="@id/blankFragment2" />
</fragment>
BlankFragmentBlankFragment2var action = BlankFragment.actionJump("111")
action.setParam("222")
adopt Navigation imitation WeChat Bottom jump
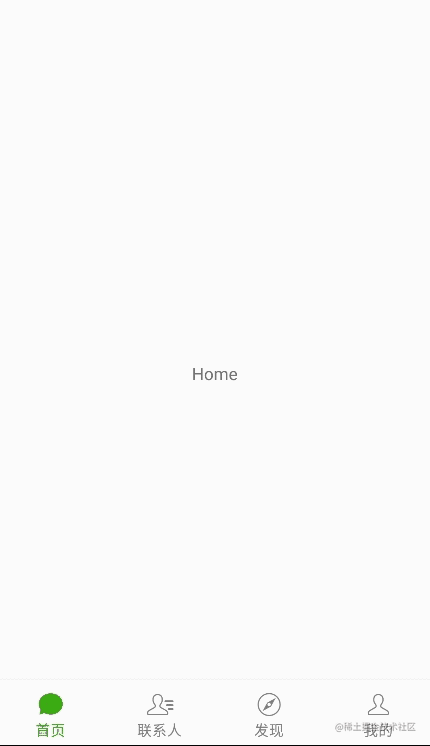
resNewAndroid Resource FileNew Resource FileFile namemenuResource typeMenuresmenuitem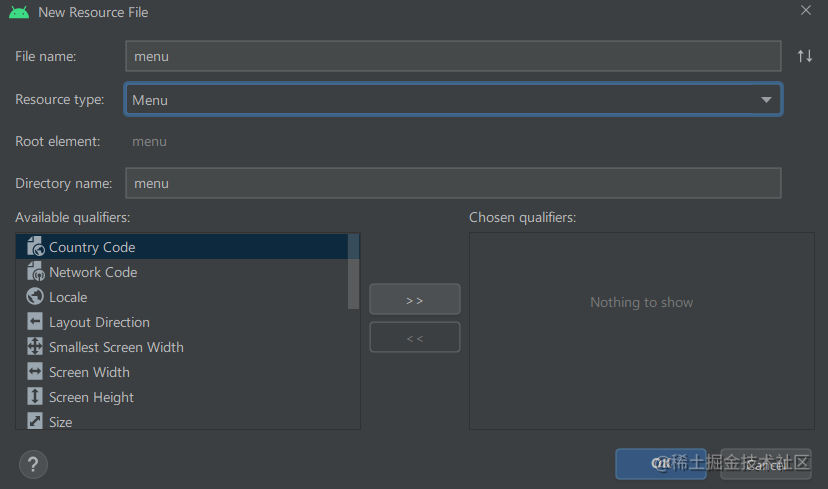
menu.xmlDesignItemidtitleicon
FragmentNavigation<?xml version="1.0" encoding="utf-8"?>
<FrameLayout xmlns:android="http://schemas.android.com/apk/res/android"
xmlns:tools="http://schemas.android.com/tools"
android:layout_width="match_parent"
android:layout_height="match_parent"
tools:context=".HomeFragment">
<TextView
android:layout_width="match_parent"
android:layout_height="match_parent"
android:gravity="center"
android:text="Home" />
</FrameLayout>
class HomeFragment : Fragment() {
override fun onCreateView(
inflater: LayoutInflater, container: ViewGroup?,
savedInstanceState: Bundle?
): View? {
return inflater.inflate(R.layout.fragment_home, container, false)
}
}
nav_graph_main.xmlFragmentidmenu.xmlid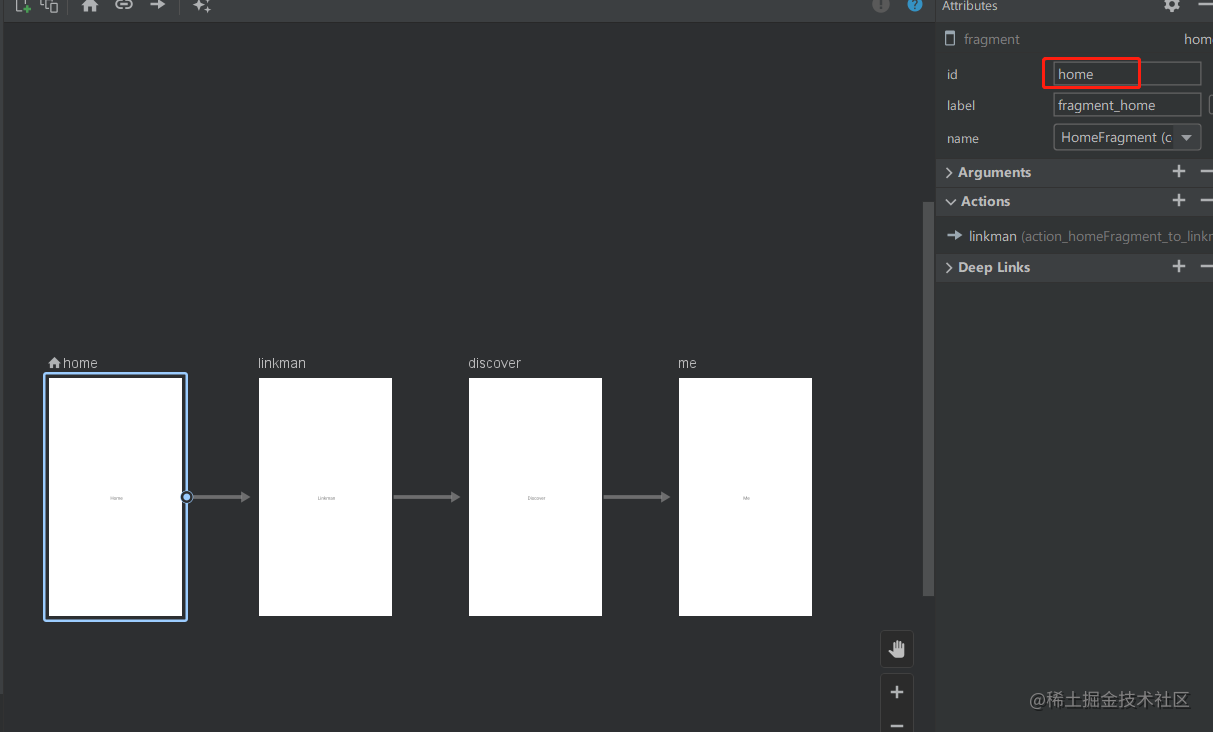
activity_mainBottomNavigationViewdrawableselector_menu_text_color.xmlItem<?xml version="1.0" encoding="utf-8"?>
<selector xmlns:android="http://schemas.android.com/apk/res/android">
<item android:color="#818181" android:state_checked="false"/>
<item android:color="#45C01A" android:state_checked="true"/>
</selector>
<?xml version="1.0" encoding="utf-8"?>
<androidx.constraintlayout.widget.ConstraintLayout xmlns:android="http://schemas.android.com/apk/res/android"
xmlns:app="http://schemas.android.com/apk/res-auto"
xmlns:tools="http://schemas.android.com/tools"
android:layout_width="match_parent"
android:layout_height="match_parent"
tools:context=".MainActivity">
<fragment
android:id="@+id/nav_host_fragment"
android:layout_width="0dp"
android:layout_height="0dp"
android:name="androidx.navigation.fragment.NavHostFragment"
app:layout_constraintBottom_toBottomOf="parent"
app:layout_constraintLeft_toLeftOf="parent"
app:layout_constraintRight_toRightOf="parent"
app:layout_constraintTop_toTopOf="parent"
app:defaultNavHost="true"
app:navGraph="@navigation/nav_graph_main" />
<com.google.android.material.bottomnavigation.BottomNavigationView
android:id="@+id/nav_view"
android:layout_width="match_parent"
android:layout_height="0dp"
app:layout_constraintBottom_toBottomOf="parent"
app:layout_constraintEnd_toEndOf="parent"
app:layout_constraintStart_toStartOf="parent"
app:itemIconTint="@drawable/selector_menu_text_color"
app:labelVisibilityMode="labeled"
app:itemTextColor="@drawable/selector_menu_text_color"
app:menu="@menu/menu" />
</androidx.constraintlayout.widget.ConstraintLayout>
class MainActivity : AppCompatActivity() {
override fun onCreate(savedInstanceState: Bundle?) {
super.onCreate(savedInstanceState)
// Remove the title bar
supportRequestWindowFeature(Window.FEATURE_NO_TITLE)
setContentView(R.layout.activity_main)
val navController: NavController = Navigation.findNavController(this, R.id.nav_host_fragment)
val navigationView = findViewById<BottomNavigationView>(R.id.nav_view)
NavigationUI.setupWithNavController(navigationView, navController)
}
}
GitEpilogue
About me
边栏推荐
- 【AI实战】应用xgboost.XGBRegressor搭建空气质量预测模型(二)
- IP address home location query full version
- [Reading stereo matching papers] [III] ints
- Parameter keywords final, flags, internal, mapping keywords internal
- Interface automation test - solution of data dependency between interfaces
- 一个程序员的水平能差到什么程度?尼玛,都是人才呀...
- 一文读懂数仓中的pg_stat
- How can the PC page call QQ for online chat?
- LeetCode每日一题(636. Exclusive Time of Functions)
- Demis Hassabis谈AlphaFold未来目标
猜你喜欢

【服务器数据恢复】某品牌StorageWorks服务器raid数据恢复案例
OAuth 2.0 + JWT protect API security
UML state diagram

Equipment failure prediction machine failure early warning mechanical equipment vibration monitoring machine failure early warning CNC vibration wireless monitoring equipment abnormal early warning

Introduction to sakt method
Selenium Library
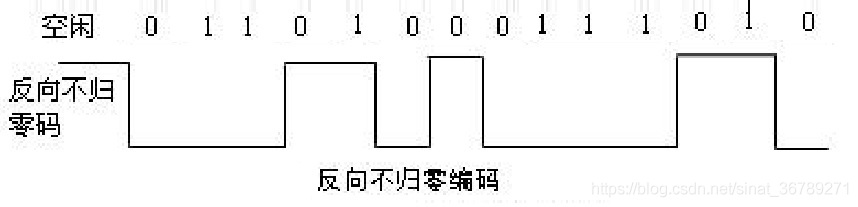
常用數字信號編碼之反向不歸零碼碼、曼徹斯特編碼、差分曼徹斯特編碼
设备故障预测机床故障提前预警机械设备振动监测机床故障预警CNC震动无线监控设备异常提前预警
2022年13个UX/UI/UE最佳创意灵感网站

VSCode 配置使用 PyLint 语法检查器
随机推荐
IP address home location query full version
内部排序——插入排序
股票开户首选,炒股交易开户佣金最低网上开户安全吗
找到自己的价值
Es log error appreciation -limit of total fields
Cargo placement problem
Excuse me, when using Flink SQL sink data to Kafka, the execution is successful, but there is no number in Kafka
LeetCode每日一题(636. Exclusive Time of Functions)
Substance Painter笔记:多显示器且多分辨率显示器时的设置
Is the spare money in your hand better to fry stocks or buy financial products?
通过 iValueConverter 给datagrid 的背景颜色 动态赋值
Hangdian oj2054 a = = B? ???
Notes de l'imprimante substance: paramètres pour les affichages Multi - écrans et multi - Résolutions
Leetcode - Sword finger offer 05 Replace spaces
Equipment failure prediction machine failure early warning mechanical equipment vibration monitoring machine failure early warning CNC vibration wireless monitoring equipment abnormal early warning
JS get the current time, month, day, year, and the uniapp location applet opens the map to select the location
UML 状态图
VSCode 配置使用 PyLint 语法检查器
GVIM [III] [u vimrc configuration]
Leetcode——344. Reverse string /541 Invert string ii/151 Reverse the word / Sword finger in the string offer 58 - ii Rotate string left