当前位置:网站首页>Debug and run the first xv6 program
Debug and run the first xv6 program
2022-07-06 17:39:00 【Wzzzzzzx】
The original text can be found in Debug and run the first one Xv6 Program Check out , Subsequent updates will be updated to Personal blog
Xv6 When it was just started, it was Machine Mode, After completing the basic configuration, you will jump to Supervisor Mode, In this mode ,main Will complete the configuration of the system as soon as possible and create the first user program .
Pre knowledge
Xv6 Is an operating system that supports multiple processes , stay Makefile Can be seen in CPUS Will be set to... By default 3, For debugging convenience , At startup , You can set it to 1. This will only be in one CPU Run the program on , A single breakpoint can prevent the operation of the entire operating system .
Environmental preparation
The system can use Ubuntu Server 20.04, For debugging GDB yes gdb-multiarch 9.2.0,qemu Then SiFive Provided by the qemu-system-riscv64 5.1.0.
Began to run
Press {% post_link 6s081/ debugging xv6 “ debugging xv6” %} One article to operate , The development and debugging environment can run smoothly . At this time, execute at a terminal make CPUS=1 qemu-gdb Run the system , Then execute... At another terminal gdb-multiarch take gdb Run up , here gdb Will automatically connect to qemu In the debugging environment , If everything goes well , You can see the following output :
GNU gdb (Ubuntu 9.2-0ubuntu1~20.04.1) 9.2
Copyright (C) 2020 Free Software Foundation, Inc.
License GPLv3+: GNU GPL version 3 or later <http://gnu.org/licenses/gpl.html>
This is free software: you are free to change and redistribute it.
There is NO WARRANTY, to the extent permitted by law.
Type "show copying" and "show warranty" for details.
This GDB was configured as "x86_64-linux-gnu".
Type "show configuration" for configuration details.
For bug reporting instructions, please see:
<http://www.gnu.org/software/gdb/bugs/>.
Find the GDB manual and other documentation resources online at:
    <http://www.gnu.org/software/gdb/documentation/>.

For help, type "help".
Type "apropos word" to search for commands related to "word".
The target architecture is assumed to be riscv:rv64
warning: No executable has been specified and target does not support
determining executable automatically.  Try using the "file" command.
0x0000000000001000 in ?? ()
Starting operation
At the beginning , Can pass b _entry Set a breakpoint at the entrance of the system , stay {% post_link 6s081/ Kernel link script parsing “ Link control script ” %} Mentioned in , The entry point of the system will be set to 0x80000000. But I don't know why , It's on my machine , The address of this breakpoint will be set to 0x80000004, What the teacher showed in class was 0x8000000a. But at this time, if you pass info address _entry see _entry The address of , You can also see its location 0x80000000 On . The specific reasons need to be further explored .
After the breakpoint is set , You can enter c Let the system run , At this time, it will be directly stuck at the breakpoint . For the convenience of debugging , You can use it layout split take gdb The window is divided into instruction and code windows , It is convenient to view the instructions corresponding to each code .
At this time, the system is in Machine Mode, At this time, the environment will be configured , Create a program stack , In order to transfer in Supervisor Mode function C Code . These codes can be ignored for the time being .
Get into main function
Skip over Machine Mode After the relevant code , You can go directly to the beginning of the kernel , This is the same as the ordinary C Same procedure , It's all about main As an entry function . Through the command b main Set the breakpoint to main At function . And then directly input c Let the program run , until main The function stops again .
stay main Various configurations of the system will be completed in the function , Including setting up virtual memory , A page table , File systems, etc , Please refer to Code The comments in . The teacher mentioned in class , These initialization operations are sequential , You can't change it at will .
In these initialized functions , Now we need to pay attention to userinit(). In this function , Will complete the first User Mode The creation of the program .
Get into userinit() function
stay main Function n The command makes the program execute line by line , until userinit() When , change to the use of sth. s Let the program enter the function body .
The operation of this function is to manually create a user process , Set this process to RUNNABLE state , In order to cpu Scheduling execution . Here's an interesting place ,userinit() How to create user processes , It is created directly using the binary form of the program .
The binary code definition of this user program is directly hard coded in initcode In this array , The corresponding executable program is user/initcode.
initcode Program
initcode In the definition of user/initcode.S. The program is Xv6 The first user mode program created , from userinit() It can be seen that , The first user mode program can only be created manually , So it will be required to be sufficient Simple . therefore ,initcode More like a Wedge , Used to lead to the real user program with logic .
As you can see from the code ,initcode Is the use exec This system call is used to create a more complex executable program . It will be init This program is loaded into a0, This is the program name of the program to be created , Then set the parameter argv Load into a1.exec The call number of this system call is 7, So we need to 7 Load into a7 On . After the relevant operations are completed , Will call ecall Give control back to the operating system .
Trigger syscall
As can be seen from the above ,userinit Will create a simple user mode program , The program will use system calls exec To create a truly logical , More complex user mode programs to replace themselves .
The specific details of how the system creates the first program need not be paid too much attention at this time , What we need to pay attention to is the specific logic of system call , So it can be used b syscall Set the breakpoint to the trigger function of the system call . stay userinit() Use directly inside c Let the program run directly to the breakpoint .
syscall This function is located in kernel/syscall.c Inside , The kernel can be p->trapframe->a7 Get the system call number , Use at this time p num You can see that the system call number is loaded into a7 Of 7. Program run to p->trapframe->a0 = syscalls[num](); when , Use it directly s Fall into exec Within this system call .
Get into exec
exec be located kernel/sysfile.c in , After entering this function , The program path to be called will be placed in path, Start parameters are placed in argv in . And then directly use exec take path Created by the program in
The creation is complete
Through the above process , It can correctly create the first user mode program in the true sense ,init. The source code of this program is in user/init.c. You can see from the code that , The only purpose of this program is to modify the file descriptor , take 0 and 1 Force setting to standard I / O . And maintain sh Operation of .
thus , The whole system runs smoothly .
边栏推荐
- [reverse] repair IAT and close ASLR after shelling
- Final review of information and network security (full version)
- 【Elastic】Elastic缺少xpack无法创建模板 unknown setting index.lifecycle.name index.lifecycle.rollover_alias
- 自动化运维利器ansible基础
- Vscode replaces commas, or specific characters with newlines
- Application service configurator (regular, database backup, file backup, remote backup)
- Grafana 9 is officially released, which is easier to use and more cool!
- CTF reverse entry question - dice
- C#WinForm中的dataGridView滚动条定位
- C version selenium operation chrome full screen mode display (F11)
猜你喜欢


随机推荐
Xin'an Second Edition: Chapter 25 mobile application security requirements analysis and security protection engineering learning notes
C#WinForm中的dataGridView滚动条定位
02 personal developed products and promotion - SMS platform
C# WinForm系列-Button简单使用
07 personal R & D products and promotion - human resources information management system
Automatic operation and maintenance sharp weapon ansible Foundation
CentOS7上Redis安装
[VNCTF 2022]ezmath wp
yarn : 无法加载文件 D:\ProgramFiles\nodejs\yarn.ps1,因为在此系统上禁止运行脚本
集成开发管理平台
Program counter of JVM runtime data area
Application service configurator (regular, database backup, file backup, remote backup)
Flink analysis (I): basic concept analysis
网络分层概念及基本知识
The art of Engineering
Re signal writeup
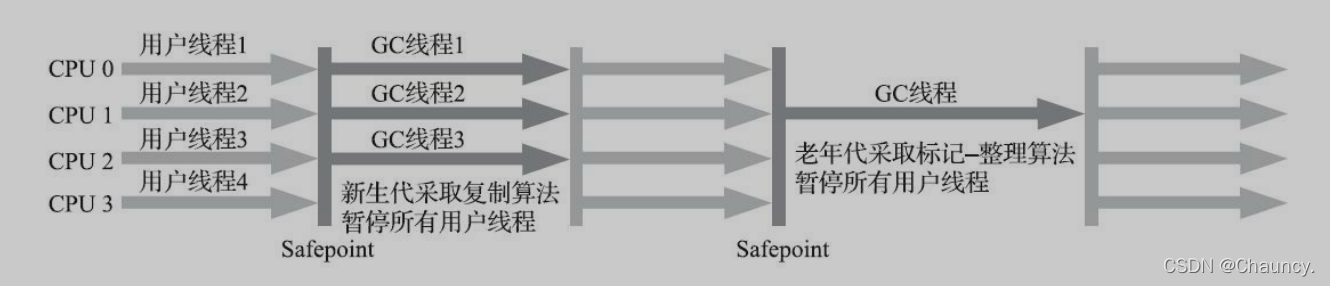
JVM garbage collection overview
【ASM】字节码操作 ClassWriter 类介绍与使用
Grafana 9 is officially released, which is easier to use and more cool!
MySQL Advanced (index, view, stored procedures, functions, Change password)