当前位置:网站首页>Elasticsearch数据库 | Elasticsearch-7.5.0应用搭建实战
Elasticsearch数据库 | Elasticsearch-7.5.0应用搭建实战
2020-11-06 20:58:00 【mazhilin】
Elasticsearch 是一个可用于分布式以及符合RESTful 风格的搜索和数据分析引擎。—— Elastic Stack 官网

搭建Elasticsearch的“那些事儿"

有一天,在黄金梅丽号的甲板上,韦柏告诉萨博,需要在接下来的项目开发过程中,运用到Elasticsearch数据库,主要用于黄金梅丽号上的各种设备采集数据实时查询,或许后期还会运用于分布式日志系统的搭建运用等,让萨博先做一次技术预研。于是,在萨博查询大量的资料发现,关于Elasticsearch数据库的搭建,网上的资料几乎是千篇一律,或者多数都是没有一个完整的流程。甚至,还发现,对于Elasticsearch数据库实际应用方面,大多数海贼只局限于ELK等这样的情况,就像是大多数海贼提到Redis,就只觉得这个玩意儿,只能用于缓存层面,但是实际上人家的功能强大到超出了海贼的想象空间。甚至于,萨博在一个阿里巴巴的地方,找到了关于Elasticsearch数据库免费试用的资源,但是对于免费的午餐,也许那一天收费之后,那就只能用一首“浪浪”来祭奠这万恶的黄金之恶。于是在萨博精心研究和分析发现,除了传统部署Elasticsearch数据库之外,有个叫Docker 的东西,除了能够稳定运行Elasticsearch数据库之外,还能节省不少的服务器内存。于是呀,萨博就开始了探索在Docker上搭建Elasticsearch之之路......
Docker部署Elasticsearch的“那些事儿"
1.基础先决条件
阿里云或者虚拟机VM主机一个,并且自行装有Docker容器: 
ps[️注意事项]: 对于Docker安装请参考:Linux环境基于CentOS7 搭建部署Docker容器
2.最大文件打开数
[2.1]参数优化:ulimit -a |grep open
[root@centos-meteor ~]# ulimit -a |grep open
open files   (-n) 65535
[root@centos-meteor ~]#
[2.2] 修改配置文件: /etc/security/limits.conf
#在最下边添加如下两行
* soft nofile 65536
* hard nofile 65536
* soft nproc 2048
* hard nproc 4096
[2.3] 确认是否修改: ulimit -a |grep open
[root@centos-meteor ~]# ulimit -a |grep open
open files   (-n) 65535
[root@centos-meteor ~]#
3.调整系统进程数
修改方法:vim /etc/security/limits.d/20-nproc.conf
#调整成以下配置
*          soft    nproc     4096
root       soft    nproc     unlimited
4.调整虚拟内存和最大并发连接数
虚拟内存(Virtual memory)->vm.max_map_count Elasticsearch默认使用 hybrid mmapfs / niofs 目录来存储索引。默认操作系统对mmap计数的限制太低,可能引发内存不足的异常
[1]临时解决方法:
sysctl –w vm.max_map_count=262144
sysctl –w vm.max_map_count=262144
如果不优化会出现启动Elasticsearch的时候会出现如下提示:
max virtual memory areas vm.max_map_count [65535] is too low, increase to at least [262144]
[2]永久生效方案:更新系统文件/etc/sysctl.conf的vm.max_map_count字段 执行命令:vim /etc/sysctl.conf
[root@turbo-master ~]# vim /etc/sysctl.conf
[root@turbo-master ~]#
#Settings Elasticsearch Virtual Memory—>655360
vm.max_map_count=655360
fs.file-max=655360
vm.overcommit_memory=1
加载到系统:sysctl -p --load /etc/sysctl.conf
[root@centos-meteor elasticsearch]# sysctl -p --load /etc/sysctl.conf
vm.swappiness = 0
net.ipv4.neigh.default.gc_stale_time = 120
net.ipv4.conf.all.rp_filter = 0
net.ipv4.conf.default.rp_filter = 0
net.ipv4.conf.default.arp_announce = 2
net.ipv4.conf.lo.arp_announce = 2
net.ipv4.conf.all.arp_announce = 2
net.ipv4.tcp_max_tw_buckets = 5000
net.ipv4.tcp_syncookies = 1
net.ipv4.tcp_max_syn_backlog = 1024
net.ipv4.tcp_synack_retries = 2
net.ipv6.conf.all.disable_ipv6 = 1
net.ipv6.conf.default.disable_ipv6 = 1
net.ipv6.conf.lo.disable_ipv6 = 1
kernel.sysrq = 1
vm.max_map_count = 655360
fs.file-max = 655360
vm.overcommit_memory = 1
[root@centos-meteor elasticsearch]#
5.关闭elasticsearch自检测
在elasticsearch.yml中添加配置项:
bootstrap.memory_lock: false
bootstrap.system_call_filter: false
ps[️注意事项]: 主要是避免以下问题: [1]最大文件打开数: max file descriptors [1024] for elasticsearch process is too low, increase to at least [65536] [2]调整虚拟内存和最大并发连接数: max virtual memory areas vm.max_map_count [65530] is too low, increase to at least [262144] [3]关闭elasticsearch自检测: system call filters failed to install; check the logs and fix your configuration or disable system call filters at your own risk [4]调整系统进程数: max number of threads [1024] for user [lish] likely too low, increase to at least [2048]
实战部署ElasticSearch服务
Docker 部署应用服务的基本步骤:Search[查询镜像]->Pull[拉取镜像]->Run[部署镜像]
1.查询Elasticsearch 镜像:
docker search elasticsearch
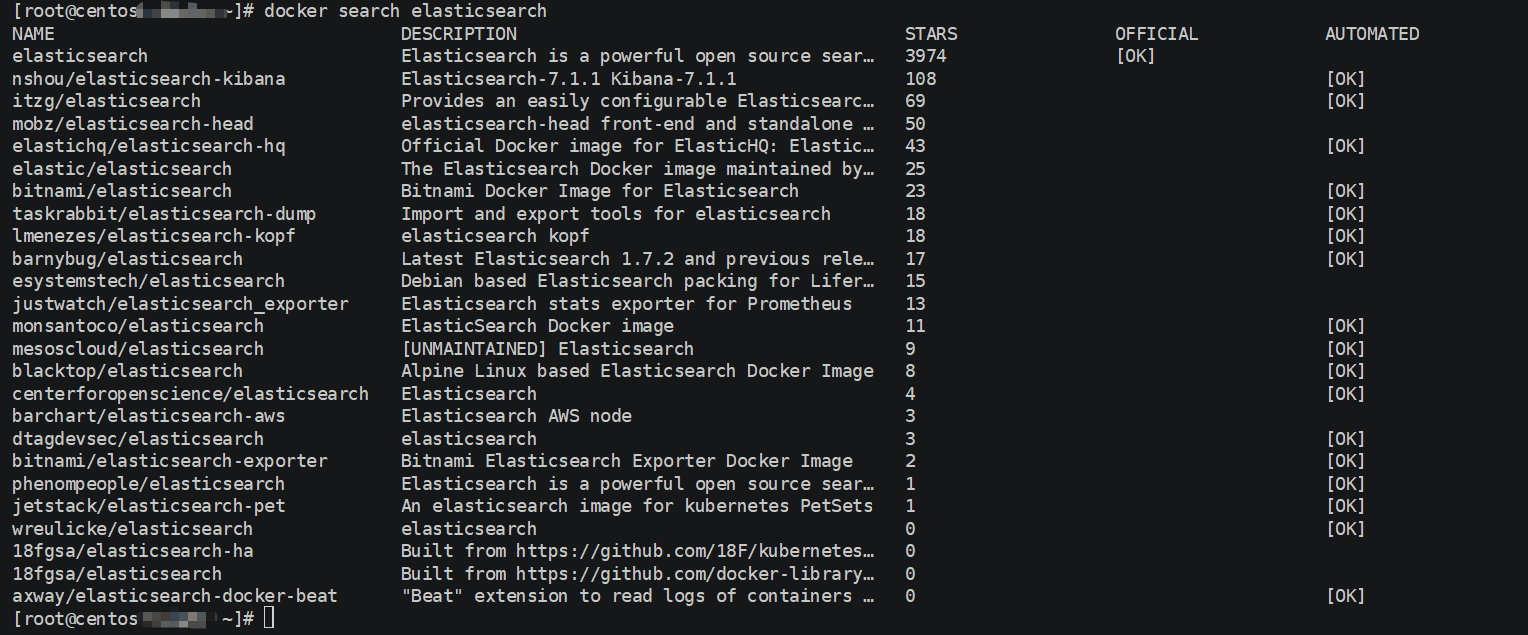
ps[注意事项]:
- 一般拉取镜像资源都是从Docker官方仓库[docker-hub]拉取,或者自己构建的Docker云仓库aliyun-docker 等
- 本教程选取的ELK镜像均是基于ELK官方Docker仓库elastic-io
2.拉取Elasticsearch 镜像:
docker pull docker.elastic.co/elasticsearch/elasticsearch:7.3.1

ps[注意事项]: 1.本教程采用7.3.x版本,目前最新版本7.4.x[主要用7.3.x版本在阿里云搭建过,避免入坑问题] 2.拉取的过程中可能会出现[net/http: TLS handshake timeout]问题,多尝试几次,主要是网络带宽限制问题
3.修改镜像名称:
docker tag docker.elastic.co/elasticsearch/elasticsearch:7.3.1 elasticsearch:latest

ps[注意事项]: 1.名称过长导致查看些许不便,通过docker tag source-image[来源镜像] target-image[目标镜像],推荐统一采用[target-image:target-version]格式定义,且不占用空间,相当于重命名镜像 2.对于拉取kibana[docker.elastic.co/kibana/kibana:7.3.1]和logstash[docker.elastic.co/logstash/logstash:7.3.1] 都建议修改。
4.部署镜像服务: 部署命令:
docker run -itd -p 9200:9200 -p 9300:9300 --restart=always --privileged=true --name elasticsearch-server -e "discovery.type=single-node" -e ES_JAVA_OPTS="-Xms=512m -Xms=512m" elasticsearch:latest
默认配置目录:
/usr/share/elasticsearch/config
/usr/share/elasticsearch/logs
查看容器列表:
docker ps --format "table {{.ID}}\t{{.Names}}\t{{.Ports}}"
![docker ps]
(https://ftp.bmp.ovh/imgs/2019/11/d7e09058af3fadbd.png) ps[注意事项]:
1.需要开放端口[9200和9300]->9200作为Http协议,主要用于外部通讯,9300作为Tcp协议,jar之间就是通过tcp协议通讯,通常部署集群就是通过9300通信。推荐[宿主机自定义端口:9200] 2.--restart=always :配置容器重启策略,当宿主机重启由于配置了开机自启动,不用手动启动 3.--privileged:配置容器操作权限[true-root操作权限,false-当前容器用户操作权限] 4.对于部署网络模式推荐默认桥接模式,也自定义可以host模式等
5.修改配置: 进入容器:docker exec -it container-id[容器id] or container-name[容器名称] /bin/bash 例如:docker exec -it f2d2e97da375 /bin/bash #f2d2e97da375-> container-id 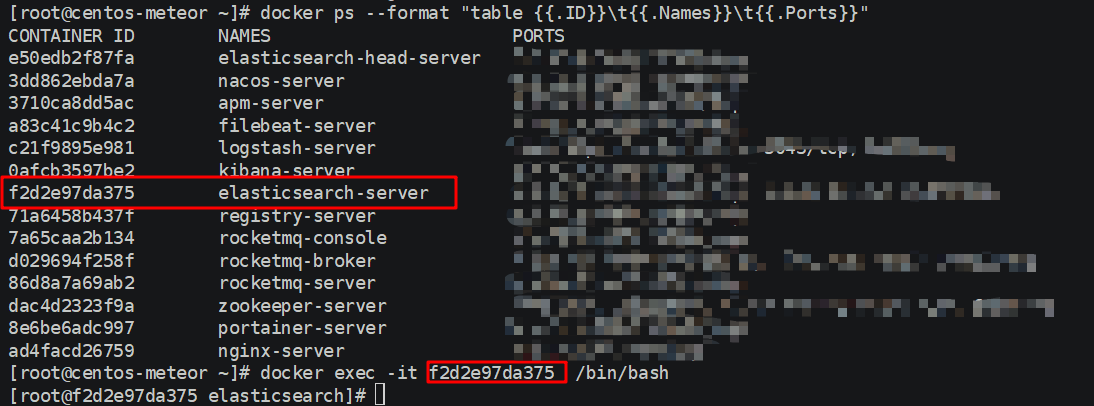
修改配置文件:
[root@f2d2e97da375 elasticsearch]# ls
LICENSE.txt  NOTICE.txt  README.textile  bin  config  data  jdk  lib  logs  modules  plugins
[root@f2d2e97da375 elasticsearch]#
[root@f2d2e97da375 elasticsearch]# cd config
[root@f2d2e97da375 config]# ls
elasticsearch.keystore  elasticsearch.yml  jvm.options  log4j2.properties  role_mapping.yml  roles.yml  users  users_roles
[root@f2d2e97da375 config]# vi elasticsearch.yml
添加跨域配置:http.cors.enabled: true && http.cors.allow-origin: "*"
cluster.name: "docker-cluster"
network.host: 0.0.0.0
http.cors.enabled: true
http.cors.allow-origin: "*"
然后退出exit容器,在宿主机重启容器:docker restart container-id[容器id] or container-name[容器名称] docker restart f2d2e97da375
[root@f2d2e97da375 config]# exit
exit
[root@centos-meteor ~]# docker restart f2d2e97da375
f2d2e97da375
[root@centos-meteor ~]#
ps[注意事项]: 1.进入容器方式:包括使用 docker attach 命令或 docker exec 命令, 推荐使用 docker exec 命令。原因:
- docker attach: 使用exit退出容器,会导致容器的停止
- docker exec:使用exit退出容器,不会导致容器的停止
- 参考docker进入容器的几种方法博客-docker进入容器的几种方法 2.如果Docker安装了可视化界面 Portainer,推荐采用这种方式进入容器:
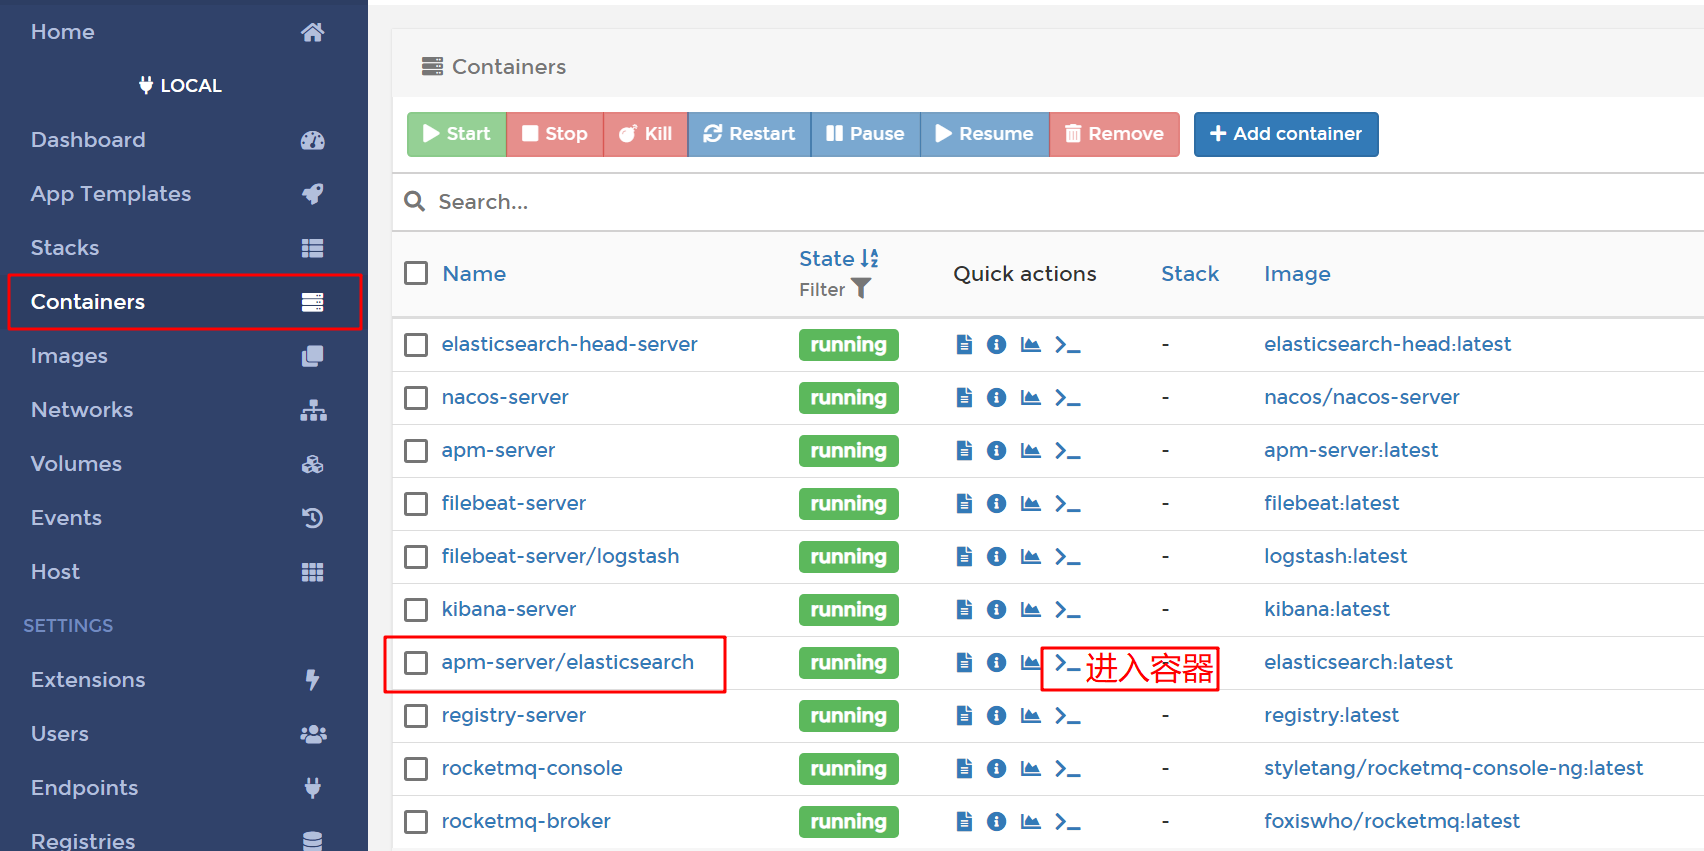
搭建部署ElasticSearch-Head服务
ElasticSearch-Head:弹性搜索集群的Web前端界面,是使用Nodjs构建的,主要用于查看ElasticSearch相关信息
1.拉取Elasticsearch-Head 镜像:docker pull mobz/elasticsearch-head:5
[root@centos-amber ~]# docker pull mobz/elasticsearch-head:5
5: Pulling from mobz/elasticsearch-head
75a822cd7888: Pull complete
57de64c72267: Pull complete
4306be1e8943: Pull complete
871436ab7225: Pull complete
0110c26a367a: Pull complete
1f04fe713f1b: Pull complete
723bac39028e: Pull complete
7d8cb47f1c60: Pull complete
7328dcf65c42: Pull complete
b451f2ccfb9a: Pull complete
304d5c28a4cf: Pull complete
4cf804850db1: Pull complete
Digest: sha256:55a3c82dd4ba776e304b09308411edd85de0dc9719f9d97a2f33baa320223f34
Status: Downloaded newer image for mobz/elasticsearch-head:5
docker.io/mobz/elasticsearch-head:5
[root@centos-amber ~]#
2.修改Elasticsearch-Head 镜像名称:docker tag mobz/elasticsearch-head:5 elasticsearch-head:latest
[root@centos-amber ~]# docker tag  mobz/elasticsearch-head:5        elasticsearch-head:latest
[root@centos-amber ~]# docker images
REPOSITORY                                      TAG                 IMAGE ID            CREATED             SIZE
grafana/grafana                                 latest              05d1bcf30d16        7 days ago          207MB
nginx                                           latest              540a289bab6c        3 weeks ago         126MB
prom/prometheus                                 latest              2c8e464e47f4        3 weeks ago         129MB
moxm/sentinel-dashboard                         latest              0ccaac81584e        4 weeks ago         167MB
portainer                                       latest              4cda95efb0e4        4 weeks ago         80.6MB
portainer/portainer                             latest              4cda95efb0e4        4 weeks ago         80.6MB
apache/skywalking-ui                            latest              fa66ca9c9862        2 months ago        123MB
apache/skywalking-oap-server                    latest              376a37cdf65c        2 months ago        190MB
docker.elastic.co/kibana/kibana                 7.3.1               b54865ba6b0b        2 months ago        1.01GB
docker.elastic.co/elasticsearch/elasticsearch   7.3.1               3d3aa92f641f        2 months ago        807MB
elasticsearch                                   latest              3d3aa92f641f        2 months ago        807MB
prom/node-exporter                              latest              e5a616e4b9cf        5 months ago        22.9MB
google/cadvisor                                 latest              eb1210707573        12 months ago       69.6MB
elasticsearch-head                              latest              b19a5c98e43b        2 years ago         824MB
mobz/elasticsearch-head                         5                   b19a5c98e43b        2 years ago         824MB
tutum/influxdb                                  latest              c061e5808198        3 years ago         290MB
[root@centos-amber ~]#
3.部署Elasticsearch-Head 容器:
docker run -itd --restart=always --privileged=true -p 9100:9100 --name elasticsearch-head-server elasticsearch-head:latest
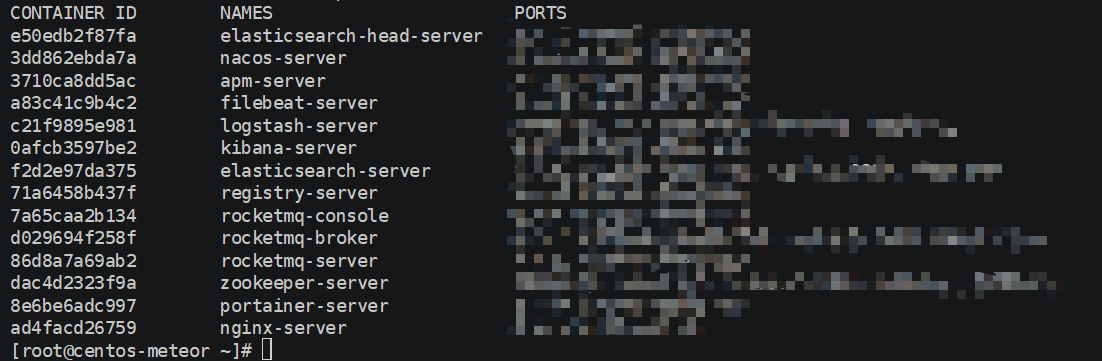
查看容器服务:
docker ps --format "table {{.ID}}\t{{.Names}}\t{{.Ports}}"

4.浏览器访问:http://remote-ip:9100/ 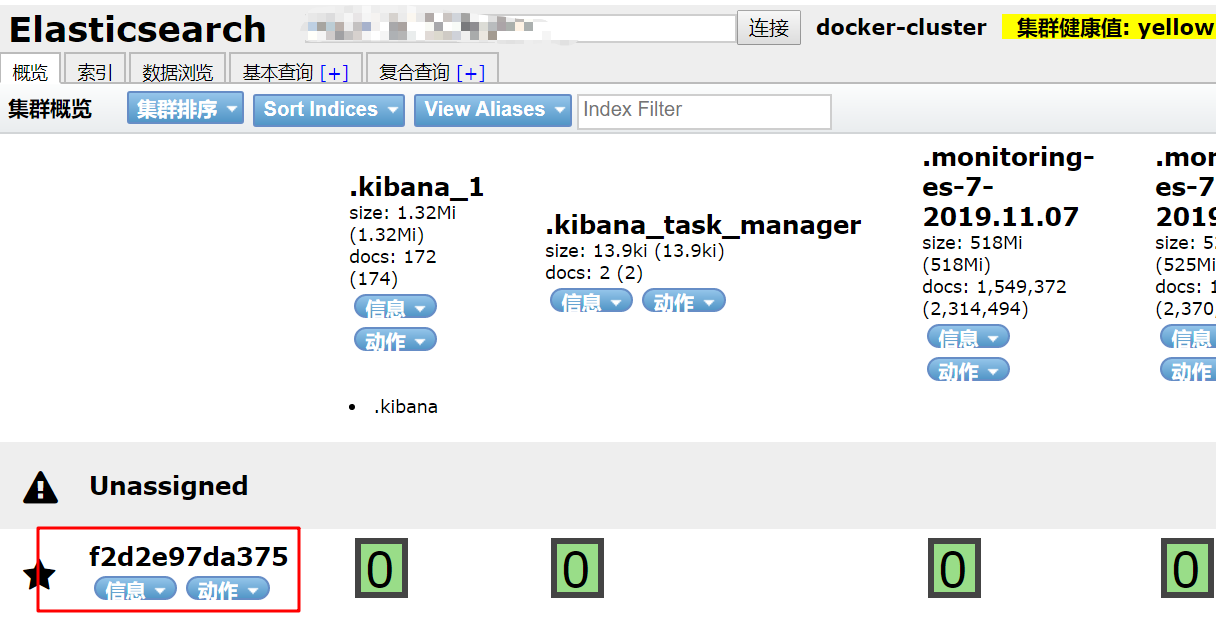
实战测试ElasticSearch-Head服务
1.准备数据: 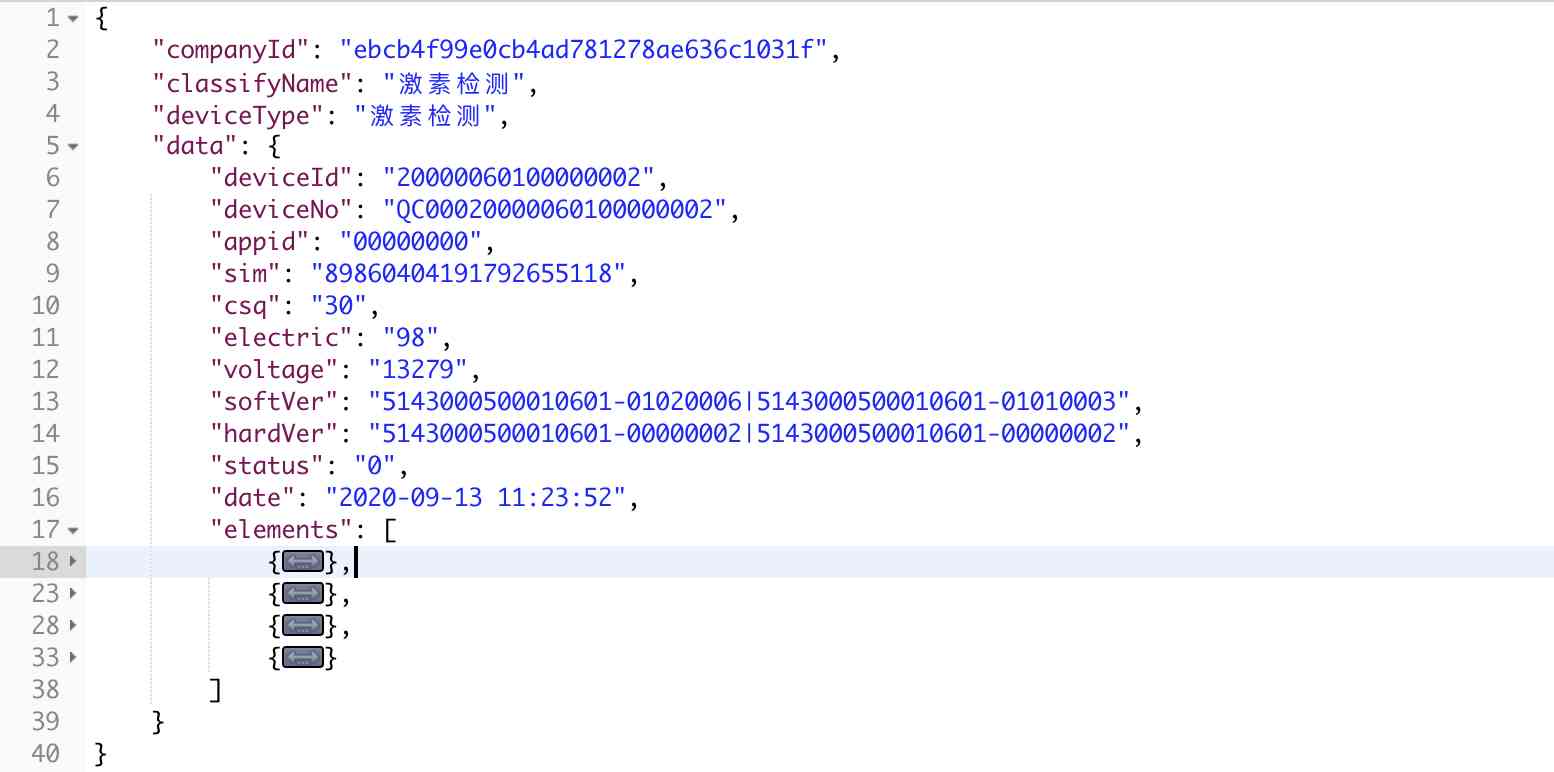
{
    "companyId": "ebcb4f99e0cb4ad781278ae636c1031f",
    "classifyName": "激素检测",
    "deviceType": "激素检测",
    "data": {
    	"deviceId": "20000060100000002",
        "deviceNo": "QC00020000060100000002",
        "appid": "00000000",
        "sim": "89860404191792655118",
        "csq": "30",
        "electric": "98",
        "voltage": "13279",
        "softVer": "5143000500010601-01020006|5143000500010601-01010003",
        "hardVer": "5143000500010601-00000002|5143000500010601-00000002",
        "status": "0",
        "date": "2020-09-13 11:23:52",
        "elements": [
        	{
                "key": "20",
                "value": "10",
                "time": "2020-09-13 11:23:52"
            },
            {
                "key": "21",
                "value": "11",
                "time": "2020-09-13 11:23:52"
            },
            {
                "key": "22",
                "value": "12",
                "time": "2020-09-13 11:23:52"
            },
            {
                "key": "23",
                "value": "13",
                "time": "2020-09-13 11:23:52"
            }
        ]
    }
}
2.设置请求头:application/json;charset=UTF-8 
3.发送PUT请求:http://remote-ip/device/deviceData/QC00020000060100000001 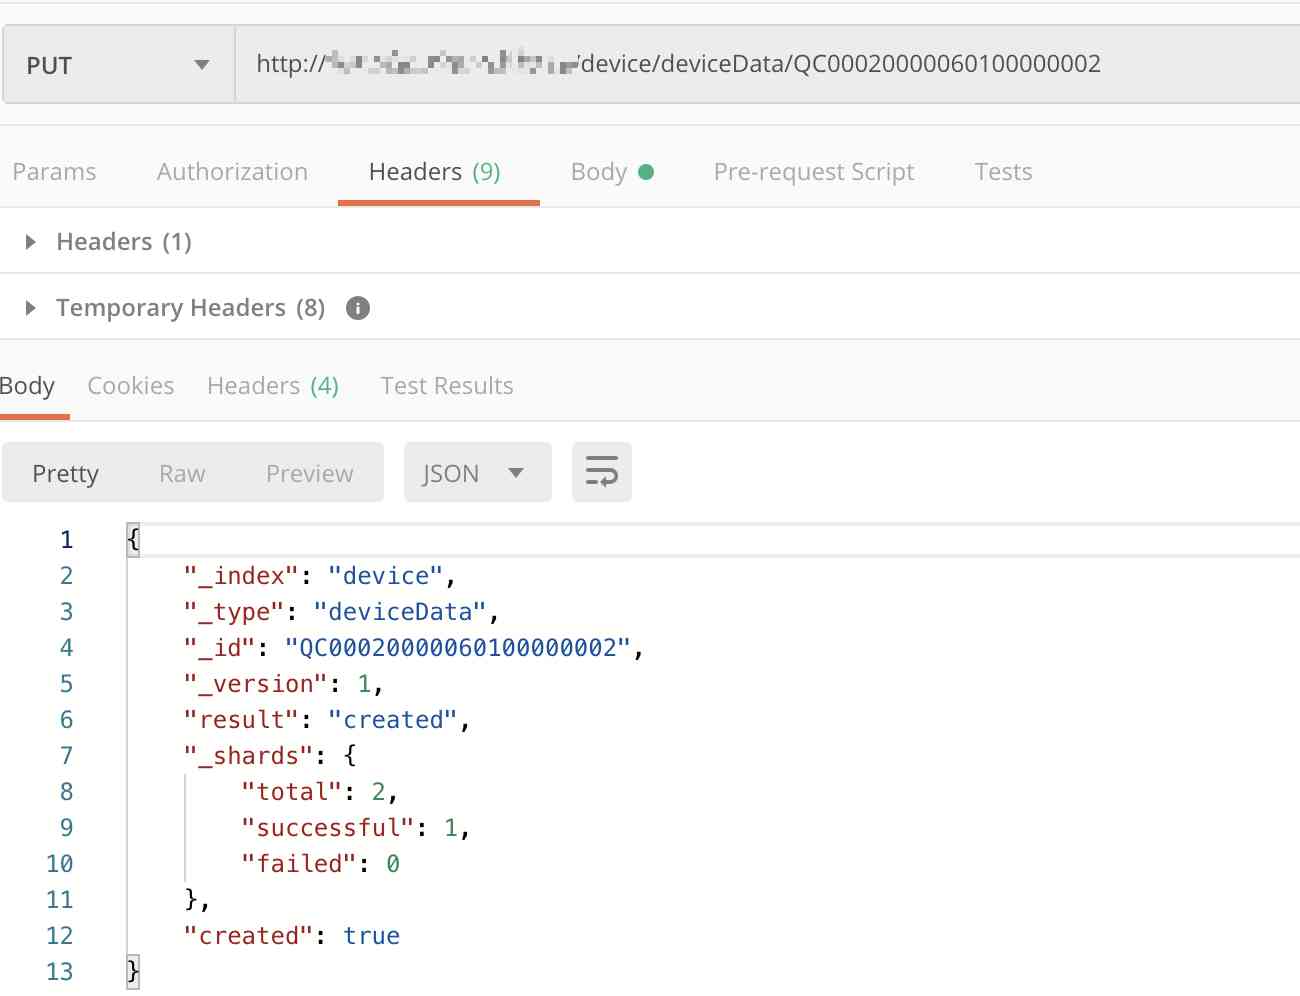
{
    "_index": "device",
    "_type": "deviceData",
    "_id": "QC00020000060100000002",
    "_version": 1,
    "result": "created",
    "_shards": {
        "total": 2,
        "successful": 1,
        "failed": 0
    },
    "created": true
}
4.打开浏览器查看结果: 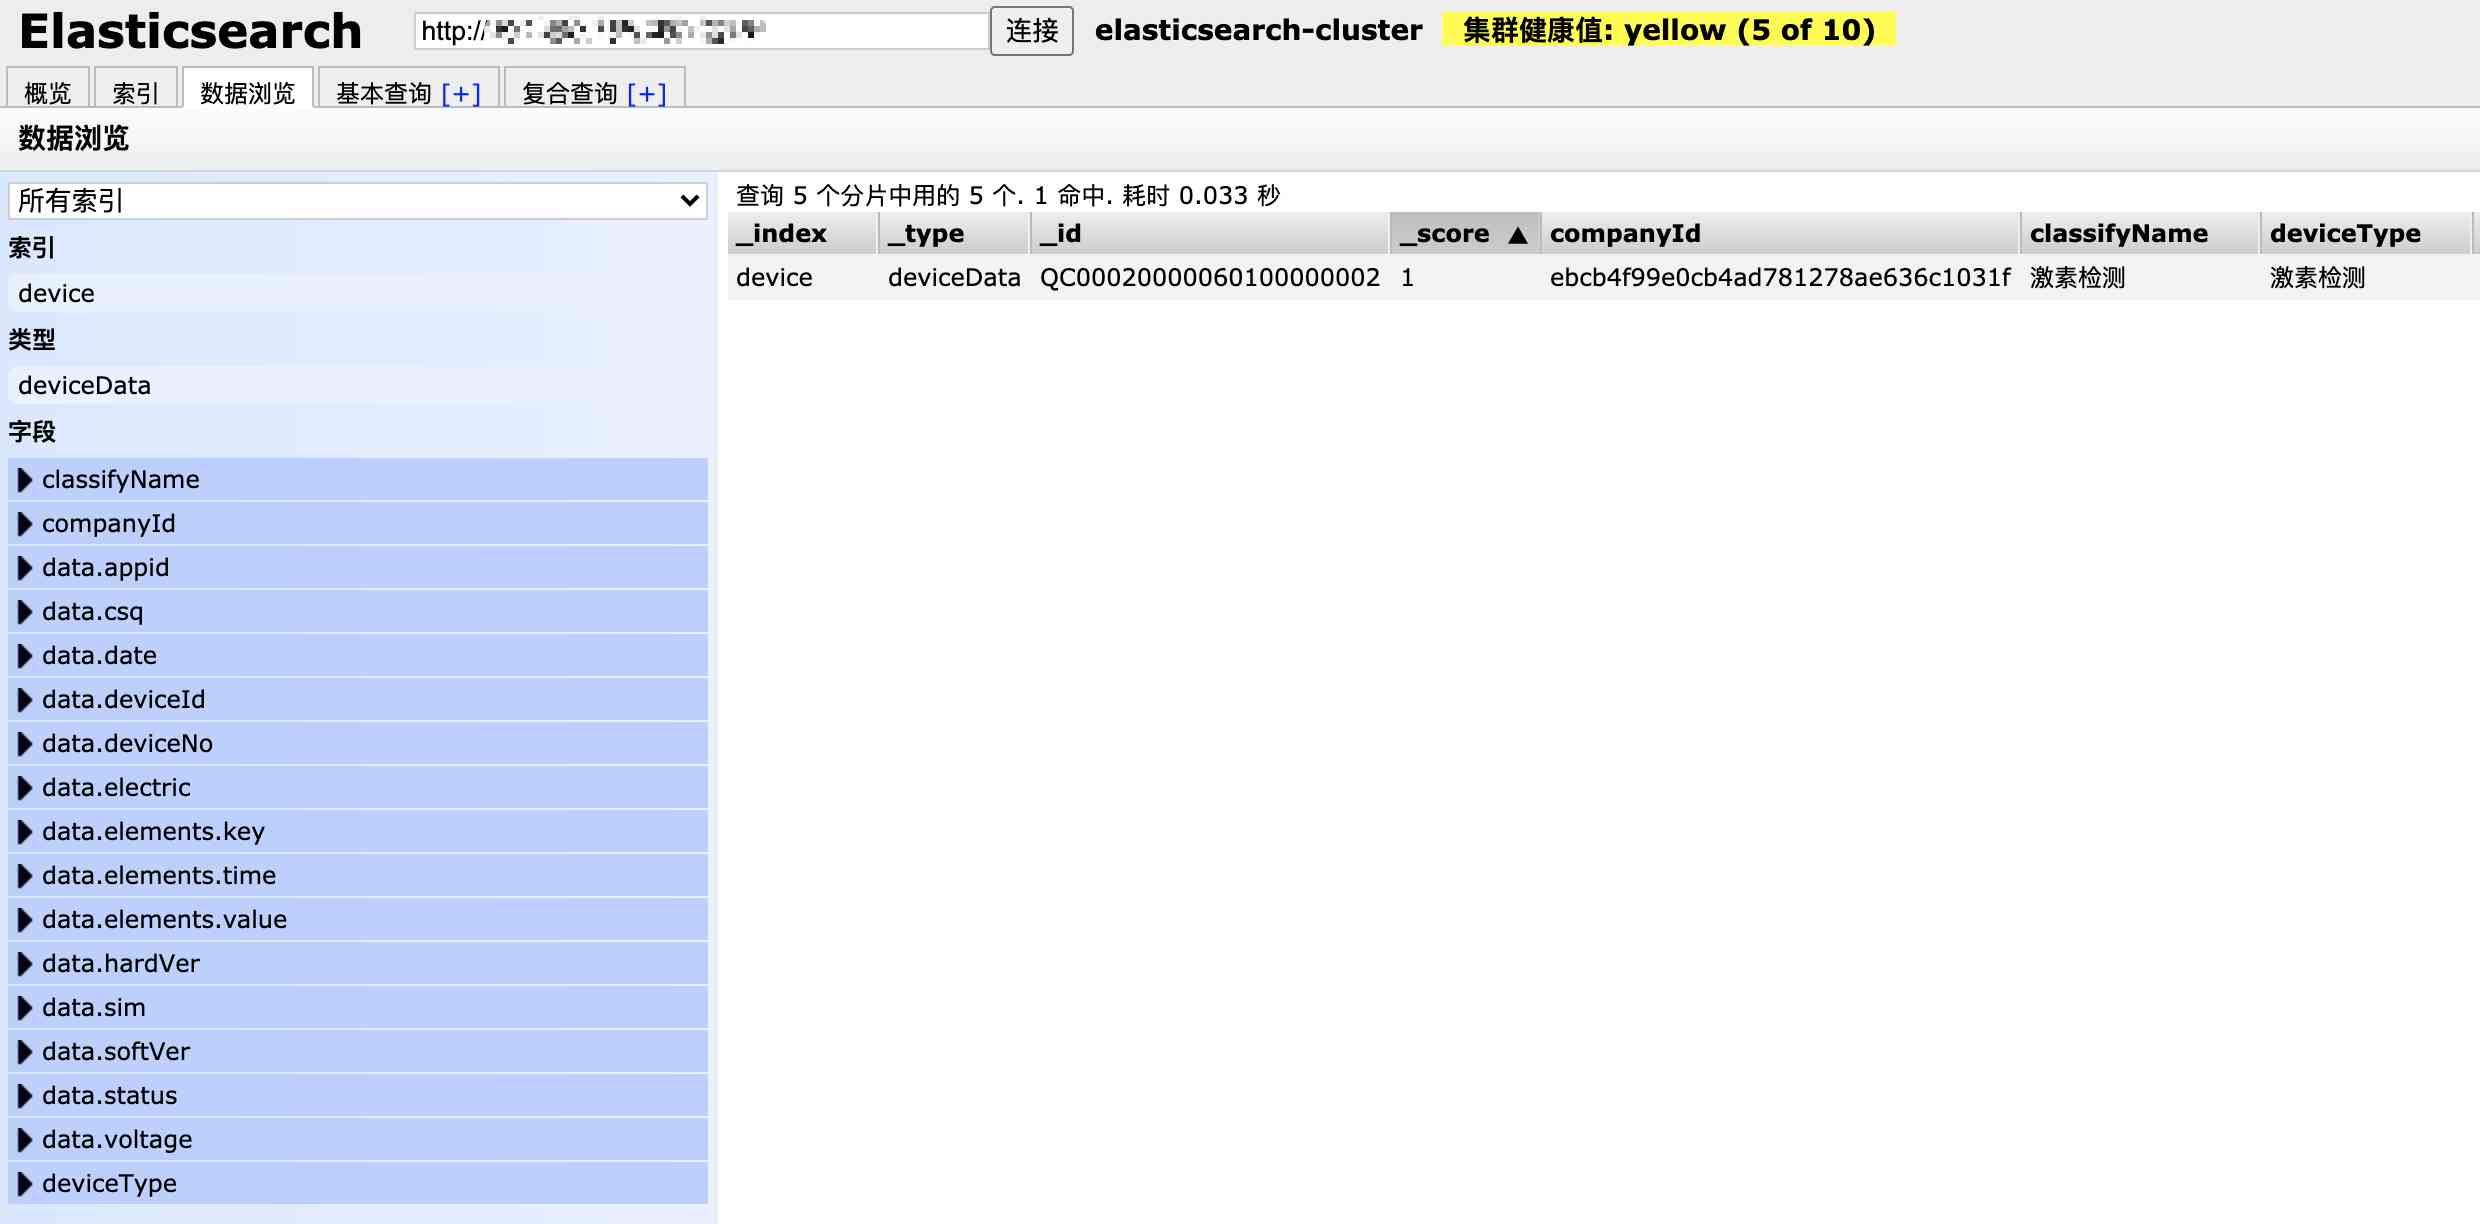
实战搭建ElasticSearch总结
1.部署基本命令:
docker run -itd -p 9200:9200 -p 9300:9300 --restart=always --privileged=true --name elasticsearch-server --network-alias elasticsearch-server --hostname elasticsearch-server -v /docker/elasticsearch/config/elasticsearch.yml:/usr/share/elasticsearch/config/elasticsearch.yml -v /docker/elasticsearch/data:/usr/share/elasticsearch/data -v /docker/elasticsearch/logs:/usr/share/elasticsearch/logs -e "discovery.type=single-node" -e ES_JAVA_OPTS="-server -Xms512m -Xmx512m -Xmn256m -XX:MetaspaceSize=128m -XX:MaxMetaspaceSize=320m -XX:+AlwaysPreTouch -XX:-UseBiasedLocking " -e TZ="Asia/Shanghai" elasticsearch:latest
2.配置文件[elasticsearch.yml ]:
cluster.name: elasticsearch-cluster
node.name: elasticsearch-server
network.host: 0.0.0.0
network.bind_host: 0.0.0.0
network.publish_host: 0.0.0.0
http.cors.enabled: true
http.cors.allow-origin: "*"
bootstrap.memory_lock: false
bootstrap.system_call_filter: false
transport.tcp.port: 9300
transport.tcp.compress: true
http.max_content_length: 128mb
3.分词插件安装:
./bin/elasticsearch-plugin install https://github.com/medcl/elasticsearch-analysis-ik/releases/download/v7.5.0/elasticsearch-analysis-ik-7.5.0.zip
4.Docker 部署 ElasticSearch-Head:
docker run -itd --restart=always --privileged=true -p 9100:9100 --network-alias elasticsearch-head-server --name elasticsearch-head-server --hostname elasticsearch-head-server -v /docker/elasticsearch-head/app:/usr/src/app elasticsearch-head:latest
5.ElasticSearch-Head 使用406错误: 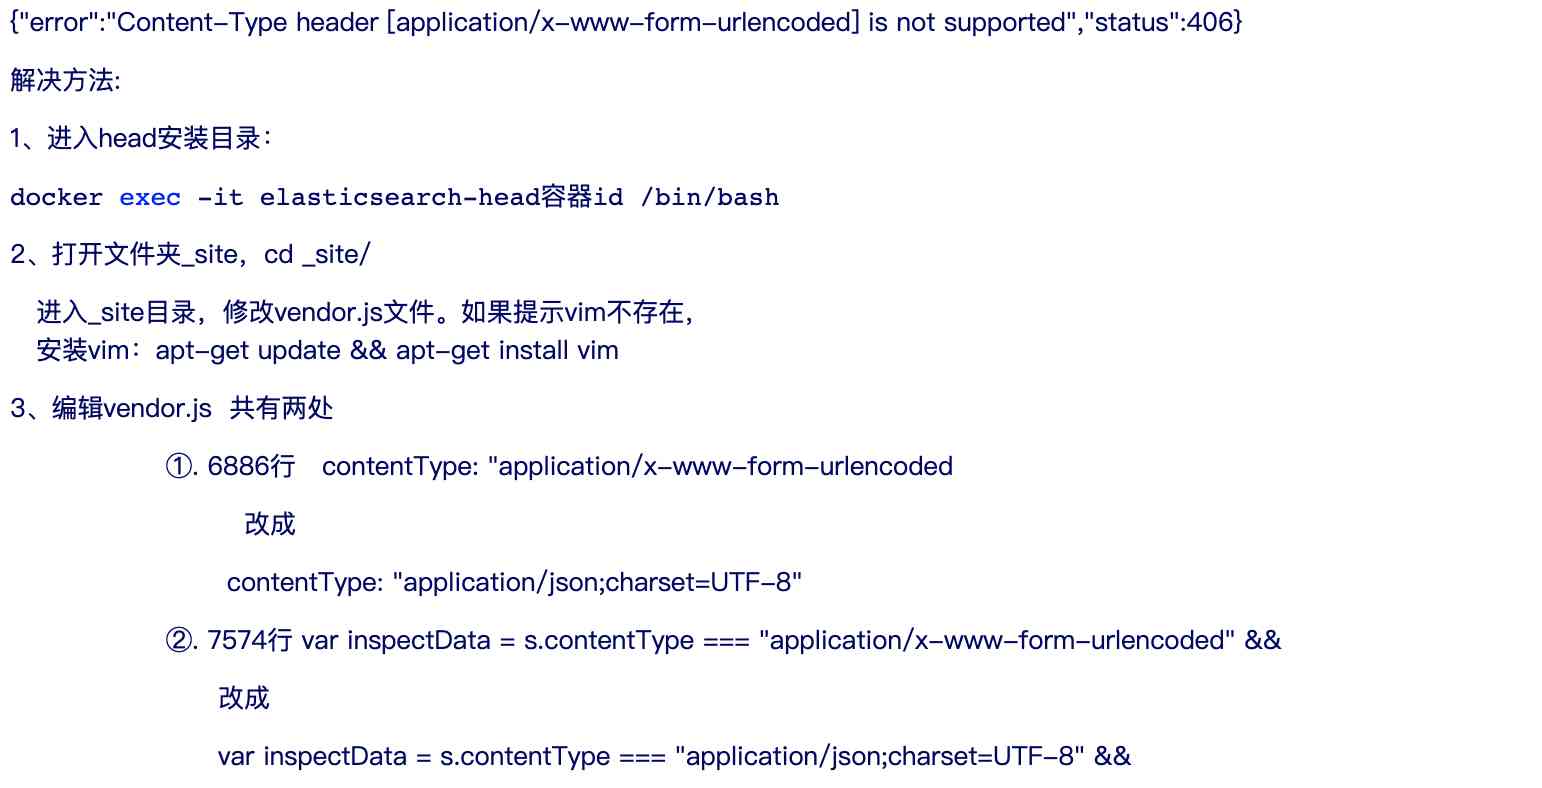 ajaxSettings部分json配置:
    ajaxSettings: {
      url: ajaxLocation,
      isLocal: rlocalProtocol.test(ajaxLocParts[1]),
      global: true,
      type: "GET",
      //contentType: "application/x-www-form-urlencoded",
      contentType: "application/json;charset=UTF-8",
      processData: true,
      async: true,
      /*
		timeout: 0,
		data: null,
		dataType: null,
		username: null,
		password: null,
		cache: null,
		traditional: false,
		headers: {},
		*/

      accepts: {
        xml: "application/xml, text/xml",
        html: "text/html",
        text: "text/plain",
        json: "application/json, text/javascript",
        "*": "*/*",
      },
inspectData 部分json配置:
  // Detect, normalize options and install callbacks for jsonp requests
  jQuery.ajaxPrefilter("json jsonp", function (s, originalSettings, jqXHR) {
    //var inspectData = s.contentType === "application/x-www-form-urlencoded" &&
    var inspectData =
      (s.contentType === "application/x-www-form-urlencoded" &&
        typeof s.data === "string") ||
      (s.contentType === "application/json;charset=UTF-8" &&
        typeof s.data === "string");
版权声明:本文为博主原创文章,遵循相关版权协议,如若转载或者分享请附上原文出处链接和链接来源。
版权声明
本文为[mazhilin]所创,转载请带上原文链接,感谢
https://my.oschina.net/2273990296/blog/4705237
边栏推荐
- 零基础打造一款属于自己的网页搜索引擎
- In order to save money, I learned PHP in one day!
- Five vuex plug-ins for your next vuejs project
- 6.4 viewresolver view parser (in-depth analysis of SSM and project practice)
- 多机器人行情共享解决方案
- 有了这个神器,快速告别垃圾短信邮件
- Vuejs development specification
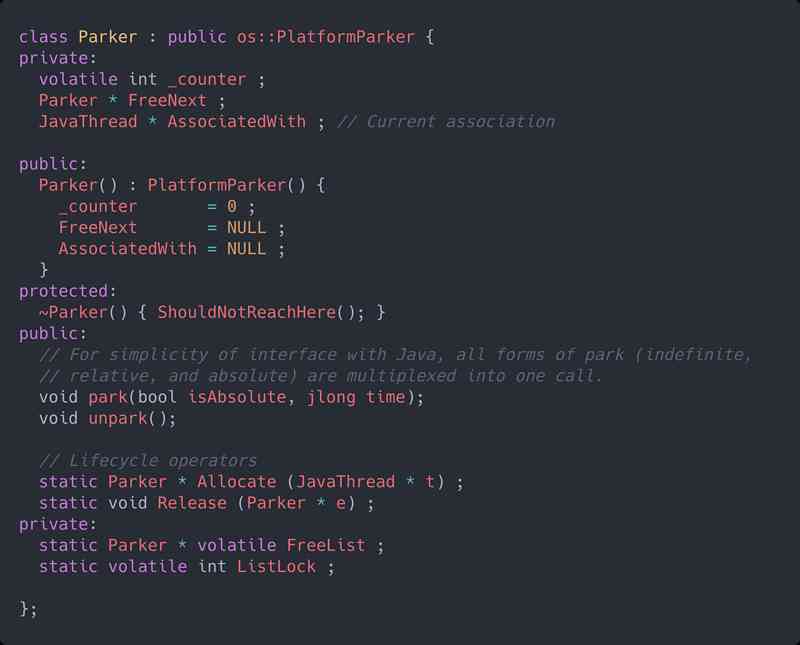
- Analysis of partial source codes of qthread
- How to select the evaluation index of classification model
- Process analysis of Python authentication mechanism based on JWT
猜你喜欢

The road of C + + Learning: from introduction to mastery

钻石标准--Diamond Standard
vue任意关系组件通信与跨组件监听状态 vue-communication
Tool class under JUC package, its name is locksupport! Did you make it?
一篇文章带你了解SVG 渐变知识
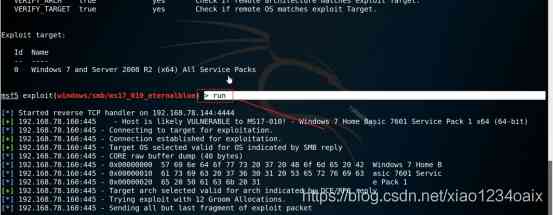
Network security engineer Demo: the original * * is to get your computer administrator rights! 【***】
一篇文章教会你使用HTML5 SVG 标签
带你学习ES5中新增的方法
IPFS/Filecoin合法性:保护个人隐私不被泄露
零基础打造一款属于自己的网页搜索引擎
随机推荐
What to do if you are squeezed by old programmers? I don't want to quit
It's so embarrassing, fans broke ten thousand, used for a year!
Filecoin最新动态 完成重大升级 已实现四大项目进展!
Wechat applet: prevent multiple click jump (function throttling)
htmlcss
Multi classification of unbalanced text using AWS sagemaker blazingtext
keras model.compile Loss function and optimizer
关于Kubernetes 与 OAM 构建统一、标准化的应用管理平台知识!(附网盘链接)
助力金融科技创新发展,ATFX走在行业最前列
The choice of enterprise database is usually decided by the system architect - the newstack
速看!互联网、电商离线大数据分析最佳实践!(附网盘链接)
Brief introduction of TF flags
PHP应用对接Justswap专用开发包【JustSwap.PHP】
In order to save money, I learned PHP in one day!
Don't go! Here is a note: picture and text to explain AQS, let's have a look at the source code of AQS (long text)
TRON智能钱包PHP开发包【零TRX归集】
use Asponse.Words Working with word templates
Python saves the list data
IPFS/Filecoin合法性:保护个人隐私不被泄露
Skywalking series blog 1 - install stand-alone skywalking