当前位置:网站首页>Flink's datasource Trilogy 3: customization
Flink's datasource Trilogy 3: customization
2020-11-08 21:09:00 【Programmer Xinchen】
Welcome to visit mine GitHub
https://github.com/zq2599/blog_demos
Content : All original articles classified summary and supporting source code , involve Java、Docker、Kubernetes、DevOPS etc. ;
An overview of this article
This article is about 《Flink Of DataSource Trilogy 》 The end of , I was learning all the time Flink Existing data source functions , But if that doesn't meet the needs , Just customize the data source ( For example, getting data from a database ), That is the content of today's actual combat , As shown in the red box below :
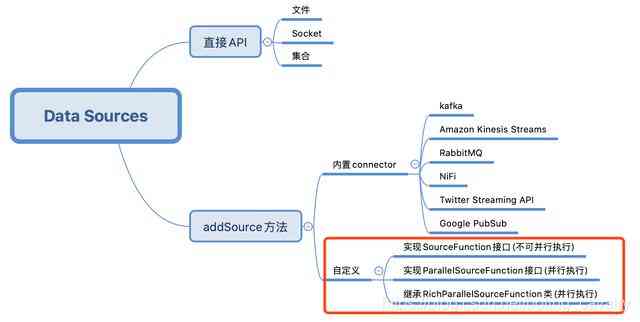
Flink Of DataSource Trilogy article links
- 《Flink Of DataSource One of the trilogy : direct API》
- 《Flink Of DataSource Trilogy two : built-in connector》
- 《Flink Of DataSource Trilogy three : Customize 》
Environment and version
The actual combat environment and version are as follows :
- JDK:1.8.0_211
- Flink:1.9.2
- Maven:3.6.0
- operating system :macOS Catalina 10.15.3 (MacBook Pro 13-inch, 2018)
- IDEA:2018.3.5 (Ultimate Edition)
Build... On the server Flink service
- The procedures in the first two chapters are in IDEA Running on , This chapter needs to pass Flink Of web ui Run the observation , So deploy it separately Flink service , Here I am CentOS The environment passes through docker-compose The deployment of , Here are docker-compose.yml The content of , For reference :
version: "2.1"
services:
  jobmanager:
    image: flink:1.9.2-scala_2.12
    expose:
      - "6123"
    ports:
      - "8081:8081"
    command: jobmanager
    environment:
      - JOB_MANAGER_RPC_ADDRESS=jobmanager
  taskmanager1:
    image: flink:1.9.2-scala_2.12
    expose:
      - "6121"
      - "6122"
    depends_on:
      - jobmanager
    command: taskmanager
    links:
      - "jobmanager:jobmanager"
    environment:
      - JOB_MANAGER_RPC_ADDRESS=jobmanager
  taskmanager2:
    image: flink:1.9.2-scala_2.12
    expose:
      - "6121"
      - "6122"
    depends_on:
      - jobmanager
    command: taskmanager
    links:
      - "jobmanager:jobmanager"
    environment:
      - JOB_MANAGER_RPC_ADDRESS=jobmanager
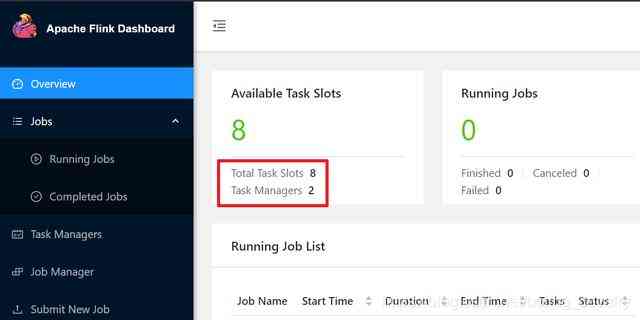
- Here is my Flink situation , There are two Task Maganer, There are eight Slot All available :
Source download
If you don't want to write code , The source code of the whole series can be found in GitHub Download to , The address and link information is shown in the following table (https://github.com/zq2599/blog_demos):
| name | link | remarks |
|---|---|---|
| Project home page | https://github.com/zq2599/blog_demos | The project is in progress. GitHub Home page on |
| git Warehouse address (https) | https://github.com/zq2599/blog_demos.git | The warehouse address of the source code of the project ,https agreement |
| git Warehouse address (ssh) | [email protected]:zq2599/blog_demos.git | The warehouse address of the source code of the project ,ssh agreement |
This git Multiple folders in project , The application of this chapter in flinkdatasourcedemo Under the folder , As shown in the red box below :

Ready , Start developing ;
Realization SourceFunctionDemo Interface DataSource
- Start with the simplest , Develop a non parallel data source and verify ;
- Realization SourceFunction Interface , In the engineering flinkdatasourcedemo add SourceFunctionDemo.java:
package com.bolingcavalry.customize;

import org.apache.flink.api.java.tuple.Tuple2;
import org.apache.flink.streaming.api.datastream.DataStream;
import org.apache.flink.streaming.api.environment.StreamExecutionEnvironment;
import org.apache.flink.streaming.api.functions.source.SourceFunction;
import org.apache.flink.streaming.api.windowing.time.Time;

public class SourceFunctionDemo {
    public static void main(String[] args) throws Exception {
        final StreamExecutionEnvironment env = StreamExecutionEnvironment.getExecutionEnvironment();
        // The degree of parallelism is 2
        env.setParallelism(2);

        DataStream<Tuple2<Integer,Integer>> dataStream = env.addSource(new SourceFunction<Tuple2<Integer, Integer>>() {

            private volatile boolean isRunning = true;

            @Override
            public void run(SourceContext<Tuple2<Integer, Integer>> ctx) throws Exception {
                int i = 0;
                while (isRunning) {
                    ctx.collect(new Tuple2<>(i++ % 5, 1));
                    Thread.sleep(1000);
                    if(i>9){
                        break;
                    }
                }
            }

            @Override
            public void cancel() {
                isRunning = false;
            }
        });

        dataStream
                .keyBy(0)
                .timeWindow(Time.seconds(2))
                .sum(1)
                .print();

        env.execute("Customize DataSource demo : SourceFunction");
    }
}
- From the above code, we can see , to addSource Method to pass in an anonymous class instance , This anonymous class implements SourceFunction Interface ;
- Realization SourceFunction The interface only needs to implement run and cancel Method ;
- run Method to generate data , Here is a short answer to the operation , Every second produces a Tuple2 example , Because of the following operators keyBy operation , therefore Tuple2 The first field of is always kept 5 The remainder of , This way, we can have more key, So as to disperse into different slot in ;
- To check the accuracy of the data , There's no infinite sending of data , It just sent 10 individual Tuple2 example ;
- cancel yes job Method executed when cancelled ;
- The overall parallelism is explicitly set to 2;
- After coding , perform mvn clean package -U -DskipTests structure , stay target Directory to get files flinkdatasourcedemo-1.0-SNAPSHOT.jar;
- stay Flink Of web UI Upload flinkdatasourcedemo-1.0-SNAPSHOT.jar, And specify the execution class , As shown in the red box below :

-
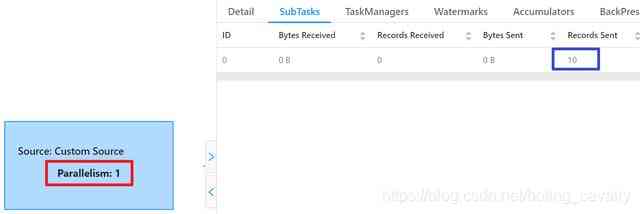
- When the task is completed , stay Completed Jobs The page can see ,DataSource The parallelism of is 1( Red box ), Corresponding SubTask A total of 10 Bar record ( Blue frame ), This is consistent with our code ;
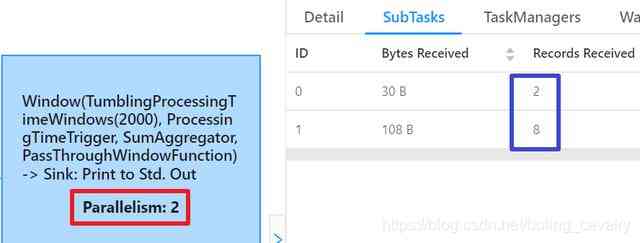
- Let's look at the subtask of consumption , Here's the picture , The red box shows that the parallelism is 2, This is consistent with the settings in the previous code , The blue box shows that two subtasks have received 10 Data records , It's the same number as the upstream :
- Next, try multi parallelism DataSource;
Realization ParallelSourceFunction Interface DataSource
- If custom DataSource There are complex or time-consuming operations , So increase DataSource Parallelism of , Let more than one SubTask Do these operations at the same time , It can effectively improve the overall throughput ( The premise is that there are plenty of hardware resources );
- Next, the actual combat can be executed in parallel DataSource, The principle is DataSoure Realization ParallelSourceFunction Interface , The code is as follows , Visible and SourceFunctionDemo Almost the same as , It's just addSource Fang sent in different parameters , The input parameter is still an anonymous class , But the implemented interface becomes ParallelSourceFunction:
package com.bolingcavalry.customize;

import org.apache.flink.api.java.tuple.Tuple2;
import org.apache.flink.streaming.api.datastream.DataStream;
import org.apache.flink.streaming.api.environment.StreamExecutionEnvironment;
import org.apache.flink.streaming.api.functions.source.ParallelSourceFunction;
import org.apache.flink.streaming.api.windowing.time.Time;

public class ParrelSourceFunctionDemo {
    public static void main(String[] args) throws Exception {
        final StreamExecutionEnvironment env = StreamExecutionEnvironment.getExecutionEnvironment();
        // The degree of parallelism is 2
        env.setParallelism(2);

        DataStream<Tuple2<Integer,Integer>> dataStream = env.addSource(new ParallelSourceFunction<Tuple2<Integer, Integer>>() {

            private volatile boolean isRunning = true;

            @Override
            public void run(SourceContext<Tuple2<Integer, Integer>> ctx) throws Exception {
                int i = 0;
                while (isRunning) {
                    ctx.collect(new Tuple2<>(i++ % 5, 1));
                    Thread.sleep(1000);
                    if(i>9){
                        break;
                    }
                }
            }

            @Override
            public void cancel() {
                isRunning = false;
            }
        });

        dataStream
                .keyBy(0)
                .timeWindow(Time.seconds(2))
                .sum(1)
                .print();

        env.execute("Customize DataSource demo : ParallelSourceFunction");
    }
}
- After coding , perform mvn clean package -U -DskipTests structure , stay target Directory to get files flinkdatasourcedemo-1.0-SNAPSHOT.jar;
- stay Flink Of web UI Upload flinkdatasourcedemo-1.0-SNAPSHOT.jar, And specify the execution class , As shown in the red box below :
 5. When the task is completed , stay Completed Jobs The page can see , Now DataSource The parallelism of is 2( Red box ), Corresponding SubTask A total of 20 Bar record ( Blue frame ), This is consistent with our code , The green box shows two SubTask Of Task Manager Is the same :
 6. Why? DataSource A total of 20 Bar record ? Because of every SubTask There's one of them ParallelSourceFunction An instance of an anonymous class , Corresponding run Methods are executed separately , So every SubTask All sent 10 strip ; 7. Let's look at the subtasks of consumption data , Here's the picture , The red box shows that the parallelism is consistent with the number set in the code , The blue box shows two SubTask A total of 20 Bar record , Same number of records as the data source , In addition, the green box shows two SubTask Of Task Manager Is the same , And and DataSource Of TaskManager Is the same , So the whole job It's all in the same place TaskManager On going , There is no extra cost across machines :
 8. What to do next , Related to another important abstract class ;
Inherited abstract class RichSourceFunction Of DataSource
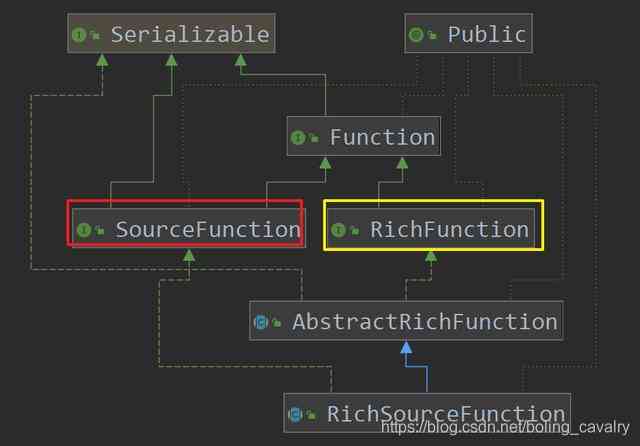
- Yes RichSourceFunction It starts from the inheritance relationship , Here's the picture ,SourceFunction and RichFunction The characteristics of are embodied in RichSourceFunction On ,SourceFunction It's a feature of data generation (run Method ),RichFunction The feature of is the connection and release of resources (open and close Method ):
 2. Next, we will start the actual battle , The goal is from MySQL Get data as DataSource, And then consume the data ; 3. Please prepare the available in advance MySql database , Then perform the following SQL, Create a library 、 surface 、 Record :
DROP DATABASE IF EXISTS flinkdemo;
CREATE DATABASE IF NOT EXISTS flinkdemo;
USE flinkdemo;

SELECT 'CREATING DATABASE STRUCTURE' as 'INFO';

DROP TABLE IF EXISTS `student`;
CREATE TABLE `student` (
  `id` int(11) unsigned NOT NULL AUTO_INCREMENT,
  `name` varchar(25) COLLATE utf8_bin DEFAULT NULL,
  PRIMARY KEY (`id`)
) ENGINE=InnoDB AUTO_INCREMENT=5 DEFAULT CHARSET=utf8 COLLATE=utf8_bin;

INSERT INTO `student` VALUES ('1', 'student01'), ('2', 'student02'), ('3', 'student03'), ('4', 'student04'), ('5', 'student05'), ('6', 'student06');
COMMIT;
- stay pom.xml add mysql rely on :
<dependency>
  <groupId>mysql</groupId>
  <artifactId>mysql-connector-java</artifactId>
  <version>5.1.34</version>
</dependency>
- newly added MySQLDataSource.java, The contents are as follows :
package com.bolingcavalry.customize;

import com.bolingcavalry.Student;
import org.apache.flink.configuration.Configuration;
import org.apache.flink.streaming.api.functions.source.RichSourceFunction;
import java.sql.Connection;
import java.sql.DriverManager;
import java.sql.PreparedStatement;
import java.sql.ResultSet;

public class MySQLDataSource extends RichSourceFunction<Student> {

    private Connection connection = null;

    private PreparedStatement preparedStatement = null;

    private volatile boolean isRunning = true;

    @Override
    public void open(Configuration parameters) throws Exception {
        super.open(parameters);

        if(null==connection) {
            Class.forName("com.mysql.jdbc.Driver");
            connection = DriverManager.getConnection("jdbc:mysql://192.168.50.43:3306/flinkdemo?useUnicode=true&characterEncoding=UTF-8", "root", "123456");
        }

        if(null==preparedStatement) {
            preparedStatement = connection.prepareStatement("select id, name from student");
        }
    }

    /**
     *  Release resources
     * @throws Exception
     */
    @Override
    public void close() throws Exception {
        super.close();

        if(null!=preparedStatement) {
            try {
                preparedStatement.close();
            } catch (Exception exception) {
                exception.printStackTrace();
            }
        }

        if(null==connection) {
            connection.close();
        }
    }

    @Override
    public void run(SourceContext<Student> ctx) throws Exception {
        ResultSet resultSet = preparedStatement.executeQuery();
        while (resultSet.next() && isRunning) {
            Student student = new Student();
            student.setId(resultSet.getInt("id"));
            student.setName(resultSet.getString("name"));
            ctx.collect(student);
        }
    }

    @Override
    public void cancel() {
        isRunning = false;
    }
}
- In the above code ,MySQLDataSource Inherited RichSourceFunction, As a DataSource, It can be used as addSource The input of method ;
- open and close Methods will be used by data sources SubTask call ,open Responsible for creating database connection objects ,close Responsible for releasing resources ;
- open Method directly write database related configuration ( Not an option );
- run Method in open Then it's called , Function and previous DataSource The example is the same , Responsible for production data , Here's the one prepared in front preparedStatement Object directly to the database to get data ;
- Next write a Demo Class uses MySQLDataSource:
package com.bolingcavalry.customize;

import com.bolingcavalry.Student;
import org.apache.flink.streaming.api.datastream.DataStream;
import org.apache.flink.streaming.api.environment.StreamExecutionEnvironment;

public class RichSourceFunctionDemo {

    public static void main(String[] args) throws Exception {
        final StreamExecutionEnvironment env = StreamExecutionEnvironment.getExecutionEnvironment();
        // The degree of parallelism is 2
        env.setParallelism(2);

        DataStream<Student> dataStream = env.addSource(new MySQLDataSource());
        dataStream.print();

        env.execute("Customize DataSource demo : RichSourceFunction");
    }
}
- From the above code, we can see ,MySQLDataSource Case introduction addSource Method to create a dataset ;
- As before , Compiling and constructing 、 Submitted to the Flink、 Specify the task class , You can start this task ;
- The results are shown in the following figure ,DataSource The parallelism of is 1, Six records sent , namely student All the records of the table :
 14. Processing data SubTask Two in all , Three messages each :
 15. Because of the execution of print(), So in TaskManager The console sees the data output as shown in the red box below :

About RichParallelSourceFunction
- Here comes the actual battle , And then there were RichParallelSourceFunction We haven't tried this abstract class yet , But I don't think this class needs to be mentioned in the article , Let's put RichlSourceFunction and RichParallelSourceFunction Let's take a look at the class diagram of :
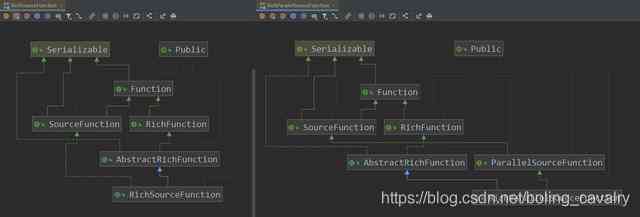 2. As can be seen from the above figure , stay RichFunction In terms of inheritance , The two are the same , stay SourceFunction On the relationship of inheritance ,RichlSourceFunction and RichParallelSourceFunction It's a little different ,RichParallelSourceFunction Is take the ParallelSourceFunction This line , and SourceFunction and ParallelSourceFunction The difference between , As I said before , therefore , The result is self-evident : Inherit RichParallelSourceFunction Of DataSource The parallelism of can be greater than 1 Of ; 3. If you are interested in , You can put the front MySQLDataSource Change to inheritance RichParallelSourceFunction Try again. ,DataSource The degree of parallelism will exceed 1, But this is not the only change ,DAG The picture shows Flink And do some more Operator Chain Handle , But that's not what this chapter is about , It can only be said that the result is correct ( Two DataSource Of SubTask, Send a total of 12 Bar record ), I suggest you try ;
thus ,《Flink Of DataSource Trilogy 》 The series is complete , Well begun is half done , After getting the data , There are many knowledge points to learn and master , The next article will go further Flink A wonderful journey ;
Welcome to the official account : Xinchen, programmer
WeChat search 「 Xinchen, programmer 」, I'm Xinchen , Looking forward to traveling with you Java The world ... https://github.com/zq2599/blog_demos
版权声明
本文为[Programmer Xinchen]所创,转载请带上原文链接,感谢
边栏推荐
- JVM真香系列:轻松理解class文件到虚拟机(上)
- Realization of file copy
- Creating a text cloud or label cloud in Python
- abp(net core)+easyui+efcore实现仓储管理系统——出库管理之五(五十四)
- 后缀表达式转中缀表达式
- [random talk] JS related thread model sorting
- 使用基于GAN的过采样技术提高非平衡COVID-19死亡率预测的模型准确性
- 中缀表达式转后缀表达式
- 在Python中创建文字云或标签云
- Dynamic query processing method of stored procedure
猜你喜欢

JVM Zhenxiang series: easy understanding of class files to virtual machines (Part 2)
. net core cross platform resource monitoring library and dotnet tool

线程池运用不当的一次线上事故
Brief VIM training strategy

信息安全课程设计第一周任务(7条指令的分析)

程序员都应该知道的URI,一文帮你全面了解
JVM真香系列:轻松理解class文件到虚拟机(上)
Countdownlatch explodes instantly! Based on AQS, why can cyclicbarrier be so popular?

How to deploy pytorch lightning model to production

Five design schemes of singleton mode
随机推荐
CMS垃圾收集器
解决go get下载包失败问题
深拷贝
The interface testing tool eolinker makes post request
Dynamic programming: maximum subarray
The road of cloud computing - going to sea - small goal: Hello world from. Net 5.0 on AWS
Process thread coroutine
[elastic search technology sharing] - ten pictures to show you the principle of ES! Understand why to say: ES is quasi real time!
RSA asymmetric encryption algorithm
Python的特性与搭建环境
Five phases of API life cycle
第一部分——第1章概述
npm install 无响应解决方案
Flink series (0) -- Preparation (basic stream processing)
【200人面试经验】,程序员面试,常见面试题解析
实现图片的复制
选择API管理平台之前要考虑的5个因素
后缀表达式转中缀表达式
getBytes之 LengthFieldBasedFrameDecoder服务端解析
ITerm2 配置和美化