当前位置:网站首页>opencv+dlib实现给蒙娜丽莎“配”眼镜
opencv+dlib实现给蒙娜丽莎“配”眼镜
2022-07-06 08:48:00 【果州做题家】
opencv+dlib实现给蒙娜丽莎“配”眼镜
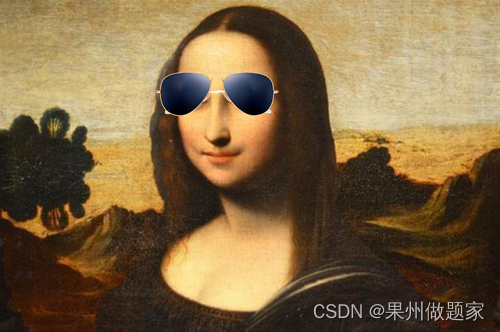
本案例利用opencv+dlib实现了给蒙娜丽莎佩戴眼镜。
主要原理就是利用dlib人脸识别的特征点提取效果,并利用特征点给人脸加上一个眼镜。
给蒙诺丽莎配眼镜
导入工具包
import cv2
import numpy as np
import dlib
from PIL import Image, ImageDraw, ImageFont
from imutils import face_utils, translate, rotate, resize
#导入python绘图matplotlib
import matplotlib.pyplot as plt
#使用ipython的魔法方法,将绘制出的图像直接嵌入在notebook单元格中
%matplotlib inline
#定义可视化图像函数
def look_img(img):
    '''opencv读入图像格式为BGR,matplotlib可视化格式为RGB,因此需将BGR转RGB'''
    img_RGB = cv2.cvtColor(img,cv2.COLOR_BGR2RGB)
    plt.imshow(img_RGB)
    plt.show()
导入模型
# 创建人脸检测器
det_face = dlib.get_frontal_face_detector()
# 加载标志点检测器
det_landmarks = dlib.shape_predictor("shape_predictor_68_face_landmarks.dat")  # 68点
单张图片处理
max_width = 500
img=cv2.imread('mnls.jpg')
img=resize(img,width=max_width)
deal = Image.open("0.png")      #眼镜图片
img_gray = cv2.cvtColor(img, cv2.COLOR_BGR2GRAY)
rects = det_face(img_gray, 0)
img = Image.fromarray(cv2.cvtColor(img, cv2.COLOR_BGR2RGB))

for rect in rects:
    face = {
    }
    shades_width = rect.right() - rect.left()

    # 用于检测当前人脸所在位置方向的预测器
    shape = det_landmarks(img_gray, rect)
    shape = face_utils.shape_to_np(shape)

    # 从输入图像中抓取每只眼睛的轮廓
    leftEye = shape[36:42]
    rightEye = shape[42:48]

    # 计算每只眼睛的中心
    leftEyeCenter = leftEye.mean(axis=0).astype("int")
    rightEyeCenter = rightEye.mean(axis=0).astype("int")

    # 计算眼心之间的夹角
    dY = leftEyeCenter[1] - rightEyeCenter[1]
    dX = leftEyeCenter[0] - rightEyeCenter[0]
    angle = np.rad2deg(np.arctan2(dY, dX))

    # 图片重写
    current_deal = deal.resize((shades_width, int(shades_width * deal.size[1] / deal.size[0])),
                           resample=Image.Resampling.LANCZOS)
    current_deal = current_deal.rotate(angle, expand=True)
    current_deal = current_deal.transpose(Image.Transpose.FLIP_TOP_BOTTOM)
    face['glasses_image'] = current_deal
    left_eye_x = leftEye[0,0] - shades_width // 4
    left_eye_y = leftEye[0,1] - shades_width // 6
    face['final_pos'] = (left_eye_x, left_eye_y)
    current_animation=1   #参数调节
    glasses_on=1         #参数调节
    current_y = int(current_animation / glasses_on * left_eye_y)
    img.paste(current_deal, (left_eye_x, current_y-20), current_deal)   #调节眼镜位置

display(img)
完整代码
# 完整代码:
import cv2
import numpy as np
import dlib
from PIL import Image, ImageDraw, ImageFont
from imutils import face_utils, translate, rotate, resize
#导入python绘图matplotlib
import matplotlib.pyplot as plt
#使用ipython的魔法方法,将绘制出的图像直接嵌入在notebook单元格中
%matplotlib inline
#定义可视化图像函数
def look_img(img):
'''opencv读入图像格式为BGR,matplotlib可视化格式为RGB,因此需将BGR转RGB'''
img_RGB = cv2.cvtColor(img,cv2.COLOR_BGR2RGB)
plt.imshow(img_RGB)
plt.show()
# 创建人脸检测器
det_face = dlib.get_frontal_face_detector()
# 加载标志点检测器
det_landmarks = dlib.shape_predictor("shape_predictor_68_face_landmarks.dat") # 68点
max_width = 500
img=cv2.imread('mnls.jpg') #人脸照片
img=resize(img,width=max_width)
deal = Image.open("./Glasses/1.png") #眼镜图片
img_gray = cv2.cvtColor(img, cv2.COLOR_BGR2GRAY)
rects = det_face(img_gray, 0)
img = Image.fromarray(cv2.cvtColor(img, cv2.COLOR_BGR2RGB))
for rect in rects:
face = {
}
shades_width = rect.right() - rect.left()
# 用于检测当前人脸所在位置方向的预测器
shape = det_landmarks(img_gray, rect)
shape = face_utils.shape_to_np(shape)
# 从输入图像中抓取每只眼睛的轮廓
leftEye = shape[36:42]
rightEye = shape[42:48]
# 计算每只眼睛的中心
leftEyeCenter = leftEye.mean(axis=0).astype("int")
rightEyeCenter = rightEye.mean(axis=0).astype("int")
# 计算眼心之间的夹角
dY = leftEyeCenter[1] - rightEyeCenter[1]
dX = leftEyeCenter[0] - rightEyeCenter[0]
angle = np.rad2deg(np.arctan2(dY, dX))
# 图片重写
current_deal = deal.resize((shades_width, int(shades_width * deal.size[1] / deal.size[0])),
resample=Image.Resampling.LANCZOS)
current_deal = current_deal.rotate(angle, expand=True)
current_deal = current_deal.transpose(Image.Transpose.FLIP_TOP_BOTTOM)
face['glasses_image'] = current_deal
left_eye_x = leftEye[0,0] - shades_width // 4
left_eye_y = leftEye[0,1] - shades_width // 6
face['final_pos'] = (left_eye_x, left_eye_y)
current_animation=1 #参数调节
glasses_on=0.8 #参数调节
current_y = int(current_animation / glasses_on * left_eye_y)
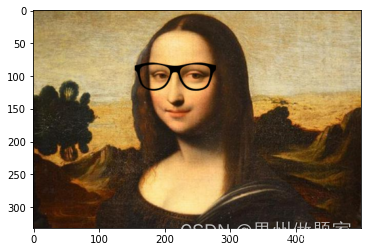
img.paste(current_deal, (left_eye_x, current_y-20), current_deal) #调节眼镜位置
#PIL图像转CV2图像
cv2_img = cv2.cvtColor(np.asarray(img), cv2.COLOR_RGB2BGR)
look_img(cv2_img)
图片合成gif
import imageio

def compose_gif():
    gif_images = []
    for path in img_paths:
        gif_images.append(imageio.imread(path))
    imageio.mimsave("test.gif",gif_images,fps=1)

data_path='./output'   #数据文件夹
images=os.listdir(data_path)
img_paths=[]
for i in images:
    img_paths+=[os.path.join(data_path,i)]
compose_gif()
效果展示:
边栏推荐
- Introduction to the differences between compiler options of GCC dynamic library FPIC and FPIC
- LeetCode:236. 二叉树的最近公共祖先
- vb. Net changes with the window, scales the size of the control and maintains its relative position
- 【ROS】usb_ Cam camera calibration
- sublime text的编写程序时的Tab和空格缩进问题
- Light of domestic games destroyed by cracking
- 自动化测试框架有什么作用?上海专业第三方软件测试公司安利
- LeetCode:34. 在排序数组中查找元素的第一个和最后一个位置
- LeetCode:41. 缺失的第一个正数
- 项目连接数据库遇到的问题及解决
猜你喜欢

Crash problem of Chrome browser
【ROS】usb_cam相机标定
![[embedded] cortex m4f DSP Library](/img/83/ab421d5cc18e907056ec2bdaeb7d5c.png)
[embedded] cortex m4f DSP Library
pytorch训练好的模型在加载和保存过程中的问题
Esp8266-rtos IOT development
UnsupportedOperationException异常
C语言双指针——经典题型
Simple use of promise in uniapp

Process of obtaining the electronic version of academic qualifications of xuexin.com
Navicat Premium 创建MySql 创建存储过程
随机推荐
LeetCode:836. 矩形重叠
Computer graduation design PHP Zhiduo online learning platform
Visual implementation and inspection of visdom
随手记01
Swagger setting field required is mandatory
Research Report on supply and demand and development prospects of China's high purity aluminum market (2022 Edition)
Deep analysis of C language pointer
Unified ordering background interface product description Chinese garbled
LeetCode:39. 组合总和
poi追加写EXCEL文件
@Jsonbackreference and @jsonmanagedreference (solve infinite recursion caused by bidirectional references in objects)
Unsupported operation exception
pytorch训练好的模型在加载和保存过程中的问题
Sublime text using ctrl+b to run another program without closing other runs
Double pointeur en langage C - - modèle classique
优秀的软件测试人员,都具备这些能力
China Light conveyor belt in-depth research and investment strategy report (2022 Edition)
LeetCode:剑指 Offer 48. 最长不含重复字符的子字符串
ROS编译 调用第三方动态库(xxx.so)
Leetcode: Sword Finger offer 42. Somme maximale des sous - tableaux consécutifs