当前位置:网站首页>[OpenGL] note 29 anti aliasing (MSAA)
[OpenGL] note 29 anti aliasing (MSAA)
2022-07-04 22:47:00 【ycrsw】
1. technological process
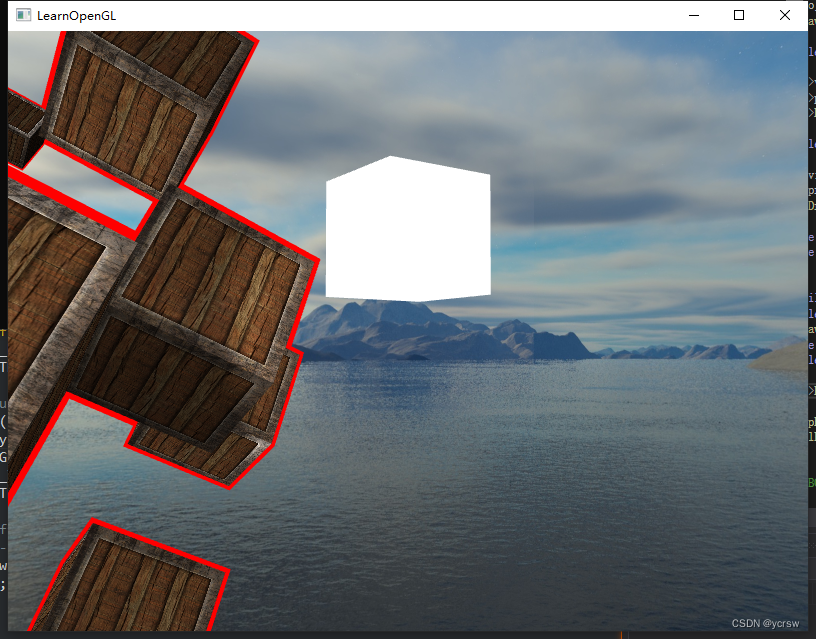
After the previous tutorial , At present, the rendered image has enough expressiveness , But there are still some flaws , For example, when our rendered image resolution cannot keep up with the screen resolution , Some serious jagged effects will appear on the edges of our rendered graphics :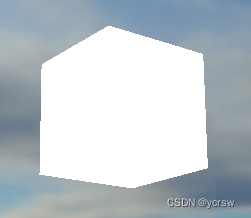
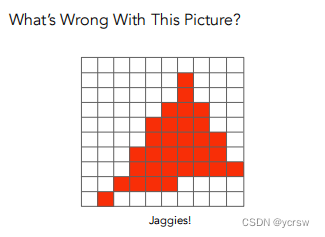
natural , This effect is due to too few pixels sampled in the picture , Thus, there is an obvious “ Broken band ”: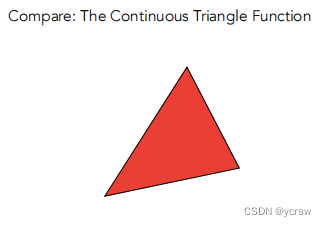
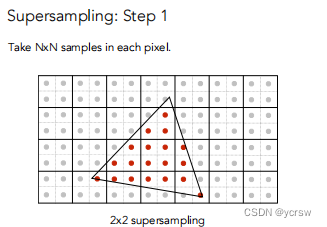
that , Of course , He who breaks the bell must tie the bell , We can increase the number of samples , At present, the widely used anti aliasing method is also multi sampling MSAA, The principle of this method is very simple , It is to divide each sampled pixel into four pixels for sampling calculation , Finally, average the results :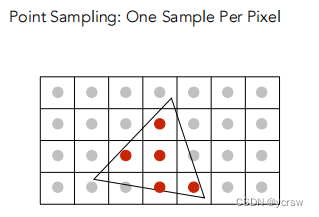
2. Realization
2.1 Increase the frame buffer
stay 【OpenGL】 Note 23 、 Frame buffer in , I reduce the number of samples in the custom frame buffer , Finally, restore to the normal viewport to complete a mosaic wind effect :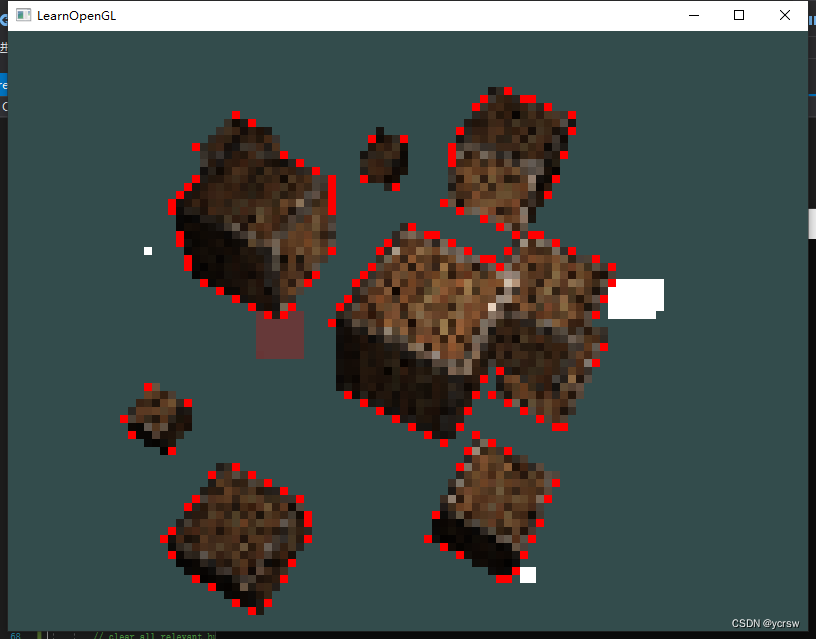
So the same , According to the above MSAA principle , I can also increase the number of samples in the custom frame buffer , Finally, restore the viewport size ( Among them, there is the function of automatic averaging ) To complete the anti aliasing effect ( With 4X4 sampling , Take off screen rendering as an example ):
First, increase the viewport before each rendering :
	while (!glfwWindowShouldClose(window))
    {

        glViewport(0, 0, 800 * 4, 600 * 4);// Increase viewport , Bind custom frame buffer
        glBindFramebuffer(GL_FRAMEBUFFER, screen->framebuffer);
		...
		// Render the scene
		...
        screen->Draw(screenShader);// Render frame buffer
        glfwSwapBuffers(window);
        glfwPollEvents();
    }
Then, when initializing the custom frame buffer, increase the texture and render object attachments proportionally
	void setup() {

        glGenVertexArrays(1, &quadVAO);
        glGenBuffers(1, &quadVBO);
        glBindVertexArray(quadVAO);
        glBindBuffer(GL_ARRAY_BUFFER, quadVBO);
        glBufferData(GL_ARRAY_BUFFER, sizeof(quadVertices), &quadVertices, GL_STATIC_DRAW);
        glEnableVertexAttribArray(0);
        glVertexAttribPointer(0, 2, GL_FLOAT, GL_FALSE, 4 * sizeof(float), (void*)0);
        glEnableVertexAttribArray(1);
        glVertexAttribPointer(1, 2, GL_FLOAT, GL_FALSE, 4 * sizeof(float), (void*)(2 * sizeof(float)));

        glGenFramebuffers(1, &framebuffer);
        glBindFramebuffer(GL_FRAMEBUFFER, framebuffer);
        glGenTextures(1, &textureColorbuffer);
        glBindTexture(GL_TEXTURE_2D, textureColorbuffer);
        glTexImage2D(GL_TEXTURE_2D, 0, GL_RGB, 800 * 4, 600 * 4, 0, GL_RGB, GL_UNSIGNED_BYTE, NULL);// Increase texture attachment
        glTexParameteri(GL_TEXTURE_2D, GL_TEXTURE_MIN_FILTER, GL_LINEAR);
        glTexParameteri(GL_TEXTURE_2D, GL_TEXTURE_MAG_FILTER, GL_LINEAR);
        glFramebufferTexture2D(GL_FRAMEBUFFER, GL_COLOR_ATTACHMENT0, GL_TEXTURE_2D, textureColorbuffer, 0);
        glGenRenderbuffers(1, &rbo);
        glBindRenderbuffer(GL_RENDERBUFFER, rbo);
        glRenderbufferStorage(GL_RENDERBUFFER, GL_DEPTH24_STENCIL8, 800 * 4, 600 * 4);// Increase the render buffer object
        glFramebufferRenderbuffer(GL_FRAMEBUFFER, GL_DEPTH_STENCIL_ATTACHMENT, GL_RENDERBUFFER, rbo);
        if (glCheckFramebufferStatus(GL_FRAMEBUFFER) != GL_FRAMEBUFFER_COMPLETE)
            cout << "ERROR::FRAMEBUFFER:: Framebuffer is not complete!" << endl;
        glBindFramebuffer(GL_FRAMEBUFFER, 0);
    }
Finally, restore the viewport size before rendering our frame buffer :
    void Draw(Shader& shader) {

        glViewport(0, 0, 800, 600);
        glBindFramebuffer(GL_FRAMEBUFFER, 0);
        glDisable(GL_DEPTH_TEST);
        glClearColor(1.0f, 1.0f, 1.0f, 1.0f);
        glClear(GL_COLOR_BUFFER_BIT);

        shader.use();
        shader.setInt("screenTexture", 0);
        glActiveTexture(GL_TEXTURE0);
        glBindVertexArray(quadVAO);
        glBindTexture(GL_TEXTURE_2D, textureColorbuffer);	// use the color attachment texture as the texture of the quad plane
        glDrawArrays(GL_TRIANGLES, 0, 6);
    }
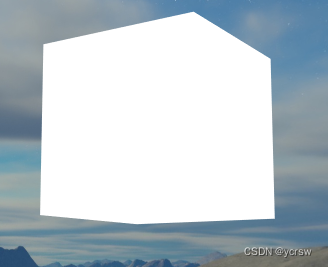
Effect comparison before and after :
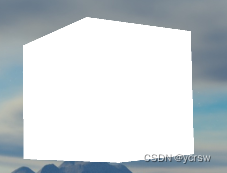
It can be seen that the actual effect is good , But from my own point of view, the number of rendered frames has decreased a lot , Is there a more efficient way ? Of course
2.2 OpenGL Bring their own MSAA
OpenGL It has its own MSAA function , Its use is also very convenient :
First call before creating the window glfwWindowHint To create a multisampling buffer :
glfwWindowHint(GLFW_SAMPLES, 16);
The second parameter is our number of samples , Sample each pixel 16 One is actually 4X4 Sampling of
Next, we can turn on the multi sampling function before rendering as before :
glEnable(GL_MULTISAMPLE);
You can see , The effect is even better than our last one , Even the number of frames is higher , But this method has a drawback , That is, it cannot be used in off screen rendering , It means that this is invalid when leaving the screen , So how can we better complete the anti aliasing function under the premise of off screen rendering ?
2.3 Off screen MSAA
Actually, off screen MSAA Not many new operations , And before 【OpenGL】 Note 23 、 Frame buffer What is said in is similar , It's just when we bind the texture attachment of the custom buffer and render the buffer object , Changed the function and texture type of partial calls :
		glGenTextures(1, &textureColorbuffer);
        glBindTexture(GL_TEXTURE_2D_MULTISAMPLE, textureColorbuffer);
        glTexImage2DMultisample(GL_TEXTURE_2D_MULTISAMPLE, 4, GL_RGB, 800, 600, GL_TRUE);// Multisampling texture attachment
        glBindTexture(GL_TEXTURE_2D_MULTISAMPLE, 0);
        glFramebufferTexture2D(GL_FRAMEBUFFER, GL_COLOR_ATTACHMENT0, GL_TEXTURE_2D_MULTISAMPLE, textureColorbuffer, 0);

        unsigned int rbo;
        glGenRenderbuffers(1, &rbo);
        glBindRenderbuffer(GL_RENDERBUFFER, rbo);
        glRenderbufferStorageMultisample(GL_RENDERBUFFER, 4, GL_DEPTH24_STENCIL8, 800, 600);// Multisampling render buffer objects
        glBindRenderbuffer(GL_RENDERBUFFER, 0);
        glFramebufferRenderbuffer(GL_FRAMEBUFFER, GL_DEPTH_STENCIL_ATTACHMENT, GL_RENDERBUFFER, rbo);
But multisampling buffering is a little special , We can't directly use their buffered images for other operations , For example, sampling them in shaders .
A multisampled image contains more information than an ordinary image , All we have to do is shrink or restore (Resolve) Images . The restoration of multisampling frame buffer is usually through glBlitFramebuffer To complete , It can copy an area in one frame buffer to another frame buffer , And restore the multisampling buffer .
	void Draw(Shader& shader) {

        glBindFramebuffer(GL_READ_FRAMEBUFFER, framebuffer);
        glBindFramebuffer(GL_DRAW_FRAMEBUFFER, 0);
        glBlitFramebuffer(0, 0, 800, 600, 0, 0, 800, 600, GL_COLOR_BUFFER_BIT, GL_NEAREST);
        // now bind back to default framebuffer and draw a quad plane with the attached framebuffer color texture
        glBindFramebuffer(GL_FRAMEBUFFER, 0);
        glDisable(GL_DEPTH_TEST); // disable depth test so screen-space quad isn't discarded due to depth test.
        // clear all relevant buffers
        glClearColor(1.0f, 1.0f, 1.0f, 1.0f); // set clear color to white (not really necessary actually, since we won't be able to see behind the quad anyways)
        glClear(GL_COLOR_BUFFER_BIT);

        shader.use();
        shader.setInt("screenTexture", 0);
        glActiveTexture(GL_TEXTURE0);
        glBindVertexArray(quadVAO);
        glBindTexture(GL_TEXTURE_2D, textureColorbuffer);	// use the color attachment texture as the texture of the quad plane
        glDrawArrays(GL_TRIANGLES, 0, 6);
    }
The result is right , But there's a problem , What if we want to use the texture output of multi sampling frame buffer to do things like post-processing ? We cannot use multisampled textures directly in fragment shaders . But what we can do is to transfer the multisampling buffer bit block to a file that does not use the multisampling texture attachment FBO in . Then use this ordinary color attachment for post-processing , So as to achieve our goal . However , This also means that we need to generate a new FBO, As an intermediate frame buffer object , Restore the multisampling buffer to a normal one that can be used in shaders 2D texture .
		glGenFramebuffers(1, &fbo);
        glBindFramebuffer(GL_FRAMEBUFFER, fbo);
        // create a color attachment texture
        glGenTextures(1, &screenTexture);
        glBindTexture(GL_TEXTURE_2D, screenTexture);
        glTexImage2D(GL_TEXTURE_2D, 0, GL_RGB, 800, 600, 0, GL_RGB, GL_UNSIGNED_BYTE, NULL);
        glTexParameteri(GL_TEXTURE_2D, GL_TEXTURE_MIN_FILTER, GL_LINEAR);
        glTexParameteri(GL_TEXTURE_2D, GL_TEXTURE_MAG_FILTER, GL_LINEAR);
        glFramebufferTexture2D(GL_FRAMEBUFFER, GL_COLOR_ATTACHMENT0, GL_TEXTURE_2D, screenTexture, 0);
Then we copy the original buffer into the new buffer when rendering , And change the binding texture to this new texture :
	void Draw(Shader& shader) {

        glBindFramebuffer(GL_READ_FRAMEBUFFER, framebuffer);
        glBindFramebuffer(GL_DRAW_FRAMEBUFFER, fbo);
        glBlitFramebuffer(0, 0, 800, 600, 0, 0, 800, 600, GL_COLOR_BUFFER_BIT, GL_NEAREST);
        // now bind back to default framebuffer and draw a quad plane with the attached framebuffer color texture
        glBindFramebuffer(GL_FRAMEBUFFER, 0);
        glDisable(GL_DEPTH_TEST); // disable depth test so screen-space quad isn't discarded due to depth test.
        // clear all relevant buffers
        glClearColor(1.0f, 1.0f, 1.0f, 1.0f); // set clear color to white (not really necessary actually, since we won't be able to see behind the quad anyways)
        glClear(GL_COLOR_BUFFER_BIT);

        shader.use();
        shader.setInt("screenTexture", 0);
        glActiveTexture(GL_TEXTURE0);
        glBindVertexArray(quadVAO);
        glBindTexture(GL_TEXTURE_2D, screenTexture);	// use the color attachment texture as the texture of the quad plane
        glDrawArrays(GL_TRIANGLES, 0, 6);
    }
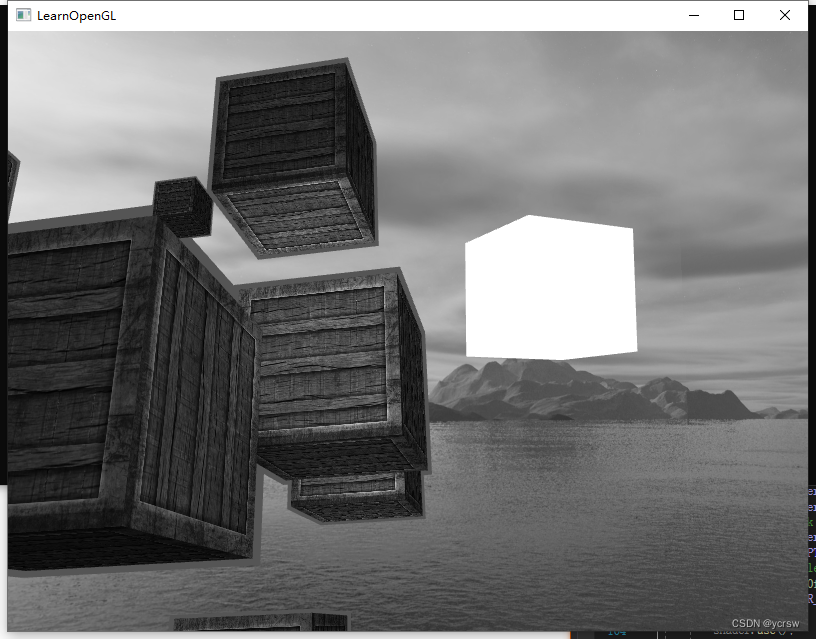
In this way, we can post process the multi sampled texture in the shader , For example, the following gray image processing :
2.4 Custom anti aliasing
It is also feasible to pass a multi sampled texture image directly into the shader without restoring .GLSL Provides such options , Let's sample each sub sample of the texture image , So we can create our own anti aliasing algorithm . This is usually done in large graphics applications .
To get the color value of each sub sample , You need to put the texture uniform The sampler is set to sampler2DMS, Instead of the usual sampler2D:
uniform sampler2DMS screenTextureMS;
Use texelFetch Function can get the color value of each sub sample :
vec4 colorSample = texelFetch(screenTextureMS, TexCoords, 3); // The first 4 Subsample
边栏推荐
- 2022-07-04:以下go语言代码输出什么?A:true;B:false;C:编译错误。 package main import “fmt“ func main() { fmt.Pri
- 通过Go语言创建CA与签发证书
- 攻防世界 MISC 进阶区 hit-the-core
- 【烹饪记录】--- 青椒炒千张
- How to reset the password of MySQL root account
- Unity Xiuxian mobile game | Lua dynamic sliding function (specific implementation of three source codes)
- 啃下大骨头——排序(二)
- LOGO特訓營 第一節 鑒別Logo與Logo設計思路
- Postgresqlql advanced skills pivot table
- Detailed explanation of flask context
猜你喜欢
How to send a reliable request before closing the page

Challenges faced by virtual human industry
UML图记忆技巧

Attack and defense world misc advanced area Hong
Close system call analysis - Performance Optimization
集群的概述与定义,一看就会

共创软硬件协同生态:Graphcore IPU与百度飞桨的“联合提交”亮相MLPerf

The new version judges the code of PC and mobile terminal, the mobile terminal jumps to the mobile terminal, and the PC jumps to the latest valid code of PC terminal
MYSQL架构——逻辑架构
Logo special training camp Section V font structure and common design techniques

随机推荐
Unity-VScode-Emmylua配置报错解决
The new version judges the code of PC and mobile terminal, the mobile terminal jumps to the mobile terminal, and the PC jumps to the latest valid code of PC terminal
10 schemes to ensure interface data security
剑指 Offer 67. 把字符串转换成整数
新版判断PC和手机端代码,手机端跳转手机端,PC跳转PC端最新有效代码
2022-07-04:以下go语言代码输出什么?A:true;B:false;C:编译错误。 package main import “fmt“ func main() { fmt.Pri
Sword finger offer 67 Convert a string to an integer
Advanced area of attack and defense world misc 3-11
堆排序代码详解
LOGO special training camp section I identification logo and Logo Design Ideas
Hit the core in the advanced area of misc in the attack and defense world
【OpenGL】笔记二十九、抗锯齿(MSAA)
Is Huatai Securities a nationally recognized securities firm? Is it safe to open an account?
LOGO特训营 第五节 字体结构与设计常用技法
The Sandbox 和数字好莱坞达成合作,通过人力资源开发加速创作者经济的发展
Apachecn translation, proofreading, note sorting activity progress announcement 2022.7
Short video system source code, click the blank space of the screen, the keyboard does not automatically stow
LOGO特訓營 第一節 鑒別Logo與Logo設計思路
leetcode 72. Edit Distance 编辑距离(中等)
页面关闭前,如何发送一个可靠请求