当前位置:网站首页>通过Go语言创建CA与签发证书
通过Go语言创建CA与签发证书
2022-07-04 22:17:00 【Hermokrates】
本篇文章中,将描述如何使用go创建CA,并使用CA签署证书。在使用openssl创建证书时,遵循的步骤是 创建秘钥 > 创建CA > 生成要颁发证书的秘钥 > 使用CA签发证书。这种步骤,那么我们现在就来尝试下。
创建证书的颁发机构
首先,会从将从创建 CA 开始。CA 会被用来签署其他证书
// 对证书进行签名
ca := &x509.Certificate{

	SerialNumber: big.NewInt(2019),
	Subject: pkix.Name{

        CommonName:    "domain name",
		Organization:  []string{
    "Company, INC."},
		Country:       []string{
    "US"},
		Province:      []string{
    ""},
		Locality:      []string{
    "San Francisco"},
		StreetAddress: []string{
    "Golden Gate Bridge"},
		PostalCode:    []string{
    "94016"},
	},
	NotBefore:             time.Now(),  // 生效时间
	NotAfter:              time.Now().AddDate(10, 0, 0), // 过期时间 年月日
	IsCA:                  true, // 表示用于CA
    // openssl 中的 extendedKeyUsage = clientAuth, serverAuth 字段
	ExtKeyUsage:           []x509.ExtKeyUsage{
    x509.ExtKeyUsageClientAuth, x509.ExtKeyUsageServerAuth},
    // openssl 中的 keyUsage 字段
	KeyUsage:              x509.KeyUsageDigitalSignature | x509.KeyUsageCertSign,
	BasicConstraintsValid: true,
}
接下来需要对证书生成公钥和私钥
caPrivKey, err := rsa.GenerateKey(rand.Reader, 4096)
if err != nil {

	return err
}
然后生成证书:
caBytes, err := x509.CreateCertificate(rand.Reader, ca, ca, &caPrivKey.PublicKey, caPrivKey)
if err != nil {

	return err
}
我们看到的证书内容是PEM编码后的,现在caBytes我们有了生成的证书,我们将其进行 PEM 编码以供以后使用:
caPEM := new(bytes.Buffer)
pem.Encode(caPEM, &pem.Block{

	Type:  "CERTIFICATE",
	Bytes: caBytes,
})

caPrivKeyPEM := new(bytes.Buffer)
pem.Encode(caPrivKeyPEM, &pem.Block{

	Type:  "RSA PRIVATE KEY",
	Bytes: x509.MarshalPKCS1PrivateKey(caPrivKey),
})
创建证书
证书的 x509.Certificate 与CA的 x509.Certificate 属性有稍微不同,需要进行一些修改
cert := &x509.Certificate{

	SerialNumber: big.NewInt(1658),
	Subject: pkix.Name{

        CommonName:    "domain name",
		Organization:  []string{
    "Company, INC."},
		Country:       []string{
    "US"},
		Province:      []string{
    ""},
		Locality:      []string{
    "San Francisco"},
		StreetAddress: []string{
    "Golden Gate Bridge"},
		PostalCode:    []string{
    "94016"},
	},
    IPAddresses:  []net.IP{
    }, // 这里就是openssl配置文件中 subjectAltName 里的 IP:/IP=
    DNSNames:     []string{
    }, // 这里就是openssl配置文件中 subjectAltName 里的 DNS:/DNS=
	NotBefore:    time.Now(),
	NotAfter:     time.Now().AddDate(10, 0, 0),
	SubjectKeyId: []byte{
    1, 2, 3, 4, 6},
    // 这里就是openssl中的extendedKeyUsage
	ExtKeyUsage:  []x509.ExtKeyUsage{
    x509.ExtKeyUsageClientAuth, x509.ExtKeyUsageServerAuth},
	KeyUsage:     x509.KeyUsageDigitalSignature,
}
注:这里会在证书中特别添加了
DNS和IP(这个不是必须的),这个选项的增加代表的我们的证书可以支持多域名
为该证书创建私钥和公钥:
certPrivKey, err := rsa.GenerateKey(rand.Reader, 4096)
if err != nil {

	return err
}
使用CA签署证书
有了上述的内容后,可以创建证书并用CA进行签名
certBytes, err := x509.CreateCertificate(rand.Reader, cert, ca, &certPrivKey.PublicKey, caPrivKey)
if err != nil {

	return err
}
要保存成证书格式需要做PEM编码
certPEM := new(bytes.Buffer)
pem.Encode(certPEM, &pem.Block{

	Type:  "CERTIFICATE",
	Bytes: certBytes,
})

certPrivKeyPEM := new(bytes.Buffer)
pem.Encode(certPrivKeyPEM, &pem.Block{

	Type:  "RSA PRIVATE KEY",
	Bytes: x509.MarshalPKCS1PrivateKey(certPrivKey),
})
把上面内容融合为一起
创建一个 ca.go 里面是创建ca和颁发证书的逻辑
package main

import (
	"bytes"
	cr "crypto/rand"
	"crypto/rsa"
	"crypto/x509"
	"crypto/x509/pkix"
	"encoding/pem"
	"math/big"
	"math/rand"
	"net"
	"os"
	"time"
)

type CERT struct {

	CERT       []byte
	CERTKEY    *rsa.PrivateKey
	CERTPEM    *bytes.Buffer
	CERTKEYPEM *bytes.Buffer
	CSR        *x509.Certificate
}

func CreateCA(sub *pkix.Name, expire int) (*CERT, error) {

	var (
		ca  = new(CERT)
		err error
	)

	if expire < 1 {

		expire = 1
	}
	// 为ca生成私钥
	ca.CERTKEY, err = rsa.GenerateKey(cr.Reader, 4096)
	if err != nil {

		return nil, err
	}

	// 对证书进行签名
	ca.CSR = &x509.Certificate{

		SerialNumber: big.NewInt(rand.Int63n(2000)),
		Subject:      *sub,
		NotBefore:    time.Now(),                       // 生效时间
		NotAfter:     time.Now().AddDate(expire, 0, 0), // 过期时间
		IsCA:         true,                             // 表示用于CA
		// openssl 中的 extendedKeyUsage = clientAuth, serverAuth 字段
		ExtKeyUsage: []x509.ExtKeyUsage{
    x509.ExtKeyUsageClientAuth, x509.ExtKeyUsageServerAuth},
		// openssl 中的 keyUsage 字段
		KeyUsage:              x509.KeyUsageDigitalSignature | x509.KeyUsageCertSign,
		BasicConstraintsValid: true,
	}
	// 创建证书
	// caBytes 就是生成的证书
	ca.CERT, err = x509.CreateCertificate(cr.Reader, ca.CSR, ca.CSR, &ca.CERTKEY.PublicKey, ca.CERTKEY)
	if err != nil {

		return nil, err
	}
	ca.CERTPEM = new(bytes.Buffer)
	pem.Encode(ca.CERTPEM, &pem.Block{

		Type:  "CERTIFICATE",
		Bytes: ca.CERT,
	})
	ca.CERTKEYPEM = new(bytes.Buffer)
	pem.Encode(ca.CERTKEYPEM, &pem.Block{

		Type:  "RSA PRIVATE KEY",
		Bytes: x509.MarshalPKCS1PrivateKey(ca.CERTKEY),
	})

	// 进行PEM编码,编码就是直接cat证书里面内容显示的东西
	return ca, nil
}

func Req(ca *x509.Certificate, sub *pkix.Name, expire int, dns []string, ip []net.IP) (*CERT, error) {

	var (
		cert = &CERT{
    }
		err  error
	)
	cert.CERTKEY, err = rsa.GenerateKey(cr.Reader, 4096)
	if err != nil {

		return nil, err
	}
	if expire < 1 {

		expire = 1
	}
	cert.CSR = &x509.Certificate{

		SerialNumber: big.NewInt(rand.Int63n(2000)),
		Subject:      *sub,
		IPAddresses:  ip,
		DNSNames:     dns,
		NotBefore:    time.Now(),
		NotAfter:     time.Now().AddDate(expire, 0, 0),
		SubjectKeyId: []byte{
    1, 2, 3, 4, 6},
		ExtKeyUsage:  []x509.ExtKeyUsage{
    x509.ExtKeyUsageClientAuth, x509.ExtKeyUsageServerAuth},
		KeyUsage:     x509.KeyUsageDigitalSignature,
	}

	cert.CERT, err = x509.CreateCertificate(cr.Reader, cert.CSR, ca, &cert.CERTKEY.PublicKey, cert.CERTKEY)
	if err != nil {

		return nil, err
	}

	cert.CERTPEM = new(bytes.Buffer)
	pem.Encode(cert.CERTPEM, &pem.Block{

		Type:  "CERTIFICATE",
		Bytes: cert.CERT,
	})
	cert.CERTKEYPEM = new(bytes.Buffer)
	pem.Encode(cert.CERTKEYPEM, &pem.Block{

		Type:  "RSA PRIVATE KEY",
		Bytes: x509.MarshalPKCS1PrivateKey(cert.CERTKEY),
	})
	return cert, nil
}

func Write(cert *CERT, file string) error {

	keyFileName := file + ".key"
	certFIleName := file + ".crt"
	kf, err := os.Create(keyFileName)
	if err != nil {

		return err
	}
	defer kf.Close()

	if _, err := kf.Write(cert.CERTKEYPEM.Bytes()); err != nil {

		return err
	}

	cf, err := os.Create(certFIleName)
	if err != nil {

		return err
	}
	if _, err := cf.Write(cert.CERTPEM.Bytes()); err != nil {

		return err
	}
	return nil
}
如果需要使用的话,可以引用这些函数
package main

import (
	"crypto/x509/pkix"
	"log"
	"net"
)

func main() {

	subj := &pkix.Name{

		CommonName:    "chinamobile.com",
		Organization:  []string{
    "Company, INC."},
		Country:       []string{
    "US"},
		Province:      []string{
    ""},
		Locality:      []string{
    "San Francisco"},
		StreetAddress: []string{
    "Golden Gate Bridge"},
		PostalCode:    []string{
    "94016"},
	}
	ca, err := CreateCA(subj, 10)
	if err != nil {

		log.Panic(err)
	}

	Write(ca, "./ca")

	crt, err := Req(ca.CSR, subj, 10, []string{
    "test.default.svc", "test"}, []net.IP{
    })

	if err != nil {

		log.Panic(err)
	}

	Write(crt, "./tls")
}
遇到的问题
panic: x509: unsupported public key type: rsa.PublicKey
这里是因为 x509.CreateCertificate 的参数 privatekey 需要传入引用变量,而传入的是一个普通变量
注:x509: only RSA and ECDSA public keys supported
一些参数的意思
extendedKeyUsage :增强型密钥用法(参见"new_oids"字段):服务器身份验证、客户端身份验证、时间戳。
extendedKeyUsage = critical,serverAuth, clientAuth, timeStamping
keyUsage : 密钥用法,防否认(nonRepudiation)、数字签名(digitalSignature)、密钥加密(keyEncipherment)。
keyUsage = nonRepudiation, digitalSignature, keyEncipherment
Reference
边栏推荐
- 蓝队攻防演练中的三段作战
- 业务太忙,真的是没时间搞自动化理由吗?
- LOGO特訓營 第一節 鑒別Logo與Logo設計思路
- LOGO special training camp section I identification logo and Logo Design Ideas
- Embedded development: skills and tricks -- seven skills to improve the quality of embedded software code
- 繁華落盡、物是人非:個人站長該何去何從
- Locust性能测试 —— 环境搭建及使用
- idea中pom.xml依赖无法导入
- HBuilder X 常用的快捷键
- i.MX6ULL驱动开发 | 24 - 基于platform平台驱动模型点亮LED
猜你喜欢

NFT Insider #64:电商巨头eBay提交NFT相关商标申请,毕马威将在Web3和元宇宙中投入3000万美元
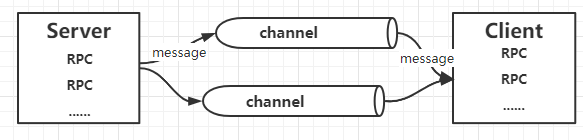
Play with grpc - go deep into concepts and principles
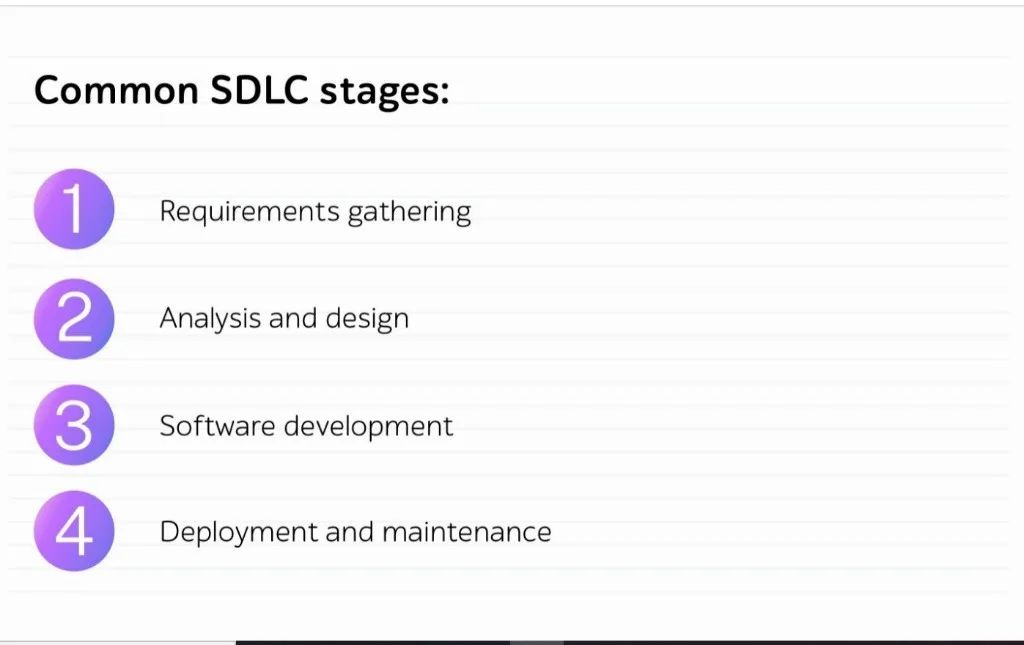
将QA引入软件开发生命周期是工程师要遵循的最佳实践
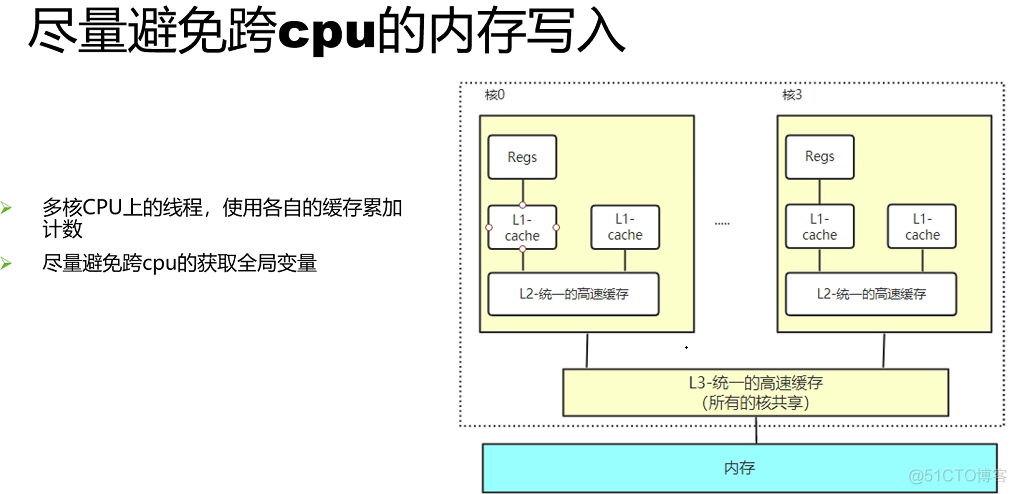
并发优化总结

傳智教育|如何轉行互聯網高薪崗比特之一的軟件測試?(附軟件測試學習路線圖)

Xiangjiang Kunpeng joined the shengteng Wanli partnership program and continued to write a new chapter of cooperation with Huawei

Tiktok actual combat ~ the number of comments is updated synchronously
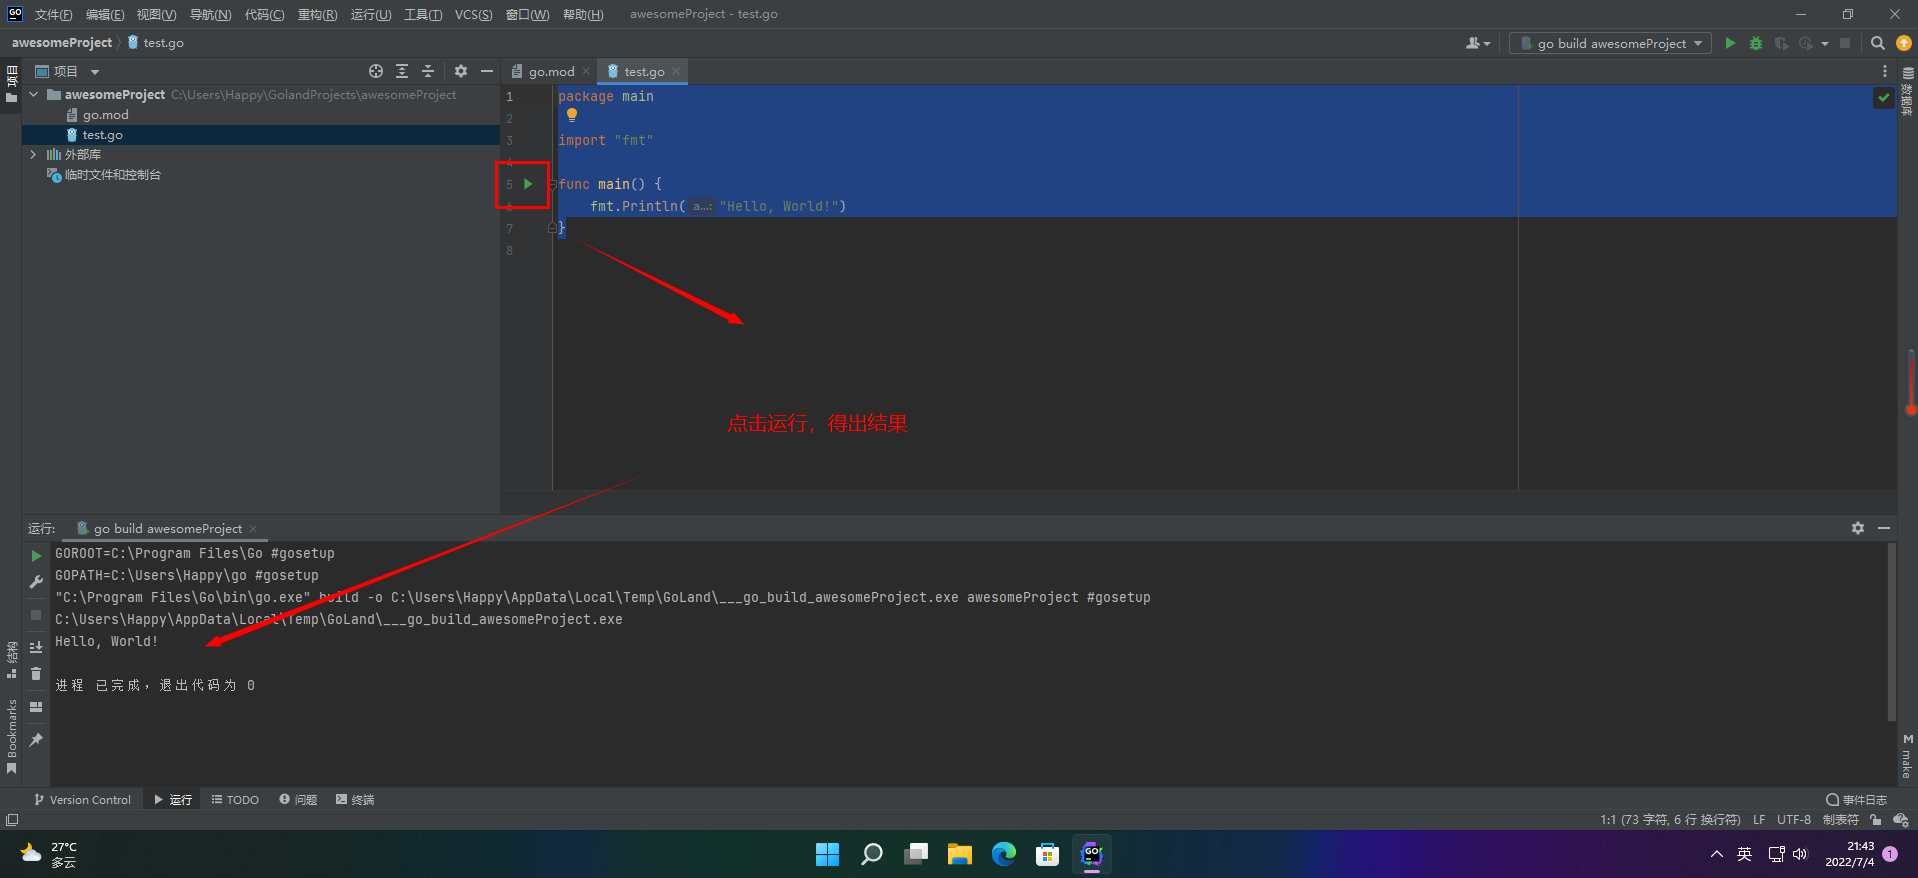
【愚公系列】2022年7月 Go教学课程 003-IDE的安装和基本使用

Enabling digital economy Fuxin software attends the BRICs high level Forum on Sustainable Development
传智教育|如何转行互联网高薪岗位之一的软件测试?(附软件测试学习路线图)
随机推荐
面试必备 LeetCode 链表算法题汇总,全程干货!
UML diagram memory skills
B站大量虚拟主播被集体强制退款:收入蒸发,还倒欠B站;乔布斯被追授美国总统自由勋章;Grafana 9 发布|极客头条
常用的开源无代码测试工具
Short video system source code, click the blank space of the screen, the keyboard does not automatically stow
Solana链上应用Crema因黑客攻击停运
Flask 上下文详解
Google Earth Engine(GEE)——基于 MCD64A1 的 GlobFire 日常火灾数据集
Introduction and application of bigfilter global transaction anti duplication component
Play with grpc - go deep into concepts and principles
并发优化总结
Easy to use app recommendation: scan QR code, scan barcode and view history
复数在数论、几何中的用途 - 曹则贤
微服务--开篇
Postgresqlql advanced skills pivot table
Mysql root 账号如何重置密码
php短视频源码,点赞时会有大拇指动画飘起
Embedded development: skills and tricks -- seven skills to improve the quality of embedded software code
傳智教育|如何轉行互聯網高薪崗比特之一的軟件測試?(附軟件測試學習路線圖)
How diff are the contents of the same configuration item in different environments?