当前位置:网站首页>[system security] ten thousand words summary system virtualization container bottom layer principle experiment
[system security] ten thousand words summary system virtualization container bottom layer principle experiment
2022-07-05 03:13:00 【_ Zer0】
This paper is the author's notes on learning system security related content from zero foundation , If you are concerned about system security 、 Interested in reverse analysis or want to know some knowledge , Welcome to your attention . This series of articles will be continuously updated with the author's postgraduate study in the next three years , Because the author is still in the initial stage , It is inevitable to refer to and reproduce the contents of various books , If the author of the book believes that infringement, please inform , I will delete... Immediately . Emphasize that all the contents of this series are only used for learning and Research , The author is not legally liable for any consequences caused by the code in this article .
Previous link
[ System security ] PE File format details 1
[ System security ] PE File format details 2
[ System security ] Windbg Preview Debug record
[ System security ]《 Hackers are exempt from attack and defense 》MFC Reverse basic combat
[ System security ] windows Next C++ Write the first shell program
[ System security ] PE File format analysis and practical basis — analysis helloworld file
[ System security ]《 Hackers are exempt from attack and defense 》 Classical shelling foundation of reverse Foundation
[ System security ] Introduction to anti-virus and anti killing principle
[ System security ] The necessary knowledge points and common tool records of the practical basis of malicious code analysis
[ System security ] Windows Reverse essential knowledge 、 Reverse analysis small actual combat
[ System security ] Notes on advanced dynamic analysis techniques for reverse analysis
[ System security ] Experiment of container bottom principle of system virtualization
List of articles
GO Environment building
install GO Environmental Science
go Official website https://golang.google.cn/dl/ download go1.7.1.linux-amd64.tar.gz,
Unzip to /usr/local Catalog ,suso tar -C /usr/local -xzf go1.7.1.linux-amd64.tar.gz,
edit $HOME/.profile, take export PATH=$PATH:/usr/local/go/bin Add in ,
perform source $HOME/.profile Make Settings work ,
to root User's environment variables are added go,su Switch to root,
cdthenvim .profile, Add the above , Carry out an effective order .
Open a terminal , perform go version see go Environment configured successfully .
tar -C: When unzipping, modify the directory to which you unzipped
.bashrcand.profileAll are sehll Startup settings file ..bashrcIt will automatically execute after the system starts ,.profileRun after the user logs in .
To configure GOPATH Information
edit ~/.profile, Add command export GOPATH=/go To the file , That is, set a file in the root directory as the working directory .
perform source ~/.profile Make Settings work ,
perform go env see go Whether the language environment is successfully configured .
Then create it manually /go And the three folders below .
go When storing the path of the code
$GOPATH, also go It is also based on this variable to find dependent packages ( Command line pass go get It will be downloaded to this directory ). The old version GOPATH There are three sub directories under the directory , Are stored source codesrc、 Store the compiled generated filepkg、 Store the compiled executablebin.
Namespace
Last article recorded linux Six kinds of implementation Namespace, Use these namespace Three system calls are mainly used : Use clone() Set the... Of the process when creating it namespace attribute ; Use unshare() Move a process out of the specified namespace、 Use setns() Add the process to a specified namespace Inside . Reuse in this note go experiment .
UTS Namespace
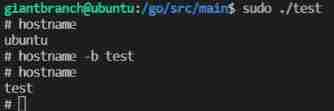
You can use this namespace to isolate hostname, Just set the flag as CLONE_NEWUTS that will do .
Now? src Create under directory main Folder is written as a future go The package to which the code belongs .
package main
import (
	"os/exec"
	"syscall"
	"os"
	"log"
)
func main(){

	cmd := exec.Command("sh")	// Specified by fork The initial command of the child process
	cmd.SysProcAttr = &syscall.SysProcAttr{

		Cloneflags: syscall.CLONE_NEWUTS,	// Set the process property to CLONE_NEWUTS
	}
	cmd.Stdin = os.Stdin
	cmd.Stdout = os.Stdout
	cmd.Stderr = os.Stderr
	if err:= cmd.Run(); err!=nil{
    	//Run Function waits for the subprocess to end before exiting
		log.Fatal(err)
	}
}
compile go file go build test.go, function ./test, Modify in the newly opened process space hostname take effect , For reopening a command line window hostname Don't take effect , Prove successful isolation .

IPC Namespace
IPC It means inter process communication , To isolate the process communication space . Add syscall.CLONE_NEWIPC that will do .
package main
import (
	"os/exec"
	"syscall"
	"os"
	"log"
)
func main(){

	cmd := exec.Command("sh")	// Specified by fork The initial command of the child process
	cmd.SysProcAttr = &syscall.SysProcAttr{

		Cloneflags: syscall.CLONE_NEWUTS | 	syscall.CLONE_NEWIPC,
	}
	cmd.Stdin = os.Stdin
	cmd.Stdout = os.Stdout
	cmd.Stderr = os.Stderr
	if err:= cmd.Run(); err!=nil{
    	//Run Function waits for the subprocess to end before exiting
		log.Fatal(err)
	}
}
PID Namespace
Isolation pid Can do things like docker The same process number from 1 Start . Add syscall.CLONE_NEWPID
package main
import (
	"os/exec"
	"syscall"
	"os"
	"log"
)
func main(){

	cmd := exec.Command("sh")	// Specified by fork The initial command of the child process
	cmd.SysProcAttr = &syscall.SysProcAttr{

		Cloneflags: syscall.CLONE_NEWUTS|syscall.CLONE_NEWIPC|syscall.CLONE_NEWPID,
	}
	cmd.Stdin = os.Stdin
	cmd.Stdout = os.Stdout
	cmd.Stderr = os.Stderr
	if err:= cmd.Run(); err!=nil{
    	//Run Function waits for the subprocess to end before exiting
		log.Fatal(err)
	}
}
After running the command echo $$ View the current shell Of id by 1, Verify success .
Mount Namespace
The file systems that the two isolated processes can see are different views , adopt mount() and umount() It will only affect the current mount Namespace file system .mount namespace Than chroot More secure . But in mount() Before, you can see the file system of the host , And creating files in the root directory can affect the host .
Add syscall.CLONE_NEWNS
package main
import (
	"os/exec"
	"syscall"
	"os"
	"log"
)
func main(){

	cmd := exec.Command("sh")	// Specified by fork The initial command of the child process
	cmd.SysProcAttr = &syscall.SysProcAttr{

		Cloneflags: syscall.CLONE_NEWUTS | syscall.CLONE_NEWIPC | syscall.CLONE_NEWPID | syscall.CLONE_NEWNS,
	}
	cmd.Stdin = os.Stdin
	cmd.Stdout = os.Stdout
	cmd.Stderr = os.Stderr
	if err:= cmd.Run(); err!=nil{
    	//Run Function waits for the subprocess to end before exiting
		log.Fatal(err)
	}
}
Execute the command after running mount -t proc proc /proc, Put the virtual file system proc Attached to the host /proc Under the table of contents , Then check later /proc The directory shows that the child processes are isolated proc file system .
mount -t type Device name dir, But for proc The virtual file system has no device name , So why does the device name setting have no effect .
Command again ps -ef You can see that the file system at this time has been isolated , Unable to see the process information of the host .
ps -ef It's about looking at proc Information in the virtual file system to return results .
User Nmaespace
Isolate user groups , use syscall.CLONE_NEWUSER It can be mapped as root user , But in the host computer, this process is just an ordinary process .
package main
import (
	"os/exec"
	"syscall"
	"os"
	"log"
)
func main(){

	cmd := exec.Command("sh")	// Specified by fork The initial command of the child process
	cmd.SysProcAttr = &syscall.SysProcAttr{

		Cloneflags: syscall.CLONE_NEWUTS | syscall.CLONE_NEWIPC | syscall.CLONE_NEWPID | syscall.CLONE_NEWNS | syscall.CLONE_NEWUSER,
	}
	cmd.Stdin = os.Stdin
	cmd.Stdout = os.Stdout
	cmd.Stderr = os.Stderr
	if err:= cmd.Run(); err!=nil{
    	//Run Function waits for the subprocess to end before exiting
		log.Fatal(err)
	}
}
Input after operation id, Found at this time id It's not root Of 0 了 , Proof is separated .
Network Namespace
The isolated container has its own independent network device ,clone Set up signs when CLONE_NEWNET
package main
import (
	"os/exec"
	"syscall"
	"os"
	"log"
)
func main(){

	cmd := exec.Command("sh")	// Specified by fork The initial command of the child process
	cmd.SysProcAttr = &syscall.SysProcAttr{

		Cloneflags: syscall.CLONE_NEWUTS | syscall.CLONE_NEWIPC | syscall.CLONE_NEWPID | syscall.CLONE_NEWNS | syscall.CLONE_NEWUSER | syscall.CLONE_NEWNET,
	}
	cmd.Stdin = os.Stdin
	cmd.Stdout = os.Stdout
	cmd.Stderr = os.Stderr
	if err:= cmd.Run(); err!=nil{
    	//Run Function waits for the subprocess to end before exiting
		log.Fatal(err)
	}
}
Use the command after execution ifconfig Unable to view the network card information , Open another terminal command ifconfig You can see the current network card information , prove network namespace Work .
CGroup
CGroup You can limit the resources of the process , Include cpu、 Memory 、 Storage, etc .
CGroup It mainly contains three components ,cgroup( Notice that it's lowercase ) Provide a mechanism for process grouping management ,subsystem Resource control module ,hierarchy( Hierarchy ) Provide cgroup Tree structure of .
CGroup experiment
First create a cgroup Trees , Check the contents below .
mkdir cgroup-lab
sudo mount -t cgroup -o none,name=cgroup-lab cgroup-lab ./cgroup-lab
ls ./cgroup-lab/
-t cgroupSpecifies the type of Mount
-o none,name=cgroup-labSpecify the options
cgroup-labThat is, the position of the device name. This string can be any value
./cgroup-labIt's mount point

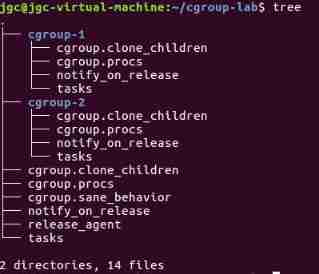
cgroup.clone_child,cpuset Of subsystem This configuration file will be read , The default value is 0; yes 1 All of a sudden cgroup Will inherit the father cgroup Of cpuset Configuration of .
cgroup.procs, The current node in the tree (cgroup) Process groups in id, The root node of the cgroup.procs The value contains... For all process groups id.
release_agent It's a path , Used to automatically clean up unused after the process exits cgroup,notify_on_release Identify this cgroup Whether to execute after the last process in the identified process group exits release_agent.
tasks, identification cgroup Node contains process id, It is to set this value to add a process group in .
Create two children at the root node of the tree cgroup, At this time, it will be automatically filled cgroup The profile value of the node .
Next, the current terminal shell The process of is added to cgroup-1 in , First cd Go to this directory , Then order sudo sh -c "echo $$ >> tasks", see cat /proc/$$/cgroup, You can see being added to cgroup-1 in .
adopt subsystem Limit cgroup In progress cpu Occupancy resources , The system used here is memory Created by default hierachy experiment .
The system for each subsystem Create a default hierarchy.
Use stress Tool simulation high cpu Occupancy process stress --cpu 1 &,
Then add this process to cpu In the catalog cpu-lab This cgroup in , And limit , The code is as follows
cd /sys/fs/cgroup/cpu
mkdir cpu-lab
cd cpu-lab
sudo sh -c "echo 4551 > cgroup.procs"
sudo sh -c "echo 10000 > cpu.cfs_quota_us"
Then you can see the process cpu Occupancy rate from 100% Down to 10%(10000/10^6=10%).
docker Use CGroup Limit the container
docker Run a container that limits memory
sudo docker run -itd -m 128m ubuntu
Then go to cgroup Check the information of this container

You can see docker The memory limitation measures are in the system memory Next create a child cgroup by docker, And then in docker Create the node of each container under this node , Make restrictions under this container node .
go Through CGroup Limit container resources
package main
import (
	"os"
	"fmt"
	"os/exec"
	"path"
	"io/ioutil"
	"syscall"
	"strconv"
)
const cgroupMemoryHierarchyMount = "/sys/fs/cgroup/memory"

func main(){

	if os.Args[0] == "/proc/self/exe" {

		cmd := exec.Command("sh", "-c", `stress --vm-bytes 200m --vm-keep -m 1`)
		cmd.SysProcAttr = &syscall.SysProcAttr{

		}
		cmd.Stdin = os.Stdin
		cmd.Stdout = os.Stdout
		cmd.Stderr = os.Stderr
		// Only the child processes created will enter this large if, Subprocesses execute cmd.Run Is to perform stress command , Will not perform the following
		if err:= cmd.Run(); err!=nil {

			fmt.Println(err)
			os.Exit(1)
		}
	}
	cmd := exec.Command("/proc/self/exe")	///proc/self/exe  It represents the current program , That is, this program creates sub processes to call itself
	cmd.SysProcAttr = &syscall.SysProcAttr{

		Cloneflags: syscall.CLONE_NEWUTS | syscall.CLONE_NEWPID | syscall.CLONE_NEWNS,
	}
	cmd.Stdin = os.Stdin
	cmd.Stdout = os.Stdout
	cmd.Stderr = os.Stderr
	if err:= cmd.Start(); err!=nil {

		fmt.Println("oh~ error", err)
		os.Exit(1)
	}else{

		fmt.Printf("child pid:%v\n", cmd.Process.Pid)	//fork The child process of is on the host pid
		// stay /sys/fs/cgroup/memory Next create a cgroup
		os.Mkdir(path.Join(cgroupMemoryHierarchyMount, "memory-limit-lab"), 0775)	//0775 It's authority
		// Put the process id Add to cgroup in
		ioutil.WriteFile(path.Join(cgroupMemoryHierarchyMount, "memory-limit-lab", "tasks"), []byte(strconv.Itoa(cmd.Process.Pid)), 0644)
		// Limit cgroup The memory usage of the process
		ioutil.WriteFile(path.Join(cgroupMemoryHierarchyMount, "memory-limit-lab", "memory.limit_in_bytes"), []byte("100m"), 0644)
		cmd.Process.Wait()
	}
}
docker Image layering —AUFS
Union File System Using the copy on write mechanism makes the modification of the file not change the content of the original file . The later, more stable and reliable version is called AUFS.
When writing copy : For a resource that has not been modified , Multiple instances share ; If an instance modifies this resource , Will copy and modify this resource .
docker Mirror usage AUFS principle
Boss version docker Each image in is composed of many read-only layers read-only layer form , These images are stored in /var/lib/docker/aufs/diff/ Next ; Another directory /var/lib/docker/aufs/layers It stores the read-only layer information that each image depends on . stay pull After an image, the relevant file images that make up the image will be downloaded , If you modify this image slightly , Then the modified part will be made into a new file image , And associate some unmodified file images , And because only a small part has been modified , Therefore, the size of the file image that is part of the new image created by the write time copy mechanism is very small .
docker Container usage AUFS principle
When you start a container ,docker Create a ``read-only Of init layer , and read-write` Layer to save the modification of container information .
Container of read-write Layers are also stored in /var/lib/docker/aufs/diff Under the table of contents , Because containers can be turned into images , Images can open containers , So these two things are equivalent in a sense . This also explains that data will not be lost after closing the container .
If you want to delete a file file, be aufs The mechanism will generate a .wh.file File to hide all read-only layers file file .
AUFS experiment
Create your own aufs Catalog , Create something below it
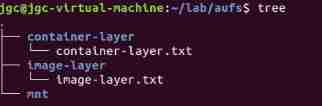
hold container-layer and image-layer use aufs How to mount to mnt Under the table of contents , Be careful mount aufs If you do not have the permission to mount files , The default first directory is read-write jurisdiction , It's all in the back read-only jurisdiction .
sudo mount -t aufs -o dirs=./container-layer:./image-layer none ./mnt
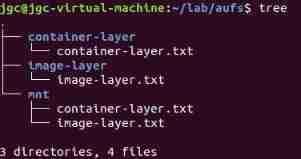
The effect is as follows
You can view the mount information sudo cat /sys/fs/aufs/si_xxxxx/*
Read only image-layer.txt What's in the file echo -e "\nhello world" >> ./mnt/image-layer.txt, see mnt Under the image-layer Changed , however image-layer In the catalog image-layer.txt It hasn't been changed , also container-layer There is one more... In the catalog image-layer.txt, The content is the changed file content .

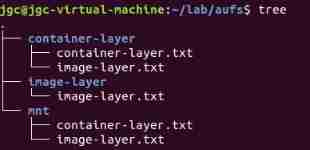
But for the read-write layer container-layer Content modification of ,mnt Contents and container-layer The contents under the directory are consistent .

Relevant concepts
proc file system
proc The file system is provided by the kernel , It doesn't really exist on disk . Many commands obtain file information by reading this virtual file system .
/proc/n		pid by n Process information
/proc/n/cmdline		n Start command of process No
/proc/n/cwd		n The current working directory of process No
/proc/n/environ		 List of process environment variables
/proc/n/exe		 Process execution command file
/proc/n/fd		 All file descriptors related to the process
/proc/n/maps	 Memory mapping information related to the process
/proc/n/mem		 Memory held by the process
/proc/n/root	 The root directory that the process can see
/proc/n/stat	 State of process
/proc/n/statm	 The state of memory occupied by the process
/proc/n/status	 Detailed process status
/proc/self	 Connect to the currently running process
chroot、pivot_root
chroot The function of is to change the root view of the process , Make it unable to access other files outside the directory .
chroot <newroot> [<command><arg>...]
newroot:	 To switch to a new root Catalog
command:	 Switch root The command to be executed after the directory
 Example :	sudo chroot /home/jgc/lab/rootfs_lab /bin/bash
however chroot Just change the root view of the current process .
pivot_root The function and chroot similar , however pivot_root Switch the whole system to a new root directory , In this way, we can get rid of the previous rootfs Dependence , That is to say umount Uninstall the mount point .
Container vs. virtual machine
Containers are shared kernel , The underlying principle is that multiple processes run on one kernel at the same time , utilize Namespace Separate them , And then use CGroup Limit available resources .
Virtual machines are shared “ Hardware ” Of , Each virtual machine has its own independent operating system . therefore , Virtual machines are bootable 、 Absolutely safe isolation technology ; The container is relatively fragile , Unsafe isolation technology .
Network configuration of container
linux It is to operate and use network cards through network devices , After installing a network card, the system generates a network device , for example eth0; You can also virtualize a network device , for example veth,bridge.
veth
veth It is a pair of virtual network devices , Send data at one end , Data will be obtained at the other end ; Usually use veth Connect different Net Namespace.
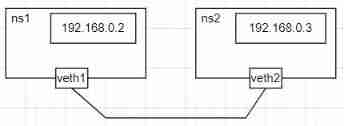
Let's experiment , Create two networks and a pair veth, And put veth Both ends of are bound to these two networks respectively , And set up for two networks ip, Finally, use a network namespace Go to ping Another network namespace.
sudo ip netns add ns1
sudo ip netns add ns2

sudo ip link add veth1 type veth peer name veth2

sudo ip link set veth1 netns ns1
sudo ip link set veth2 netns ns2
 see ns1 This namespace Network devices
sudo ip netns exec ns1 ip link

 Configure each veth Network address and route
sudo ip netns exec ns1 ifconfig veth1 192.168.0.2/24 up
sudo ip netns exec ns2 ifconfig veth2 192.168.0.3/24 up
sudo ip netns exec ns1 route add default dev veth1
sudo ip netns exec ns2 route add default dev veth2
#  use veth Go for a while ping The other end
sudo ip netns exec ns1 ping -c 1 192.168.0.3
Be careful ns1 yes ping Non overnight host , Because the two one. ip Not in the same network segment , And the device connects two network segments , The network diagram is as follows .
bridge And routing table
fictitious bridge Equivalent to a switch , Connect different network devices ; Network packets arrive bridge when , Through the in the message mac Broadcast or forward .
You can define a routing table to determine the routing of a network namespace Flow direction of packets in .
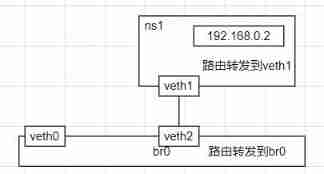
Let's experiment , Create a ns1, And a veth1-veth2, Handle one end veth1 Bound to the ns1, Create another bridge , A section of the network bridge is attached to veth1, The other end is attached to eth0.
sudo ip netns add ns1
sudo ip link add veth1 type veth peer name veth2
sudo ip link set veth1 netns ns1

sudo brctl addbr br0
sudo brctl addif br0 eth0
sudo brctl addif br0 veth2

sudo ip link set veth2 up
sudo ip link set br0 up
sudo ip netns exec ns1 ifconfig veth1 192.168.0.2/24 up

 Set separately ns1 And the route on the host
ns1 All traffic in the goes through veth1 The network equipment outflow of
sudo ip netns exec ns1 route add default dev veth1
 Host will 192.168.0.0/24 The data of the network segment is routed to br0
sudo route add -net 192.168.0.0/24 dev br0

 from ns1 in ping Host address
sudo ip netns exec ns1 ping -c 1 192.168.200.129
here ns1 Sure ping Hostel host , The network diagram is as follows
iptables
Two common strategies for container virtualization MASQUERADE and DNAT To realize the network communication between the container and the host .
MASQUERADE The policy can convert the source address in the request packet into the address of a network device .
Let's experiment , To open the first ip Forward capability , Then the source address is 192.168.0.0/24 The data from the network segment is modified to eth0 Of ip Source address of , So you can do it ns1 Access the network outside the host in . But there was no success here , I don't know why .
sudo sysctl -w net.ipv4.conf.all.forwarding=1
sudo iptables -t nat -A POSTROUTING -s 192.168.0.0/24 -o eth0 -j MASQUERADE

 Pay attention to closing the firewall
apt-get install ufw
ufw disable
DNAT Also do network address translation , Used to map the ports of the internal network .
experiment , Put the host 80 Port of tcp Request forwarding to namespace Of 80 port
sudo iptables -t nat -A PREROUTING -p tcp -m tcp --dport 80 -j DNAT --to-destination 192.168.0.2:80
go Get an unallocated ip
package main

import(
    "fmt"
    "os"
    "path"
    "json"
    "net"
)

const ipamDefaultAllocatorPath = "C:/subnet.json"

//IP Address Management
type IPAM struct{

    // Distribute ip File storage location of
    SubnetAllocatorPath string
    // An array of network segments and bitmap algorithms map,key It's the segment ,value Is an array of allocated bitmaps
    Subnets *map[string]string
}

// Initialize a IPAM object
var ipAllocator = &IPAM{

    SubnetAllocatorPath: ipamDefaultAllocatorPath
}

//json File transfer ip Distribution information
func (ipam *IPAM) load() error{

    if _, err := os.Stat(ipam.SubnetAllocatorPath); err!=nil{

        return err
    }
    // Open file
    subnetConfigFile, err := os.Open(ipam.SubnetAllocatorPath)
    defer subnetConfigFile.Close()
    if err!= nil{

        return err
    }
    // Read json Format information
    subnetJson := make([]byte, 2000)
    n, err := subnetConfigFile.Read(subnetJson)
    if err!=nil{

        return err
    }
    //json format conversion
    err = json.Unmarsha1(subnetJson[:n], ipam.Subnets)
    if err!=nil{

        return err
    }
    return nil
}

//ip Assign information to json file
func (ipam *IPAM) dump() err{

    ipamConfigFileDir, _ := path.Split(ipam.SubnetAllocatorPath)
    // Check that the directory exists
    if _, err := os.Stat(ipamConfigFileDir); err !=nil {

        if os.IsNotExist(err){

            os.MkdirAll(ipamConfigFileDir, 0644)
        }else{

            return err
        }
    }
    // Open file
    subnetConfigFile, err := os.OpenFile(ipam.SubnetAllocatorPath, os.O_TRUNC | os.O_WRONLY | os.O_CREATE, 0644)
    defer subnetConfigFile.Close()
    if err!=nil{

        return err
    }
    // Storage
    ipamConfigJson, err := json.Marsha1(ipam.Subnets)
    if err !=nil{

        return err
    }
    _, err = subnetConfigFile.Write(ipamConfigJson)
    if err !=nil{

        return err
    }
    return nil
}

// Get an available ip
func (ipam *IPAM) Allocate(subnet *net.IPNet) (ip net.IP, err error){

    ipam.Subnets = &map[string]string{
    }
    err = ipam.load()
    if err!=nil{

        fmt.Println(err)
    }
    one, size := subnet.Mask.Size() // Returns the subnet mask length and ip Total length
    // If you haven't assigned this network segment , Then initialize the network segment
    if _, exist := (*ipam.Subnets)[subnet.String()]; !exist {

        //2^(size-one) One can be allocated ip, every 0 Means available ip,1 Means not available ( Has been allocated )
        (*ipam.Subnets)[subnet.String()] = strings.Repeat("0", 1<<uint8(size-one))
    }
    // Traverse the bitmap array of network segments
    for c:= range((*ipam.Subnets)[subnet.String()]){

        if (*ipam.Subnets)[subnet.String()][c] =='0'{

            ipalloc := []byte((*ipam.Subnets)[subnet.String()])
            ipalloc[c] = '1'
            (*ipam.Subnets)[subnet.String()] = string(ipalloc)
            ip = subnet.Ip  // initial ip, For example, network segment 192.168.0.0/24,  here ip by 192.168.0.0
            // Handle ip Value , Add correction on the basis of network segment
            for t:=uint(4); t>0; t-=1 {

                []byte(ip)[4-t] += uint8(c>>((t-1)*8))
            }
            ip[3] += 1  //ip from 1 Start
            break
        }
    }
    ipam.dump()
    return
}

// Release ip Address
func (ipam *IPAM) Release(subnet *net.IPNet, ipaddr *net.IP) error{

    ipam.Subnets = &map[string]string{
    }
    if err := ipam.load(); err !=nil {

        fmt.Println(err)
    }
    c := 0
    releaseIP := ipaddr.To4()   // take ip Address to 4 The representation of bytes
    releaseIP[3] -=1
    for t:=uint(4) ; t>0; t-=1 {

        c += int(releaseIP[t-1]-subnet.IP[t-1]) << ((4-t)*8)
    }
    ipalloc := []byte((*ipam.Subnets))[subnet.String()]
    ipalloc[c] = '0'
    (*ipam.Subnets)[subnet.String()] = String(ipalloc)
    ipam.dump()
    return nil
}

// Test allocation ip
func TestAllocate(t *testing.T){

    _, ipnet, _ := net.ParseCIDR("192.168.0.0/24")
    ip, _ := ipAllocator.Allocate(ipnet)
    fmt.Println(ip)
}
// Test release ip
func TestRelease(t *testing.T){

    ip, ipnet, _ := net.ParseCIDR("192.168.0.1/24")
    ipAllocator.Release(ipnet, &ip)
}
边栏推荐
- SFTP cannot connect to the server # yyds dry goods inventory #
- Linux Installation redis
- ELK日志分析系统
- Moco V2 literature research [self supervised learning]
- Azkaban安装部署
- Share the newly released web application development framework based on blazor Technology
- [105] Baidu brain map - Online mind mapping tool
- Basic authorization command for Curl
- Logstash、Fluentd、Fluent Bit、Vector? How to choose the appropriate open source log collector
- Cut! 39 year old Ali P9, saved 150million
猜你喜欢
Design of KTV intelligent dimming system based on MCU
Pat class a 1162 postfix expression
![ASP. Net core 6 framework unveiling example demonstration [01]: initial programming experience](/img/3b/0ae9fbadec5dbdfc6981f1f55546a5.jpg)
ASP. Net core 6 framework unveiling example demonstration [01]: initial programming experience

单项框 复选框
51 independent key basic experiment
Idea inheritance relationship

Yuan universe also "real estate"? Multiple second-hand trading websites block metauniverse keywords
8. Commodity management - commodity classification

Devtools的简单使用
Design and implementation of campus epidemic prevention and control system based on SSM
随机推荐
PHP cli getting input from user and then dumping into variable possible?
Bumblebee: build, deliver, and run ebpf programs smoothly like silk
有個疑問 flink sql cdc 的話可以設置並行度麼, 並行度大於1會有順序問題吧?
Azkaban安装部署
Mongodb common commands
Share the newly released web application development framework based on blazor Technology
What is the most effective way to convert int to string- What is the most efficient way to convert an int to a String?
[Yu Yue education] National Open University autumn 2018 8109-22t (1) monetary and banking reference questions
How to learn to get the embedding matrix e # yyds dry goods inventory #
Last words record
LeetCode 234. Palindrome linked list
Voice chip wt2003h4 B008 single chip to realize the quick design of intelligent doorbell scheme
Apache Web page security optimization
TCP security of network security foundation
Ubantu disk expansion (VMware)
Cette ADB MySQL prend - elle en charge SQL Server?
Daily question 2 12
tuple and point
Devtools的簡單使用
The perfect car for successful people: BMW X7! Superior performance, excellent comfort and safety