当前位置:网站首页>Shutter uses overlay to realize global pop-up
Shutter uses overlay to realize global pop-up
2022-07-05 09:08:00 【Flying bear blablabla】
One 、Overlay Introduce
1、Overlay What is it?
On the official website about Overlay The introduction of :

A simple translation :
Overlay This widget It's a be based on Stack Managed Widget, It can be used independently .
Overlay By putting independent widget Insert into overlay Of stack Inside to realize this widget Show to other widget On top of .Overlay It's through OverlayEntry To manage widget Display hierarchy ( Can't be used directly widget).
You can create a Overlay Object to use , But more generally , Is to use WidgetsApp perhaps MaterialApp Inside Navigator Created Overlay,Navigator Use this overlay To manage the route display effect ( We can go through this overlay To realize the global pop-up ).
2、Overlay Use steps
- establish OverlayEntry
Overlay entry=new OverlayEntry(
builder:(){
// Their own  widget
});
Copy code - take OverlayEntry Insert into Overlay in
Overlay.of(context).insert(overlayEntry);
Copy code - take OverlayEntry remove
entry.remove();
 Copy code
Two 、 be based on Overlay Realization Toast
// adopt  Overlay  Realization  Toast
class Toast {
  static void show({@required BuildContext context, @required String message}) {

    //1、 establish  overlayEntry
    OverlayEntry overlayEntry = new OverlayEntry(builder: (context) {
      return new Positioned(
          top: MediaQuery.of(context).size.height * 0.8,
          child: new Material(
            child: new Container(
              width: MediaQuery.of(context).size.width,
              alignment: Alignment.center,
              child: new Center(
                child: new Card(
                  child: new Padding(
                    padding: EdgeInsets.all(8),
                    child: new Text(message),
                  ),

                  color: Colors.grey.withOpacity(0.6),
                ),
              ),
            ),
          ));
    });


    // Insert into  Overlay It shows that  OverlayEntry
    Overlay.of(context).insert(overlayEntry);


    // Two seconds later , remove  OverlayEntry
    new Future.delayed(Duration(seconds: 2)).then((value) {
      overlayEntry.remove();
    }
    );
  }
 Copy code
Use :
    RaisedButton(
                child: Text('SUBMIT'),
                onPressed: () {
                  Toast.show(context: context, message: " The information has been submitted !");
                },
              )
 Copy code
3、 ... and 、 be based on Overlay Realize automatic prompt of text input box ( completion )
Suppose we have an information input interface , as follows :

We want users to input in the input box , You can input according to the user below , When the input box gets the focus , To show a list To assist user input ( This can be adjusted according to your own needs ), as follows :

Of course, in order to achieve this function , You can completely rewrite the interface , adopt Stack + Position To complete , But this may require refactoring the code , Increase interface complexity , And poor scalability , Can pass Overlay To achieve this function .
1、 adopt Overlay To display the suspended window
What we need to achieve is , When TextFormField When you get the focus , Pop up the pop-up window , When you lose focus , Just remove this pop-up window . Define the pop-up control as follows :
class CountriesField extends StatefulWidget {
  @override
  _CountriesFieldState createState() => _CountriesFieldState();
}

class _CountriesFieldState extends State<CountriesField> {

  final FocusNode _focusNode = FocusNode();

  OverlayEntry _overlayEntry;

  @override
  void initState() {
    _focusNode.addListener(() {
      if (_focusNode.hasFocus) {

        this._overlayEntry = this._createOverlayEntry();
        Overlay.of(context).insert(this._overlayEntry);

      } else {
        this._overlayEntry.remove();
      }
    });
  }

  OverlayEntry _createOverlayEntry() {

    RenderBox renderBox = context.findRenderObject();
    var size = renderBox.size;
    var offset = renderBox.localToGlobal(Offset.zero);

    return OverlayEntry(
      builder: (context) => Positioned(
        left: offset.dx,
        top: offset.dy + size.height + 5.0,
        width: size.width,
        child: Material(
          elevation: 4.0,
          child: ListView(
            padding: EdgeInsets.zero,
            shrinkWrap: true,
            children: <Widget>[
              ListTile(
                title: Text('Syria'),
              ),
              ListTile(
                title: Text('Lebanon'),
              )
            ],
          ),
        ),
      )
    );
  }

  @override
  Widget build(BuildContext context) {
    return TextFormField(
        focusNode: this._focusNode,
      decoration: InputDecoration(
        labelText: 'Country'
      ),
    );
  }
}
Copy code - adopt FocusNode To listen to TextFormField Get or lose focus events ,FocusNode stay initState It was initialized .
- When TextFormField When you get the focus , We will pass _createOverlayEntry Created OverlayEntry use Overlay.of(context).insert Method Insert into Overlay Top of , This shows the floating window .
- When TextFormField When you lose focus , We go through _overlayEntry.remove Method to remove the pop-up window .
- Because when we show the pop-up window , You need to know the display position of this pop-up window , This position must be related to the current input box , We can go through context.findRenderObject Method to find the current RenderBox, According to this RenderBox We can know the currently displayed widget The location of , Size or other rendering information , Based on this information, we can adjust the position and size of the pop-up window .
- renderBox.localToGlobal(Offset.zero) Means to get the current widget Position in screen .
- Inside the pop-up window , We go through Positioned To locate the pop-up window , adopt ListView To show the content .
however , When using this custom control , There is a problem , Is that when ListView Long enough , We scroll ListView when , The position of this pop-up window is fixed .

2、 The pop-up window follows the scroll
What we need to do is , Our global pop-up window can follow TextField rolling ,Flutter Two components are provided :CompositedTransformFollower and CompositedTransformTarget .
We will follower and One target Link together ( For these two widget Specify the same LayerLink), So when target When rolling ,follower Will follow the scroll .
In our example , Pop up window is equivalent to Follower, and TextField yes Target . We use it CompositedTransformFollower and CompositedTransformTarget Wrap the pop-up window and TextField, The code is as follows :
class CountriesField extends StatefulWidget {
  @override
  _CountriesFieldState createState() => _CountriesFieldState();
}

class _CountriesFieldState extends State<CountriesField> {

  final FocusNode _focusNode = FocusNode();

  OverlayEntry _overlayEntry;

  final LayerLink _layerLink = LayerLink();

  @override
  void initState() {
    _focusNode.addListener(() {
      if (_focusNode.hasFocus) {

        this._overlayEntry = this._createOverlayEntry();
        Overlay.of(context).insert(this._overlayEntry);

      } else {
        this._overlayEntry.remove();
      }
    });
  }

  OverlayEntry _createOverlayEntry() {

    RenderBox renderBox = context.findRenderObject();
    var size = renderBox.size;

    return OverlayEntry(
      builder: (context) => Positioned(
        width: size.width,
        child: CompositedTransformFollower(
          link: this._layerLink,
          showWhenUnlinked: false,
          offset: Offset(0.0, size.height + 5.0),
          child: Material(
            elevation: 4.0,
            child: ListView(
              padding: EdgeInsets.zero,
              shrinkWrap: true,
              children: <Widget>[
                ListTile(
                  title: Text('Syria'),
                  onTap: () {
                    print('Syria Tapped');
                  },
                ),
                ListTile(
                  title: Text('Lebanon'),
                  onTap: () {
                    print('Lebanon Tapped');
                  },
                )
              ],
            ),
          ),
        ),
      )
    );
  }

  @override
  Widget build(BuildContext context) {
    return CompositedTransformTarget(
      link: this._layerLink,
      child: TextFormField(
          focusNode: this._focusNode,
        decoration: InputDecoration(
          labelText: 'Country'
        ),
      ),
    );
  }
}
Copy code - In the code above , We go through CompositedTransformFollower It's wrapped OverlayEntry, adopt CompositedTransformTarget It's wrapped TextFormTield .
- We are Follower and Target Provides the same LayerLink example , This can achieve the effect of pop-up window following the scroll .
- Because the pop-up window follows target rolling , So in Positioned There is no need top and left The attribute is .
- Set up showWhenUnlinked by false, So when target When not on the screen ( Get out of the screen ), Set pop-up hide .
effect :

Reference resources : Using Overlay to display floating widgets
Code : github
Welcome to your attention 「Flutter Programming development 」 WeChat official account .
author :Flutter Programming development
link :https://juejin.cn/post/6844904115764658189
source : Rare earth digs gold
The copyright belongs to the author . Commercial reprint please contact the author for authorization , Non-commercial reprint please indicate the source .
边栏推荐
- ROS learning 1- create workspaces and function packs
- 2020 "Lenovo Cup" National College programming online Invitational Competition and the third Shanghai University of technology programming competition
- C [essential skills] use of configurationmanager class (use of file app.config)
- Add discount recharge and discount shadow ticket plug-ins to the resource realization applet
- ROS learning 4 custom message
- AUTOSAR from getting started to mastering 100 lectures (103) -dbc file format and creation details
- Redis implements a high-performance full-text search engine -- redisearch
- c#比较两张图像的差异
- Understanding rotation matrix R from the perspective of base transformation
- [code practice] [stereo matching series] Classic ad census: (4) cross domain cost aggregation
猜你喜欢
![Introduction Guide to stereo vision (5): dual camera calibration [no more collection, I charge ~]](/img/68/6bfa390b0bedcdbc4afba2f9bd9c0f.jpg)
Introduction Guide to stereo vision (5): dual camera calibration [no more collection, I charge ~]
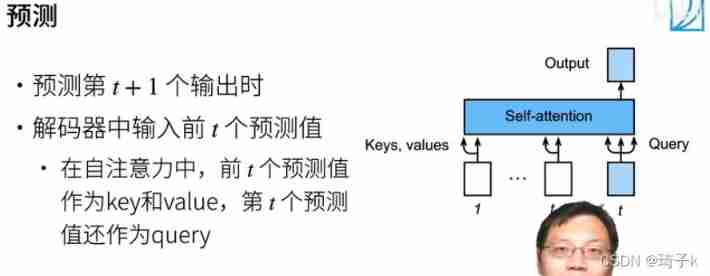
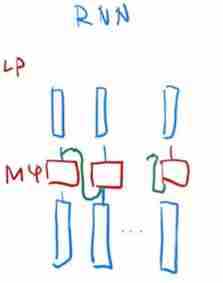
Summary and Reflection on issues related to seq2seq, attention and transformer in hands-on deep learning
![Introduction Guide to stereo vision (4): DLT direct linear transformation of camera calibration [recommended collection]](/img/ed/0483c529db2af5b16b18e43713d1d8.jpg)
Introduction Guide to stereo vision (4): DLT direct linear transformation of camera calibration [recommended collection]
Attention is all you need

Hi Fun Summer, play SQL planner with starrocks!
![Rebuild my 3D world [open source] [serialization-1]](/img/74/b6253845b43bc18f425d57695fba7c.jpg)
Rebuild my 3D world [open source] [serialization-1]

Editor use of VI and VIM
![Rebuild my 3D world [open source] [serialization-2]](/img/e6/aad5f432aca619b992753187729dcf.jpg)
Rebuild my 3D world [open source] [serialization-2]
![[technical school] spatial accuracy of binocular stereo vision system: accurate quantitative analysis](/img/59/823b587566f812c76e0e4dee486674.jpg)
[technical school] spatial accuracy of binocular stereo vision system: accurate quantitative analysis

Nodemon installation and use
随机推荐
Multiple solutions to one problem, asp Net core application startup initialization n schemes [Part 1]
How many checks does kubedm series-01-preflight have
Return of missing persons
Uni app implements global variables
It's too difficult to use. Long articles plus pictures and texts will only be written in short articles in the future
2310. 个位数字为 K 的整数之和
Blogger article navigation (classified, real-time update, permanent top)
2020 "Lenovo Cup" National College programming online Invitational Competition and the third Shanghai University of technology programming competition
LLVM之父Chris Lattner:为什么我们要重建AI基础设施软件
[code practice] [stereo matching series] Classic ad census: (4) cross domain cost aggregation
fs. Path module
Programming implementation of ROS learning 2 publisher node
Install the CPU version of tensorflow+cuda+cudnn (ultra detailed)
[code practice] [stereo matching series] Classic ad census: (6) multi step parallax optimization
Rebuild my 3D world [open source] [serialization-2]
Codeworks round 681 (Div. 2) supplement
ECMAScript6介绍及环境搭建
信息與熵,你想知道的都在這裏了
Explain NN in pytorch in simple terms CrossEntropyLoss
12. Dynamic link library, DLL