当前位置:网站首页>14. Draw network model structure
14. Draw network model structure
2022-07-08 01:01:00 【booze-J】
article
Draw network structure process
Before running the code, you need to install pydot and graphviz
install pydot:pip install pydot
install graphviz It's a little bit more complicated , Let's Baidu by ourselves .
The code running platform is jupyter-notebook, Code blocks in the article , According to jupyter-notebook Written in the order of division in , Run article code , Glue directly into jupyter-notebook that will do .
1. Import third-party library
import numpy as np
from keras.datasets import mnist
from keras.utils import np_utils
from keras.models import Sequential
from keras.layers import Dense,Dropout,Convolution2D,MaxPooling2D,Flatten
from tensorflow.keras.optimizers import Adam
from keras.utils.vis_utils import plot_model
import matplotlib.pyplot as plt
# install pydot and graphviz
2. Data preprocessing
#  Load data
(x_train,y_train),(x_test,y_test) = mnist.load_data()
# (60000, 28, 28)
print("x_shape:\n",x_train.shape)
# (60000,)  Not yet one-hot code   You need to operate by yourself later
print("y_shape:\n",y_train.shape)
# (60000, 28, 28) -> (60000,28,28,1)=( Number of pictures , Picture height , Image width , The number of channels in the picture ) reshape() Middle parameter filling -1 Parameter results can be calculated automatically   Divide 255.0 To normalize
#  Normalization is critical , It can greatly reduce the amount of calculation
x_train = x_train.reshape(-1,28,28,1)/255.0
x_test = x_test.reshape(-1,28,28,1)/255.0
#  in one hot Format
y_train = np_utils.to_categorical(y_train,num_classes=10)
y_test = np_utils.to_categorical(y_test,num_classes=10)
3. Build a network model
#  Define sequential model
model = Sequential()

#  The first convolution layer   Note that the first layer should write the size of the input image   Later layers can be ignored
# input_shape  Input plane
# filters  Convolution kernel / Number of filters
# kernel_size  Convolution window size
# strides  step
# padding padding The way  same/valid
# activation  Activation function
model.add(Convolution2D(
    input_shape=(28,28,1),
    filters=32,
    kernel_size=5,
    strides=1,
    padding="same",
    activation="relu"
))

#  The first pool
model.add(MaxPooling2D(
    pool_size=2,
    strides=2,
    padding="same"
))
#  The second pooling layer
model.add(Convolution2D(filters=64,kernel_size=5,strides=1,padding="same",activation="relu"))
#  The second pooling layer
model.add(MaxPooling2D(pool_size=2,strides=2,padding="same"))
#  Flatten the output of the second pool layer into 1 dimension
model.add(Flatten())
#  The first full connection layer
model.add(Dense(units=1024,activation="relu"))
# Dropout  Random selection 50% Neurons are trained
model.add(Dropout(0.5))
#  The second full connection layer
model.add(Dense(units=10,activation="softmax"))

# #  Define optimizer   Set the learning rate to 1e-4
# adam = Adam(lr=1e-4)

# #  Define optimizer ,loss function, The accuracy of calculation during training
# model.compile(optimizer=adam,loss="categorical_crossentropy",metrics=["accuracy"])

# #  Training models
# model.fit(x_train,y_train,batch_size=64,epochs=10)

# #  Evaluation model
# loss,accuracy=model.evaluate(x_test,y_test)

# print("test loss:",loss)
# print("test accuracy:",accuracy)
4. Draw the network model structure
# rankdir="TB"  Finally, this is what determines the direction  T representative TOP B representative BOTTOM TB From top to bottom   If you want to go from left to right , modify rankdir="LR" that will do
plot_model(model,to_file="model.png",show_shapes=True,show_layer_names="False",rankdir="TB")
plt.figure(figsize=(10,10))
img = plt.imread("model.png")
plt.imshow(img)
plt.axis("off")
plt.show()
Running results :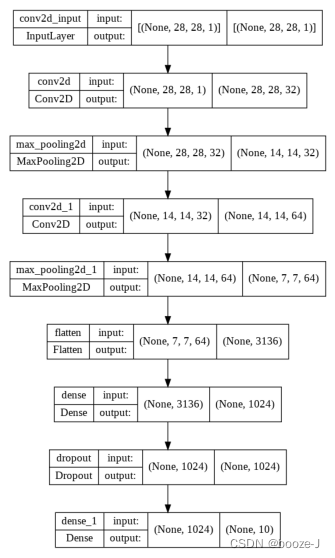
plot_model(model,to_file="model.png",show_shapes=True,show_layer_names="False",rankdir="TB") Medium rankdir="TB" Finally, this is what determines the direction T representative TOP ,B representative BOTTOM,TB From top to bottom , If you want to go from left to right , modify rankdir="LR" that will do .
边栏推荐
- 牛客基础语法必刷100题之基本类型
- NVIDIA Jetson测试安装yolox过程记录
- Deep dive kotlin collaboration (the end of 23): sharedflow and stateflow
- 130. Surrounding area
- Letcode43: string multiplication
- 【obs】Impossible to find entrance point CreateDirect3D11DeviceFromDXGIDevice
- 攻防演练中沙盘推演的4个阶段
- SDNU_ ACM_ ICPC_ 2022_ Summer_ Practice(1~2)
- QT establish signal slots between different classes and transfer parameters
- Four stages of sand table deduction in attack and defense drill
猜你喜欢


![[OBS] the official configuration is use_ GPU_ Priority effect is true](/img/df/772028e44776bd667e814989e8b09c.png)
随机推荐
《因果性Causality》教程,哥本哈根大学Jonas Peters讲授
第四期SFO销毁,Starfish OS如何对SFO价值赋能?
9. Introduction to convolutional neural network
Mathematical modeling -- knowledge map
4.交叉熵
股票开户免费办理佣金最低的券商,手机上开户安全吗
接口测试进阶接口脚本使用—apipost(预/后执行脚本)
攻防演练中沙盘推演的4个阶段
8.优化器
Huawei switch s5735s-l24t4s-qa2 cannot be remotely accessed by telnet
Service Mesh的基本模式
完整的模型验证(测试,demo)套路
The weight of the product page of the second level classification is low. What if it is not included?
A network composed of three convolution layers completes the image classification task of cifar10 data set
Deep dive kotlin collaboration (the end of 23): sharedflow and stateflow
Hotel
串口接收一包数据
Image data preprocessing
CVE-2022-28346:Django SQL注入漏洞
英雄联盟胜负预测--简易肯德基上校