当前位置:网站首页>利用GPU训练网络模型
利用GPU训练网络模型
2022-07-07 23:11:00 【booze-J】
本文章中使用的网络模型架构图: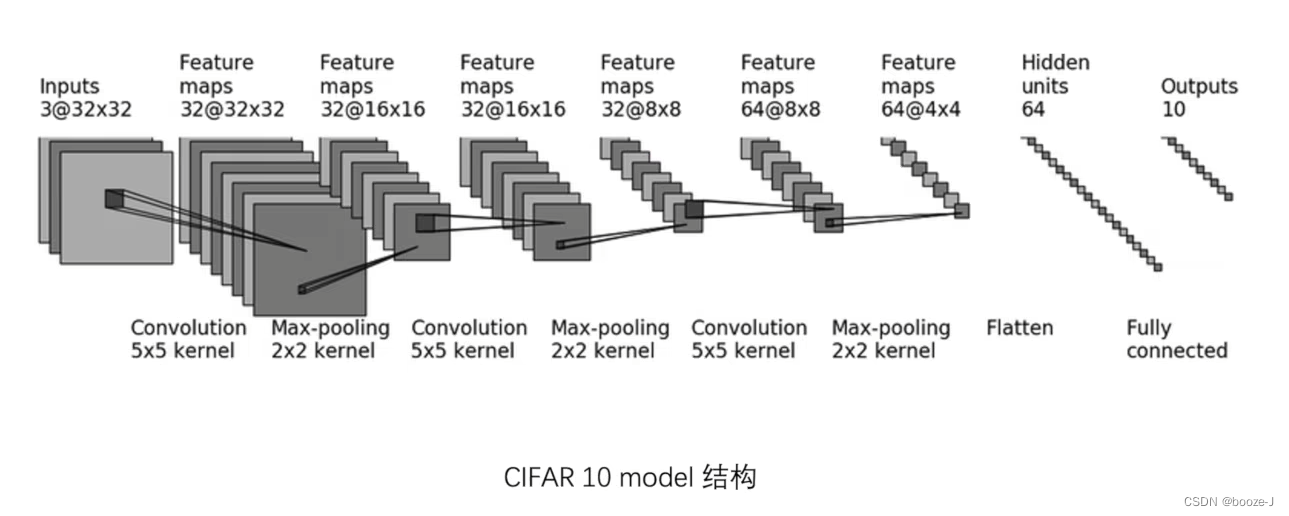
GPU训练有两种方式:
方式一
使用gpu训练只要找到:网络模型、数据(输入和标注)、损失函数再调用.cuda()即可。
CPU训练代码:
import torch
import torchvision
from torch import nn
from torch.nn import Sequential, Conv2d, MaxPool2d, Flatten, Linear
from torch.utils.data import DataLoader
from torch.utils.tensorboard import SummaryWriter
import time

# 准备数据集
train_data = torchvision.datasets.CIFAR10(root='./CIFAR10',train=True,transform=torchvision.transforms.ToTensor(),download=True)
test_data = torchvision.datasets.CIFAR10(root='./CIFAR10',train=False,transform=torchvision.transforms.ToTensor(),download=True)

# length长度
train_data_size = len(train_data)
test_data_size = len(test_data)
print("训练数据集的长度为:{}".format(train_data_size))
print("测试数据集的长度为:{}".format(test_data_size))

# 利用dataloader 来加载数据集
train_dataloader = DataLoader(train_data,batch_size=64)
test_dataloader = DataLoader(test_data,batch_size=64)

# 创建网络模型
# 搭建神经网络(单独开一个文件存放网络模型)
class Booze(nn.Module):

    def __init__(self):
        super(Booze, self).__init__()
        self.model = Sequential(
            Conv2d(3, 32, 5, padding=2),
            MaxPool2d(2),
            Conv2d(32, 32, 5, padding=2),
            MaxPool2d(2),
            Conv2d(32, 64, 5, padding=2),
            MaxPool2d(2),
            Flatten(),
            Linear(1024, 64),
            Linear(64, 10)
        )


    def forward(self,x):
        x = self.model(x)
        return x

obj = Booze()

# 创建损失函数
loss_fn = nn.CrossEntropyLoss()

# 定义优化器
learning_rate = 0.01
optimizer = torch.optim.SGD(obj.parameters(),lr = learning_rate)


# 设置训练网络的一些参数
# 记录训练的次数
total_train_step=0
# 记录测试的次数
total_test_step=0
# 训练的轮数
epoch = 10

# 添加tensorboard
writer = SummaryWriter("logs")
start_time = time.time()


for i in range(epoch):
    print("-------------第{}轮训练开始------------".format(i+1))
    # 训练步骤开始 [train()](https://pytorch.org/docs/stable/generated/torch.nn.Module.html#torch.nn.Module.train)
    obj.train()
    for data in train_dataloader:
        imgs,targets = data
        outputs = obj(imgs)
        # 计算输出值与目标值的损失
        loss = loss_fn(outputs,targets)

        # 优化器优化模型:
        # 利用优化器将梯度清零
        optimizer.zero_grad()
        # 利用反向传播得到每个参数节点的一个梯度
        loss.backward()
        optimizer.step()

        total_train_step += 1
        if total_train_step%100==0:
            end_time = time.time()
            print(end_time-start_time)
            print("训练次数:{},Loss:{}".format(total_train_step,loss.item()))
            writer.add_scalar("train_loss",loss.item(),total_train_step)

    # 测试步骤开始:
    # 注意在测试的过程中不需要对模型进行调优
    obj.eval()   # [eval()](https://pytorch.org/docs/stable/generated/torch.nn.Module.html#torch.nn.Module.eval)
    total_test_loss = 0
    total_accuracy = 0
    with torch.no_grad():
        for data in test_dataloader:
            imgs,targets = data
            outputs = obj(imgs)
            loss = loss_fn(outputs,targets)
            total_test_loss+=loss
            accurcay = (outputs.argmax(1)==targets).sum()
            total_accuracy+=accurcay

    print("整体测试集上的Loss:{}".format(total_test_loss))
    print("整体测试集上的正确率:{}".format(total_accuracy/test_data_size))
    writer.add_scalar("test_accuracy",total_accuracy/test_data_size,total_test_step)
    writer.add_scalar('test_loss',total_test_loss,total_test_step)
    total_test_step+=1

    torch.save(obj,"./model/obj_{}.pth".format(i))
    print("模型已保存")

writer.close()
代码运行结果: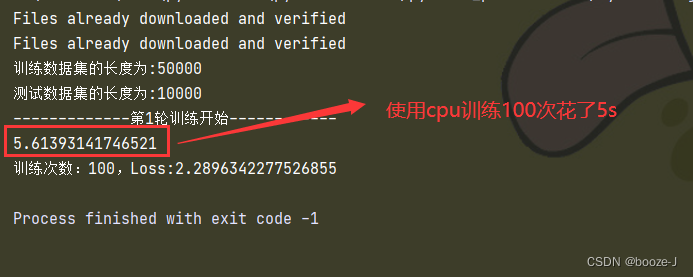
GPU训练代码:
import torch
import torchvision
from torch import nn
from torch.nn import Sequential, Conv2d, MaxPool2d, Flatten, Linear
from torch.utils.data import DataLoader
from torch.utils.tensorboard import SummaryWriter
import time

# 准备数据集
train_data = torchvision.datasets.CIFAR10(root='./CIFAR10',train=True,transform=torchvision.transforms.ToTensor(),download=True)
test_data = torchvision.datasets.CIFAR10(root='./CIFAR10',train=False,transform=torchvision.transforms.ToTensor(),download=True)

# length长度
train_data_size = len(train_data)
test_data_size = len(test_data)
print("训练数据集的长度为:{}".format(train_data_size))
print("测试数据集的长度为:{}".format(test_data_size))

# 利用dataloader 来加载数据集
train_dataloader = DataLoader(train_data,batch_size=64)
test_dataloader = DataLoader(test_data,batch_size=64)


# 创建网络模型
# 搭建神经网络(单独开一个文件存放网络模型)
class Booze(nn.Module):

    def __init__(self):
        super(Booze, self).__init__()
        self.model = Sequential(
            Conv2d(3, 32, 5, padding=2),
            MaxPool2d(2),
            Conv2d(32, 32, 5, padding=2),
            MaxPool2d(2),
            Conv2d(32, 64, 5, padding=2),
            MaxPool2d(2),
            Flatten(),
            Linear(1024, 64),
            Linear(64, 10)
        )


    def forward(self,x):
        x = self.model(x)
        return x

obj = Booze()
if torch.cuda.is_available():
    # 网络模型 调用cuda()方法之后再进行返回
    obj = obj.cuda()

# 创建损失函数
loss_fn = nn.CrossEntropyLoss()
# 要先判断cuda可不可以用,然后才可以转移过去
if torch.cuda.is_available():
    # 损失函数 调用cuda()方法之后再进行返回
    loss_fn = loss_fn.cuda()

# 定义优化器
learning_rate = 0.01
optimizer = torch.optim.SGD(obj.parameters(),lr = learning_rate)


# 设置训练网络的一些参数
# 记录训练的次数
total_train_step=0
# 记录测试的次数
total_test_step=0
# 训练的轮数
epoch = 10

# 添加tensorboard
writer = SummaryWriter("logs")
start_time = time.time()


for i in range(epoch):
    print("-------------第{}轮训练开始------------".format(i+1))
    # 训练步骤开始 [train()](https://pytorch.org/docs/stable/generated/torch.nn.Module.html#torch.nn.Module.train)
    obj.train()
    for data in train_dataloader:
        imgs,targets = data
        if torch.cuda.is_available():
            # 数据 调用cuda()方法之后再进行返回
            imgs = imgs.cuda()
            # 数据 调用cuda()方法之后再进行返回
            targets = targets.cuda()
        outputs = obj(imgs)
        # 计算输出值与目标值的损失
        loss = loss_fn(outputs,targets)

        # 优化器优化模型:
        # 利用优化器将梯度清零
        optimizer.zero_grad()
        # 利用反向传播得到每个参数节点的一个梯度
        loss.backward()
        optimizer.step()

        total_train_step += 1
        if total_train_step%100==0:
            end_time = time.time()
            print(end_time-start_time)
            print("训练次数:{},Loss:{}".format(total_train_step,loss.item()))
            writer.add_scalar("train_loss",loss.item(),total_train_step)

    # 测试步骤开始:
    # 注意在测试的过程中不需要对模型进行调优
    obj.eval()   # [eval()](https://pytorch.org/docs/stable/generated/torch.nn.Module.html#torch.nn.Module.eval)
    total_test_loss = 0
    total_accuracy = 0
    with torch.no_grad():
        for data in test_dataloader:
            imgs,targets = data
            if torch.cuda.is_available():
                # 数据 调用cuda()方法之后再进行返回
                imgs = imgs.cuda()
                # 数据 调用cuda()方法之后再进行返回
                targets = targets.cuda()
            outputs = obj(imgs)
            loss = loss_fn(outputs,targets)
            total_test_loss+=loss
            accurcay = (outputs.argmax(1)==targets).sum()
            total_accuracy+=accurcay

    print("整体测试集上的Loss:{}".format(total_test_loss))
    print("整体测试集上的正确率:{}".format(total_accuracy/test_data_size))
    writer.add_scalar("test_accuracy",total_accuracy/test_data_size,total_test_step)
    writer.add_scalar('test_loss',total_test_loss,total_test_step)
    total_test_step+=1

    torch.save(obj,"./model/obj_{}.pth".format(i))
    print("模型已保存")

writer.close()
代码运行结果: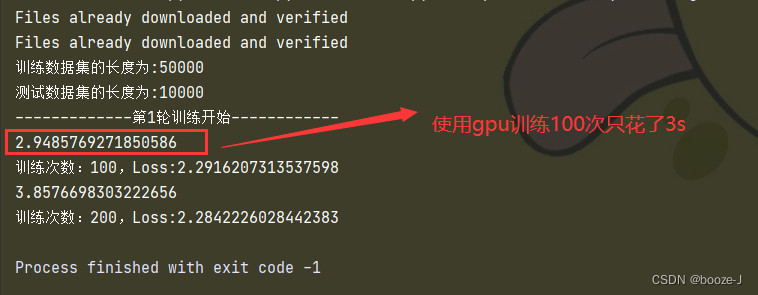
相比于CPU训练代码,GPU训练代码做出了以下的改变。
CPU中的网络模型
# 创建神经网络
obj = Booze()
GPU中的网络模型
obj = Booze()
# 要先判断cuda可不可以用,然后才可以转移过去
if torch.cuda.is_available():
    # 网络模型 调用cuda()方法之后再进行返回
    obj = obj.cuda()
CPU中的损失函数
# 创建损失函数
loss_fn = nn.CrossEntropyLoss()
GPU中的损失函数
# 创建损失函数
loss_fn = nn.CrossEntropyLoss()
# 要先判断cuda可不可以用,然后才可以转移过去
if torch.cuda.is_available():
    # 损失函数 调用cuda()方法之后再进行返回
    loss_fn = loss_fn.cuda()
CPU中的数据
imgs,targets = data
GPU中的数据
imgs,targets = data
if torch.cuda.is_available():
   # 数据 调用cuda()方法之后再进行返回
   imgs = imgs.cuda()
   # 数据 调用cuda()方法之后再进行返回
   targets = targets.cuda()
另外,有些笔记本可能没有显卡,然后又想体验显卡的快感,其实网上也有一些线上的显卡可以使用,像是谷歌的colab也可以线上使用显卡进行GPU训练。
方式二
使用gpu训练只要找到:网络模型、数据(输入和标注)、损失函数再调用.to(device)即可。
前提是得先定义device
例如:
# 使用CPU进行训练
device = torch.device("cpu")
# 使用GPU进行训练
device = torch.device("cuda")
# 如果有多张显卡时,使用第一张显卡进行训练
device = torch.device("cuda:0")
# 如果有多张显卡时,使用第二张显卡进行训练
device = torch.device("cuda:1")
# 若cuda可以使用则使用GPU进行训练,否则使用cpu作为设备进行训练
device = torch.device("cuda" if torch.cuda.is_available() else "cpu")
定义完device之后只要对网络模型、数据(输入和标注)、损失函数调用.to(device)即可
相比于CPU训练代码,GPU训练代码做出了以下的改变。
CPU中的网络模型
# 创建神经网络
obj = Booze()
GPU中的网络模型
obj = Booze()
# 调用.to(device)方法
obj = obj.to(device)
CPU中的损失函数
# 创建损失函数
loss_fn = nn.CrossEntropyLoss()
GPU中的损失函数
# 创建损失函数
loss_fn = nn.CrossEntropyLoss()
# 调用.to(device)方法
loss_fn = loss_fn.to(device)
CPU中的数据
imgs,targets = data
GPU中的数据
imgs,targets = data
# 调用.to(device)方法
imgs = imgs.to(device)
targets = targets.to(device)
边栏推荐
- NVIDIA Jetson test installation yolox process record
- Basic mode of service mesh
- SDNU_ACM_ICPC_2022_Summer_Practice(1~2)
- CVE-2022-28346:Django SQL注入漏洞
- 大二级分类产品页权重低,不收录怎么办?
- Reentrantlock fair lock source code Chapter 0
- Marubeni official website applet configuration tutorial is coming (with detailed steps)
- 取消select的默认样式的向下箭头和设置select默认字样
- 1293_FreeRTOS中xTaskResumeAll()接口的实现分析
- 4.交叉熵
猜你喜欢
Fofa attack and defense challenge record
![[go record] start go language from scratch -- make an oscilloscope with go language (I) go language foundation](/img/76/b048e100d2c964ac00bc4f64e97e7a.png)
[go record] start go language from scratch -- make an oscilloscope with go language (I) go language foundation

《因果性Causality》教程,哥本哈根大学Jonas Peters讲授

Image data preprocessing
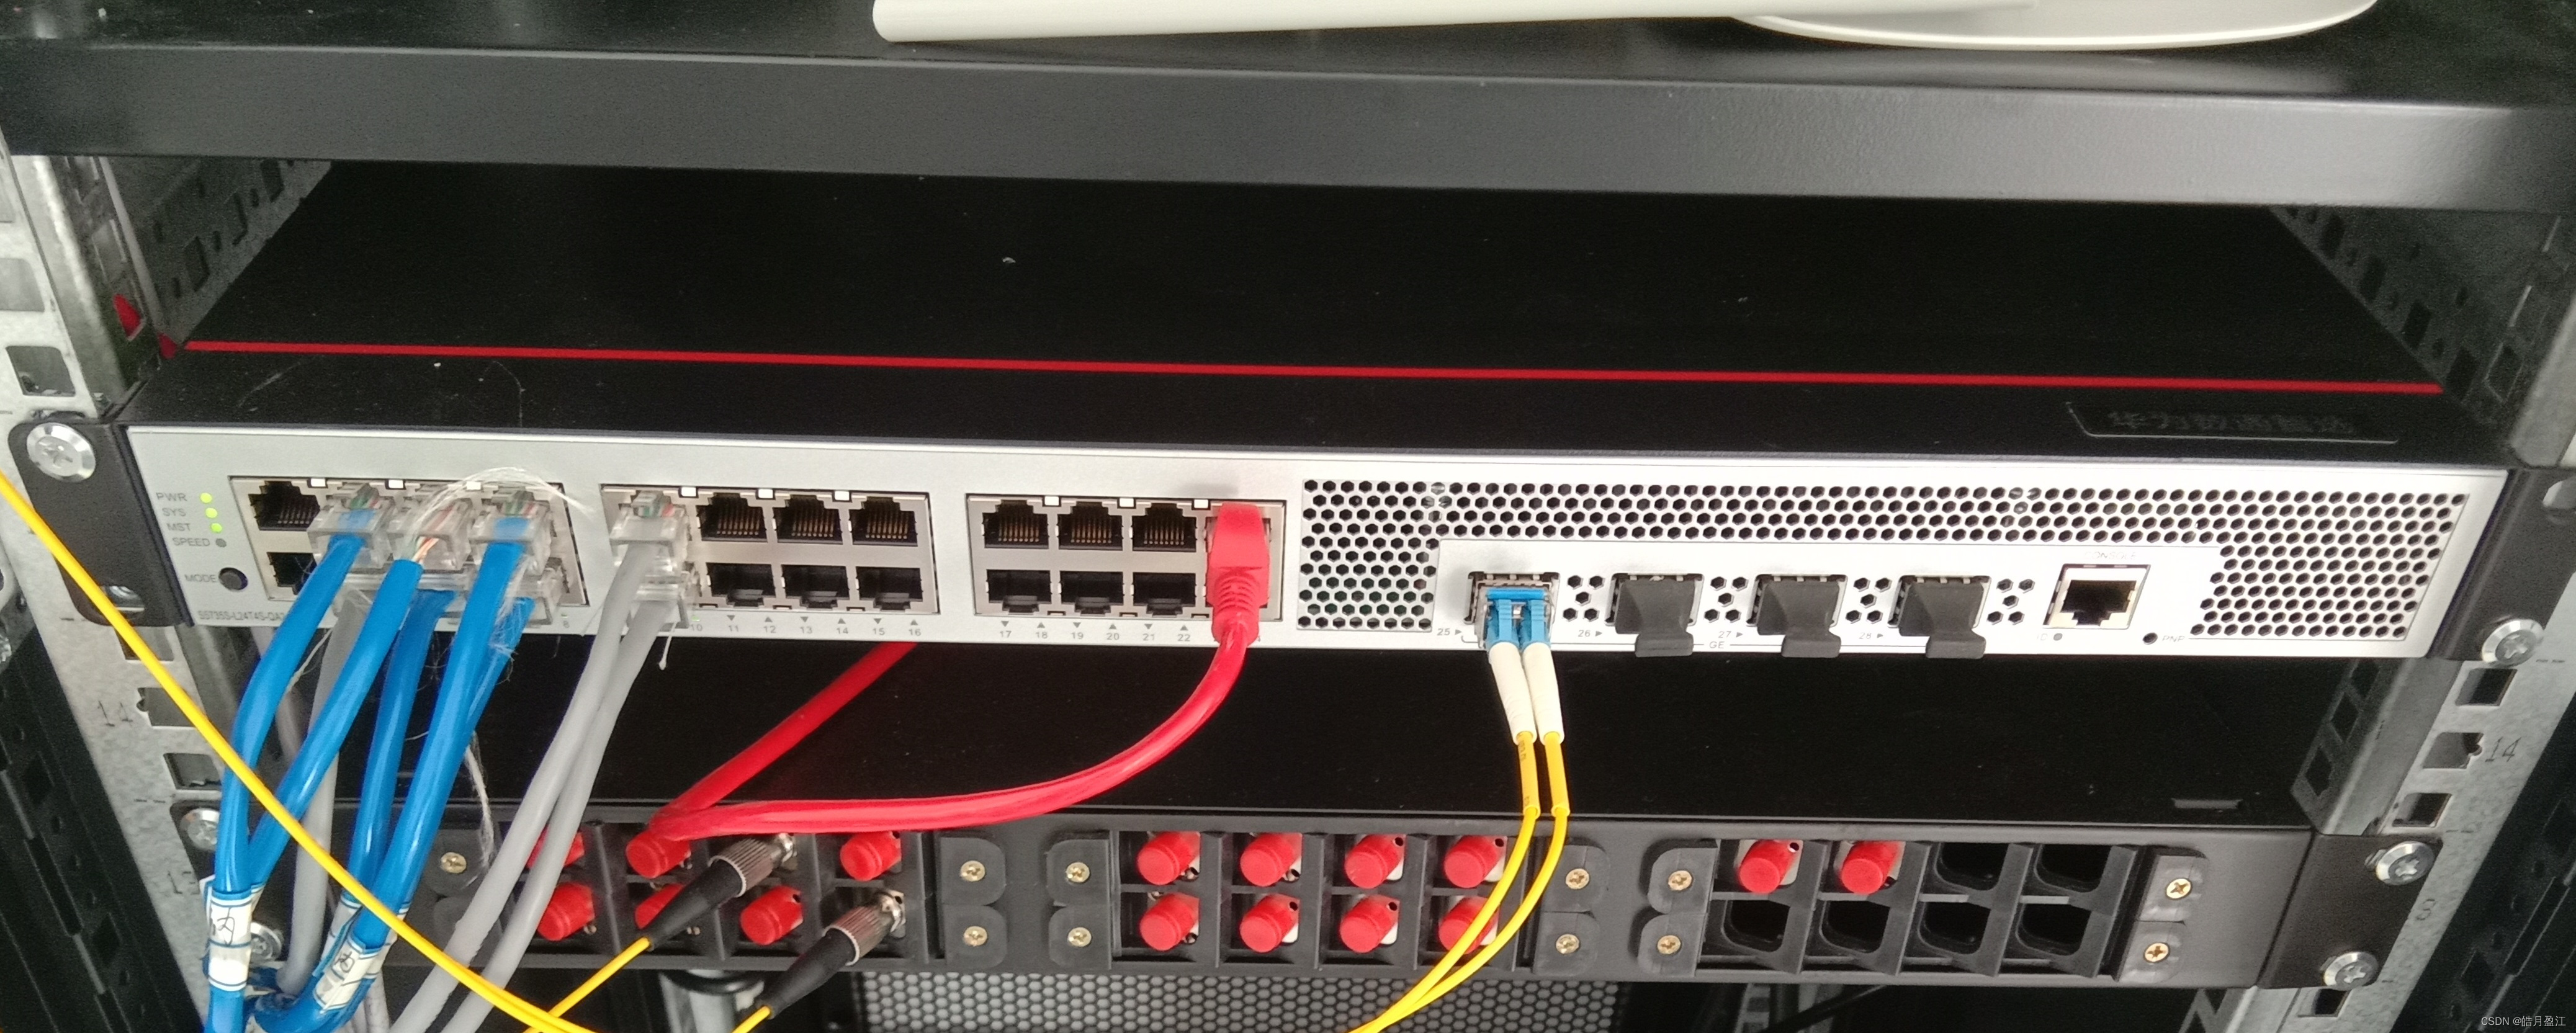
华为交换机S5735S-L24T4S-QA2无法telnet远程访问
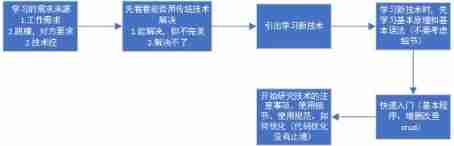
How to learn a new technology (programming language)
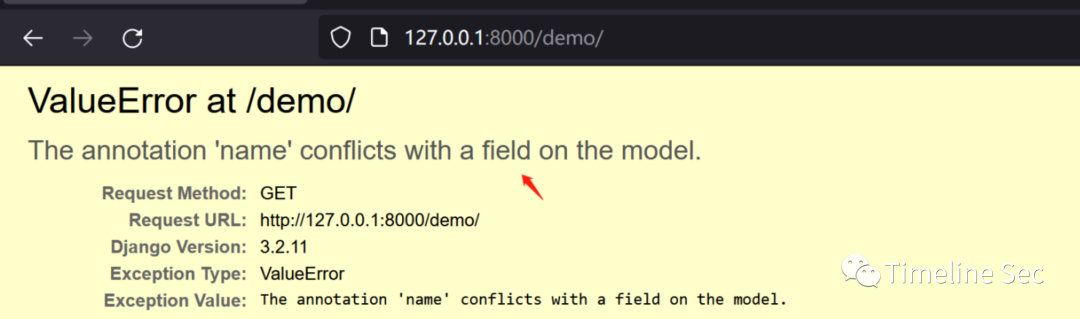
CVE-2022-28346:Django SQL注入漏洞

接口测试要测试什么?

Where is the big data open source project, one-stop fully automated full life cycle operation and maintenance steward Chengying (background)?
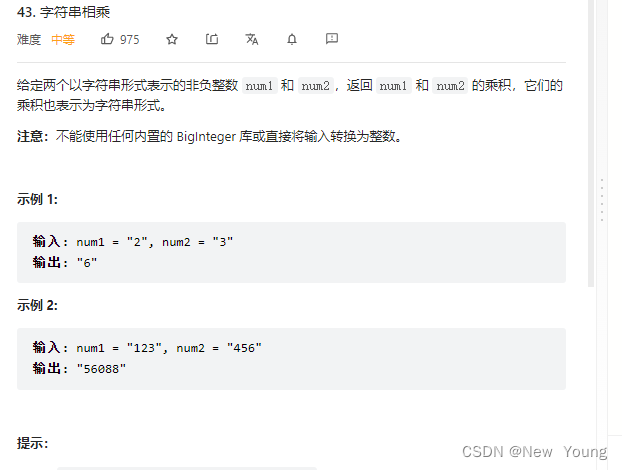
letcode43:字符串相乘
随机推荐
取消select的默认样式的向下箭头和设置select默认字样
【愚公系列】2022年7月 Go教学课程 006-自动推导类型和输入输出
国外众测之密码找回漏洞
【愚公系列】2022年7月 Go教学课程 006-自动推导类型和输入输出
【obs】Impossible to find entrance point CreateDirect3D11DeviceFromDXGIDevice
Which securities company has a low, safe and reliable account opening commission
"An excellent programmer is worth five ordinary programmers", and the gap lies in these seven key points
13. Enregistrement et chargement des modèles
From starfish OS' continued deflationary consumption of SFO, the value of SFO in the long run
jemter分布式
Letcode43: string multiplication
图像数据预处理
新库上线 | CnOpenData中国星级酒店数据
Service Mesh介绍,Istio概述
Introduction to paddle - using lenet to realize image classification method I in MNIST
Kubernetes static pod (static POD)
Where is the big data open source project, one-stop fully automated full life cycle operation and maintenance steward Chengying (background)?
What has happened from server to cloud hosting?
What does interface testing test?
Deep dive kotlin collaboration (the end of 23): sharedflow and stateflow