当前位置:网站首页>Introduction to paddle - using lenet to realize image classification method I in MNIST
Introduction to paddle - using lenet to realize image classification method I in MNIST
2022-07-08 00:17:00 【Vertira】
MNIST The data set realizes image classification
One 、 Configuration environment
import paddle
print(paddle.__version__)
How to configure paddle You can search online , My blog also has , Here is a little
Load data : There are two ways : Custom data loading ( My previous blog has ), load paddled Data prepared on the official website
We are looking for the second way , Because it's convenient
Handwritten numbers MNIST Data sets , contain 60,000 Examples and for training 10,000 An example for testing . These numbers have been dimensioned and located in the center of the image , The image is a fixed size (28x28 Pixels ), Its value is 0 To 1. The official address of the data set is :http://yann.lecun.com/exdb/mnist .
We use the built-in... Of the propeller frame paddle.vision.datasets.MNIST complete mnist Data set loading .
from paddle.vision.transforms import Compose, Normalize

transform = Compose([Normalize(mean=[127.5],
                               std=[127.5],
                               data_format='CHW')])
#  Use transform Normalize the data set
print('download training data and load training data')
train_dataset = paddle.vision.datasets.MNIST(mode='train', transform=transform)
test_dataset = paddle.vision.datasets.MNIST(mode='test', transform=transform)
print('load finished')
Take a piece of data from the training set and have a look .
import numpy as np
import matplotlib.pyplot as plt
train_data0, train_label_0 = train_dataset[0][0],train_dataset[0][1]
train_data0 = train_data0.reshape([28,28])
plt.figure(figsize=(2,2))
plt.imshow(train_data0, cmap=plt.cm.binary)
print('train_data0 label is: ' + str(train_label_0))
3、 ... and 、 networking
use paddle.nn Under the API, Such as Conv2D、MaxPool2D、Linear complete LeNet The construction of .
import paddle
import paddle.nn.functional as F
class LeNet(paddle.nn.Layer):
    def __init__(self):
        super(LeNet, self).__init__()
        self.conv1 = paddle.nn.Conv2D(in_channels=1, out_channels=6, kernel_size=5, stride=1, padding=2)
        self.max_pool1 = paddle.nn.MaxPool2D(kernel_size=2,  stride=2)
        self.conv2 = paddle.nn.Conv2D(in_channels=6, out_channels=16, kernel_size=5, stride=1)
        self.max_pool2 = paddle.nn.MaxPool2D(kernel_size=2, stride=2)
        self.linear1 = paddle.nn.Linear(in_features=16*5*5, out_features=120)
        self.linear2 = paddle.nn.Linear(in_features=120, out_features=84)
        self.linear3 = paddle.nn.Linear(in_features=84, out_features=10)

    def forward(self, x):
        x = self.conv1(x)
        x = F.relu(x)
        x = self.max_pool1(x)
        x = self.conv2(x)
        x = F.relu(x)
        x = self.max_pool2(x)
        x = paddle.flatten(x, start_axis=1,stop_axis=-1)
        x = self.linear1(x)
        x = F.relu(x)
        x = self.linear2(x)
        x = F.relu(x)
        x = self.linear3(x)
        return x
Four 、 The way 1: Based on high-level API, Complete the training and prediction of the model
adopt paddle Provided Model Build instance , Use the encapsulated training and test interface , Quickly complete model training and testing .
4.1 Use Model.fit To train the model
from paddle.metric import Accuracy
model = paddle.Model(LeNet())   #  use Model Packaging model
optim = paddle.optimizer.Adam(learning_rate=0.001, parameters=model.parameters())

#  Configuration model
model.prepare(
    optim,
    paddle.nn.CrossEntropyLoss(),
    Accuracy()
    )
#  Training models
model.fit(train_dataset,
        epochs=2,
        batch_size=64,
        verbose=1
        )
Training results
The loss value printed in the log is the current step, and the metric is the average value of previous steps.
Epoch 1/2
step 938/938 [==============================] - loss: 0.0329 - acc: 0.9399 - 10ms/step
Epoch 2/2
step 938/938 [==============================] - loss: 0.0092 - acc: 0.9798 - 10ms/step
4.2 Use Model.evaluate To predict the model
model.evaluate(test_dataset, batch_size=64, verbose=1)
Eval begin...
step 157/157 [==============================] - loss: 4.4728e-04 - acc: 0.9857 - 8ms/step
Eval samples: 10000


{'loss': [0.0004472804], 'acc': 0.9857}
Way one ends
That's way one , Can quickly 、 Efficiently complete network model training and prediction .
Reference resources :
边栏推荐
- limit 与offset的用法(转载)
- Binary sort tree [BST] - create, find, delete, output
- C language 005: common examples
- Daily question brushing record (16)
- 2022-07-07:原本数组中都是大于0、小于等于k的数字,是一个单调不减的数组, 其中可能有相等的数字,总体趋势是递增的。 但是其中有些位置的数被替换成了0,我们需要求出所有的把0替换的方案数量:
- C language 001: download, install, create the first C project and execute the first C language program of CodeBlocks
- paddle入门-使用LeNet在MNIST实现图像分类方法二
- 哪个券商公司开户佣金低又安全,又靠谱
- Set up personal network disk with nextcloud
- 单机高并发模型设计
猜你喜欢
Is 35 really a career crisis? No, my skills are accumulating, and the more I eat, the better

new和delete的底层原理以及模板

全自动化处理每月缺卡数据,输出缺卡人员信息
Play sonar
![[研发人员必备]paddle 如何制作自己的数据集,并显示。](/img/50/3d826186b563069fd8d433e8feefc4.png)
[研发人员必备]paddle 如何制作自己的数据集,并显示。
51与蓝牙模块通讯,51驱动蓝牙APP点灯
How to insert highlighted code blocks in WPS and word
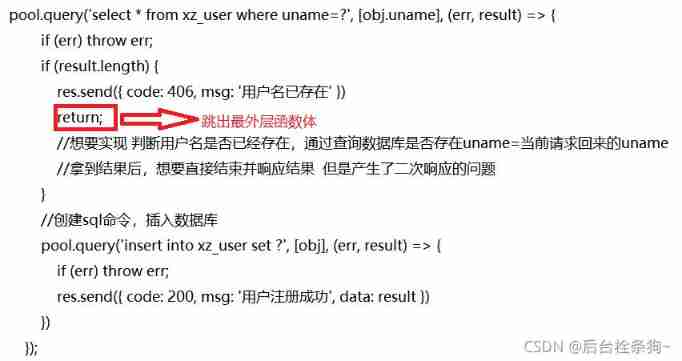
Two small problems in creating user registration interface
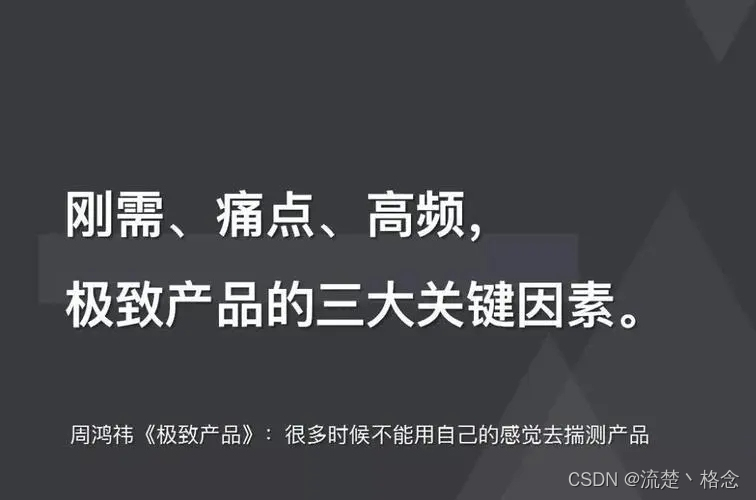
如何衡量产品是否“刚需、高频、痛点”

Install sqlserver2019
随机推荐
Tencent security released the white paper on BOT Management | interpreting BOT attacks and exploring ways to protect
Kubectl's handy command line tool: Oh my Zsh tips and tricks
某马旅游网站开发(登录注册退出功能的实现)
Is it safe for tongdaxin to buy funds?
RPA cloud computer, let RPA out of the box with unlimited computing power?
Two small problems in creating user registration interface
去了字节跳动,才知道年薪 40w 的测试工程师有这么多?
Trust orbtk development issues 2022
用語雀寫文章了,功能真心强大!
每日刷题记录 (十六)
[leetcode] 20. Valid brackets
52岁的周鸿祎,还年轻吗?
搭建ADG过程中复制报错 RMAN-03009 ORA-03113
【测试面试题】页面很卡的原因分析及解决方案
SQL knowledge summary 004: Postgres terminal command summary
Sqlite数据库存储目录结构邻接表的实现2-目录树的构建
[研发人员必备]paddle 如何制作自己的数据集,并显示。
Notice on organizing the second round of the Southwest Division (Sichuan) of the 2021-2022 National Youth electronic information intelligent innovation competition
80% of the people answered incorrectly. Does the leaf on the apple logo face left or right?
The underlying principles and templates of new and delete