当前位置:网站首页>2. Basic use RecyclerView
2. Basic use RecyclerView
2022-08-02 14:52:00 【Fall in love with learning!】
详解RecyclerView系列文章目录
概述
In the previous article, we briefly introduced what it isRecyclerView,and what advantages does he have.So from the beginning of this article, we will start to learn step by stepRecyclerView的使用方法.实现的效果图如下:

The first step in using a control is definitely to add dependencies,That is, import relatedjar或者是aar包,这里我们直接gradle配置,如果你使用的Eclipsee那我只能呵呵了.
添加依赖
In this step you just need to addRecyclerView的依赖配置,I only explain hereAndroid Studio中配置.
### Gradle
Add the following code to yoursmodule的build.gradle文件dependencies代码块中
compile 'com.android.support:design:25.2.0'然后重新build,You can automatically reference the dependent library to your project.Then you can use the control.
添加RecyclerView到布局
Add the layout code below to yoursxml中:
<android.support.v7.widget.RecyclerView
  android:id="@+id/rv"
  android:layout_width="match_parent"
  android:layout_height="match_parent"
  android:scrollbars="vertical" />
After the controls are all added,Next, you need to configure it in the codeRecyclerView了.
配置RecyclerView
//如果你知道你的RecyclerViewThe height does not change during use
// Using this setting can improve performance,A later article will analyze why
rv.setHasFixedSize(true);

//设置一个布局管理器
LinearLayoutManager linearLayoutManager = new LinearLayoutManager(this);
rv.setLayoutManager(linearLayoutManager);
Here we set a layout manager after finding the control.The so-called layout manager is to tellRecyclerViewHow to display eachItem,这也就是RecyclerViewOne of the spermatic cords of this control,How he will show eachItem,也就是每个Itemhow to place,Abstract to a callLayoutManager的类,You can customize different classes to display different effectsItem,从而实现类似ListView,GridViewand waterfalls, etc.The advantage of this is that the different layouts can be dynamically changed.
After completing the basic configuration,我们需要给他设置一个adapter,这和ListView的使用方法是一样的.
设置Adapter
我们先新建一个Adapter,然后继承RecyclerView.Adapter
class MyAdapter extends RecyclerView.Adapter<RecyclerView.ViewHolder>{


  private final LayoutInflater layoutInflater;

  public MyAdapter(Context context) {
    layoutInflater = LayoutInflater.from(context);
  }

  @Override
  public ViewHolder onCreateViewHolder(ViewGroup parent, int viewType) {
    return null;
  }

  @Override
  public void onBindViewHolder(ViewHolder holder, int position) {

  }

  @Override
  public int getItemCount() {
    return 0;
  }

}
Next we need to implement the corresponding method,But before implementing the corresponding method, we still need to understand the use of each method:
onCreateViewHolder:This method only creates oneViewHolder的时候调用
onBindViewHolder:This method displays one at a timeItem时,调用他,将ViewHolder传递给你,Set the data you want to display here
getItemCount:就是Item的数量
You can see how to use it hereListView差不多,It's just that he will be where we used to begetViewThe events made in the method are divided into two steps,The first step is to createViewHolder,Another step is to bind the data to be displayed.This way the user does not need to judge as badly as beforeconvertView是否为空了.
Now that the user of each method is known,Next, you can implement each method,但是我们发现onCreateViewHolder返回的是ViewHolder,So I need one moreViewHolder类:
创建ViewHolder
class MyViewHolder extends RecyclerView.ViewHolder {


  private final TextView tv;

  public MyViewHolder(View itemView) {
    super(itemView);
    tv = (TextView)itemView. findViewById(android.R.id.text1);
  }

  public void bindData(String d) {
    tv.setText(d);
  }
}
We found it in the constructor classTextView,There are also some frameworks that can be used here to avoid writingfindViewById,Because we are still writing basic articles, so let's not make it so complicated,Subsequent articles in this series will take you to encapsulateAdapter,ViewHolder等.Here, let's make it simple to understand.
The next thing you need to do is implement itAdaptermethod inside.
@Override
public MyViewHolder onCreateViewHolder(ViewGroup parent, int viewType) {
  return new MyViewHolder(
      layoutInflater.inflate(android.R.layout.simple_list_item_1, parent, false));
}

@Override
public void onBindViewHolder(MyViewHolder holder, int position) {
  String d = BasicUseActivity.this.data.get(position);
  holder.bindData(d);
}

@Override
public int getItemCount() {
  return data.size();
}
然后我们就可以在Activity中设置adapter了.
//设置适配器
MyAdapter myAdapter = new MyAdapter(this);
rv.setAdapter(myAdapter);
接下来就是见证奇迹的时候了,We can run the project to the phone.Check out your results.
边栏推荐
猜你喜欢


随机推荐
加减法运算及其溢出处理
C语言初级—数组元素的增删改查
Kubernetes架构和组件
liunx下mysql遇到的简单问题
MySQL知识总结 (二) 存储引擎
C语言日记 6 基本输入/输出
宝塔搭建PHP自适应懒人网址导航源码实测
MySQL知识总结 (九) 用户与用户权限管理
安装使用——百家CMS微商城说明文档(2)
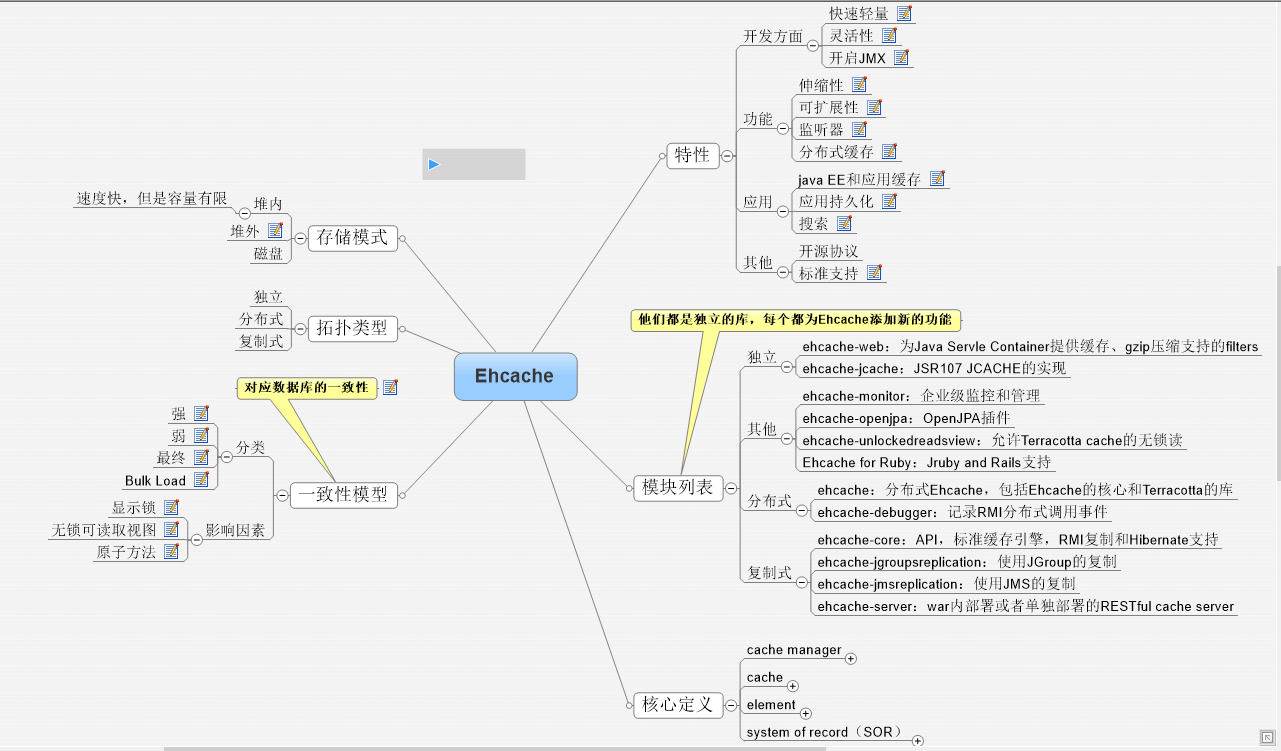
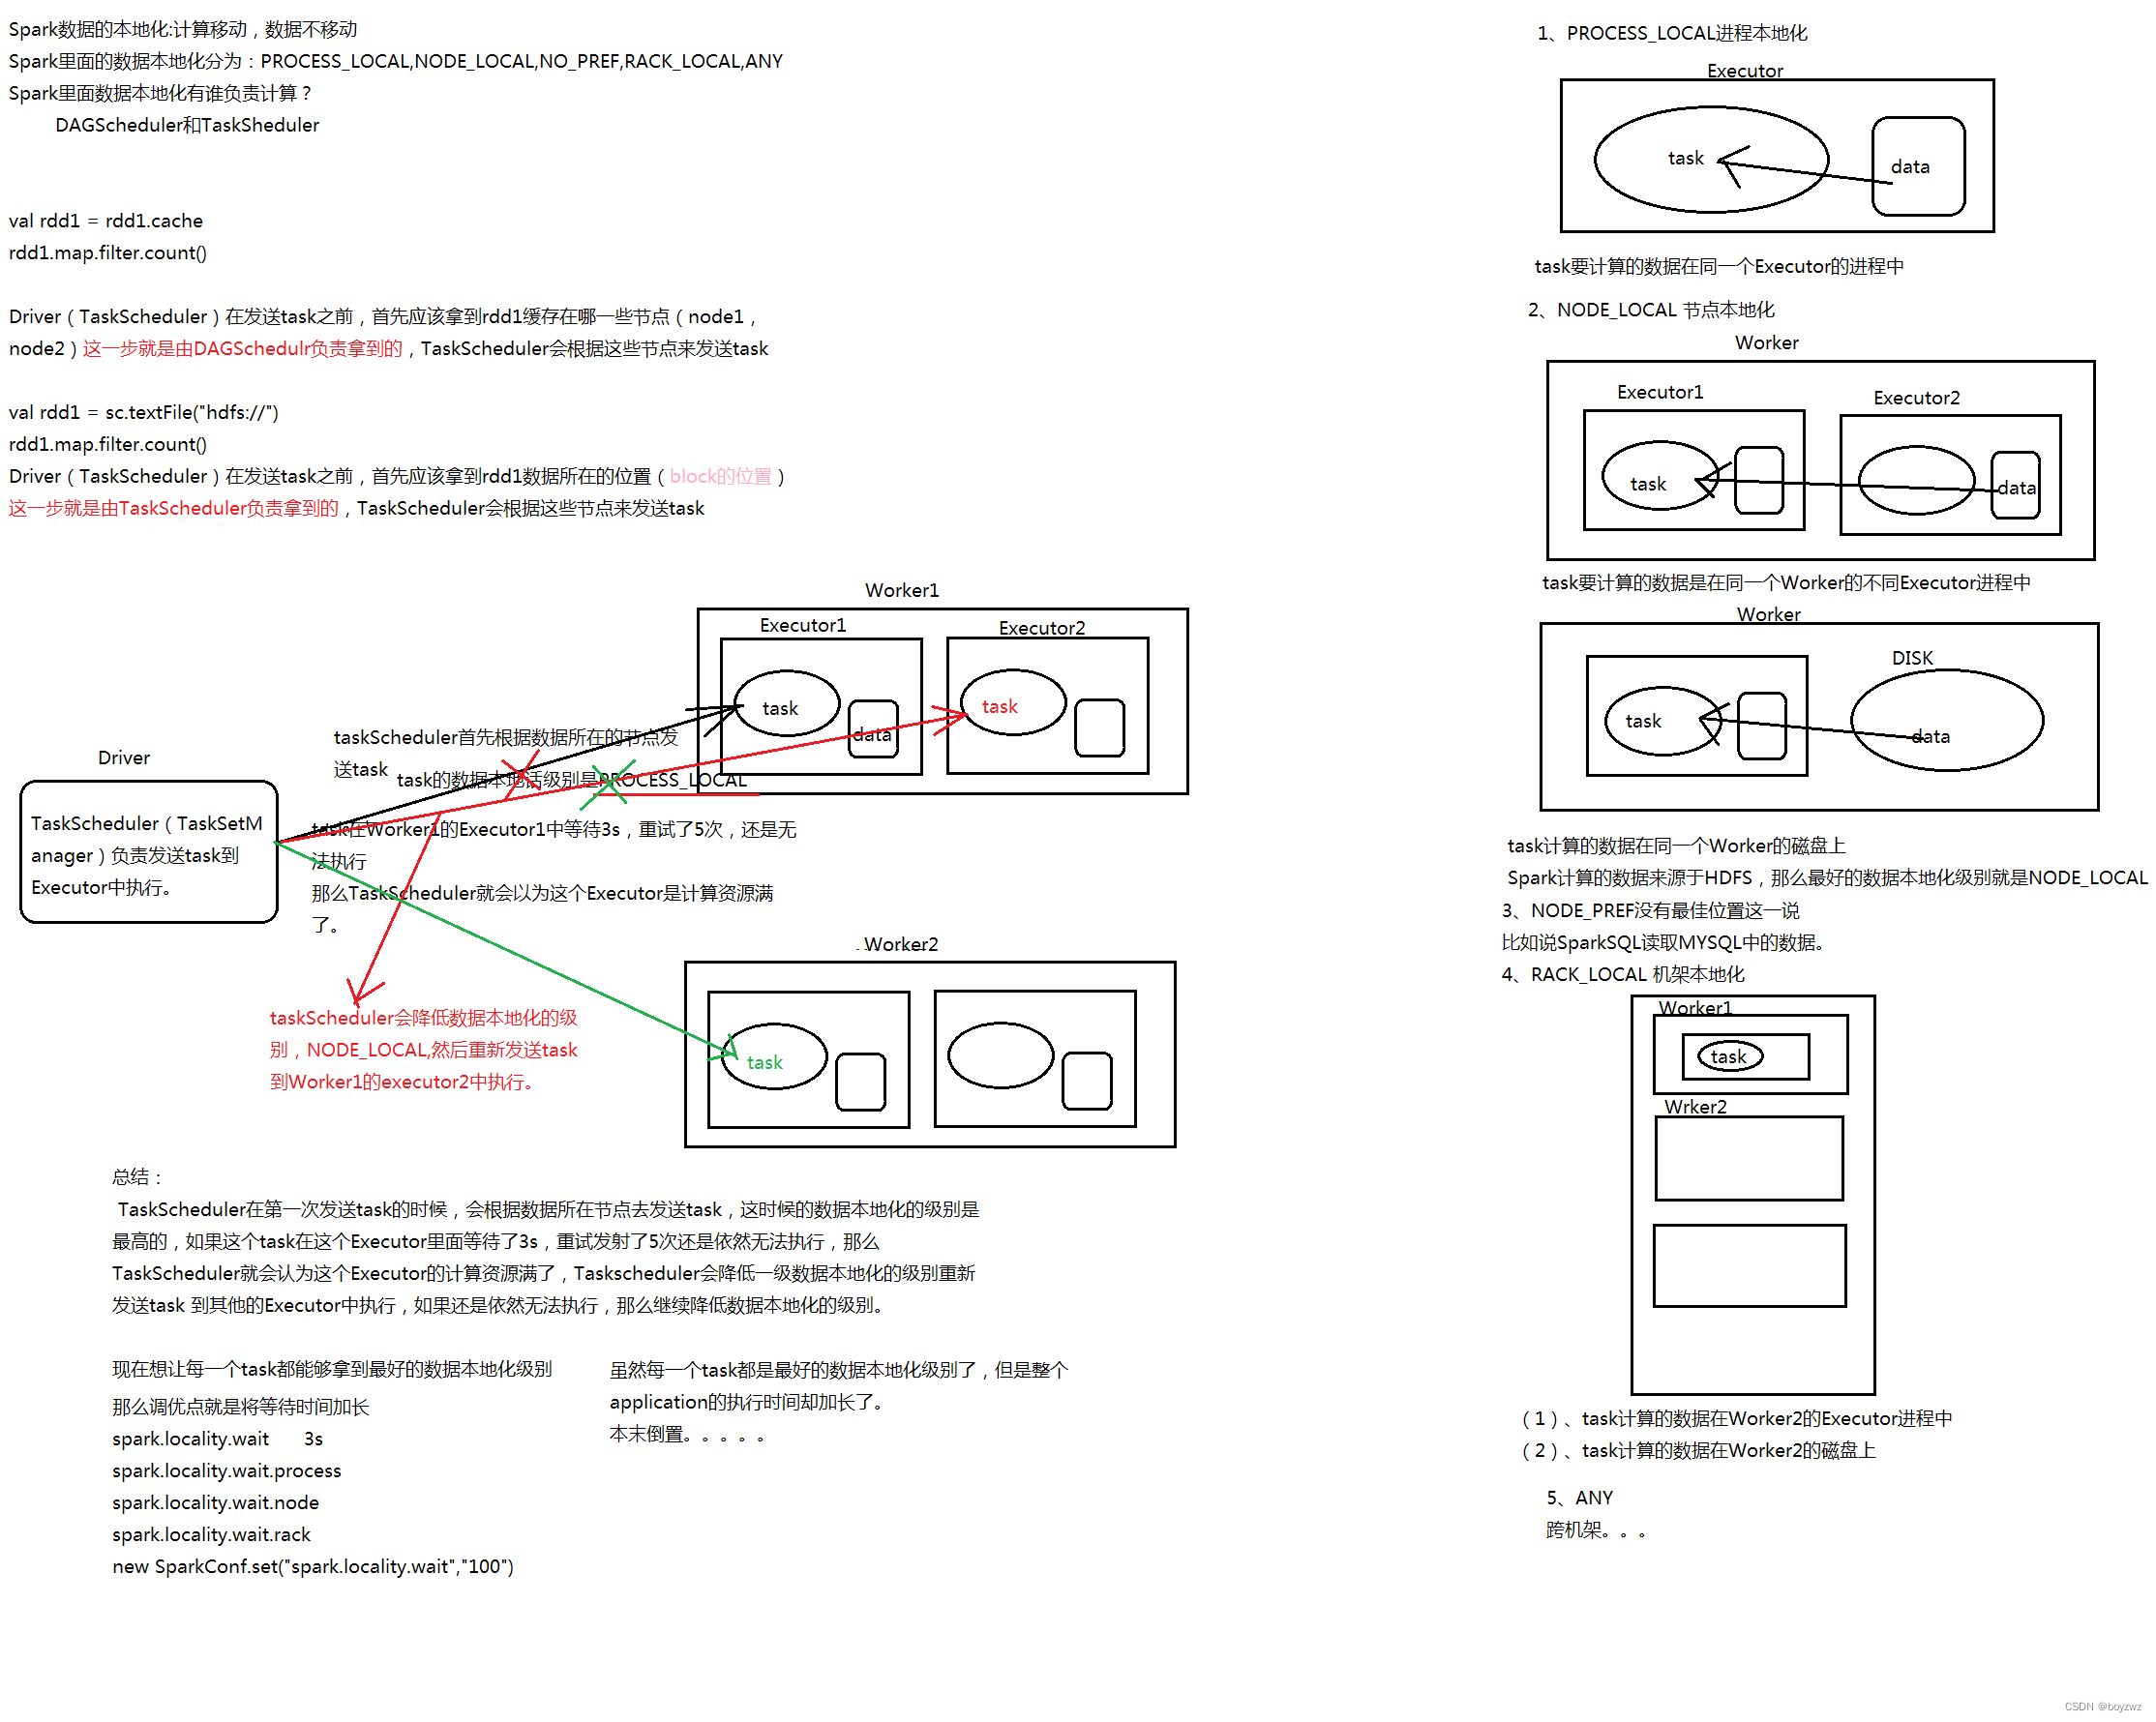
Spark_Core
MySQL知识总结 (四) 事务
芝诺悖论的理解
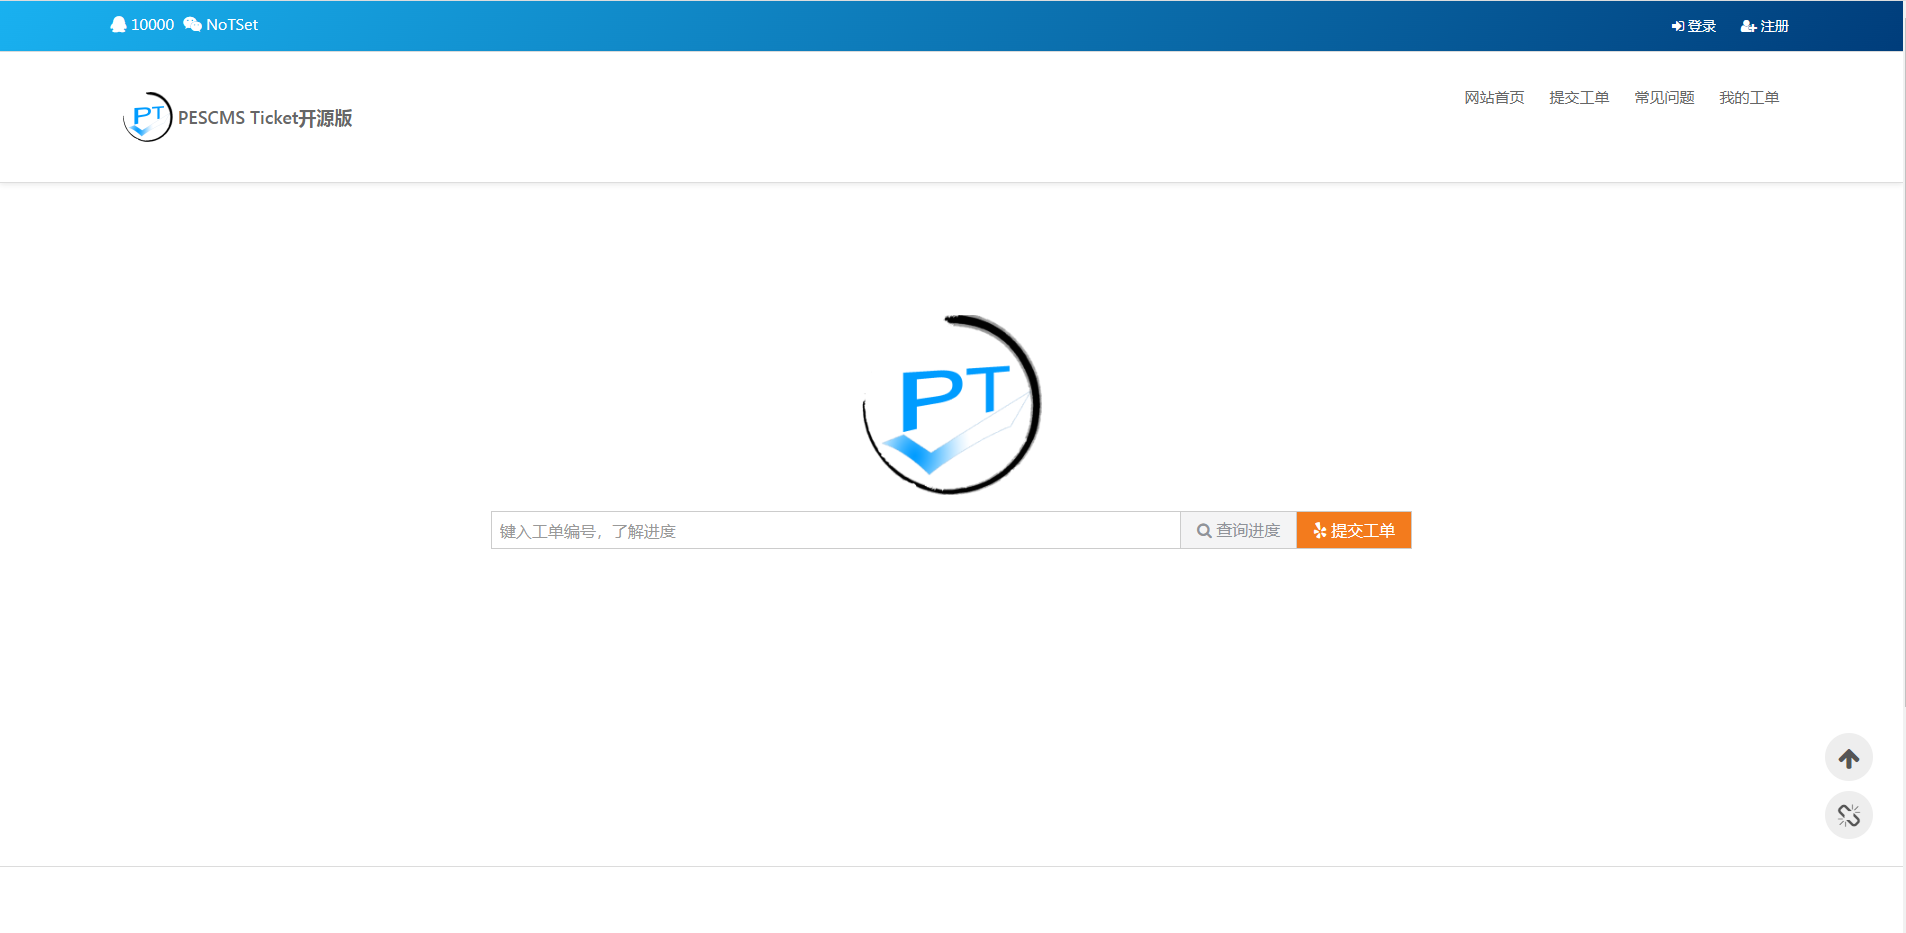
宝塔搭建PESCMS-Ticket开源客服工单系统源码实测
OpenCart迁移到其他服务器
HBuilderX 核心插件安装提示:“插件XXX下载失败,请检查网络”问题的解决办法
redis基础
华为防火墙
鼠标右键菜单栏太长如何减少
浮点数的运算方法
MySQL 8.0 新特性