Ubuntu18.04 NAT Configure static in mode IP Address -2020.11.09
preparation
Usually use ssh Connecting virtual machines , But once the network is switched , The virtual machine IP The address always changes , So how to set the static state of virtual machine IP The address?
Usually use ssh Connecting virtual machines , But once the network is switched , The virtual machine IP The address always changes , So how to set the static state of virtual machine IP The address?
Be careful :Ubuntu18.04 By modification /etc/netplan Directory to modify the configuration file IP Address of the
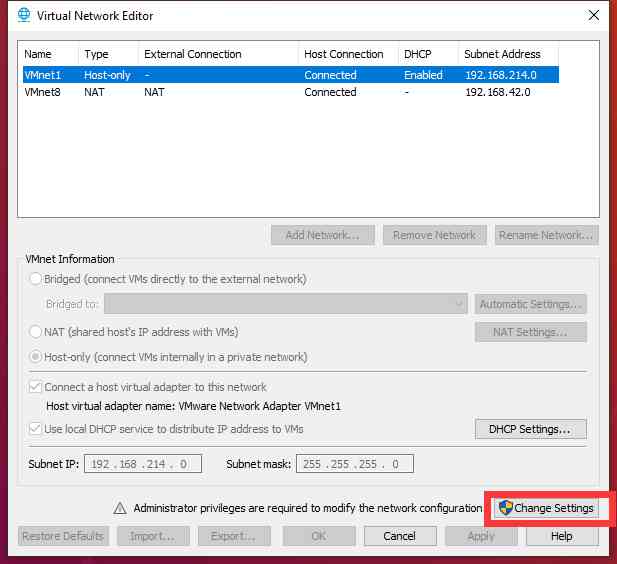
First, in the VMware Of Edit Find the virtual network settings under the menu

Select the lower right corner , Change settings
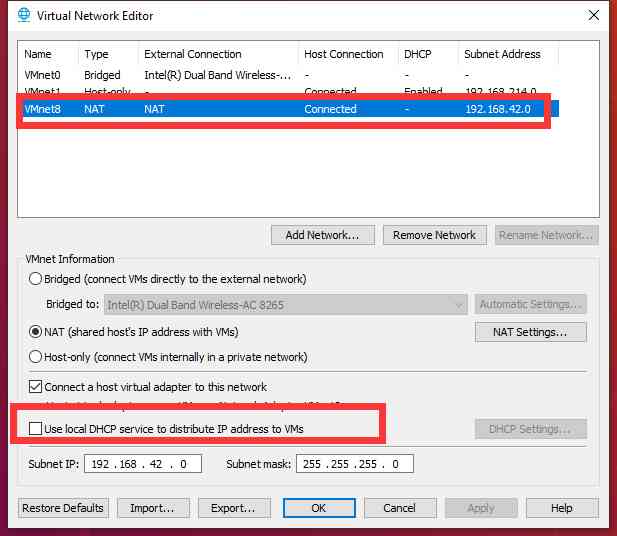
find VMnet8,NAT Pattern , Remove the use of local DHCP Services are assigned to virtual machines IP Address
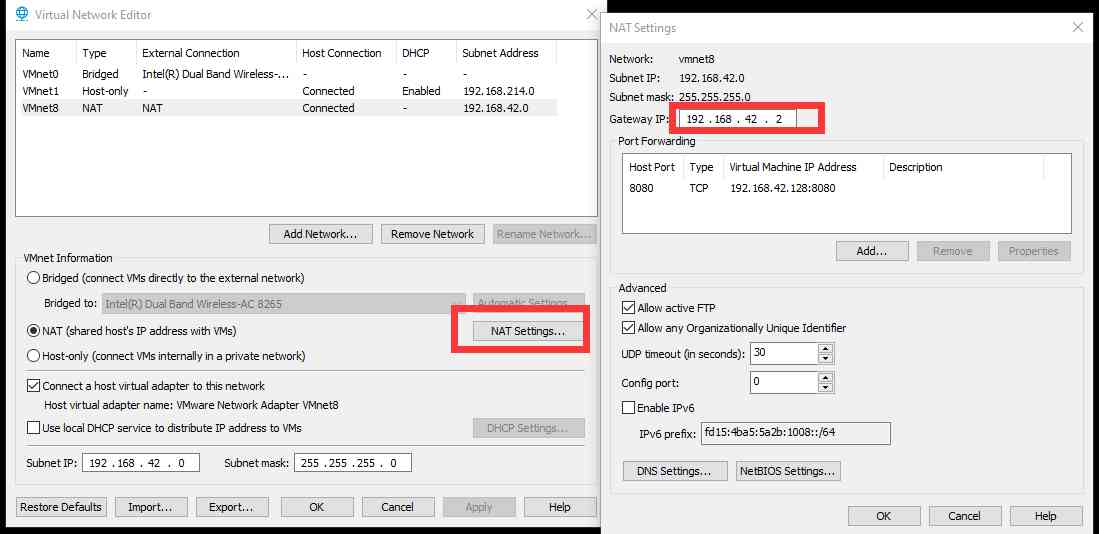
choice NAT Set up , see NAT gateway IP,Gateway IP, Here is 192.168.42.2, And the subnet mask is 255.255.255.0
open cmd terminal , Input ipconfig, see VMnet8 In the machine IPv4 Address
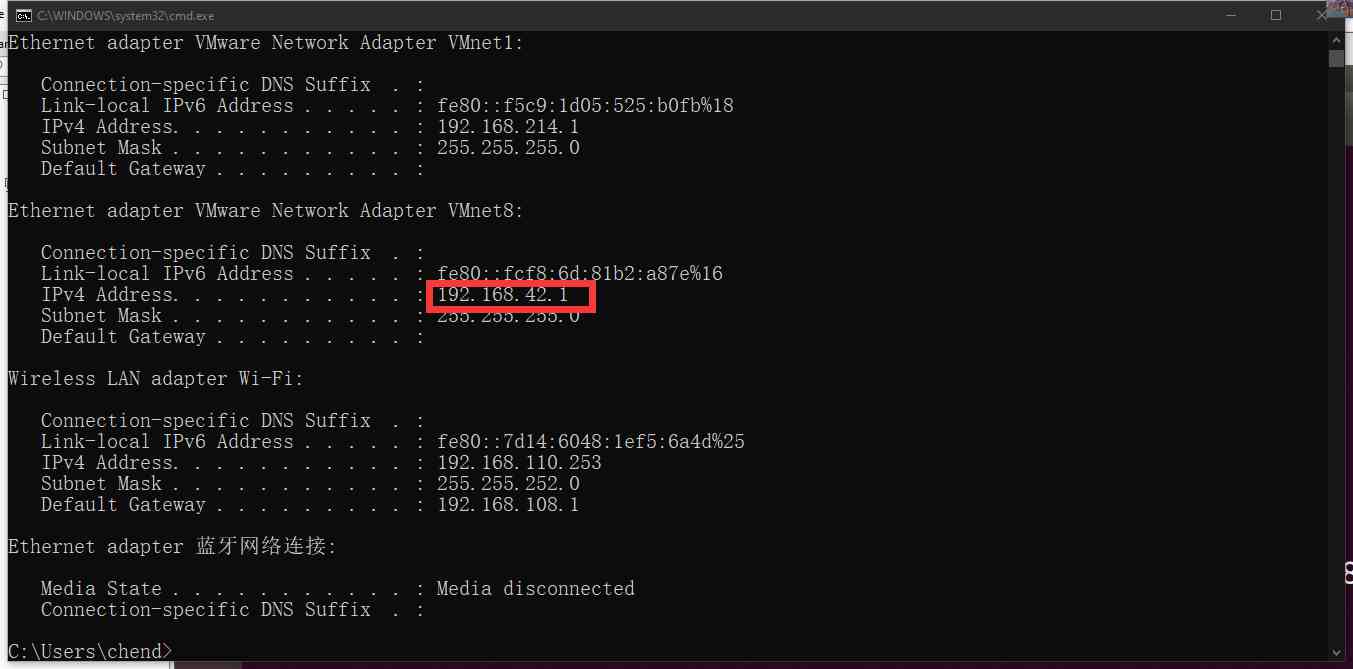
I am here 192.168.42.1, So far we've got 3 individual IP Address , They are as follows
- VMnet8 Network address of :192.168.42.0
- VMnet8 Gateway address for :192.168.42.2
- This machine VMnet8 Of IPv4 Address :192.168.42.1
Rewrite the configuration file
First, change Ubuntu18.04 The network connection mode is NAT, Then open the Ubuntu18.04 Terminal , First check your network name , Use ifconfig, Here is ens33
Then input ls /etc/netplan/
linkchen@master:~$ ls /etc/netplan/
01-network-manager-all.yaml
linkchen@master:~$
You can see a file ,01-network-manager-all.yaml
Enter the command sudo vim /etc/netplan/01-network-manager-all.yaml Edit the file
Specific modification items :【 Be careful yaml The alignment format and the space after the colon , Otherwise, there will be a mistake when it comes into effect later 】
- stay network Add Ethernet ethernets
- stay ethernets Add your network name in , Here is ens33
- stay ens33 Add 【 Notice the space after the colon 】
- dhcp4: no
- dhcp6: no
- addresses: [192.168.42.*/24], What we use here is CIDR The way of division , among * Can be in addition to 0、1、2 Anything less than 255 Number of numbers , because 0、1、2 By using , I'm going to set it to 100,addresses This property sets the static state of the virtual machine IP Address
- gateway4: 192.168.42.2, Here's what I've seen before VMnet8 default gateway
- add to nameservers, Domain name server , And configuration addresses: [114.114.114.114, 8.8.8.8], This one can be configured or not
All the contents are as follows
# Let NetworkManager manage all devices on this system
network:
  version: 2
  renderer: NetworkManager
  ethernets:
          ens33:
                  dhcp4: no
                  dhcp6: no
                  addresses: [192.168.42.100/24]
                  gateway4: 192.168.42.2
                  nameservers:
                          addresses: [114.114.114.114, 8.8.8.8]
After modification , Input sudo netplan apply, Input again ifconfig, see ip Does the address change
linkchen@master:~$ ifconfig
ens33: flags=4163<UP,BROADCAST,RUNNING,MULTICAST>  mtu 1500
        inet 192.168.42.100  netmask 255.255.255.0  broadcast 192.168.42.255
        inet6 fe80::20c:29ff:fec4:7cb  prefixlen 64  scopeid 0x20<link>
        ether 00:0c:29:c4:07:cb  txqueuelen 1000  (Ethernet)
        RX packets 3933  bytes 1728376 (1.7 MB)
        RX errors 0  dropped 0  overruns 0  frame 0
        TX packets 2033  bytes 226412 (226.4 KB)
        TX errors 0  dropped 0 overruns 0  carrier 0  collisions 0

lo: flags=73<UP,LOOPBACK,RUNNING>  mtu 65536
        inet 127.0.0.1  netmask 255.0.0.0
        inet6 ::1  prefixlen 128  scopeid 0x10<host>
        loop  txqueuelen 1000  (Local Loopback)
        RX packets 854  bytes 87847 (87.8 KB)
        RX errors 0  dropped 0  overruns 0  frame 0
        TX packets 854  bytes 87847 (87.8 KB)
        TX errors 0  dropped 0 overruns 0  carrier 0  collisions 0
restart VMnet8
This step is very important , Otherwise, the host will still ping No virtual machine , find VMnet8 Adapter , Select disable , Just turn it on in a few seconds
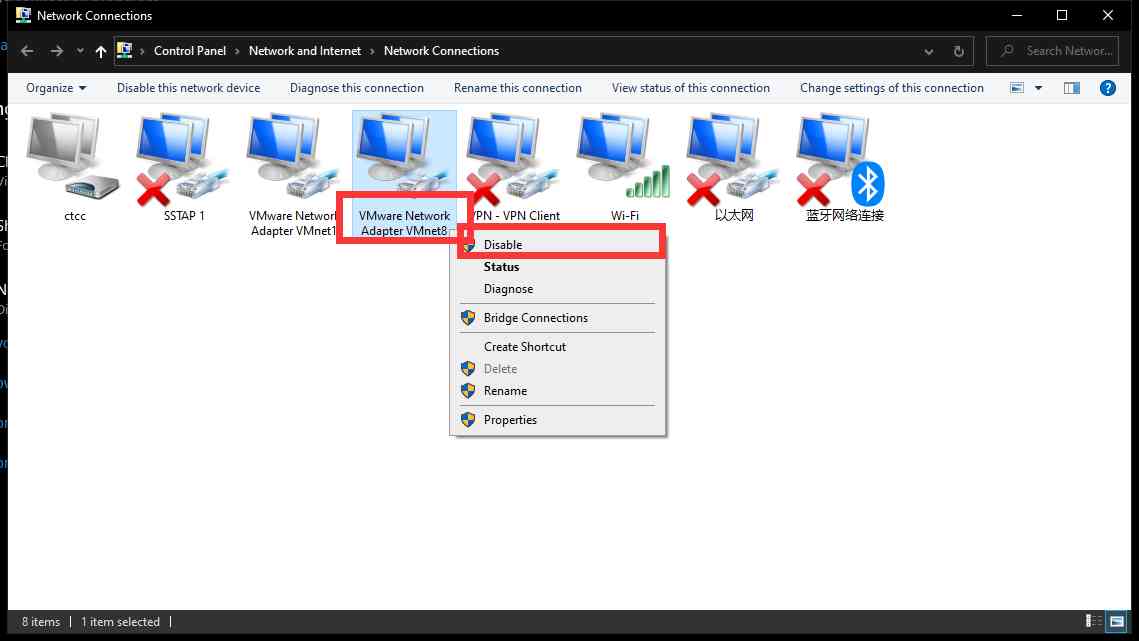
When the configuration is complete , You can use static IP Address to access the virtual machine , If you still can't connect , Can pass ping Check whether the host is connected to the virtual machine network , If it doesn't work, you can try to restart the host , If it is configured normally, restart it , Can use static IP To access the virtual machine


