当前位置:网站首页>Complete model training routine
Complete model training routine
2022-07-08 01:02:00 【booze-J】
article
1. Prepare the dataset
Here we take the data set CIFAR10 For example . About data sets CIFAR10 The introduction of can be seen in detail here , The use of data sets can refer to pytorch How to use data sets commonly used in
import torch
import torchvision
from torch import nn
from torch.nn import Sequential, Conv2d, MaxPool2d, Flatten, Linear
from torch.utils.data import DataLoader
from torch.utils.tensorboard import SummaryWriter
from model import Booze

#  Prepare the dataset
train_data = torchvision.datasets.CIFAR10(root='./CIFAR10',train=True,transform=torchvision.transforms.ToTensor(),download=True)
test_data = torchvision.datasets.CIFAR10(root='./CIFAR10',train=False,transform=torchvision.transforms.ToTensor(),download=True)
# length length
train_data_size = len(train_data)
test_data_size = len(test_data)
print(" The length of the training data set is :{}".format(train_data_size))
print(" The length of the test data set is :{}".format(test_data_size))
2. utilize DataLoader Load data set
DataLoader For specific use, please refer to the previous blog Dataloader Use
#  utilize dataloader  To load the dataset
train_dataloader = DataLoader(train_data,batch_size=64)
test_dataloader = DataLoader(test_data,batch_size=64)
3. Creating neural network models
Let's follow the following network model diagram , Create a single python file Used to write network models , For the construction of neural network, please refer to neural network - Use Sequential Building neural networks :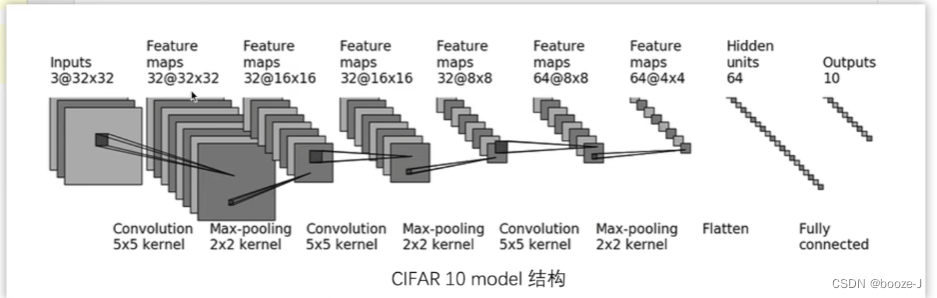
import torch
from torch import nn
from torch.nn import Sequential, Conv2d, MaxPool2d, Flatten, Linear
#  Building neural networks ( Open a separate file to store the network model )
class Booze(nn.Module):

    def __init__(self):
        super(Booze, self).__init__()
        self.model = Sequential(
            Conv2d(3, 32, 5, padding=2),
            MaxPool2d(2),
            Conv2d(32, 32, 5, padding=2),
            MaxPool2d(2),
            Conv2d(32, 64, 5, padding=2),
            MaxPool2d(2),
            Flatten(),
            Linear(1024, 64),
            Linear(64, 10)
        )


    def forward(self,x):
        x = self.model(x)
        return x

#  Verify the correctness of the network
if __name__ =="__main__":
    obj = Booze()
    input = torch.ones(64,3,32,32)
    output = obj(input)
    # torch.Size([64, 10])  You can see that he has 64 Row data , because batch_size=64, Then there is 10 Data , This data represents every picture of it 10 Probability in categories
    print(output.shape)
After building the network model, it is best to verify the correctness of the network model .
4. Create a loss function
Official documentation of loss function , Choose the appropriate loss function according to different situations , The simple use of loss function can be referred to Loss function and back propagation
#  Create a loss function
loss_fn = nn.CrossEntropyLoss()
5. Define optimizer
The simple use of optimizer can be referred to pytorch- Optimizer
#  Define optimizer
learning_rate = 0.01
optimizer = torch.optim.SGD(obj.parameters(),lr = learning_rate)
6. Set some parameters of the training network
These parameters are optional , Like epoch It can also be written directly in the loop , Setting a variable alone is for better modification , And more clearly , and total_train_step and total_test_step It can be used to calculate the number of steps , In the use of tensorboard When visualizing the incoming parameters .
#  Set some parameters of the training network
#  Record the number of workouts
total_train_step=0
#  Record the number of tests
total_test_step=0
#  Number of training rounds
epoch = 10
7. model training
for i in range(epoch):
    print("------------- The first {} Round of training begins ------------".format(i+1))
    #  The training steps begin  [train()](https://pytorch.org/docs/stable/generated/torch.nn.Module.html#torch.nn.Module.train)
    obj.train()
    for data in train_dataloader:
        imgs,targets = data
        outputs = obj(imgs)
        #  Calculate the loss between the output value and the target value
        loss = loss_fn(outputs,targets)

        #  Optimizer optimization model :
        #  Use the optimizer to clear the gradient
        optimizer.zero_grad()
        #  A gradient of each parameter node is obtained by back propagation
        loss.backward()
        optimizer.step()

        total_train_step += 1
        #  every other 100 Step   Print and add to tensorboard Once in a while
        if total_train_step%100==0:
            print(" Training times :{},Loss:{}".format(total_train_step,loss.item()))
            writer.add_scalar("train_loss",loss.item(),total_train_step)
There is another point that needs to be popularized ,writer.add_scalar("train_loss",loss.item(),total_train_step) You can see that the second parameter here is loss.item(), that item() What is the function of ?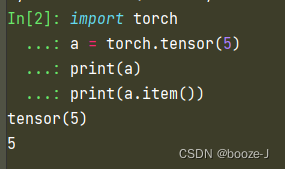
It can be seen from this that item() The function of method , Is equivalent to tensor The number in the data type is taken out . If you don't understand, you can still watch Official documents The explanation of .
8. Model test
for i in range(epoch):
    print("------------- The first {} Round of training begins ------------".format(i+1))
    #  The training steps begin  [train()](https://pytorch.org/docs/stable/generated/torch.nn.Module.html#torch.nn.Module.train)
    obj.train()
    for data in train_dataloader:
        imgs,targets = data
        outputs = obj(imgs)
        #  Calculate the loss between the output value and the target value
        loss = loss_fn(outputs,targets)

        #  Optimizer optimization model :
        #  Use the optimizer to clear the gradient
        optimizer.zero_grad()
        #  A gradient of each parameter node is obtained by back propagation
        loss.backward()
        optimizer.step()

        total_train_step += 1
        if total_train_step%100==0:
            print(" Training times :{},Loss:{}".format(total_train_step,loss.item()))
            writer.add_scalar("train_loss",loss.item(),total_train_step)

    #  The test step begins :
    #  Note that there is no need to tune the model in the process of testing
    obj.eval()   # [eval()](https://pytorch.org/docs/stable/generated/torch.nn.Module.html#torch.nn.Module.eval)
    total_test_loss = 0
    total_accuracy = 0
    with torch.no_grad():
        for data in test_dataloader:
            imgs,targets = data
            outputs = obj(imgs)
            loss = loss_fn(outputs,targets)
            total_test_loss+=loss
            accurcay = (outputs.argmax(1)==targets).sum()
            total_accuracy+=accurcay

    print(" On the overall test set Loss:{}".format(total_test_loss))
    print(" Accuracy on the overall test set :{}".format(total_accuracy/test_data_size))
    writer.add_scalar("test_accuracy",total_accuracy/test_data_size,total_test_step)
    writer.add_scalar('test_loss',total_test_loss,total_test_step)
    total_test_step+=1
You can see before training , There is a sentence. obj.train(), There is a sentence before the test obj.eval() What are their functions ?
You can see Official documents Yes train() and eval() The explanation of
- train() - This has any effect only on certain modules. See documentations of particular modules for details of their behaviors in training/evaluation mode, if they are affected, e.g. Dropout, BatchNorm, etc.
- eval() - This has any effect only on certain modules. See documentations of particular modules for details of their behaviors in training/evaluation mode, if they are affected, e.g. Dropout, BatchNorm, etc.
Add these two sentences to the general meaning , It will have an impact on the training and testing of some network layers of the network model , It is suggested to add .
In addition, the above also involves the calculation accuracy , A method is used at this time argmax You can see Official documents Yes argmax The explanation of :
- Returns the indices of the maximum value of all elements in the input tensor.
Generally speaking, it means to tensor The index value of the maximum value in the data returns , When encountering classification problems , Usually return outputs It's a tensor List of data types , Each data in the list represents the probability that the test sample belongs to each category , Use argmax Taking the maximum value is equivalent to taking the type with the greatest probability . By comparing the predicted category with the target category, we can judge whether the prediction is correct , By comparing all the test samples, we can get the correct number of predictions , Then divide the number of correct predictions by the total number of test samples , Then we can get the prediction accuracy .
#  Calculate the number of predicted categories in a batch consistent with the target category ( Calculate the number of correct forecasts for a batch )
accurcay = (outputs.argmax(1)==targets).sum()
#  Add up the number of predicted types of all batches that are consistent with the target type to get the number of predicted correct in the test sample
total_accuracy+=accurcay
#  Divide the number of correct predictions by the total number of predictions to get the prediction accuracy
print(" Accuracy on the overall test set :{}".format(total_accuracy/test_data_size))
9. Visualization of training and testing process
This part of the code is interspersed in the training and testing code , Is the use of tensorboard Visualize the training process , For specific use, please refer to the previous Tensorboard Use .
#  add to tensorboard
writer = SummaryWriter("logs")

for i in range(epoch):
    print("------------- The first {} Round of training begins ------------".format(i+1))
    #  The training steps begin  [train()](https://pytorch.org/docs/stable/generated/torch.nn.Module.html#torch.nn.Module.train)
    obj.train()
    for data in train_dataloader:
        imgs,targets = data
        outputs = obj(imgs)
        #  Calculate the loss between the output value and the target value
        loss = loss_fn(outputs,targets)

        #  Optimizer optimization model :
        #  Use the optimizer to clear the gradient
        optimizer.zero_grad()
        #  A gradient of each parameter node is obtained by back propagation
        loss.backward()
        optimizer.step()

        total_train_step += 1
        if total_train_step%100==0:
            print(" Training times :{},Loss:{}".format(total_train_step,loss.item()))
            writer.add_scalar("train_loss",loss.item(),total_train_step)

    #  The test step begins :
    #  Note that there is no need to tune the model in the process of testing
    obj.eval()   # [eval()](https://pytorch.org/docs/stable/generated/torch.nn.Module.html#torch.nn.Module.eval)
    total_test_loss = 0
    total_accuracy = 0
    with torch.no_grad():
        for data in test_dataloader:
            imgs,targets = data
            outputs = obj(imgs)
            loss = loss_fn(outputs,targets)
            total_test_loss+=loss
            accurcay = (outputs.argmax(1)==targets).sum()
            total_accuracy+=accurcay

    print(" On the overall test set Loss:{}".format(total_test_loss))
    print(" Accuracy on the overall test set :{}".format(total_accuracy/test_data_size))
    writer.add_scalar("test_accuracy",total_accuracy/test_data_size,total_test_step)
    writer.add_scalar('test_loss',total_test_loss,total_test_step)
    total_test_step+=1
10. Save model
Specific use can also refer to the previous Save and read the network model
#  Here is a format() format , Because the models of each batch are saved , Avoid duplicate naming , Lead to the coverage of the network model .
torch.save(obj,"./model/obj_{}.pth".format(i))
print(" Model saved ")
Complete code :
train.py
import torch
import torchvision
from torch import nn
from torch.nn import Sequential, Conv2d, MaxPool2d, Flatten, Linear
from torch.utils.data import DataLoader
from torch.utils.tensorboard import SummaryWriter
from model import Booze

#  Prepare the dataset
train_data = torchvision.datasets.CIFAR10(root='./CIFAR10',train=True,transform=torchvision.transforms.ToTensor(),download=True)
test_data = torchvision.datasets.CIFAR10(root='./CIFAR10',train=False,transform=torchvision.transforms.ToTensor(),download=True)

# length length
train_data_size = len(train_data)
test_data_size = len(test_data)
print(" The length of the training data set is :{}".format(train_data_size))
print(" The length of the test data set is :{}".format(test_data_size))

#  utilize dataloader  To load the dataset
train_dataloader = DataLoader(train_data,batch_size=64)
test_dataloader = DataLoader(test_data,batch_size=64)


#  Create a network model
obj = Booze()

#  Create a loss function
loss_fn = nn.CrossEntropyLoss()

#  Define optimizer
learning_rate = 0.01
optimizer = torch.optim.SGD(obj.parameters(),lr = learning_rate)


#  Set some parameters of the training network
#  Record the number of workouts
total_train_step=0
#  Record the number of tests
total_test_step=0
#  Number of training rounds
epoch = 10

#  add to tensorboard
writer = SummaryWriter("logs")


for i in range(epoch):
    print("------------- The first {} Round of training begins ------------".format(i+1))
    #  The training steps begin  [train()](https://pytorch.org/docs/stable/generated/torch.nn.Module.html#torch.nn.Module.train)
    obj.train()
    for data in train_dataloader:
        imgs,targets = data
        outputs = obj(imgs)
        #  Calculate the loss between the output value and the target value
        loss = loss_fn(outputs,targets)

        #  Optimizer optimization model :
        #  Use the optimizer to clear the gradient
        optimizer.zero_grad()
        #  A gradient of each parameter node is obtained by back propagation
        loss.backward()
        optimizer.step()

        total_train_step += 1
        if total_train_step%100==0:
            print(" Training times :{},Loss:{}".format(total_train_step,loss.item()))
            writer.add_scalar("train_loss",loss.item(),total_train_step)

    #  The test step begins :
    #  Note that there is no need to tune the model in the process of testing
    obj.eval()   # [eval()](https://pytorch.org/docs/stable/generated/torch.nn.Module.html#torch.nn.Module.eval)
    total_test_loss = 0
    total_accuracy = 0
    with torch.no_grad():
        for data in test_dataloader:
            imgs,targets = data
            outputs = obj(imgs)
            loss = loss_fn(outputs,targets)
            total_test_loss+=loss
            accurcay = (outputs.argmax(1)==targets).sum()
            total_accuracy+=accurcay

    print(" On the overall test set Loss:{}".format(total_test_loss))
    print(" Accuracy on the overall test set :{}".format(total_accuracy/test_data_size))
    writer.add_scalar("test_accuracy",total_accuracy/test_data_size,total_test_step)
    writer.add_scalar('test_loss',total_test_loss,total_test_step)
    total_test_step+=1

    torch.save(obj,"./model/obj_{}.pth".format(i))
    print(" Model saved ")

writer.close()
model.py
import torch
from torch import nn
from torch.nn import Sequential, Conv2d, MaxPool2d, Flatten, Linear
#  Building neural networks ( Open a separate file to store the network model )
class Booze(nn.Module):

    def __init__(self):
        super(Booze, self).__init__()
        self.model = Sequential(
            Conv2d(3, 32, 5, padding=2),
            MaxPool2d(2),
            Conv2d(32, 32, 5, padding=2),
            MaxPool2d(2),
            Conv2d(32, 64, 5, padding=2),
            MaxPool2d(2),
            Flatten(),
            Linear(1024, 64),
            Linear(64, 10)
        )


    def forward(self,x):
        x = self.model(x)
        return x

#  Verify the correctness of the network
if __name__ =="__main__":
    obj = Booze()
    input = torch.ones(64,3,32,32)
    output = obj(input)
    # torch.Size([64, 10])  You can see that he has 64 Row data , because batch_size=64, Then there is 10 Data , This data represents every picture of it 10 Probability in categories
    print(output.shape)
边栏推荐
- [necessary for R & D personnel] how to make your own dataset and display it.
- 完整的模型验证(测试,demo)套路
- 9. Introduction to convolutional neural network
- [deep learning] AI one click to change the sky
- AI遮天传 ML-回归分析入门
- ABAP ALV LVC template
- What does interface testing test?
- 10.CNN应用于手写数字识别
- Huawei switch s5735s-l24t4s-qa2 cannot be remotely accessed by telnet
- Codeforces Round #804 (Div. 2)(A~D)
猜你喜欢

Get started quickly using the local testing tool postman
fabulous! How does idea open multiple projects in a single window?
Kubernetes static pod (static POD)

基于人脸识别实现课堂抬头率检测

130. Surrounding area
New library online | cnopendata China Star Hotel data
![[deep learning] AI one click to change the sky](/img/74/f2e854b9f24129bcd9376733c2369f.png)
[deep learning] AI one click to change the sky
完整的模型训练套路
Su embedded training - Day9
![[Yugong series] go teaching course 006 in July 2022 - automatic derivation of types and input and output](/img/79/f5cffe62d5d1e4a69b6143aef561d9.png)
[Yugong series] go teaching course 006 in July 2022 - automatic derivation of types and input and output
随机推荐
Hotel
手写一个模拟的ReentrantLock
4.交叉熵
10.CNN应用于手写数字识别
基于微信小程序开发的我最在行的小游戏
Tapdata 的 2.0 版 ,开源的 Live Data Platform 现已发布
How is it most convenient to open an account for stock speculation? Is it safe to open an account on your mobile phone
基础篇——整合第三方技术
9. Introduction to convolutional neural network
NVIDIA Jetson test installation yolox process record
50Mhz产生时间
swift获取url参数
Su embedded training - Day9
6.Dropout应用
Which securities company has a low, safe and reliable account opening commission
新库上线 | 中国记者信息数据
letcode43:字符串相乘
Analysis of 8 classic C language pointer written test questions
Hotel
新库上线 | CnOpenData中国星级酒店数据