当前位置:网站首页>STM32 learning record: play with keys to control buzzer and led
STM32 learning record: play with keys to control buzzer and led
2022-07-06 15:32:00 【Bitter tea seeds】
List of articles
STM32F103ZE: Punctual atomic elite board , Call the library to write independent keys , Control buzzer and LED.
List of articles
Preface
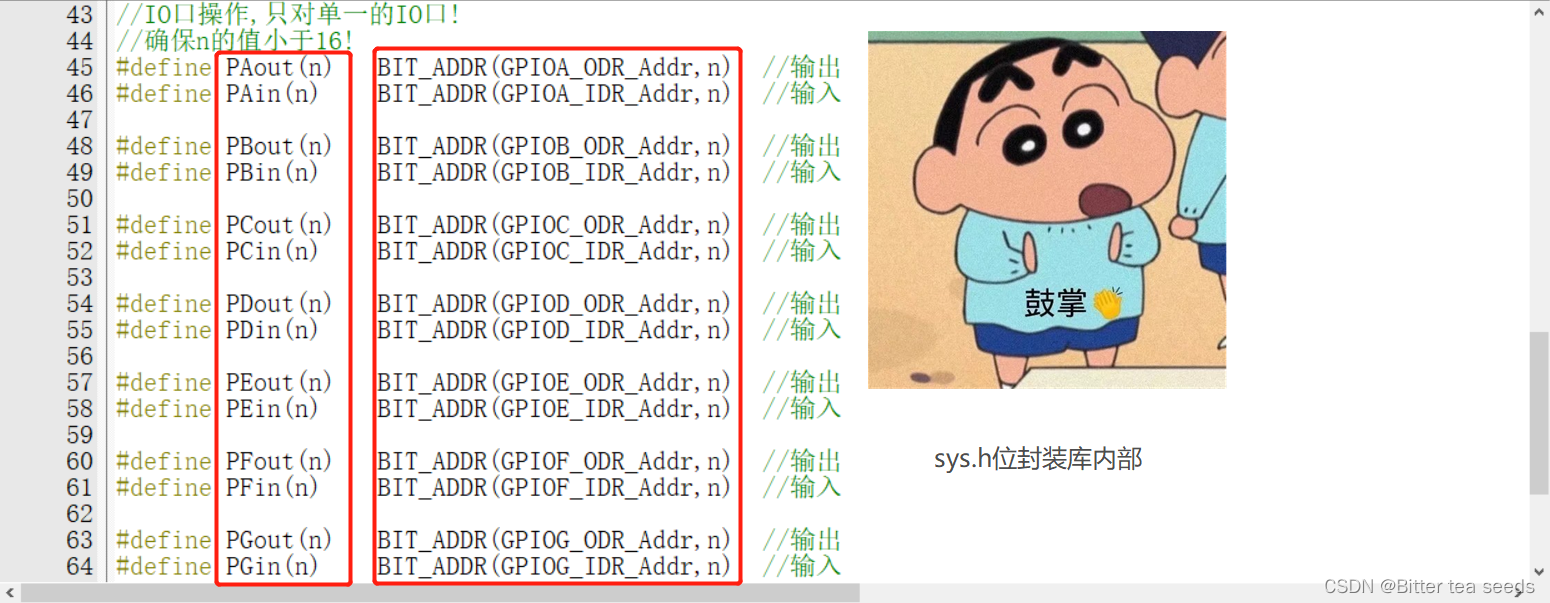
First call the library to write the control program of independent keys , Then the bit operation is carried out through the bit library encapsulated in advance , For buzzer and LED Compiling .
One 、 Yes key.c Compiling
Look at the schematic 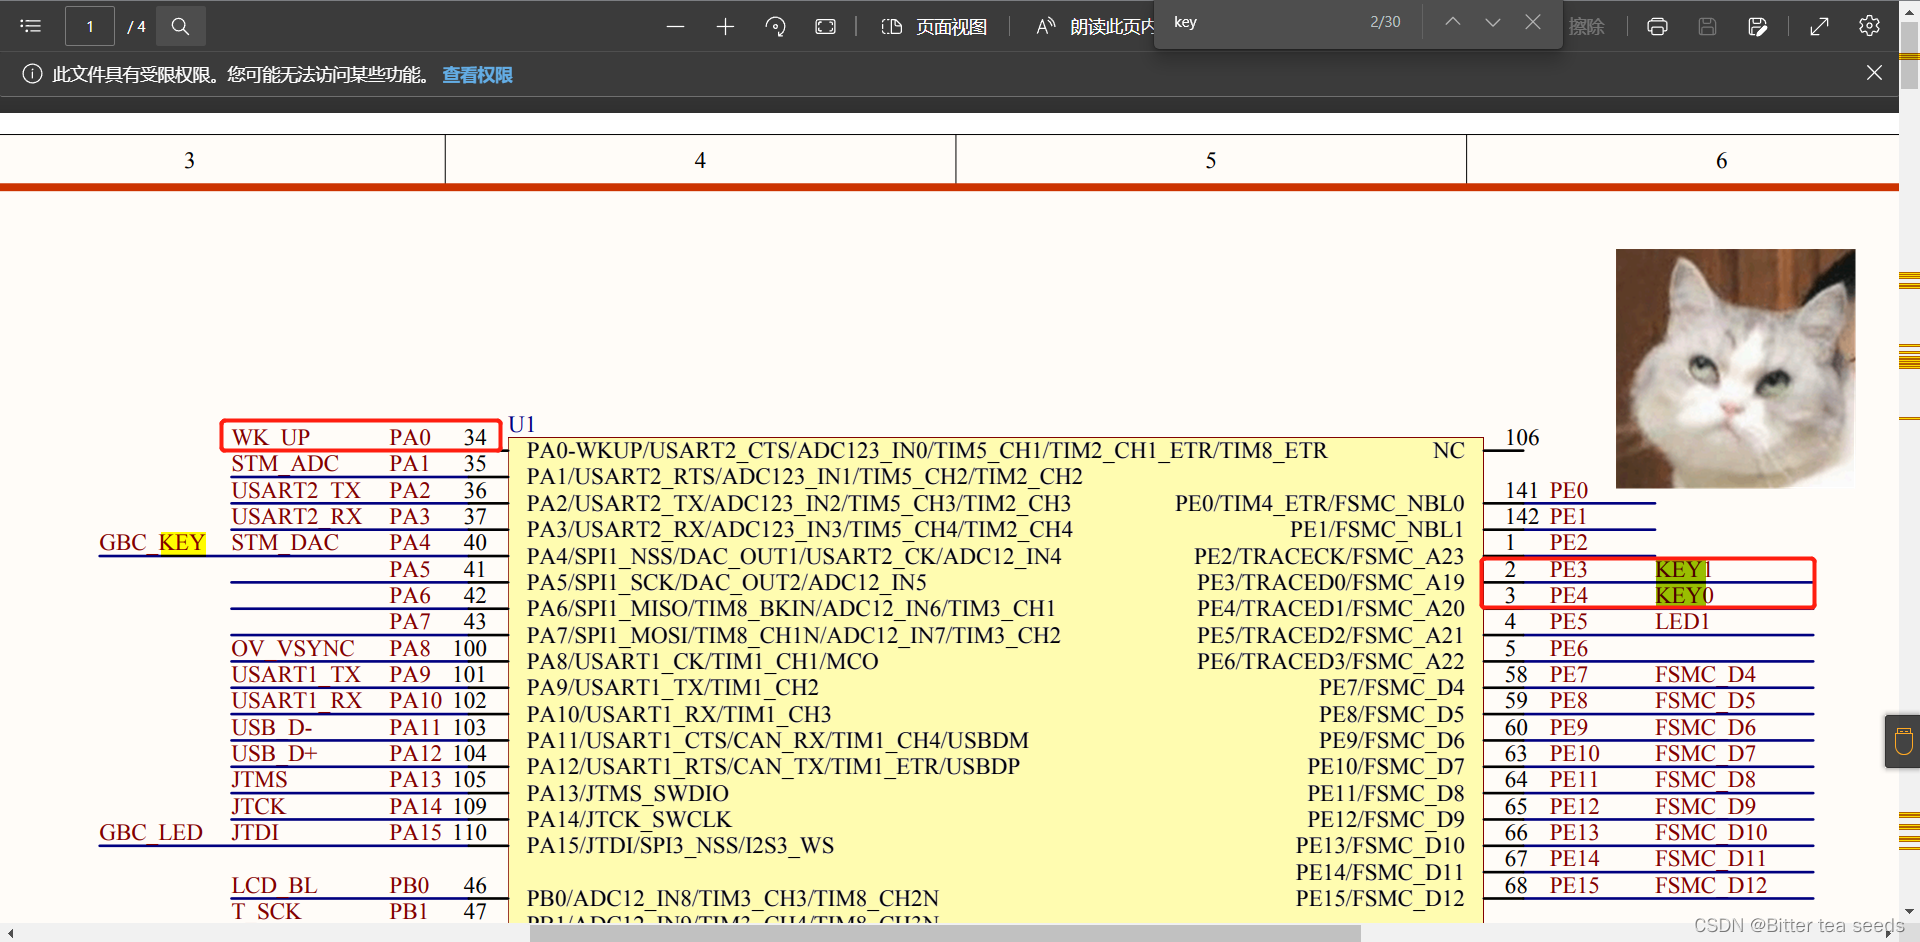
You can find , Key KEY_UP stay PA0 Pin 、KEY0 stay PE4、KEY1 stay PE3;
1. to key.h The creation of a header file
The procedure is as follows
#ifndef __key_H
#define __key_H
#include "sys.h"
#define KEY0 GPIO_ReadInputDataBit(GPIOE,GPIO_Pin_4)
#define KEY1 GPIO_ReadInputDataBit(GPIOE,GPIO_Pin_3)
#define KEY_UP GPIO_ReadInputDataBit(GPIOA,GPIO_Pin_0)
#define KEY0_PRESS 1
#define KEY1_PRESS 2
#define KEYUP_PRESS 3

void KEY_Init(void);
u8 KEY_Scan(u8);// Scan function

#endif
2.key.c The program on
Click the library encapsulated in advance , find gpio.c file 
GPIO Initialization and RCC The enabling function is gpio.h and rcc.h in , Double click to open them 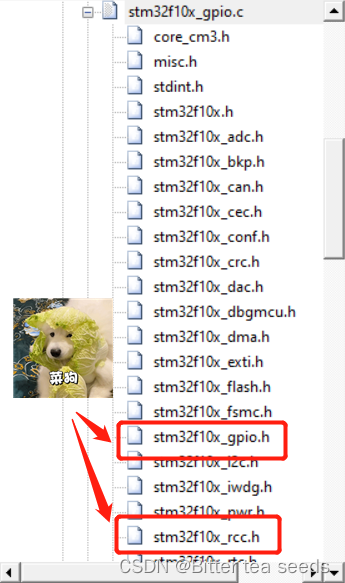
Find the function to use
GPIO Initialization function 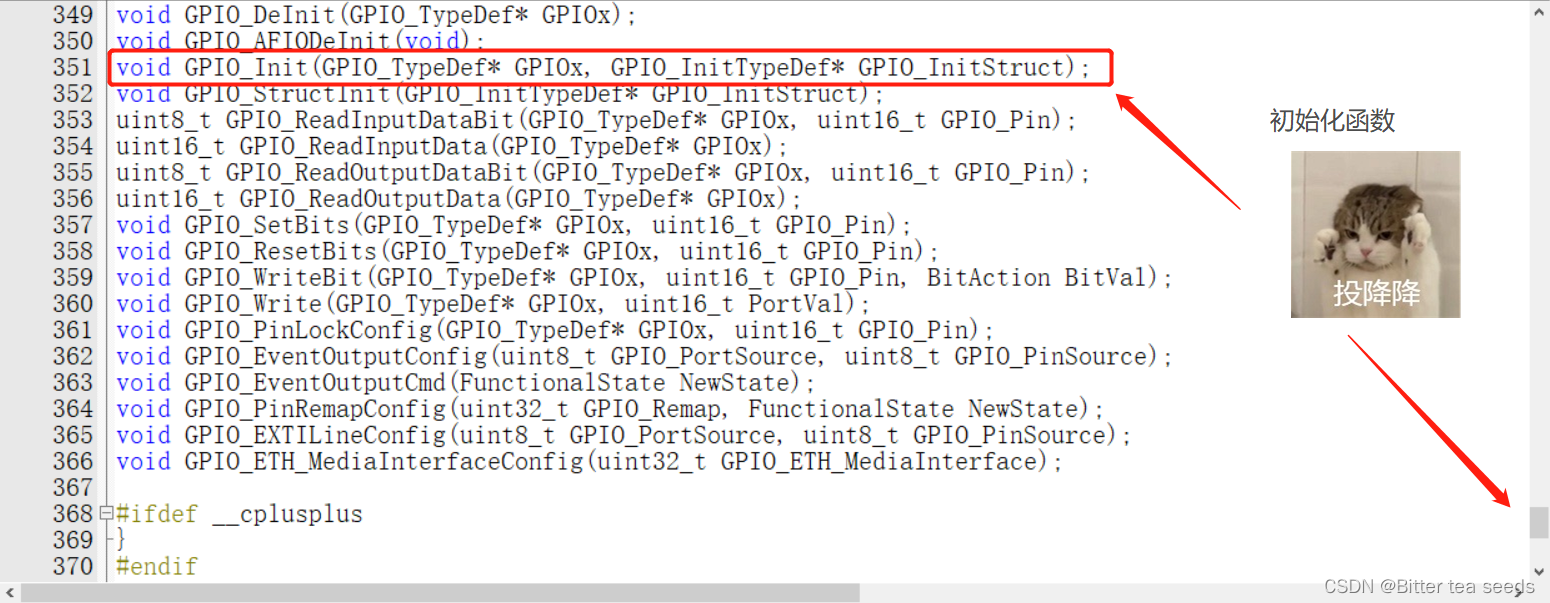
RCC->APB2 Enable function 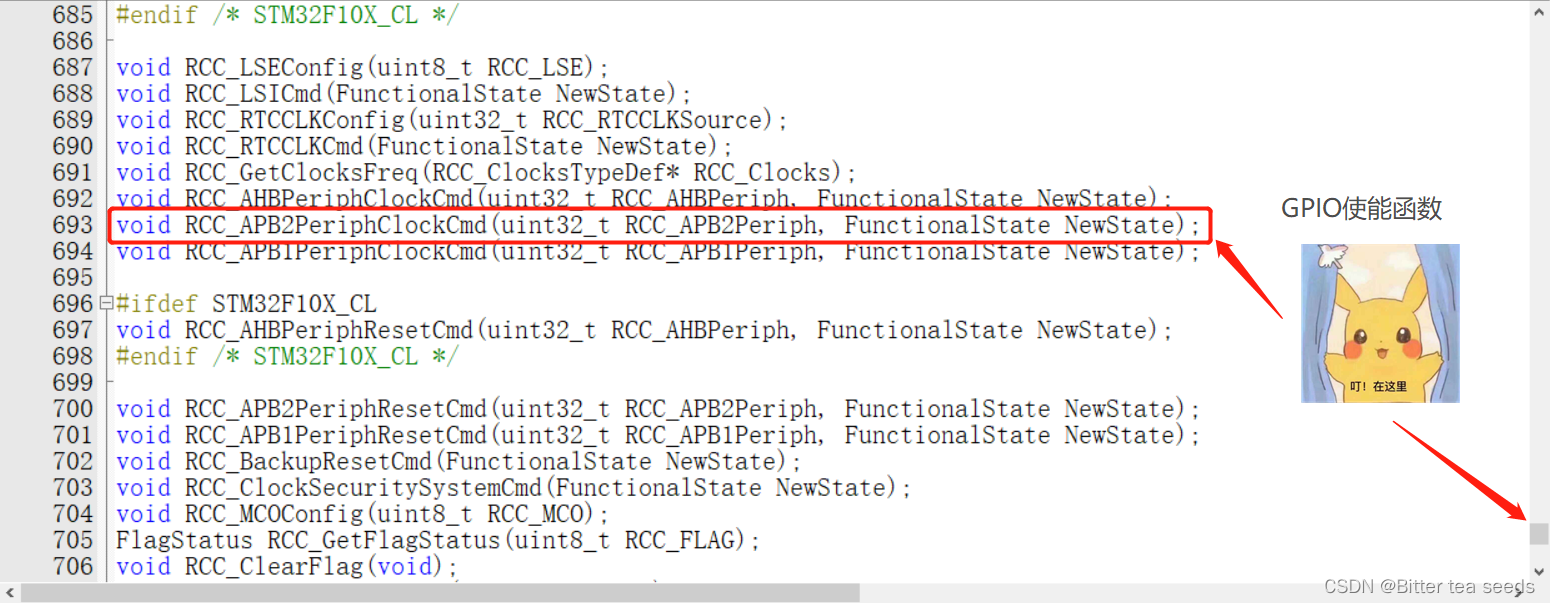
KEY_Init Initialize the function program
void KEY_Init(void)
{

		GPIO_InitTypeDef  GPIO_InitStruct;//
		RCC_APB2PeriphClockCmd(RCC_APB2Periph_GPIOA|RCC_APB2Periph_GPIOE,ENABLE);// Can make GPIOA、GPIOE
		GPIO_InitStruct.GPIO_Pin=GPIO_Pin_3|GPIO_Pin_4;// port 3、4
		GPIO_InitStruct.GPIO_Mode=GPIO_Mode_IPU;// Pull up mode
		GPIO_Init(GPIOE,&GPIO_InitStruct);//GPIOE initialization

		GPIO_InitStruct.GPIO_Pin=GPIO_Pin_0;
		GPIO_InitStruct.GPIO_Mode=GPIO_Mode_IPD;// Drop down mode
		GPIO_Init(GPIOA,&GPIO_InitStruct);
}
You can see , These two functions are used , The rest are selected on this basis “ To configure ”, See what Chuan Shen is , Just configure it .
KEY_Scan() Key scan function
key_up It's a static parameter , keep key_up++,mode It's a parameter , It is used to determine the mode of keys , Is a continuous key , Or just one button ( Only press once ); And mode by 0 continuity ,mode by 1 Only one
u8 KEY_Scan(u8 mode)// Key scan function
{

		static u8 key_up=1;
		if(mode)key_up=1;// Press continuously
		if(key_up&&(KEY0==0||KEY1==0||KEY_UP==1))
		{

				delay_ms(10);
				key_up=0;
				if(KEY0==0)return KEY0_PRESS;
				else if(KEY1==0)return KEY1_PRESS;
				else if(KEY_UP==1)return KEYUP_PRESS;
		}
		else if(KEY0==1&&KEY1==1&&KEY_UP==0)key_up=1;
		return 0;
}
Two 、 Yes main.c Programming
1.LED、BEEP Define header file
LED.h
The code is as follows ( Shown ):
#ifndef __led_H
#define __led_H
#include "sys.h"
#define LED0 PBout(5)// PB5
#define LED1 PEout(5)// PE5
void LED_Init(void);

#endif
BEEP.h
The code is as follows ( Shown ):
#ifndef __BEEP_H
#define __BEEP_H
#include "sys.h"
#define BEEP PBout(8) // BEEP, Buzzer interface

void BEEP_Init(void);	// initialization

#endif
2.main.c
The code is as follows ( Shown ):
#include "led.h"
#include "delay.h"
#include "key.h"
#include "sys.h"
#include "beep.h"

int main(void)
 {

			u8 key=0;
			delay_init();
			LED_Init();
			BEEP_Init();
			KEY_Init();
			LED0=0;
			while(1)
			{

					key=KEY_Scan(0);	// Get the key value
					if(key)
					{

							switch(key)
							{

									case KEYUP_PRESS:BEEP=!BEEP;break;
									case KEY1_PRESS:LED1=!LED1;break;
									case KEY0_PRESS:LED0=!LED0;LED1=!LED1;break;
							}
					}else delay_ms(10);
	}
}
3、 ... and 、 Macro definition calls library method
1.key.h The header file
The code is as follows , Shown
#ifndef __KEY_H
#define __KEY_H
#include "stm32f10x.h"

//  Pin definition
#define KEY1_GPIO_CLK RCC_APB2Periph_GPIOE
#define KEY1_GPIO_PORT GPIOE
#define KEY1_GPIO_PIN GPIO_Pin_3

#define KEY0_GPIO_CLK RCC_APB2Periph_GPIOE
#define KEY0_GPIO_PORT GPIOE
#define KEY0_GPIO_PIN GPIO_Pin_4

#define KEY_UP_GPIO_CLK RCC_APB2Periph_GPIOA
#define KEY_UP_GPIO_PORT GPIOA
#define KEY__UP_GPIO_PIN GPIO_Pin_0

#define KEY_ON 1
#define KEY_OFF 0

void Key_GPIO_Init(void);
uint8_t Key_Scan(GPIO_TypeDef* GPIOx,uint16_t GPIO_Pin);

#endif
2.key.c Programming
The code is as follows , Shown
#include "stm32f10x.h"
#include "key.h"

void Key_GPIO_Init(void)
{

	GPIO_InitTypeDef GPIO_InitStructure;

	/* Turn on the clock of the key port */
	RCC_APB2PeriphClockCmd(KEY0_GPIO_CLK|KEY1_GPIO_CLK|KEY_UP_GPIO_CLK,ENABLE);

	// Select the pin of the key
	GPIO_InitStructure.GPIO_Pin = KEY0_GPIO_PIN;
	//  Set the pin of the key as pull-up input
	GPIO_InitStructure.GPIO_Mode = GPIO_Mode_IPU;
	// Use the structure initialization key
	GPIO_Init(KEY0_GPIO_PORT, &GPIO_InitStructure);

	// Select the pin of the key
	GPIO_InitStructure.GPIO_Pin = KEY1_GPIO_PIN;
	// Set the pin of the key as pull-up input
	GPIO_InitStructure.GPIO_Mode = GPIO_Mode_IPU;
	// Use the structure initialization key
	GPIO_Init(KEY1_GPIO_PORT, &GPIO_InitStructure);

	// Select the pin of the key
	GPIO_InitStructure.GPIO_Pin =  KEY__UP_GPIO_PIN;
	// Set the pin of the key as the pull-down input
	GPIO_InitStructure.GPIO_Mode = GPIO_Mode_IPD;
	// Use the structure initialization key
	GPIO_Init(KEY_UP_GPIO_PORT, &GPIO_InitStructure);
}

uint8_t Key_Scan(GPIO_TypeDef* GPIOx,uint16_t GPIO_Pin)
{

	/* Check if a key is pressed  */
	if(GPIO_ReadInputDataBit(GPIOx,GPIO_Pin) == KEY_ON )
	{

		/* Wait for the key to release  */
		while(GPIO_ReadInputDataBit(GPIOx,GPIO_Pin) == KEY_ON);
		return 	KEY_ON;
	}
	else
		return KEY_OFF;
}
3.main.c Programming
The code is as follows , Shown
#include "led.h"
#include "key.h"

 int main(void)
{

	/* LED Port initialization  */
	LED_Init();
	LED0=0;
	/*  Key port initialization  */
	Key_GPIO_Init();

	/*  Turn the key state , If the key is pressed, it will be reversed LED */
	/* Press in turn KEY0、KEY1*/
	while(1)
	{

		if( Key_Scan(KEY1_GPIO_PORT,KEY1_GPIO_PIN) == KEY_ON  )
		{

			/*LED1 reverse */
			LED1=!LED1;
		}

		if( Key_Scan(KEY0_GPIO_PORT,KEY0_GPIO_PIN) == KEY_ON  )
		{

			/*LED0 reverse */
			LED0=!LED0;
		}
	}
}
Four 、 Experimental phenomena
Press KEY_UP The buzzer is on , Press again to close ,KEY1 control LED1( A green light ) The flip state of ,KEY0 control LED1 and LED0 The flip state of .
Play with the key to control the buzzer and LED
边栏推荐
- 学习记录:串口通信和遇到的错误解决方法
- ArrayList set
- ucore lab5用户进程管理 实验报告
- Introduction to safety testing
- Sorting odd and even subscripts respectively for leetcode simple problem
- Which version of MySQL does php7 work best with?
- JS --- all basic knowledge of JS (I)
- [C language] twenty two steps to understand the function stack frame (pressing the stack, passing parameters, returning, bouncing the stack)
- A method and implementation of using VSTO to prohibit excel cell editing
- Take you to use wxpy to create your own chat robot (plus wechat interface basic data visualization)
猜你喜欢
Es6---es6 content details
Want to change jobs? Do you know the seven skills you need to master in the interview software test
Threads et pools de threads
The most detailed postman interface test tutorial in the whole network. An article meets your needs
学习记录:USART—串口通讯

STM32 learning record: input capture application

What are the commonly used SQL statements in software testing?
12306: mom, don't worry about me getting the ticket any more (1)
自动化测试中敏捷测试怎么做?
Take you to use wxpy to create your own chat robot (plus wechat interface basic data visualization)

随机推荐
遇到程序员不修改bug时怎么办?我教你
Iterators and generators
The maximum number of words in the sentence of leetcode simple question
学习记录:USART—串口通讯
The number of reversing twice in leetcode simple question
ucore lab 6
学习记录:STM32F103 时钟系统概述工作原理
软件测试面试回答技巧
UCORE lab7 synchronous mutual exclusion experiment report
Jupyter installation and use tutorial
学习记录:理解 SysTick系统定时器,编写延时函数
ucore lab5用户进程管理 实验报告
Introduction to safety testing
LeetCode#62. Different paths
Interface test interview questions and reference answers, easy to grasp the interviewer
ucorelab4
几款开源自动化测试框架优缺点对比你知道吗?
Brief introduction to libevent
安全测试入门介绍
Flex --- detailed explanation of flex layout attributes