当前位置:网站首页>[kubernetes series] learn the exposed application of kubernetes service security
[kubernetes series] learn the exposed application of kubernetes service security
2022-07-06 02:45:00 【Half body wind and snow】
author : Half body wind and snow
Previous section :K8S in Pod Life cycle of
brief introduction : We learned together in the last section ,Kubernetes application Pod Three states of the life cycle Pending -> Running -> Succeeded/Failed. Content of this section , We will learn how to expose our application together .
Service Safe exposure application
The goal is
- Study Kubernetes Medium Service
- understand label (Label) and tag chooser (Label Selector) How objects relate to Service relation
- Use Service Connect to the app
- stay Kubernetes Cluster external use Service Exposed applications
One 、 What is? Kubernetes Service
In the last section , We have learned pod Life cycle of , When a job Node After hanging up , stay Node Running on Pod Will die . ReplicaSet Will automatically create a new Pod Drive the cluster back to the target state , To ensure the normal operation of the application .
Kubernetes In the service (Service) It's an abstract concept , It defines the Pod Logical set and access Pod The agreement .Service Make subordinate Pod It is possible to synthesize the loose coupling between the two . And others Kubernetes object , Service use YAML ( More recommended ) perhaps JSON To define Service The next group Pod Usually by LabelSelector To mark .
Although each Pod There's a unique one IP Address , But if not Service , these IP Not exposed outside the cluster .Service Allow your app to receive traffic .Service It can also be used in ServiceSpec Mark type The way to expose
- ClusterIP ( Default ) - Inside the cluster IP Go public Service . This type makes Service Can only be accessed from within the cluster .
- NodePort - Use NAT In the cluster, each selected Node On the same port of Service . Use
<NodeIP>:<NodePort>Access from outside the cluster Service. yes ClusterIP Superset . - LoadBalancer - Create an external load balancer in the current cloud ( If you support it ), And for Service Assign a fixed external IP. yes NodePort Superset .
- ExternalName - By returning CNAME Record , Use any name ( from spec Medium externalName Appoint ) Open Service. Don't use agents . This type requires kube-dns Of v1.7 Or later .
Two 、 Use Service Connect to the app
Kubernetes hypothesis Pod Can be used with other Pod signal communication , No matter which host they are on . Kubernetes To every one. Pod Assign a cluster private IP Address , So there's no need to be in Pod And Pod Create a connection between or map the port of the container to the host port . It means the same Pod All containers inside can pass localhost The ports on are interconnected , All in the cluster Pod No need to pass NAT Transformation can see each other .
2.1、 Expose in the cluster Pod
First, let's start a project , Specific startup mode , We have talked about it before , I won't repeat it here .
- After the project runs , open Kubernetes instrument panel (Dashboard), Click on the + Number , Use YAML The way , Create a pod node .
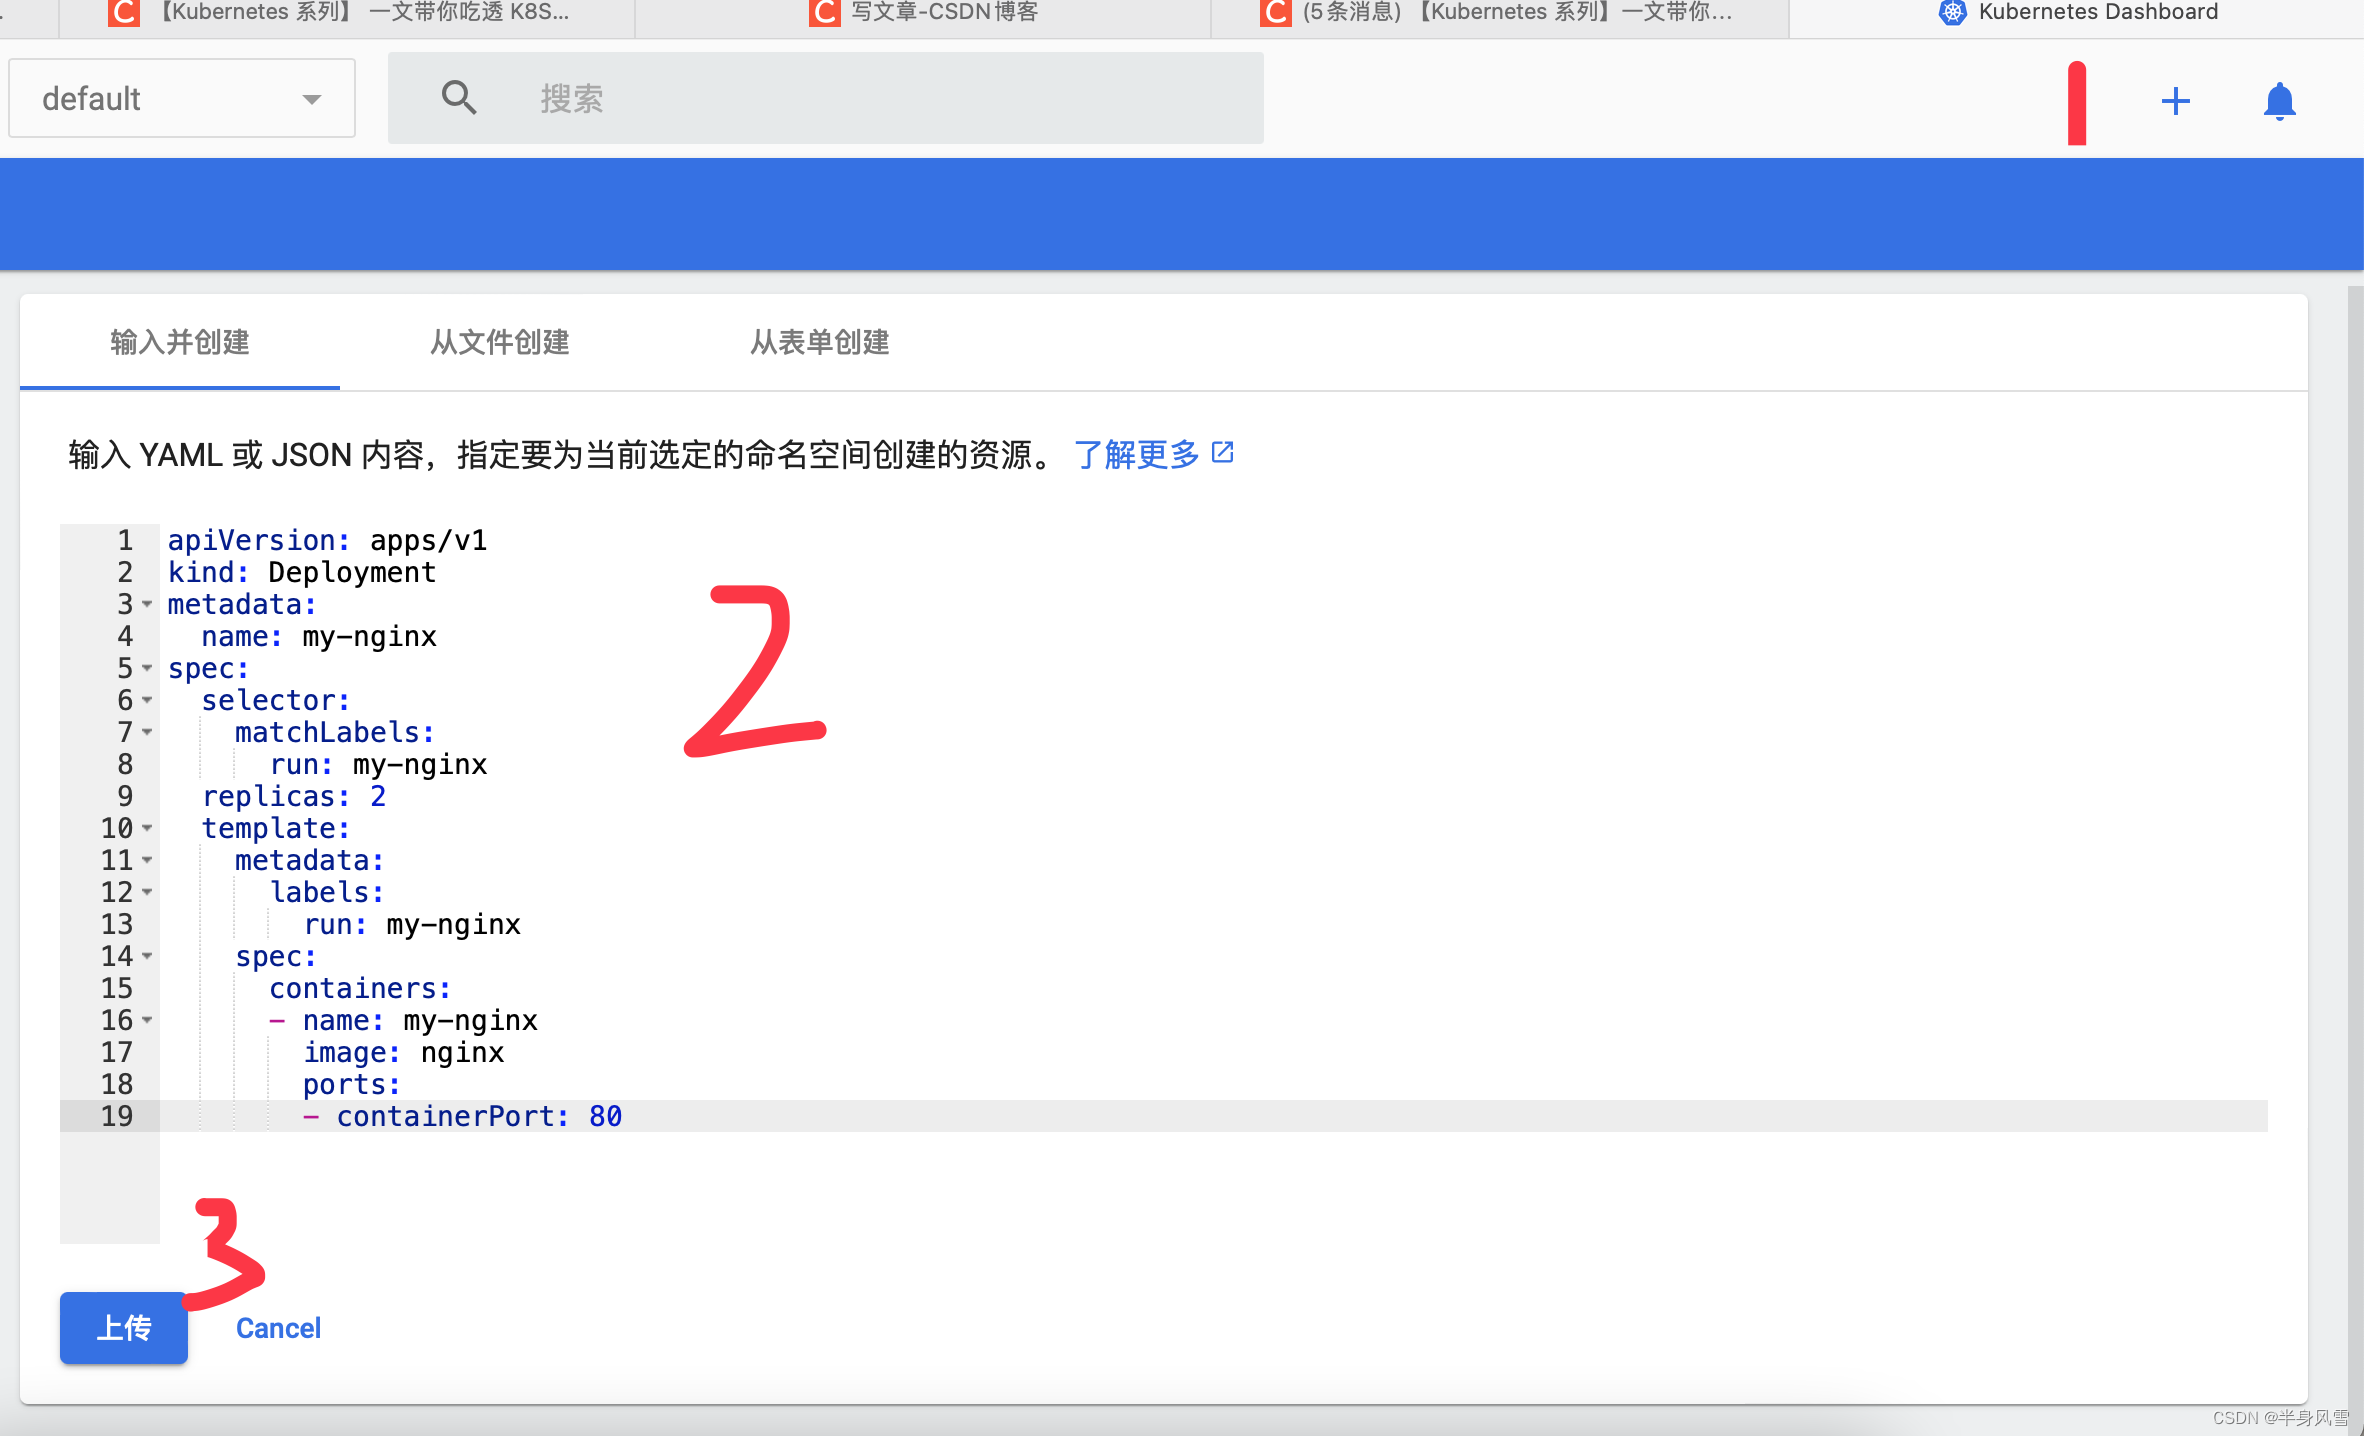
- As shown in the figure above , stay YAML Add the following code to :
apiVersion: apps/v1
kind: Deployment
metadata:
  name: my-nginx
spec:
  selector:
    matchLabels:
      run: my-nginx
  replicas: 2
  template:
    metadata:
      labels:
        run: my-nginx
    spec:
      containers:
      - name: my-nginx
        image: nginx
        ports:
        - containerPort: 80
- Click upload , Click again in the list bar on the left pod Options , Just back before us Familiar with pod page .

Of course , We can also use the command line directly , To check our nodes :
$ kubectl apply -f ./run-my-nginx.yaml
If the following error is reported :

Direct command execution :
$ unset KUBECONFIG
Re execution :
$ kubectl apply -f ./run-my-nginx.yaml
$ kubectl get pods -l run=my-nginx -o wide
The execution result output node is as follows :

Of course , We can also use the command line , Check pod Of IP Address :
$ kubectl get pods -l run=my-nginx -o yaml | grep podIP
Output current node IP:

We can get through ssh Log in to any node in the cluster , And use things like curl Such tools to these two IP Address to make a query request . It should be noted that , The container will not use... On this node 80 port , And will not use any specific NAT Rules to route traffic to Pod On . This means that you can run multiple on the same node Nginx Pod, Use the same containerPort, And from any other in the cluster Pod Or on a node IP The way to access them .
2.2、 establish Service
It creates a flat 、 Run in a cluster wide address space Nginx Service Pod , To expose it , We also need to create one Service.
Kubernetes Service It is a group that provides the same functions in the cluster Pod Abstract expression of . When each Service Creation time , Will be assigned a unique IP Address ( Also known as clusterIP). This IP Address and Service The lifecycles of the , as long as Service There is , It won't change . You can configure the Pod Make it with Service communicate ,Pod Know and Service The communication will be automatically load balanced to the Service Some of them Pod On .
Use it directly Order to above Nginx Create a copy Service:
$ kubectl expose deployment/my-nginx
$ service/my-nginx exposed
Of course , We can also use YAML Way to create , The creation method is the same as that above pod The same as , You can directly use the following code :
apiVersion: v1
kind: Service
metadata:
  name: my-nginx
  labels:
    run: my-nginx
spec:
  ports:
  - port: 80
    protocol: TCP
  selector:
    run: my-nginx
Click... In the menu bar on the left Serverces, You will see the present Serverces Details of :

Above we created Service All with tags will be run: my-nginx Of Pod Of TCP 80 The port is exposed to an abstract Service On port (targetPort: The port on which the container receives traffic ;port: Abstract that can take any value Service port , other Pod Access... Through this port Service).
Now? , We execute the following command to check Service resources :
$ kubectl get svc my-nginx
The resource output is shown in the following figure :

I mentioned earlier that , One Service By a group Pod Provide support . these Pod adopt endpoints Exposed . Service Selector Will continue to evaluate , The result is POST To a named my-nginx Of Endpoint On the object . When Pod After termination , It will automatically follow Endpoint Remove , The new one can match Service Selector Of Pod Will be automatically added to Endpoint in . Check that Endpoint, be aware IP The address is the same as the one created in the first step Pod It's the same .
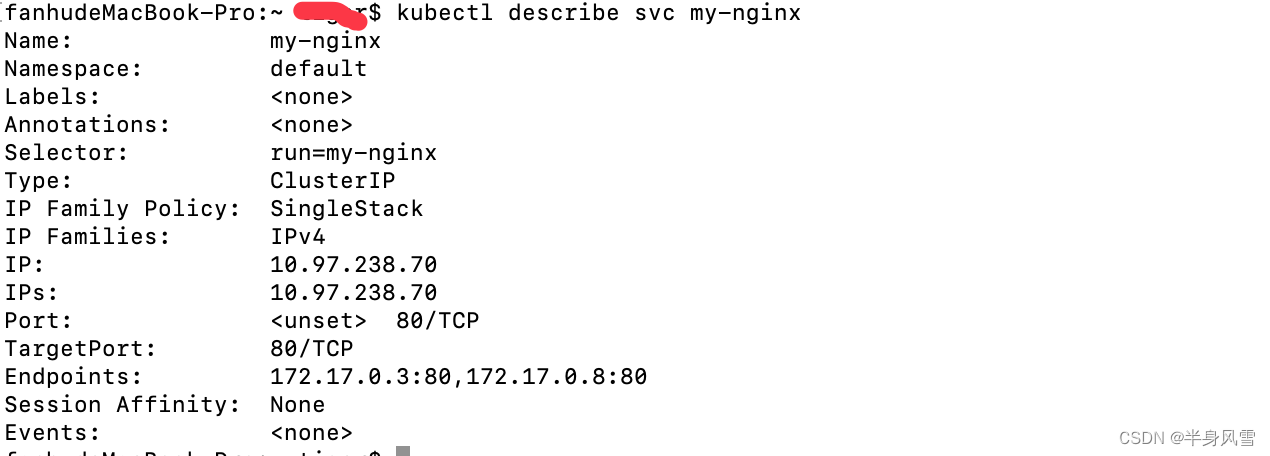
$ kubectl describe svc my-nginx
Execute the above command , We can get the present serverces All the information about :
$ kubectl get ep my-nginx
Now? , We execute the above order , Can expose our service 了 , The results are as follows :
NAME ENDPOINTS AGE
my-nginx 172.17.0.3:80,172.17.0.8:80 23m
Now we can use it from any node in the cluster curl The command to <CLUSTER-IP>:<PORT> Send a request to access Nginx Service.
2.3、 visit Service
Kubernetes Two main modes of search service are supported : Environment variables and DNS. Here I will only introduce how to find environment variables .
When Pod When running on a node ,kubelet For each active Service by Pod Add a set of environment variables . This introduces a sequential problem . To explain this problem , Let's check the running Nginx Pod Environment variables of .
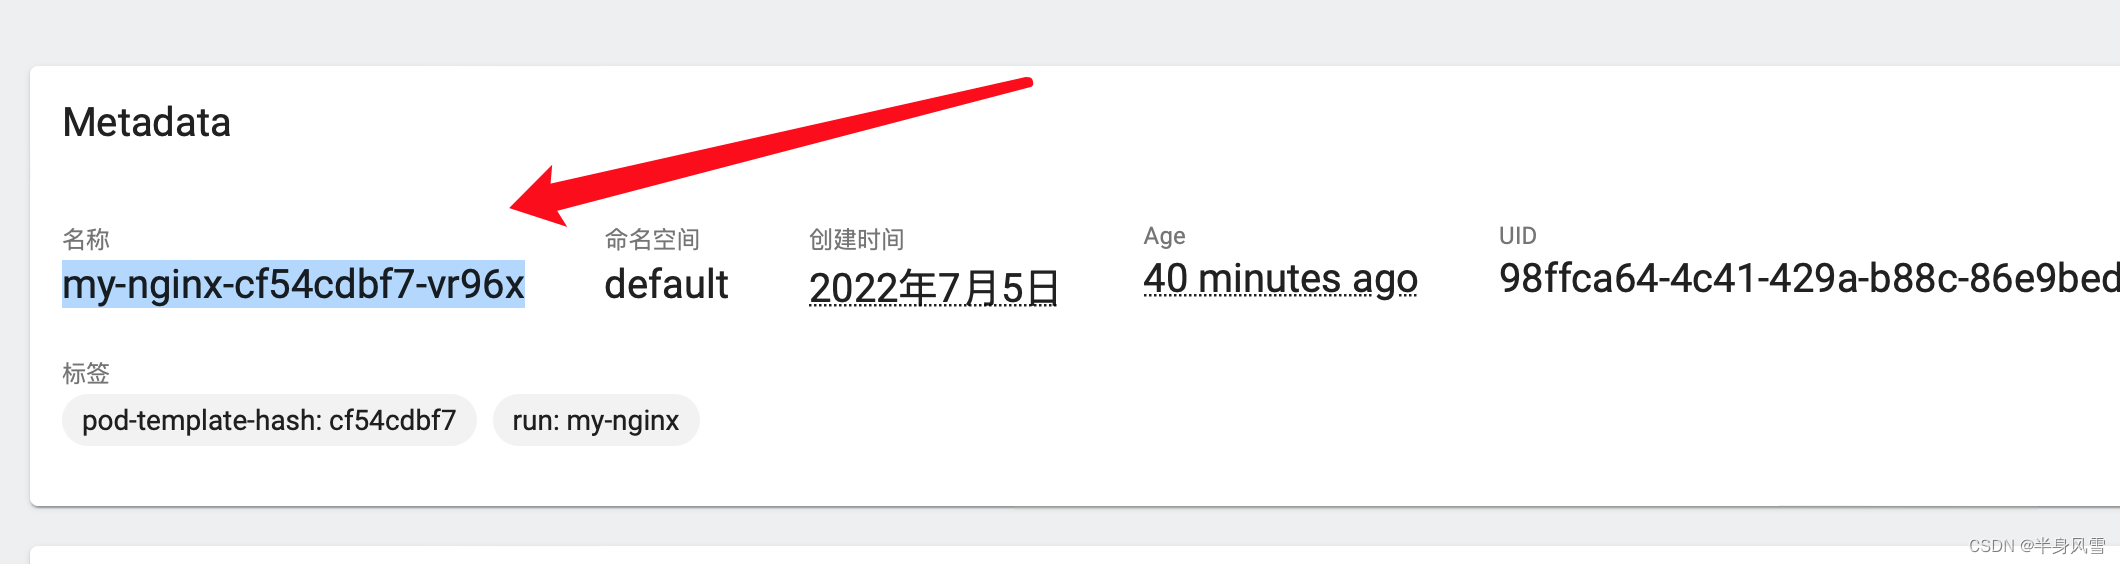
My personal environment variable is my-nginx-cf54cdbf7-vr96x Yours may be different from mine , Directly in pod View direct environment variables in .
Next, execute the command :
$ kubectl exec my-nginx-cf54cdbf7-vr96x – printenv | grep SERVICE
The operation results are as follows :
KUBERNETES_SERVICE_HOST=10.96.0.1
KUBERNETES_SERVICE_PORT=443
KUBERNETES_SERVICE_PORT_HTTPS=443
You can see that there is no environment variable you created Service Related values . This is because the creation of copies precedes Service. Another disadvantage of this is , The scheduler may put all Pod Deploy to the same machine , If the machine goes down, the whole Service Will be offline . If you want to correct it , We can stop this first 2 individual Pod, And then wait Deployment To recreate them . This time, Service Will exist before the copy . This will achieve scheduler level Pod Press Service Distribution ( Assume that all nodes have the same capacity ), And provide the correct environment variables .
Execute the following two commands respectively :
$ kubectl scale deployment my-nginx --replicas=0; kubectl scale deployment my-nginx --replicas=2;
$ kubectl get pods -l run=my-nginx -o wide

You might notice ,Pod Have different names , This is because they were recreated .
Now let's do it again Nginx Pod Environment variable command , Be careful : Now your environment variables have changed , Please verify :
$ kubectl exec my-nginx-cf54cdbf7-fhghk – printenv | grep SERVICE
finally , We are in the running results , I saw it Service Related values :
KUBERNETES_SERVICE_PORT_HTTPS=443
MY_NGINX_SERVICE_HOST=10.97.238.70
KUBERNETES_SERVICE_HOST=10.96.0.1
KUBERNETES_SERVICE_PORT=443
MY_NGINX_SERVICE_PORT=80
2.4、 Protect Service
Up to now , We only accessed... Within the cluster Nginx The server . Will be Service Before exposure to the Internet , We want to ensure that the communication channel is secure . To achieve this , need :
- be used for HTTPS Self signed certificate of ( Unless you already have an identity certificate )
- Configured with certificate Nginx The server
- send Pod Can access the certificate Secret
We can directly execute the following commands by manually executing the steps :
$ make keys KEY=/tmp/nginx.key CERT=/tmp/nginx.crt
$ kubectl create secret tls nginxsecret --key /tmp/nginx.key --cert /tmp/nginx.crt
$ secret/nginxsecret created
$ kubectl get secrets
The output is as follows :
NAME TYPE DATA AGE
default-token-t7mbb kubernetes.io/service-account-token 3 56m
Here are configmap:
$ kubectl create configmap nginxconfigmap --from-file=default.conf
$ configmap/nginxconfigmap created
$ ubectl get configmaps
The output is as follows :
NAME DATA AGE
kube-root-ca.crt 1 58m
Here's what you're running make Manual steps to follow when encountering problems ( for example , stay Windows On ):
#  Create public key and corresponding private key
openssl req -x509 -nodes -days 365 -newkey rsa:2048 -keyout /d/tmp/nginx.key -out /d/tmp/nginx.crt -subj "/CN=my-nginx/O=my-nginx"
#  Implement the key  base64  code
cat /d/tmp/nginx.crt | base64
cat /d/tmp/nginx.key | base64
Use the output of the previous command to create yaml file , As shown below . base64 The encoded values should all be placed on one line .
apiVersion: "v1"
kind: "Secret"
metadata:
  name: "nginxsecret"
  namespace: "default"
type: kubernetes.io/tls
data:
  tls.crt: " Put your code here "
  tls.key: " Put your code here "
Now use the file to create Secret:
$ kubectl apply -f nginxsecrets.yaml
$ kubectl get secrets
Execution results :
NAME TYPE DATA AGE
default-token-t7mbb kubernetes.io/service-account-token 3 62m
Now modify nginx Copy to start a use Secret Of the certificate in HTTPS The server and the corresponding port used to expose it (80 and 443) Of Service:
apiVersion: v1
kind: Service
metadata:
  name: my-nginx
  labels:
    run: my-nginx
spec:
  type: NodePort
  ports:
  - port: 8080
    targetPort: 80
    protocol: TCP
    name: http
  - port: 443
    protocol: TCP
    name: https
  selector:
    run: my-nginx
---
apiVersion: apps/v1
kind: Deployment
metadata:
  name: my-nginx
spec:
  selector:
    matchLabels:
      run: my-nginx
  replicas: 1
  template:
    metadata:
      labels:
        run: my-nginx
    spec:
      volumes:
      - name: secret-volume
        secret:
          secretName: nginxsecret
      - name: configmap-volume
        configMap:
          name: nginxconfigmap
      containers:
      - name: nginxhttps
        image: bprashanth/nginxhttps:1.0
        ports:
        - containerPort: 443
        - containerPort: 80
        volumeMounts:
        - mountPath: /etc/nginx/ssl
          name: secret-volume
        - mountPath: /etc/nginx/conf.d
          name: configmap-volume
About nginx-secure-app detailed list , The points worth noting are as follows :
- It will Deployment and Service The specifications of are put in the same file .
- Nginx Server pass 80 Port processing HTTP Traffic , adopt 443 Port processing HTTPS Traffic , and Nginx Service These two ports are exposed .
- Each container can be attached to /etc/nginx/ssl Volume access key . The volume and key need to be in Nginx Configure before the server starts .
$ kubectl delete deployments,svc my-nginx; kubectl create -f ./nginx-secure-app.yaml
At this time , You can access... From any node Nginx The server .
kubectl get pods -o yaml | grep -i podip
    podIP: 10.244.3.5
node $ curl -k https://10.244.3.5
...
<h1>Welcome to nginx!</h1>
Notice how the last step is to provide -k Parameter execution curl Ordered , This is because when the certificate is generated , We don't know anything about running nginx Of Pod Information about , So we have to execute curl Ignore the command CName Mismatches . By creating a Service, We connected to the in the certificate CName And in Service The query was Pod The actual use of DNS name . Let's go from one Pod To test ( For convenience , The same... Is used here Secret,Pod Just use nginx.crt To visit Service):
apiVersion: apps/v1
kind: Deployment
metadata:
  name: curl-deployment
spec:
  selector:
    matchLabels:
      app: curlpod
  replicas: 1
  template:
    metadata:
      labels:
        app: curlpod
    spec:
      volumes:
      - name: secret-volume
        secret:
          secretName: nginxsecret
      containers:
      - name: curlpod
        command:
        - sh
        - -c
        - while true; do sleep 1; done
        image: radial/busyboxplus:curl
        volumeMounts:
        - mountPath: /etc/nginx/ssl
          name: secret-volume
Then execute the following command :
$ kubectl apply -f ./curlpod.yaml
$ kubectl get pods -l app=curlpod
The results are as follows :
NAME READY STATUS RESTARTS AGE
curl-deployment-1515033274-1410r 1/1 Running 0 1m
kubectl exec curl-deployment-1515033274-1410r -- curl https://my-nginx --cacert /etc/nginx/ssl/tls.crt
...
<title>Welcome to nginx!</title>
...
2.5、 expose Service
For some parts of the application , You may want to Service Exposed to an outside IP Address . Kubernetes Two implementations are supported :NodePort and LoadBalancer. Created in the previous paragraph Service Used NodePort, therefore , If your node has a public network IP, that Nginx HTTPS Replicas have been able to handle traffic on the Internet .
$ kubectl get svc my-nginx -o yaml | grep nodePort -C 5
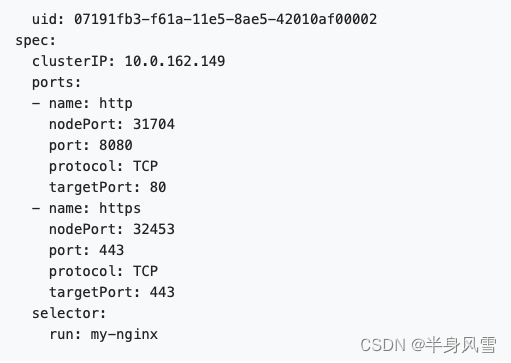
$ kubectl get nodes -o yaml | grep ExternalIP -C 1
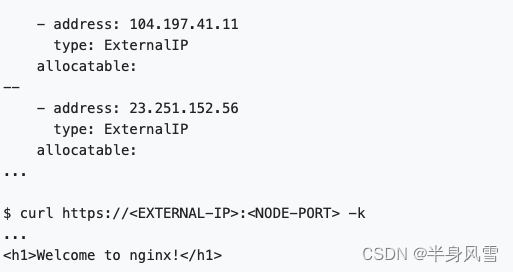
Let's recreate Service To use cloud load balancer . take my-nginx Service Of Type from NodePort Change to LoadBalancer:
$ kubectl edit svc my-nginx
$ kubectl get svc my-nginx
NAME TYPE CLUSTER-IP EXTERNAL-IP PORT(S) AGE
my-nginx LoadBalancer 10.0.162.149 xx.xxx.xxx.xxx 8080:30163/TCP
stay EXTERNAL-IP In column IP The address can be accessed on the public network .CLUSTER-IP Only from the cluster / Access in private cloud network .
Be careful , stay AWS On , type LoadBalancer The service of will create a ELB, And ELB Use host name ( A long ), instead of IP. ELB The host name of is too long to fit the standard kubectl get svc Output , So you need to execute kubectl describe service my-nginx Command to view it . You can see something similar to the following :

It should be noted that there are some Service The use case of is not in spec In the definition of selector. A no selector Created Service The corresponding endpoint object will not be created . This allows users to manually map services to specific endpoints . No, selector Another possibility is that you strictly use type: ExternalName To mark .
3、 ... and 、Service and Label
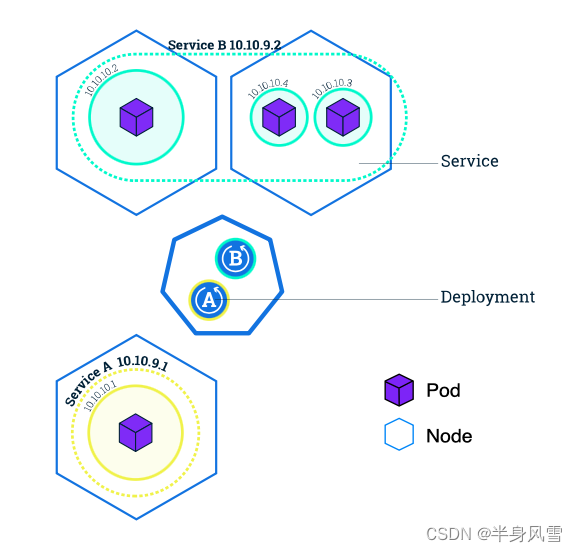
Service Through a group Pod Routing communications .Service It's an abstraction , It allows the Pod Death and death Kubernetes Copy the , Without affecting the application . Depending on Pod ( Such as front-end and back-end components in applications ) Discovery and routing between is done by Kubernetes Service To deal with the .
Service Match a group Pod It's using label (Label) selector construction (Selector), They are allowed to Kubernetes A grouping primitive that performs logical operations on objects in . label (Label) Is the key attached to the object / It's worth it , It can be used in many ways :
- Designated for development , Test and produce objects
- Embedded version label
- Use Label Classify objects

label (Label) Can be attached to an object at or after creation . They can be modified at any time .
summary
Content of this section , Mainly explained service modular , And its associated tags , also service How to expose the cluster to the outside , There is still a lot of content , It's not easy to create , Hope to support .
边栏推荐
- 球面透镜与柱面透镜
- MySQL winter vacation self-study 2022 11 (9)
- Network Security Learning - Web vulnerabilities (Part 1)
- 深度解析链动2+1模式,颠覆传统卖货思维?
- 2022.02.13
- Trends in DDoS Attacks
- [Yunju entrepreneurial foundation notes] Chapter II entrepreneur test 6
- Y a - t - il des cas où sqlcdc surveille plusieurs tables et les associe à une autre? Tout fonctionne dans MySQL
- Reset nodejs of the system
- 微服务间通信
猜你喜欢
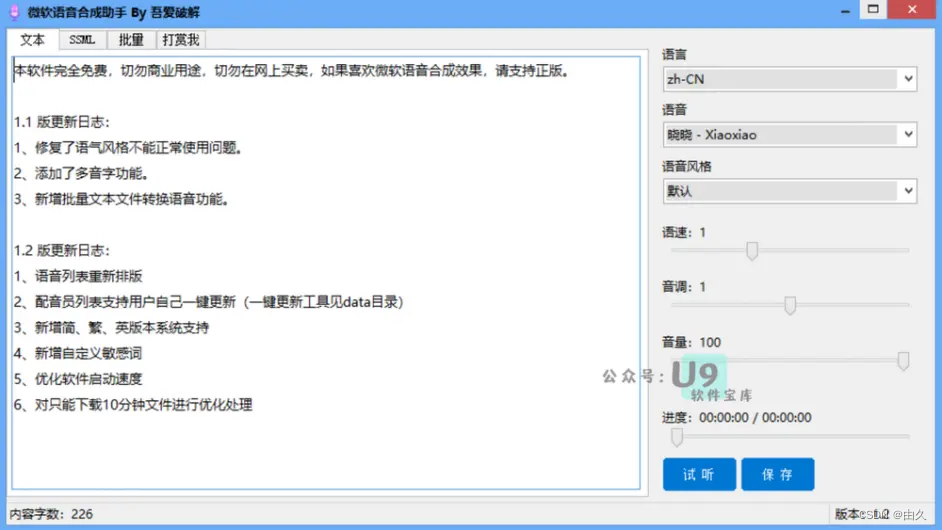
Microsoft speech synthesis assistant v1.3 text to speech tool, real speech AI generator
![[Yunju entrepreneurial foundation notes] Chapter II entrepreneur test 13](/img/29/49da279efed22706545929157788f0.jpg)
[Yunju entrepreneurial foundation notes] Chapter II entrepreneur test 13

Which ecology is better, such as Mi family, graffiti, hilink, zhiting, etc? Analysis of five mainstream smart brands
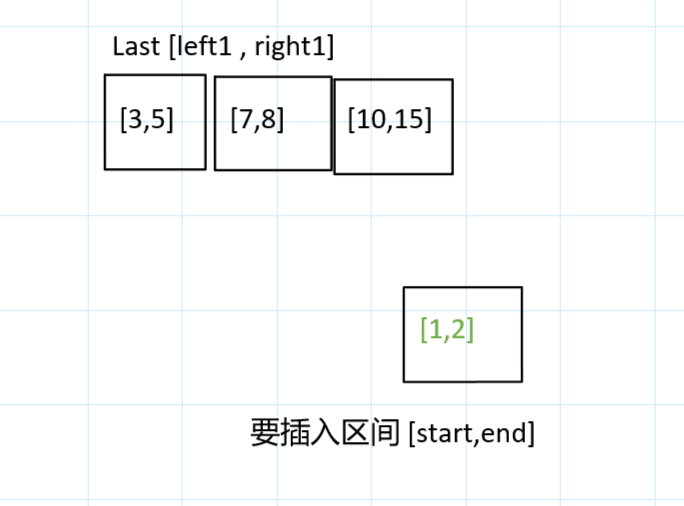
力扣今日题-729. 我的日程安排表 I
如何精准识别主数据?
Apt installation ZABBIX
![[Yunju entrepreneurial foundation notes] Chapter II entrepreneur test 22](/img/e0/21367eeaeca10c0a2f2aab3a4fa1fb.jpg)
[Yunju entrepreneurial foundation notes] Chapter II entrepreneur test 22
Introduction to robotframework (II) app startup of appui automation
全国大学生信息安全赛创新实践赛初赛---misc(永恒的夜)
Advanced technology management - what is the physical, mental and mental strength of managers
随机推荐
Apt installation ZABBIX
微软语音合成助手 v1.3 文本转语音工具,真实语音AI生成器
RobotFramework入门(三)WebUI自动化之百度搜索
"Hands on learning in depth" Chapter 2 - preparatory knowledge_ 2.5 automatic differentiation_ Learning thinking and exercise answers
CSP date calculation
Day 50 - install vsftpd on ceontos6.8
Shell script updates stored procedure to database
Network Security Learning - Web vulnerabilities (Part 1)
[Yunju entrepreneurial foundation notes] Chapter II entrepreneur test 22
Pure QT version of Chinese chess: realize two-man, man-machine and network games
Black high-end responsive website dream weaving template (adaptive mobile terminal)
Looking at the trend of sequence modeling of recommended systems in 2022 from the top paper
MySQL (IV) - transactions
[Yunju entrepreneurial foundation notes] Chapter II entrepreneur test 18
技术分享 | undo 太大了怎么办
"Hands on learning in depth" Chapter 2 - preparatory knowledge_ 2.3 linear algebra_ Learning thinking and exercise answers
Six stone management: why should leaders ignore product quality
2022.02.13
[Yunju entrepreneurial foundation notes] Chapter II entrepreneur test 16
PMP practice once a day | don't get lost in the exam -7.5