当前位置:网站首页>Esp8266 connect onenet (old mqtt mode)
Esp8266 connect onenet (old mqtt mode)
2022-07-06 12:19:00 【XlinliY. Zhang】
One 、 Why use the old version MQTT
1、 Simple
Use ESP8266 + Arduino The way of development , Only minimal code is needed , You can achieve cloud .
MQTT stay ESP8266 There are ready-made libraries on , We just need to create devices on the platform , Input parameters in the program .
2、 two-way
In contrast to HTTP One way connection of ,MQTT It's two-way , There is no need for the device to request the server to send data , Greatly simplifies the process .
Two 、 How to achieve MQTT Access
1、 Register device
Directly above
The first step, of course, is to log in to your account ( No direct registration + Real name authentication is enough , Free )
And then go to the console

Then start adding product devices
Using the old console

Add products before adding devices


Finished adding products , Then click the product just added to enter product management , Then start adding devices


equipment ID by CLIENTID The authentication information is USERPASSWORD product ID by USERNAME
To this step , The device has been added , Data flow can be ignored , After the device uploads data, the system will automatically add data nodes .
2、 burn ESP8266 Code
About Arduino IDE How to burn ESP8266, There are many tutorials online , This step will not be repeated , Go straight to the code
const char *Device_ID = "*******";         // equipment ID
const char *Product_ID = "*******";        // product ID
const char *Api_KEY = "*******";           // Authentication information
const char *WiFi_SSID = "*******";         //WiFi name
const char *WiFi_Password = "***********"; //WiFi password
#include <ESP8266WiFi.h>
#include <PubSubClient.h>
float Current = 0;
uint8_t Upload_Package[100];
uint32_t Last_Updata_Time = 0;
WiFiClient espClient;
PubSubClient client(espClient);
void WiFi_Init(void);
void MQTT_Init(void);
void MQTT_Reconnection(void);
void MQTT_Callback(char *MQTT_Topic, uint8_t *MQTT_Payload, uint16_t MQTT_Payload_Len);
void setup()
{
  Serial.begin(115200);
  WiFi_Init();
  MQTT_Init();
}

void loop()
{
  if (!client.connected())
    MQTT_Reconnection();
  if (millis() - Last_Updata_Time >= 3000)
  {
    Last_Updata_Time = millis();
    float ADC_Value = analogRead(A0);
    Current = (ADC_Value - 512) * 0.033783784;
    Serial.print("Current: ");
    Serial.print(Current);
    Serial.println("  A\r\n");
    memset(Upload_Package, 0, 100);
    String Json_Buffer = ",;Current,";
    Json_Buffer += String(Current);
    Json_Buffer += ";";
    Upload_Package[0] = 5;
    Upload_Package[1] = highByte(Json_Buffer.length());
    Upload_Package[2] = lowByte(Json_Buffer.length());
    for (int i = 0; i < Json_Buffer.length(); i++)
      Upload_Package[i + 3] = Json_Buffer.c_str()[i];
    client.publish("$dp", Upload_Package, Json_Buffer.length() + 3);
  }
  client.loop();
}
void WiFi_Init(void)
{
  Serial.print("\r\n\r\nConnecting to ");
  Serial.print(WiFi_SSID);
  WiFi.mode(WIFI_STA);
  WiFi.begin(WiFi_SSID, WiFi_Password);
  while (WiFi.status() != WL_CONNECTED)
  {
    delay(500);
    Serial.print(".");
  }
  Serial.print("\r\nWiFi Connected.\r\nIP address: ");
  Serial.println(WiFi.localIP());
}

void MQTT_Init(void)
{
  client.setServer("183.230.40.39", 6002);
  client.setCallback(MQTT_Callback);
}
void MQTT_Callback(char *MQTT_Topic, uint8_t *MQTT_Payload, uint16_t MQTT_Payload_Len)
{
  Serial.printf("Topic: %s[%d]:\r\n", MQTT_Topic, MQTT_Payload_Len);
  for (uint16_t i = 0; i < MQTT_Payload_Len; i++)
  {
    Serial.print(MQTT_Payload[i] < 0x10 ? " 0x0" : " 0x");
    Serial.print(MQTT_Payload[i]);
  }
  Serial.println();
}
void MQTT_Reconnection(void)
{
  while (!client.connected())
  {
    Serial.println("MQTT Reconnection.");
    if (client.connect(Device_ID, Product_ID, Api_KEY))
      Serial.println("MQTT Connected");
    else
    {
      Serial.print("Connect Failed, Error Code = ");
      Serial.print(client.state());
      Serial.println(", Try again in 5 seconds.");
      delay(5000);
    }
  }
}
This example will A0 The analog value read by the port is uploaded to onenet, And after receiving onenet When sending information, print it on the serial port
3、 ... and 、 The program on
1、 Networking related
// First of all WiFi Parameters
const char *WiFi_SSID = "*******";         //WiFi name
const char *WiFi_Password = "***********"; //WiFi password
// Secondly, we should have WiFi Driver library
#include <ESP8266WiFi.h>
// Declare the function
void WiFi_Init(void);
void setup()//setup Only once , Just put it in the Internet
{
  // The serial port should be initialized , Easy to view the process
  Serial.begin(115200);
  // Start WiFi initialization
  WiFi_Init();
}
void loop()
{

}
void WiFi_Init(void)
{
  // Print the prompt
  Serial.print("\r\n\r\nConnecting to ");
  Serial.print(WiFi_SSID);
  //STA Pattern , Pass in wifi Parameters
  WiFi.mode(WIFI_STA);
  WiFi.begin(WiFi_SSID, WiFi_Password);
  // Loop to WiFi Connect
  while (WiFi.status() != WL_CONNECTED)
  {
    // Print regularly ............ Tell you I didn't crash
    delay(500);
    Serial.print(".");
  }
  // Print prompt and local IP Address
  Serial.print("\r\nWiFi Connected.\r\nIP address: ");
  Serial.println(WiFi.localIP());
}
2、 Cloud related
// First of all, there must be parameters
const char *Device_ID = "711583270";       // equipment ID
const char *Product_ID = "421451";         // product ID
const char *Api_KEY = "20210425";          // Authentication information
// Provide socket agreement (MQTT be based on TCP)
#include <ESP8266WiFi.h>
// Provide MQTT agreement
#include <PubSubClient.h>
// Create objects
WiFiClient espClient;
PubSubClient client(espClient);
// Declare the function
void MQTT_Init(void);
void MQTT_Reconnection(void);
void setup()
{
  Serial.begin(115200);
  MQTT_Init();// initialization MQTT
}

void loop()//loop Equivalent to other microcontrollers while(1)
{
 // Judge MQTT Is it connected , Reconnect if not
  if (!client.connected())
    MQTT_Reconnection();
  //MQTT function
  client.loop();
}
void MQTT_Init(void)
{
  client.setServer("183.230.40.39", 6002);// Setup server IP Address and port
  client.setCallback(MQTT_Callback);      // Set the callback function that receives the information
}

//MQTT Reconnection function
void MQTT_Reconnection(void)
{
  while (!client.connected())// Loop to MQTT Connected
  {
    Serial.println("MQTT Reconnection.");
    if (client.connect(Device_ID, Product_ID, Api_KEY))// call MQTT Connect , Pass in the corresponding parameter , return 1 The connection is successful
      Serial.println("MQTT Connected");
    else// Otherwise, print an error message
    {
      Serial.print("Connect Failed, Error Code = ");
      Serial.print(client.state());
      Serial.println(", Try again in 5 seconds.");
      delay(5000);
    }
  }
}
3、 Sending and receiving data
// Initializing MQTT When , We have set the callback function
  client.setCallback(MQTT_Callback);
// therefore , When you receive a message , Will call this function , The meanings of the passed in parameters are as follows
//MQTT_Topic        The subject of the received message
//MQTT_Payload      The content of the received message
//MQTT_Payload_Len  The length of the content of the received message
void MQTT_Callback(char *MQTT_Topic, uint8_t *MQTT_Payload, uint16_t MQTT_Payload_Len)
{
  // Only printing is done here , There are no other processing operations
  Serial.printf("Topic: %s[%d]:\r\n", MQTT_Topic, MQTT_Payload_Len);
  for (uint16_t i = 0; i < MQTT_Payload_Len; i++)
  {
    Serial.print(MQTT_Payload[i] < 0x10 ? " 0x0" : " 0x");
    Serial.print(MQTT_Payload[i]);
  }
  Serial.println();
}
// To upload data , Then use the publish function to publish
//$dp                      ONENT Upload data fixed theme
//Upload_Package            Uploaded data array
//Json_Buffer.length() + 3  Length of uploaded data , Because contain 0, Use cannot use strlen Calculate the length
    client.publish("$dp", Upload_Package, Json_Buffer.length() + 3);
4、 Upload protocol
Upload_Package[0] In upload format , See ONENET file , Here is 5
The data sample :,; Data name , Data values ;
Upload_Package[1] * 256 + Upload_Package[2] by 3~ The length of the end of the data
Four 、 summary
1、 A few things to pay attention to
ONENET The upload data format of is a little special , front 3 Bytes are in fixed format , Then comes the real data
ONENET The port number of is 6002 Not traditional 1883
Format 5 Even characters don't need double quotes ( differ JSON)
2、 shortcoming
ONENET The time of issuing data is different from that of updating data , Sometimes data is distributed , Control has not been refreshed
The fault is described as follows :
Press the button , He changed ON, It changed again after a while OFF, Until the device uploads ON Data will become ON
边栏推荐
- ES6 grammar summary -- Part I (basic)
- 基于Redis的分布式锁 以及 超详细的改进思路
- 小天才电话手表 Z3工作原理
- Programmers can make mistakes. Basic pointers and arrays of C language
- Common properties of location
- ESP学习问题记录
- Kconfig Kbuild
- 1081 rational sum (20 points) points add up to total points
- ES6语法总结--下篇(进阶篇 ES6~ES11)
- MySQL time, time zone, auto fill 0
猜你喜欢
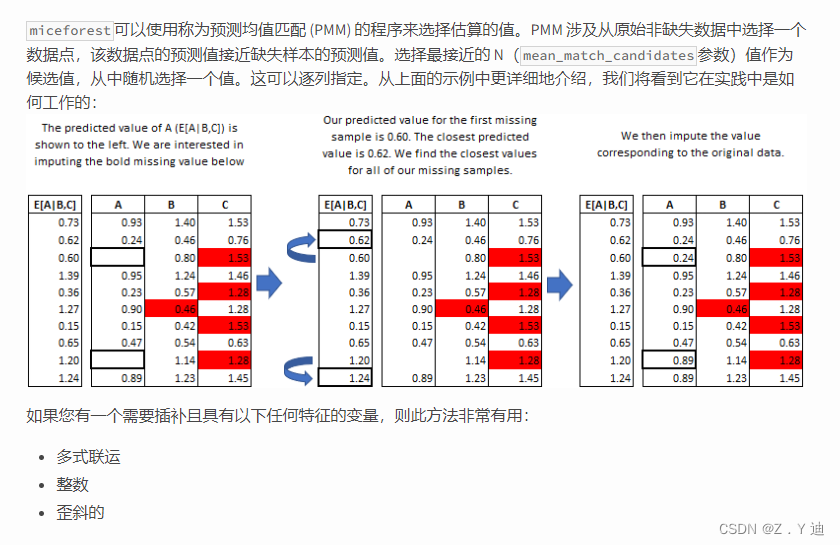
Missing value filling in data analysis (focus on multiple interpolation method, miseforest)
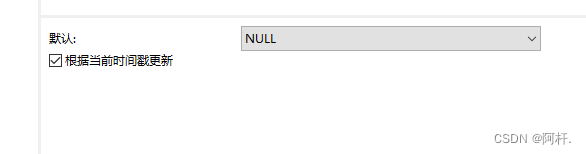
MySQL時間、時區、自動填充0的問題
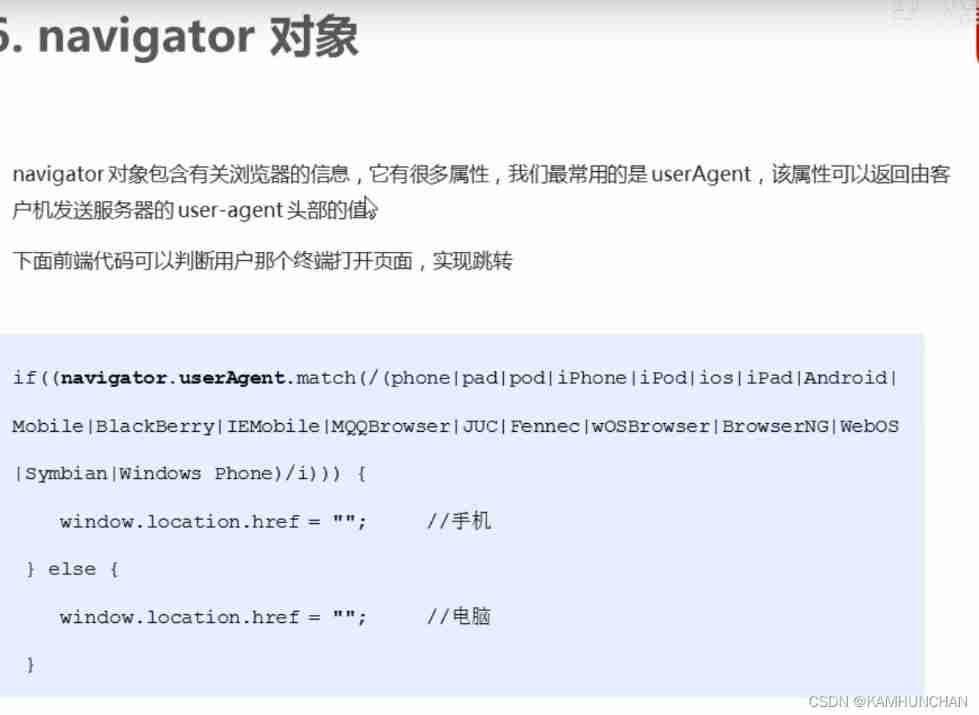
Navigator object (determine browser type)
![Several declarations about pointers [C language]](/img/9b/ace0abbd1956123a945a98680b1e86.png)
Several declarations about pointers [C language]
MySQL takes up too much memory solution
Pat 1097 duplication on a linked list (25 points)
Problèmes avec MySQL time, fuseau horaire, remplissage automatique 0
![[golang] leetcode intermediate - fill in the next right node pointer of each node & the k-smallest element in the binary search tree](/img/6e/0802a92511ac50a652afa1678ad28c.jpg)
[golang] leetcode intermediate - fill in the next right node pointer of each node & the k-smallest element in the binary search tree

(五)R语言入门生物信息学——ORF和序列分析
【ESP32学习-1】Arduino ESP32开发环境搭建
随机推荐
基於Redis的分布式ID生成器
Symbolic representation of functions in deep learning papers
Important methods of array and string
Classification, understanding and application of common methods of JS array
锂电池基础知识
Amba, ahb, APB, Axi Understanding
Pytorch four commonly used optimizer tests
MySQL时间、时区、自动填充0的问题
ESP8266连接onenet(旧版MQTT方式)
JS数组常用方法的分类、理解和运用
JS正则表达式基础知识学习
基于Redis的分布式锁 以及 超详细的改进思路
Stm32f1+bc20+mqtt+freertos system is connected to Alibaba cloud to transmit temperature and humidity and control LED lights
Pytorch: tensor operation (I) contiguous
arduino获取随机数
The dolphin scheduler remotely executes shell scripts through the expect command
Whistle+switchyomega configure web proxy
Gateway fails to route according to the service name, and reports an error service unavailable, status=503
单片机蓝牙无线烧录
Common DOS commands