One 、PolarDB-X brief introduction
PolarDB-X It is a product for ultra-high concurrency 、 Mass storage 、 Cloud native distributed database system designed for complex query scenario . It USES the Shared-nothing Separate architecture from storage and computing , Support horizontal scaling 、 Distributed transactions 、 Mixed load capacity , Enterprise level 、 Cloud native 、 High availability 、 Highly compatible MySQL Characteristics of system and Ecology .
PolarDB-X Initially, Alibaba tmall “ A double tenth ” The core trading system is born from the bottleneck of database scalability , After that, Alibaba cloud has grown all the way , It is a product that has been verified by a variety of core business scenarios 、 Mature and stable database system .
Two 、PolarDB-X The core feature of
- Horizontal expansion
PolarDB-X use Shared-nothing Architecture design , Support for multiple Hash and Range Data splitting algorithm , Dynamic scheduling through implicit primary key splitting and data fragmentation , Realize the transparent horizontal expansion of the system .
- Distributed transactions
PolarDB-X use MVCC + TSO Programme and 2PC The protocol implements distributed transactions . The transaction satisfies ACID characteristic , Support RC/RR Isolation level , And submit through one stage 、 Read only transactions 、 Asynchronous commit and other optimizations achieve high performance of transactions .
- Mixed load
PolarDB-X Through the native MPP Ability to support analytical queries , adopt CPU quota constraint 、 Memory pooling 、 Separation of storage resources and so on OLTP And OLAP Strong isolation of flow .
- Enterprise class
PolarDB-X Many kernel capabilities have been designed for enterprise scenarios , for example SQL Current limiting 、SQL Advisor、TDE、 Separation of powers 、Flashback Query etc. .
- Cloud native
PolarDB-X Alibaba cloud has many years of cloud native practice , Supported by K8S Operator Manage cluster resources , Support for public clouds 、 A hybrid cloud 、 VPC and other forms of deployment , And support localized operating systems and chips .
- High availability
By majority Paxos The protocol realizes strong data consistency , Support two places and three centers 、 Three places, five copies and other disaster recovery methods , At the same time through Table Group、Geo-locality Improve system availability .
- compatible MySQL System and ecology
PolarDB-X Our goal is full compatibility MySQL , Currently compatible content includes MySQL agreement 、MySQL Most grammar 、Collation、 Transaction isolation level 、Binlog etc. .
3、 ... and 、 How to build a highly available system
1. Create experimental resources and installation environment
Before you start the experiment , You need to create ECS Instance resources , And install Docker、kubectl、minikube and Helm3, Final installation MySQL.
2. Use PolarDB-X Operator install PolarDB-X
- Use minikube establish Kubernetes colony .
minikube It is maintained by the community for quick creation Kubernetes Tools for testing clusters , Suitable for testing and learning Kubernetes. Use minikube Created Kubernetes Clusters can run in containers or virtual machines , The experimental scenario is based on CentOS 8.5 To create a Kubernetes For example .
a. New account galaxykube, And will galaxykube Join in docker In the group .【minikube It is required to use non root Account for deployment 】, Switch to account galaxykube, Enter into home/galaxykube Catalog . Execute the following command , Start a minikube.
minikube start --cpus 4 --memory 12288 --image-mirror-country cn --registry-mirror=https://docker.mirrors.sjtug.sjtu.edu.cn --kubernetes-version 1.23.3
b. Execute the following command , Use kubectl View cluster information .
kubectl cluster-info
- Deploy PolarDB-X Operator.
a. Execute the following command , Create a file called polardbx-operator-system The namespace of .
kubectl create namespace polardbx-operator-system
b. Execute the following command , install PolarDB-X Operator.
helm repo add polardbx https://polardbx-charts.oss-cn-beijing.aliyuncs.com
helm install --namespace polardbx-operator-system polardbx-operator polardbx/polardbx-operator
c. Execute the following command , see PolarDB-X Operator Operation of components . Wait for all components to enter Running state , Express PolarDB-X Operator Installation completed .
kubectl get pods --namespace polardbx-operator-system
- Deploy PolarDB-X colony .
a. establish polardb-x.yaml, Press i Key to enter edit mode , Copy the code to the following file , Then press ECS Exit edit mode , Input :wq Then press Enter Key save and exit .
apiVersion: polardbx.aliyun.com/v1
kind: PolarDBXCluster
metadata:
  name: polardb-x
spec:
  config:
    dn:
      mycnfOverwrite: |-
        print_gtid_info_during_recovery=1
        gtid_mode = ON
        enforce-gtid-consistency = 1
        recovery_apply_binlog=on
        slave_exec_mode=SMART
  topology:
    nodes:
      cdc:
        replicas: 1
        template:
          resources:
            limits:
              cpu: "1"
              memory: 1Gi
            requests:
              cpu: 100m
              memory: 500Mi
      cn:
        replicas: 2
        template:
          resources:
            limits:
              cpu: "2"
              memory: 4Gi
            requests:
              cpu: 100m
              memory: 1Gi
      dn:
        replicas: 1
        template:
          engine: galaxy
          hostNetwork: true
          resources:
            limits:
              cpu: "2"
              memory: 4Gi
            requests:
              cpu: 100m
              memory: 500Mi
      gms:
        template:
          engine: galaxy
          hostNetwork: true
          resources:
            limits:
              cpu: "1"
              memory: 1Gi
            requests:
              cpu: 100m
              memory: 500Mi
          serviceType: ClusterIP
  upgradeStrategy: RollingUpgrade
b. establish PolarDB-X colony , see PolarDB-X Cluster creation status .
3. Connect PolarDB-X colony
1. Execute the following command , see PolarDB-X Cluster login password .
kubectl get secret polardb-x -o jsonpath="{.data['polardbx_root']}" | base64 -d - | xargs echo "Password: "
2. Execute the following command , take PolarDB-X The cluster port is forwarded to 3306 port .
kubectl port-forward svc/polardb-x 3306
3. Execute the following command , Connect PolarDB-X colony .
mysql -h127.0.0.1 -P3306 -upolardbx_root -p<PolarDB-X Cluster login password >
4. Start the business
· Prepare the pressure test data
- Create pressure test database sysbench_test, Input exit Exit database , Switch to account galaxykube.
- Enter into /home/galaxykube Catalog , Create a sysbench-prepare.yaml file .
- Press i Key to enter edit mode , Copy the code to the following file , Then press ECS Exit edit mode , Input :wq Then press Enter Key save and exit .
apiVersion: batch/v1
kind: Job
metadata:
  name: sysbench-prepare-data-test
  namespace: default
spec:
  backoffLimit: 0
  template:
    spec:
      restartPolicy: Never
      containers:
        - name: sysbench-prepare
          image: severalnines/sysbench
          env:
            - name: POLARDB_X_USER
              value: polardbx_root
            - name: POLARDB_X_PASSWD
              valueFrom:
                secretKeyRef:
                  name: polardb-x
                  key: polardbx_root
          command: [ 'sysbench' ]
          args:
            - --db-driver=mysql
            - --mysql-host=$(POLARDB_X_SERVICE_HOST)
            - --mysql-port=$(POLARDB_X_SERVICE_PORT)
            - --mysql-user=$(POLARDB_X_USER)
            - --mysql_password=$(POLARDB_X_PASSWD)
            - --mysql-db=sysbench_test
            - --mysql-table-engine=innodb
            - --rand-init=on
            - --max-requests=1
            - --oltp-tables-count=1
            - --report-interval=5
            - --oltp-table-size=160000
            - --oltp_skip_trx=on
            - --oltp_auto_inc=off
            - --oltp_secondary
            - --oltp_range_size=5
            - --mysql_table_options=dbpartition by hash(`id`)
            - --num-threads=1
            - --time=3600
            - /usr/share/sysbench/tests/include/oltp_legacy/parallel_prepare.lua
            - run
4. Execute the following command , Run to prepare pressure measurement data sysbench-prepare.yaml file , Initialize test data .
kubectl apply -f sysbench-prepare.yaml
5. Execute the following command , Get task progress status .
kubectl get jobs
· Start pressure measurement flow .
Create a sysbench-oltp.yaml file .
Press i Key to enter edit mode , Copy the code to the following file , Then press ECS Exit edit mode , Input :wq Then press Enter Key save and exit .
apiVersion: batch/v1
kind: Job
metadata:
  name: sysbench-oltp-test
  namespace: default
spec:
  backoffLimit: 0
  template:
    spec:
      restartPolicy: Never
      containers:
        - name: sysbench-oltp
          image: severalnines/sysbench
          env:
            - name: POLARDB_X_USER
              value: polardbx_root
            - name: POLARDB_X_PASSWD
              valueFrom:
                secretKeyRef:
                  name: polardb-x
                  key: polardbx_root
          command: [ 'sysbench' ]
          args:
            - --db-driver=mysql
            - --mysql-host=$(POLARDB_X_SERVICE_HOST)
            - --mysql-port=$(POLARDB_X_SERVICE_PORT)
            - --mysql-user=$(POLARDB_X_USER)
            - --mysql_password=$(POLARDB_X_PASSWD)
            - --mysql-db=sysbench_test
            - --mysql-table-engine=innodb
            - --rand-init=on
            - --max-requests=0
            - --oltp-tables-count=1
            - --report-interval=5
            - --oltp-table-size=160000
            - --oltp_skip_trx=on
            - --oltp_auto_inc=off
            - --oltp_secondary
            - --oltp_range_size=5
            - --mysql-ignore-errors=all
            - --num-threads=8
            - --time=3600
            - /usr/share/sysbench/tests/include/oltp_legacy/oltp.lua
            - run
- Execute the following command , Run the startup pressure measurement sysbench-oltp.yaml file , Start the pressure test .
kubectl apply -f sysbench-oltp.yaml
- Execute the following command , Find the one where the pressure test script runs POD.
kubectl get pods
- Execute the following command , see QPS Equal flow data .
kubectl logs -f The goal is POD
5. Experience PolarDB-X High availability
After the previous preparations , We've used PolarDB-X+Sysbench OLTP Built a running business system . This step will be done by using kill POD The way , Simulate physical downtime 、 Node unavailability caused by network disconnection , And observe the business QPS The change of .
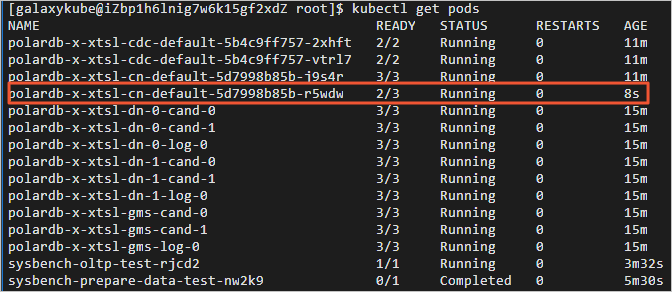
- Switch to account galaxykube, obtain CN POD Name . The results are as follows , With ‘polardb-x-xxxx-cn-default’ The first is CN POD Name .
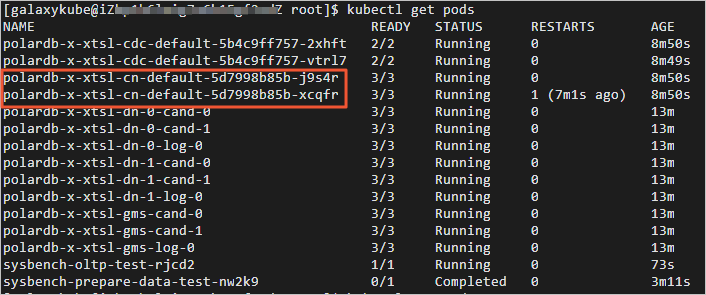
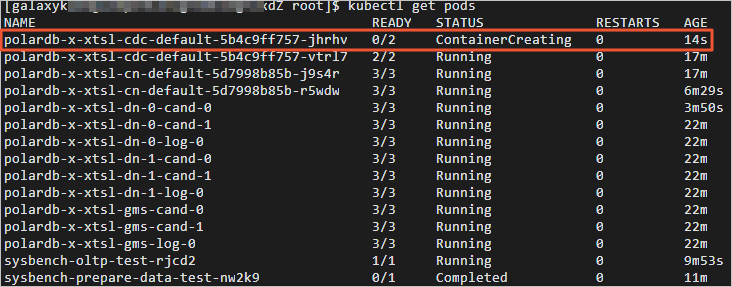
2. Delete any one CN POD, see CN POD Automatically create situations . The results are as follows , You can see CN POD Already in automatic creation . After dozens of seconds , By kill Of CN POD Automatic return to normal . Switch to terminal 2 , You can see kill CN Subsequent business QPS The situation of .
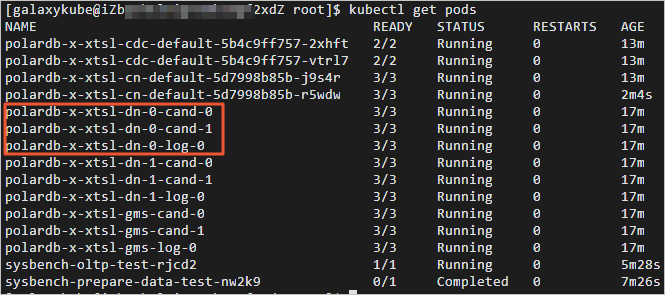
3. Switch to terminal 3 , obtain DN POD Name . The results are as follows , With ‘polardb-x-xxxx-dn’ The first is DN POD Name .
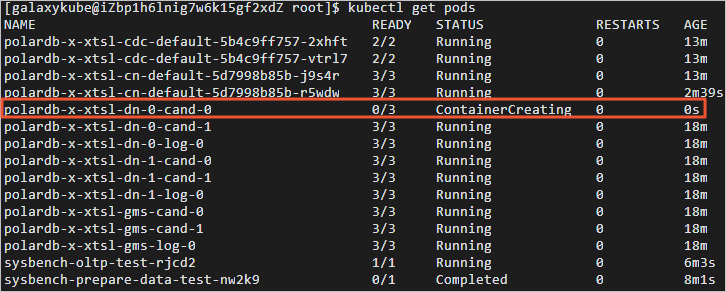
4. Execute the following command , Delete any one DN POD, see DN POD Automatically create situations . The results are as follows , You can see DN POD Already in automatic creation . After dozens of seconds , By kill Of DN POD Automatic return to normal . Switch to terminal 2 , You can see kill DN Subsequent business QPS The situation of .
5. Switch to terminal 3 , obtain CDC POD Name . The results are as follows , With ‘polardb-x-xxxx-cdc-defaul’ The first is CDC POD Name .
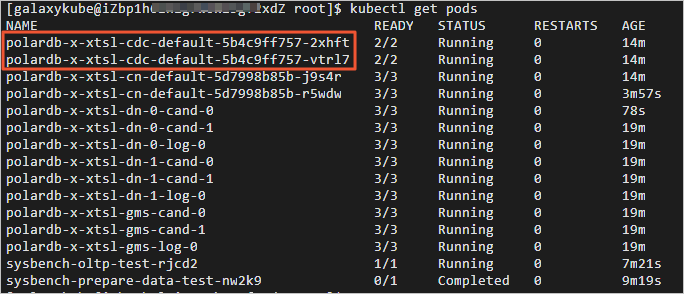
6. Delete any one CDC POD, see CDC POD Automatically create situations . The results are as follows , You can see CDC POD Already in automatic creation . After dozens of seconds , By kill Of CDC POD Automatic return to normal . Switch to terminal 2 , You can view kill CDC Subsequent business QPS The situation of .
Four 、 How to link the big data screen
1. Create experimental resources / install PolarDB-X
Before you start the experiment , You need to create ECS Instance resources , Then install and start Docker, Final installation PolarDB-X
2. stay PolarDB-X Prepare the order form in
PolarDB-X Supported by MySQL Client Command line 、 Third party clients and compliance MySQL Third party program code of interaction protocol to connect . This experiment uses MySQL Client The command line connects to PolarDB-X database .
- install MySQL, see MySQL Version number . Execute the following command , Sign in PolarDB-X database .
mysql -h127.0.0.1 -P8527 -upolardbx_root -p123456
2. perform SQL sentence , Create and use test libraries mydb.
3. The implementation is as follows SQL sentence , Create order form orders.
CREATE TABLE `orders` (
 `order_id` int(11) NOT NULL AUTO_INCREMENT,
 `order_date` datetime NOT NULL,
 `customer_name` varchar(255) NOT NULL,
 `price` decimal(10, 5) NOT NULL,
 `product_id` int(11) NOT NULL,
 `order_status` tinyint(1) NOT NULL,
 PRIMARY KEY (`order_id`)
)AUTO_INCREMENT = 10001;
4. The implementation is as follows SQL sentence , To order form orders Insert data .
INSERT INTO orders
VALUES (default, '2020-07-30 10:08:22', 'Jark', 50.50, 102, false),
       (default, '2020-07-30 10:11:09', 'Sally', 15.00, 105, false),
       (default, '2020-07-30 12:00:30', 'Edward', 25.25, 106, false);
3. function Flink
- install JDK.
Use yum install JDK 1.8, Check whether the installation is successful . The results are as follows , Indicates that you have successfully installed JDK 1.8.

- download Flink and Flink CDC MySQL Connector.
Download and unzip Flink, Get into lib Catalog . Execute the following command , download flink-sql-connector-mysql-cdc.
wget https://labfileapp.oss-cn-hangzhou.aliyuncs.com/PolarDB-X/flink-sql-connector-mysql-cdc-2.2.1.jar
- start-up Flink.
a. Execute the following command , start-up Flink.
./bin/start-cluster.sh
b. Execute the following command , Connect Flink.
./bin/sql-client.sh
- stay Flink And PolarDB-X Associated order table orders.
a. The implementation is as follows SQL sentence , Create order form orders.
CREATE TABLE orders (
 order_id INT,
 order_date TIMESTAMP(0),
 customer_name STRING,
 price DECIMAL(10, 5),
 product_id INT,
 order_status BOOLEAN,
 PRIMARY KEY (order_id) NOT ENFORCED
) WITH (
'connector' = 'mysql-cdc',
'hostname' = 'localhost',
'port' = '8527',
'username' = 'polardbx_root',
'password' = '123456',
'database-name' = 'mydb',
'table-name' = 'orders'
);
b. The implementation is as follows SQL sentence , Check the order form orders. You can see that PolarDB-X Order form orders Your data has been synchronized to Flink Order form orders in .
select * from orders;
4. Start the pressure test script and get it in real time GMV
After the previous steps , We are PolarDB-X The original order form is ready in , stay Flink The corresponding order table is prepared in , And pass PolarDB-X Global Binlog And Flink CDC MySQL Connector The real-time synchronization link between the two is opened . This step will guide you on how to create a pressure test script , Simulate the scene of a large number of orders pouring in at double 11:00 .
- Prepare the pressure test script .
a. Create a new terminal 2 , The configuration file mysql-config.cnf. Add the following code to the configuration file mysql-config.cnf in .
[client]
user = "polardbx_root"
password = "123456"
host = 127.0.0.1
port = 8527
b. When I'm done , Press down Esc Post key , Input :wq Then press Enter Key save and exit . Create script buy.sh, Add the following code to the script buy.sh in . When I'm done , Press down Esc Post key , Input :wq Then press Enter Key save and exit .
#!/bin/bash

echo "start buying..."

count=0
while :
do
 mysql --defaults-extra-file=./mysql-config.cnf -Dmydb -e "insert into orders values(default, now(), 'free6om', 1024, 102, 0)"
 let count++
 if ! (( count % 10 )); then
  let "batch = count/10"
  echo $batch": got 10 products, gave 1024¥"
 fi
 sleep 0.05
done
c. Execute the following command , For script buy.sh Add execution permission .
chmod +x buy.sh
- start-up Flink Real time computing .
Switch to terminal I , stay Flink The following is executed in SQL sentence , Inquire about GMV(gmv Column ) And orders (orders Column ).
select 1, sum(price) as gmv, count(order_id) as orders from orders;
- Start the pressure test script .
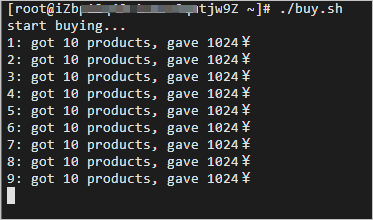
a. Switch to terminal 2 , Execute the following command , Start the pressure test script , Start order creation .
b. Switch to terminal I , stay Flink In the real-time calculation results of , Real time GMV(gmv Column ) And orders (orders Column ).

