当前位置:网站首页>Image classification, just look at me!
Image classification, just look at me!
2022-07-05 18:02:00 【Everything】

List of articles
- Preface
- Support model ( Click to jump to the training your dataset tutorial page )
- Environment building
- Data set preparation
- Profile explanation
- How to train
- Model to evaluate
- Add new model components
- Category activation diagram visualization
- Visualization of learning rate strategies
- Pre training weights
Preface
Project address :https://github.com/Fafa-DL/Awesome-Backbones
cannot access GitHub: official account 【 A graduate student who knows everything 】- Course resources - My project -00
Video tutorial :https://www.bilibili.com/video/BV1SY411P7Nd
This article is used to take care of inaccessible Github Classmate ~
The original :
- Help everyone from simple LeNet Network to Transformer Repeat learning on the Internet ;
- Help improve the ability to read engineering code ;
- Help with network comparison / Alchemy / Hair paper
Support model ( Click to jump to the training your dataset tutorial page )
- LeNet5
- AlexNet
- VGG
- DenseNet
- ResNet
- ResNeXt
- SEResNet
- SEResNeXt
- RegNet
- MobileNetV2
- MobileNetV3
- ShuffleNetV1
- ShuffleNetV2
- EfficientNet
- RepVGG
- Res2Net
- ConvNeXt
- HRNet
- ConvMixer
- CSPNet
- Swin-Transformer
- Vision-Transformer
- Transformer-in-Transformer
- MLP-Mixer
- DeiT
- Conformer
- T2T-ViT
- Twins
- PoolFormer
- VAN
Environment building
- It is recommended to use Anaconda Environmental Management , The commands to create the environment are as follows
conda create -n [name] python=3.6 among [name] Change to your own environment name , Such as [name]->torch,conda create -n torch python=3.6
- My test environment is as follows
torch==1.7.1
torchvision==0.8.2
scipy==1.4.1
numpy==1.19.2
matplotlib==3.2.1
opencv_python==3.4.1.15
tqdm==4.62.3
Pillow==8.4.0
h5py==3.1.0
terminaltables==3.1.0
packaging==21.3
- First installation Pytorch. The suggested version is the same as mine , Get into Pytorch Official website , Click on
install previous versions of PyTorch, With 1.7.1 For example , The installation given on the official website is as follows , Choose the right one cuda edition
# CUDA 11.0
pip install torch==1.7.1+cu110 torchvision==0.8.2+cu110 torchaudio==0.7.2 -f https://download.pytorch.org/whl/torch_stable.html

# CUDA 10.2
pip install torch==1.7.1 torchvision==0.8.2 torchaudio==0.7.2

# CUDA 10.1
pip install torch==1.7.1+cu101 torchvision==0.8.2+cu101 torchaudio==0.7.2 -f https://download.pytorch.org/whl/torch_stable.html

# CUDA 9.2
pip install torch==1.7.1+cu92 torchvision==0.8.2+cu92 torchaudio==0.7.2 -f https://download.pytorch.org/whl/torch_stable.html

# CPU only
pip install torch==1.7.1+cpu torchvision==0.8.2+cpu torchaudio==0.7.2 -f https://download.pytorch.org/whl/torch_stable.html
- installed Pytorch after , Run again
pip install -r requirements.txt
Data set preparation
1. Label file making
- This demonstration takes flower data set as an example , The directory structure is as follows :
├─flower_photos
│  ├─daisy
│  │      100080576_f52e8ee070_n.jpg
│  │      10140303196_b88d3d6cec.jpg
│  │      ...
│  ├─dandelion
│  │      10043234166_e6dd915111_n.jpg
│  │      10200780773_c6051a7d71_n.jpg
│  │      ...
│  ├─roses
│  │      10090824183_d02c613f10_m.jpg
│  │      102501987_3cdb8e5394_n.jpg
│  │      ...
│  ├─sunflowers
│  │      1008566138_6927679c8a.jpg
│  │      1022552002_2b93faf9e7_n.jpg
│  │      ...
│  └─tulips
│  │      100930342_92e8746431_n.jpg
│  │      10094729603_eeca3f2cb6.jpg
│  │      ...
- stay
Awesome-Backbones/datas/Create a label file inannotations.txt, By rowClass alias Indexeswrite file ;
daisy 0
dandelion 1
roses 2
sunflowers 3
tulips 4
2. Data set partitioning
- open
Awesome-Backbones/tools/split_data.py - modify
Original dataset pathas well asDivided save path, It is strongly recommended that the divided save pathdatasetsDon't change it , The next step is to operate based on the folder by default
init_dataset = 'A:/flower_photos'
new_dataset = 'A:/Awesome-Backbones/datasets'
- stay
Awesome-Backbones/Open the terminal and enter the command :
python tools/split_data.py
- The format of the divided data set is as follows :
├─...
├─datasets
│  ├─test
│  │  ├─daisy
│  │  ├─dandelion
│  │  ├─roses
│  │  ├─sunflowers
│  │  └─tulips
│  └─train
│      ├─daisy
│      ├─dandelion
│      ├─roses
│      ├─sunflowers
│      └─tulips
├─...
3. Data set information file making
- Ensure that the divided data set is in
Awesome-Backbones/datasetsNext , If not, thenget_annotation.pyNext, modify the data set path ;
datasets_path = ' Your dataset path '
- stay
Awesome-Backbones/Open the terminal and enter the command :
python tools/get_annotation.py
- stay
Awesome-Backbones/datasGet the generated dataset information filetrain.txtAndtest.txt
Profile explanation
- Each model has its own configuration file , Save in
Awesome-Backbones/modelsNext - Model
'''  from backbone、neck、head、head.loss Form a complete model ; type Corresponding to the corresponding structure , Then the parameters needed to build the structure , Each profile has been set ;  In the configuration file  `type`  It is not a parameter at the time of construction , It's the class name .  What needs to be modified :num_classes Change to corresponding quantity , For example, flower data sets fall into five categories , be `num_classes=5`  Note that if ` The number of categories is less than 5` At this time, it defaults to top5 Accuracy rate is 100% '''
model_cfg = dict(
    backbone=dict(
        type='ResNet',          #  Backbone network type
        depth=50,               #  Backbone network depth , ResNet  Generally speaking, there are 18, 34, 50, 101, 152  You can choose
        num_stages=4,           #  Backbone network status (stages) Number of , These States produce characteristic graphs as follow  head  The input of .
        out_indices=(3, ),      #  Output characteristic graph output index . The farther away from the input image , The larger the index
        frozen_stages=-1,       #  Network tuning , Freeze the network stage( The inverse propagation algorithm is not executed during training ), if num_stages=4,backbone contain stem  And  4  individual  stages.frozen_stages by -1 when , Do not freeze the network ;  by 0 when , frozen  stem;  by 1 when , frozen  stem  and  stage1;  by 4 when , Freeze the whole backbone
        style='pytorch'),       #  Backbone style ,'pytorch'  It means that the step length is 2 The layer of is  3x3  Convolution , 'caffe'  It means that the step length is 2 The layer of is  1x1  Convolution .
    neck=dict(type='GlobalAveragePooling'),    #  Neck network type
    head=dict(
        type='LinearClsHead',     #  Linear classification header ,
        num_classes=1000,         #  Number of output categories , This is consistent with the number of categories in the dataset
        in_channels=2048,         #  Enter the number of channels , This is related to  neck  The output channels of are consistent
        loss=dict(type='CrossEntropyLoss', loss_weight=1.0), #  Loss function configuration information
        topk=(1, 5),              #  Evaluation indicators ,Top-k  Accuracy rate ,  Here for  top1  And  top5  Accuracy rate
    ))
- Datasets
'''  This part corresponds to the construction training / During the test Datasets, Use torchvision.transforms Pre treatment ; size=224 After final treatment , Image size of feed network ; Normalize Corresponding to normalization , By default ImageNet Mean and variance of data set , If you have parameters of your own dataset , You can choose to overwrite . '''
train_pipeline = (
    dict(type='RandomResizedCrop', size=224),
    dict(type='RandomHorizontalFlip', p=0.5),
    dict(type='ToTensor'),
    dict(type='Normalize', mean=[0.485, 0.456, 0.406], std=[0.229, 0.224, 0.225]),
    dict(type='RandomErasing',p=0.2,ratio=(0.02,1/3)),
)
val_pipeline = (
    dict(type='Resize', size=256),
    dict(type='CenterCrop', size=224),
    dict(type='ToTensor'),
    dict(type='Normalize', mean=[0.485, 0.456, 0.406], std=[0.229, 0.224, 0.225])
)
- Train/Test
'''  This part corresponds to training / Test the required parameters ; batch_size :  Adjust according to your own equipment , The suggestion is `2` Multiple  num_workers : Dataloader Number of threads loading data in , Adjust according to your own equipment  pretrained_flag :  If pre training weights are used , Is set to True pretrained_weights :  Weight path  freeze_flag :  If you freeze some training , Is set to True freeze_layers : The options for freezing are backbone, neck, head epoches :  Maximum iteration period  ckpt :  Weight files needed to evaluate the model   Note that if ` The number of categories is less than 5` At this time, it defaults to top5 Accuracy rate is 100% ` Other parameters need not be changed ` '''
data_cfg = dict(
    batch_size = 32,
    num_workers = 4,
    train = dict(
        pretrained_flag = False,
        pretrained_weights = './datas/mobilenet_v3_small.pth',
        freeze_flag = False,
        freeze_layers = ('backbone',),
        epoches = 100,
    ),
    test=dict(
        ckpt = 'logs/20220202091725/Val_Epoch019-Loss0.215.pth',
        metrics = ['accuracy', 'precision', 'recall', 'f1_score', 'confusion'],
        metric_options = dict(
            topk = (1,5),
            thrs = None,
            average_mode='none'
    ))
)
- Optimizer
'''  Optimizer during training , And torch.optim Corresponding  type : 'RMSprop' Corresponding torch.optim.RMSprop, Can be found in torch.optim see  PyTorch Support Adadelta、Adagrad、Adam、AdamW、SparseAdam、Adamax、ASGD、SGD、Rprop、RMSprop、Optimizer、LBFGS  You can choose the optimizer according to your needs  lr :  Initial learning rate , According to oneself Batch Size adjustment  ckpt :  Weight files needed to evaluate the model   Other parameters need not be changed  '''
optimizer_cfg = dict(
    type='RMSprop',
    lr=0.001,
    alpha=0.9,
    momentum=0.9,
    eps=0.0316,
    weight_decay=1e-5)
- Learning Rate
'''  Learning rate update strategy , Each method can be found in Awesome-Backbones/core/optimizers/lr_update.py see  StepLrUpdater :  Linear decline  CosineAnnealingLrUpdater :  Cosine annealing  by_epoch :  Whether each Epoch Update learning rate  warmup :  Use... Before formally using the learning rate update strategy warmup Primary school habituation training , Optional constant, linear, exp warmup_ratio :  And `Optimizer` Medium `lr` Combine the selected warmup Method to update the learning rate calculation  warmup_by_epoch :  The functions and `by_epoch` similar , if False, For each step (Batch) updated , Otherwise, every cycle  warmup_iters : warmup Duration of action ,warmup_by_epoch by True Represents the period ,False Represents the number of steps  '''
lr_config = dict(
    type='CosineAnnealingLrUpdater',
    by_epoch=False,
    min_lr_ratio=1e-2,
    warmup='linear',
    warmup_ratio=1e-3,
    warmup_iters=20,
    warmup_by_epoch=True)
How to train
- confirm
Awesome-Backbones/datas/annotations.txtThe label is ready - confirm
Awesome-Backbones/datas/Nexttrain.txtAndtest.txtAndannotations.txtCorresponding - Select the model you want to train , stay
Awesome-Backbones/models/Find the corresponding configuration file - according to
Profile explanationModify the parameters - stay
Awesome-BackbonesTurn on the terminal to run
python tools/train.py models/mobilenet/mobilenet_v3_small.py
Command line :
python tools/train.py \
    ${CONFIG_FILE} \
    [--resume-from] \
    [--seed] \
    [--device] \
    [--gpu-id] \
    [--deterministic] \
Description of all parameters :
config: Path to the model configuration file .--resume-from: Resume training from the break , Provide weight path ,Be sure to note that the correct way to recover is from Last_Epoch***.pth, Such as –resume-from logs/SwinTransformer/2022-02-08-08-27-41/Last_Epoch15.pth--seed: Set random number seed , By default, it is set according to the environment--device: Set up GPU or CPU Training--gpu-id: Appoint GPU equipment , The default is 0( Single cards are basically 0 No need to change )--deterministic: many GPU Training related , Do not set
Model to evaluate
- confirm
Awesome-Backbones/datas/annotations.txtThe label is ready - confirm
Awesome-Backbones/datas/Nexttest.txtAndannotations.txtCorresponding - stay
Awesome-Backbones/models/Find the corresponding configuration file - according to
Profile explanationModify the parameters , Mainly modify the weight path - stay
Awesome-BackbonesTurn on the terminal to run
python tools/evaluation.py models/mobilenet/mobilenet_v3_small.py
- Single image test , stay
Awesome-BackbonesTurn on the terminal to run
python tools/single_test.py datasets/test/dandelion/14283011_3e7452c5b2_n.jpg models/mobilenet/mobilenet_v3_small.py
Parameter description :
img : Single image path tested
config : Model configuration file , Pay attention to modifying the configuration file data_cfg->test->ckpt Weight path , This weight will be used for prediction
--device : Reasoning equipment , Default GPU
--save-path : Save the path , The default is not to save
Add new model components
- A complete model consists of
Backbone、Neck、Head、Lossform , In the folderconfigsYou can find - Backbone network : It is usually a feature extraction network , for example ResNet、MobileNet
- neck : Components used to connect the backbone network and the head , for example GlobalAveragePooling
- Head : Components used to perform specific tasks , For example, classification and regression
- Loss : Used to calculate the deviation between the predicted value and the real value
Add a new backbone Backbone
 With  `ResNet_CIFAR`  For example

ResNet_CIFAR  in the light of  CIFAR 32x32  Image input , take  ResNet  in  kernel_size=7, stride=2  Replace the setting of with  kernel_size=3, stride=1, And removed  stem  After layer  MaxPooling, To avoid passing too small feature map to residual block .

 It is inherited from  ResNet  And only modified  stem  layer .
- Create a new file
configs/backbones/resnet_cifar.py.
import torch.nn as nn

from ..common import BaseModule
from .resnet import ResNet


class ResNet_CIFAR(ResNet):

    """ResNet backbone for CIFAR. ( A brief description of this backbone network ) Args: depth(int): Network depth, from {18, 34, 50, 101, 152}. ... ( Parameter document ) """

    def __init__(self, depth, deep_stem=False, **kwargs):
        #  Call the base class  ResNet  Initialization function for
        super(ResNet_CIFAR, self).__init__(depth, deep_stem=deep_stem **kwargs)
        #  Other special initialization processes
        assert not self.deep_stem, 'ResNet_CIFAR do not support deep_stem'

    def _make_stem_layer(self, in_channels, base_channels):
        #  Overloading the methods of the base class , To realize the modification of the network structure
        self.conv1 = build_conv_layer(
            self.conv_cfg,
            in_channels,
            base_channels,
            kernel_size=3,
            stride=1,
            padding=1,
            bias=False)
        self.norm1_name, norm1 = build_norm_layer(
            self.norm_cfg, base_channels, postfix=1)
        self.add_module(self.norm1_name, norm1)
        self.relu = nn.ReLU(inplace=True)

    def forward(self, x):  #  You need to return a tuple
        pass  #  The forward implementation of the network is omitted here

    def init_weights(self, pretrained=None):
        pass  #  If necessary , Overloading base classes  ResNet  Parameter initialization function of

    def train(self, mode=True):
        pass  #  If necessary , Overloading base classes  ResNet  Training state function
- stay
configs/backbones/__init__.pyImport a new module
...
from .resnet_cifar import ResNet_CIFAR

__all__ = [
    ..., 'ResNet_CIFAR'
]
- Use the new backbone network in the configuration file
model_cfg = dict(
    backbone=dict(
        type='ResNet_CIFAR',
        depth=18,
        other_arg=xxx),
    ...
Add a new neck Neck
 With  `GlobalAveragePooling`  For example

 To add a new neck component , It mainly needs to realize  forward  function , This function performs   Some operations and pass the results to the head .
- Create a new file
configs/necks/gap.py
import torch.nn as nn


class GlobalAveragePooling(nn.Module):

    def __init__(self):
        self.gap = nn.AdaptiveAvgPool2d((1, 1))

    def forward(self, inputs):
        #  Simplicity , Our default input is a tensor
        outs = self.gap(inputs)
        outs = outs.view(inputs.size(0), -1)
        return outs
stay configs/necks/__init__.pyImport a new module
...
from .gap import GlobalAveragePooling

__all__ = [
    ..., 'GlobalAveragePooling'
]
- Modify the configuration file to use the new neck assembly
model_cfg = dict(
    neck=dict(type='GlobalAveragePooling'),
)
Add a new header Head
 With  `LinearClsHead`  For example

 To add a new neck component , It mainly needs to realize  forward  function , This function performs   Some operations and pass the results to the head .
- Create a new file
configs/heads/linear_head.py
from .cls_head import ClsHead

class LinearClsHead(ClsHead):

    def __init__(self,
              num_classes,
              in_channels,
              loss=dict(type='CrossEntropyLoss', loss_weight=1.0),
              topk=(1, )):
        super(LinearClsHead, self).__init__(loss=loss, topk=topk)
        self.in_channels = in_channels
        self.num_classes = num_classes

        if self.num_classes <= 0:
            raise ValueError(
                f'num_classes={
      num_classes} must be a positive integer')

        self._init_layers()

    def _init_layers(self):
        self.fc = nn.Linear(self.in_channels, self.num_classes)

    def init_weights(self):
        normal_init(self.fc, mean=0, std=0.01, bias=0)

    def forward_train(self, x, gt_label):
        cls_score = self.fc(x)
        losses = self.loss(cls_score, gt_label)
        return losses
stay configs/heads/__init__.pyImport a new module
...
from .linear_head import LinearClsHead

__all__ = [
    ..., 'LinearClsHead'
]
- Modify the configuration file to use the new neck assembly , together with GlobalAveragePooling Neck assembly , The complete model configuration is as follows :
model_cfg = dict(
    backbone=dict(
        type='ResNet',
        depth=50,
        num_stages=4,
        out_indices=(3, ),
        style='pytorch'),
    neck=dict(type='GlobalAveragePooling'),
    head=dict(
        type='LinearClsHead',
        num_classes=1000,
        in_channels=2048,
        loss=dict(type='CrossEntropyLoss', loss_weight=1.0),
        topk=(1, 5),
    ))
Add a new loss function Loss
 To add a new loss function , Mainly in the loss function module  forward  function . in addition , Using decorators  weighted_loss  It is convenient to realize the weighted average of the loss of each element .

 Suppose we want to simulate the probability distribution generated from another classification model , Need to add  L1loss  To achieve that goal .
- Create a new file
configs/losses/l1_loss.py
import torch
import torch.nn as nn

from .utils import weighted_loss

@weighted_loss
def l1_loss(pred, target):
    assert pred.size() == target.size() and target.numel() > 0
    loss = torch.abs(pred - target)
    return loss

class L1Loss(nn.Module):

    def __init__(self, reduction='mean', loss_weight=1.0):
        super(L1Loss, self).__init__()
        self.reduction = reduction
        self.loss_weight = loss_weight

    def forward(self,
                pred,
                target,
                weight=None,
                avg_factor=None,
                reduction_override=None):
        assert reduction_override in (None, 'none', 'mean', 'sum')
        reduction = (
            reduction_override if reduction_override else self.reduction)
        loss = self.loss_weight * l1_loss(
            pred, target, weight, reduction=reduction, avg_factor=avg_factor)
        return loss
stay configs/losses/__init__.pyImport a new module
...
from .l1_loss import L1Loss, l1_loss

__all__ = [
    ..., 'L1Loss', 'l1_loss'
]
- Modify... In the configuration file
lossField to use the new loss function
loss=dict(type='L1Loss', loss_weight=1.0))
Category activation diagram visualization
- Provide
tools/vis_cam.pyTools to visualize category activation diagrams . Please usepip install grad-camInstallation dependency , edition ≥1.3.6 - stay
Awesome-Backbones/models/Find the corresponding configuration file - modify data_cfg in test Of ckpt route , Change to the weight after training
Currently supported methods are :
| Method | What it does |
|---|---|
| GradCAM | Use the average gradient pair 2D Activate for weighting |
| GradCAM++ | similar GradCAM, But two steps are used |
| XGradCAM | similar GradCAM, But the gradient is weighted by normalized activation |
| EigenCAM | Use 2D The first principal component of activation ( Cannot distinguish between categories , But the effect seems good ) |
| EigenGradCAM | similar EigenCAM, But it supports category differentiation , Activation is used * The first principal component of the gradient , Looks like GradCAM almost , But cleaner |
| LayerCAM | The activation is spatially weighted using a positive gradient , It has better effect for shallow layer |

Command line :
python tools/vis_cam.py \
    ${IMG} \
    ${CONFIG_FILE} \
    [--target-layers ${TARGET-LAYERS}] \
    [--preview-model] \
    [--method ${METHOD}] \
    [--target-category ${TARGET-CATEGORY}] \
    [--save-path ${SAVE_PATH}] \
    [--vit-like] \
    [--num-extra-tokens ${NUM-EXTRA-TOKENS}]
    [--aug_smooth] \
    [--eigen_smooth] \
    [--device ${DEVICE}] \
Description of all parameters :
img: Target image path .config: Path to the model configuration file . Pay attention to modifying the configuration filedata_cfg->test->ckptWeight path , This weight will be used for prediction--target-layers: Network layer name viewed , You can enter one or more network layers , If not set , The last one will be usedblockMediumnormlayer .--preview-model: Whether to view all network layers of the model .--method: Category activates the method of graph visualization , At present, we supportGradCAM,GradCAM++,XGradCAM,EigenCAM,EigenGradCAM,LayerCAM, Case insensitive . If not set , The default isGradCAM.--target-category: View target categories , If not set , Use the category detected by the model as the target category .--save-path: The path of the saved visual image , The default is not to save .--eigen-smooth: Whether to use principal components to reduce noise , Not on by default .--vit-like: Is itViTAllied Transformer-based The Internet--num-extra-tokens:ViTNetwork like extras tokens The channel number , By default, the backbone network is usednum_extra_tokens.--aug-smooth: Whether to use test time enhancement--device: Computing devices used , If not set , The default is ’cpu’.
In the specified `--target-layers` when , If you don't know which network layers the model has , You can use the command line to add `--preview-model` View all network layer names ;
Example (CNN):
- Visualize using different methods
MobileNetV3, Defaulttarget-categoryFor the results of model testing , Use default derivedtarget-layers.
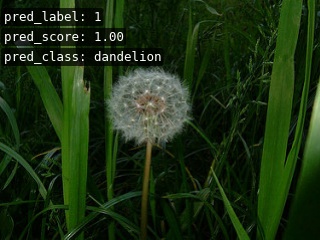
python tools/vis_cam.py datasets/test/dandelion/14283011_3e7452c5b2_n.jpg models/mobilenet/mobilenet_v3_small.py
- Specify different types of activation effect pictures in the same picture , Given the category index
python tools/vis_cam.py datasets/test/dandelion/14283011_3e7452c5b2_n.jpg models/mobilenet/mobilenet_v3_small.py --target-category 1
- Use
--eigen-smoothas well as--aug-smoothGet better visualization .
python tools/vis_cam.py datasets/test/dandelion/14283011_3e7452c5b2_n.jpg models/mobilenet/mobilenet_v3_small.py --eigen-smooth --aug-smooth
Example (Transformer):
about Transformer-based Network of , such as ViT、T2T-ViT and Swin-Transformer, Features are flattened . To draw CAM chart , You need to specify the --vit-like Options , So that the flattened features can be restored to the square feature map .
In addition to features being flattened , Some classes ViT Your network will also add additional tokens. such as ViT and T2T-ViT Added classification token,DeiT Distillation is also added in token. In these networks , The classification calculation has been completed after the last attention module , The classification score is only related to these extra tokens of , It has nothing to do with the characteristic diagram , in other words , The derivative of the classification score to these characteristic graphs is 0. therefore , We cannot use the output of the last attention module as CAM Painted target layer .
in addition , To get rid of these extra toekns To get the characteristic map , We need to know these extra tokens The number of .MMClassification Almost all of Transformer-based All networks have num_extra_tokens attribute . And if you want to apply this tool to new , Or third-party Networks , And the network is not specified num_extra_tokens attribute , Then you can use --num-extra-tokens Parameter manually specify its quantity .
- Yes
Swin TransformerUse the defaulttarget-layersConduct CAM visualization :
python tools/vis_cam.py datasets/test/dandelion/14283011_3e7452c5b2_n.jpg models/swin_transformer/tiny_224.py --vit-like
- Yes
Vision Transformer(ViT)Conduct CAM visualization ( After testing, it is not added –target-layer Even the default effect is similar ):
python tools/vis_cam.py datasets/test/dandelion/14283011_3e7452c5b2_n.jpg models/vision_transformer/vit_base_p16_224.py --vit-like --target-layers backbone.layers[-1].ln1
- Yes
T2T-ViTConduct CAM visualization :
python tools/vis_cam.py datasets/test/dandelion/14283011_3e7452c5b2_n.jpg models/t2t_vit/t2t_vit_t_14.py --vit-like --target-layers backbone.encoder[-1].ln1

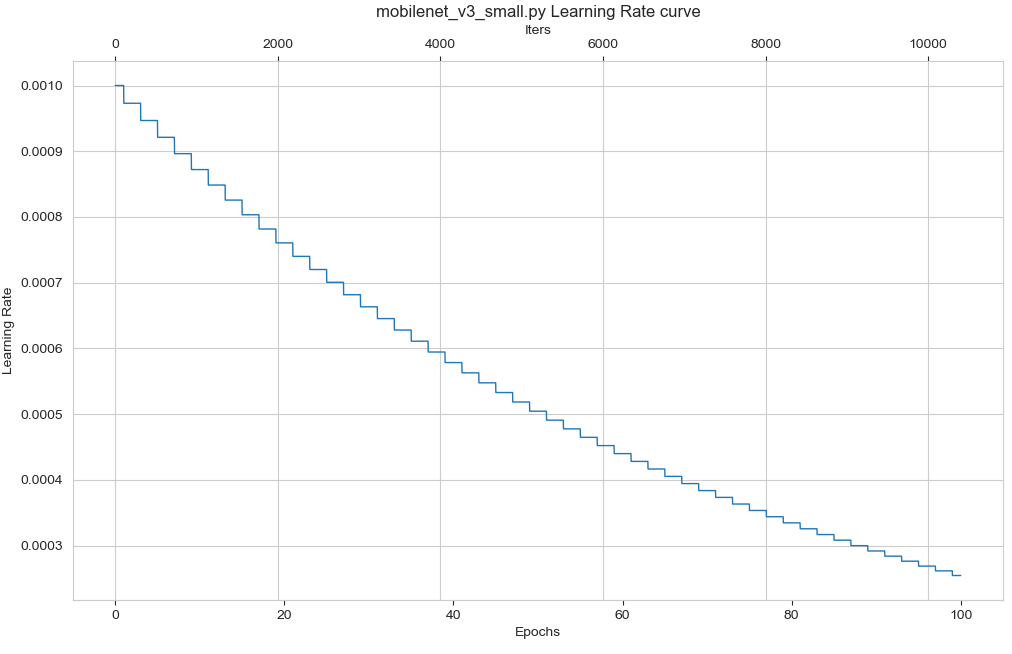
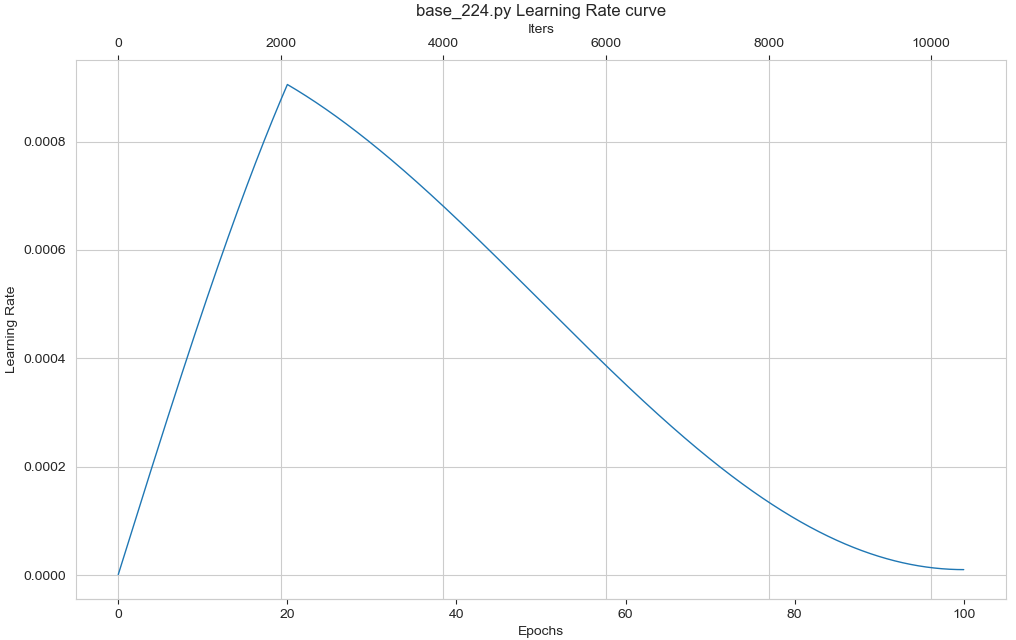
Visualization of learning rate strategies
- Provide
tools/vis_lr.pyTools to visualize learning rates .
Command line :
python tools/vis_lr.py \
    ${CONFIG_FILE} \
    [--dataset-size ${Dataset_Size}] \
    [--ngpus ${NUM_GPUs}] \
    [--save-path ${SAVE_PATH}] \
    [--title ${TITLE}] \
    [--style ${STYLE}] \
    [--window-size ${WINDOW_SIZE}] \
Description of all parameters :
config: Path to the model configuration file .--dataset-size: The size of the dataset . If specified ,datas/train.txtWill be skipped and used as the dataset size , By defaultdatas/train.txtThe size of the resulting dataset .--ngpus: Use GPU The number of .--save-path: The path of the saved visual image , The default is not to save .--title: The title of the visual image , The default is the configuration file name .--style: Visual image style , The default iswhitegrid.--window-size: Visualization window size , If not specified , The default is12*7. If you need to specify , By format'W*H'.
Some datasets are time-consuming in the parsing and annotation stage , You can directly put `dataset-size` Specify the size of the dataset , To save time .
Example Step:
python tools/vis_lr.py models/mobilenet/mobilenet_v3_small.py
Example Cos:
python tools/vis_lr.py models/swin_transformer/base_224.py
Pre training weights
边栏推荐
- Cmake tutorial Step2 (add Library)
- Eliminate the writing of 'if () else{}'
- Binder开辟线程数过多导致主线程ANR异常
- Sophon CE Community Edition is online, and free get is a lightweight, easy-to-use, efficient and intelligent data analysis tool
- IDC report: Tencent cloud database ranks top 2 in the relational database market!
- 证券网上开户安全吗?证券融资利率一般是多少?
- Cmake tutorial step1 (basic starting point)
- Which platform of outer disk gold is regular and safe, and how to distinguish it?
- LeetCode笔记:Weekly Contest 300
- How awesome is the architecture of "12306"?
猜你喜欢

EPM related
使用QT遍历Json文档及搜索子对象

IDC report: Tencent cloud database ranks top 2 in the relational database market!
What are the changes in the 2022 PMP Exam?
Sophon KG升级3.1:打破数据间壁垒,解放企业生产力
Binder开辟线程数过多导致主线程ANR异常
每日一练:关于日期的一系列

How awesome is the architecture of "12306"?
Zabbix
Anaconda中配置PyTorch环境——win10系统(小白包会)
随机推荐
ITK Example
使用Jmeter虚拟化table失败
集群部署如何解决海量视频接入与大并发需求?
Zabbix
mybash
Why is all (()) true and any (()) false?
Compared with the loss of Wenxin, the performance is improved a lot
消除`if()else{ }`写法
Use QT designer interface class to create two interfaces, and switch from interface 1 to interface 2 by pressing the key
Xiaobai getting started with NAS - quick building private cloud tutorial series (I) [easy to understand]
记一次使用Windbg分析内存“泄漏”的案例
Zabbix
JVM第三话 -- JVM性能调优实战和高频面试题记录
Disabling and enabling inspections pycharm
Cmake tutorial step1 (basic starting point)
flask接口响应中的中文乱码(unicode)处理
QT console printout
Numerical calculation method chapter8 Numerical solutions of ordinary differential equations
Ten top automation and orchestration tools
Eliminate the writing of 'if () else{}'