
In the private environment of some enterprises, it may not be possible to connect to the external network . If you want to deploy in such an environment Kubernetes colony , Can collect Kubernetes Deploy by offline installation . namely : Deploy using binary installation packages Kubernetes colony , The version used is Kubernetes v1.18.20.
The following steps demonstrate how to deploy three nodes using binary packages Kubernetes colony .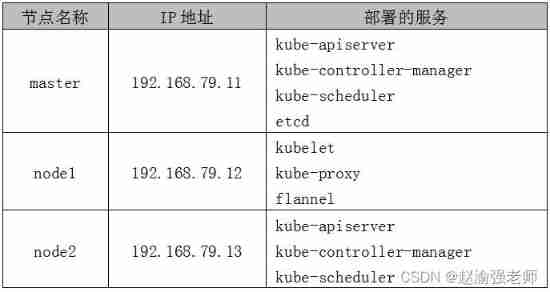
1. Deploy ETCD
(1) from GitHub Upload and download ETCD Binary installation package for “etcd-v3.3.27-linux-amd64.tar.gz”.
(2) from cfssl Download the required media on the official website , And install cfssl.
chmod +x cfssl_linux-amd64 cfssljson_linux-amd64
mv cfssl_linux-amd64 /usr/local/bin/cfssl
mv cfssljson_linux-amd64 /usr/local/bin/cfssljson
Tips : cfssl Is a command line toolkit , This toolkit contains all the functions needed to run a certification authority .
(3) Create for generating CA Configuration files for certificates and private keys , Execute the following command :
mkdir -p /opt/ssl/etcd
cd /opt/ssl/etcd
cfssl print-defaults config > config.json
cfssl print-defaults csr > csr.json

cat > config.json <<EOF
{
  "signing": {
    "default": {
      "expiry": "87600h"
    },
    "profiles": {
      "kubernetes": {
        "usages": [
            "signing",
            "key encipherment",
            "server auth",
            "client auth"
        ],
        "expiry": "87600h"
      }
    }
  }
}
EOF

cat > csr.json <<EOF
{
   "CN": "etcd",
   "key": {
     "algo": "rsa",
     "size": 2048
   },
   "names": [{
    "C": "CN",
    "ST": "BeiJing",
    "L": "BeiJing",
    "O": "k8s",
    "OU": "System"
   }]
   }
EOF
(4) Generate CA Certificate and private key .
cfssl gencert -initca csr.json | cfssljson -bare etcd(5) In the catalog “/opt/ssl/etcd” Add file below “etcd-csr.json”, This file is used to generate ETCD Certificate and private key of , The contents are as follows :
cat > etcd-csr.json <<EOF
{
  "CN": "etcd",
  "hosts": [
    "192.168.79.11"
  ],
  "key": {
    "algo": "rsa",
    "size": 2048
  },
  "names": [
    {
      "C": "CN",
      "ST": "BeiJing",
      "L": "BeiJing",
      "O": "etcd",
      "OU": "Etcd Security"
    }
  ]
}
EOF
Tips : There is only one deployed ETCD The node of . If it's deployment ETCD colony , You can modify the fields “hosts” Add multiple ETCD The node can be .
(6) install ETCD.
tar -zxvf etcd-v3.3.27-linux-amd64.tar.gz
cd etcd-v3.3.27-linux-amd64
cp etcd* /usr/local/bin
mkdir -p /opt/platform/etcd/
(7) Edit the file “/opt/platform/etcd/etcd.conf” add to ETCD Configuration information , The contents are as follows :
ETCD_NAME=k8s-etcd
ETCD_DATA_DIR="/var/lib/etcd/k8s-etcd"
ETCD_LISTEN_PEER_URLS="http://192.168.79.11:2380"
ETCD_LISTEN_CLIENT_URLS="http://127.0.0.1:2379,http://192.168.79.11:2379"
ETCD_INITIAL_ADVERTISE_PEER_URLS="http://192.168.79.11:2380"
ETCD_INITIAL_CLUSTER="k8s-etcd=http://192.168.79.11:2380"
ETCD_INITIAL_CLUSTER_STATE="new"
ETCD_INITIAL_CLUSTER_TOKEN="etcd-test"
ETCD_ADVERTISE_CLIENT_URLS="http://192.168.79.11:2379"
(8) take ETCD Services are added to system services , Edit the file “/usr/lib/systemd/system/etcd.service” The contents are as follows :
[Unit]
Description=Etcd Server
After=network.target
After=network-online.target
Wants=network-online.target

[Service]
Type=notify
EnvironmentFile=/opt/platform/etcd/etcd.conf
ExecStart=/usr/local/bin/etcd \
--cert-file=/opt/ssl/etcd/etcd.pem \
--key-file=/opt/ssl/etcd/etcd-key.pem \
--peer-cert-file=/opt/ssl/etcd/etcd.pem \
--peer-key-file=/opt/ssl/etcd/etcd-key.pem \
--trusted-ca-file=/opt/ssl/etcd/etcd.pem \
--peer-trusted-ca-file=/opt/ssl/etcd/etcd.pem
Restart=on-failure
LimitNOFILE=65536

[Install]
WantedBy=multi-user.target
(9) establish ETCD Data storage directory , Then start ETCD service .
mkdir -p /opt/platform/etcd/data
chmod 755 /opt/platform/etcd/data
systemctl daemon-reload
systemctl enable etcd.service
systemctl start etcd.service
(10) verification ETCD The state of .
etcdctl cluster-healthThe output information is as follows :
member fd4d0bd2446259d9 is healthy:
got healthy result from http://192.168.79.11:2379
cluster is healthy
(11) see ETCD Member list for .
etcdctl member listThe output information is as follows :
fd4d0bd2446259d9: name=k8s-etcd peerURLs=http://192.168.79.11:2380 clientURLs=http://192.168.79.11:2379 isLeader=trueTips : Because it is single node ETCD, So there is only one member information .
(12) take ETCD Copy of certificate file node1 and node2 Node .
cd /opt
scp -r ssl/ [email protected]:/opt
scp -r ssl/ [email protected]:/opt
2. Deploy Flannel The Internet
(1) stay master Write the allocated subnet segment on the node to ETCD Medium supply Flannel Use , Carry out orders :
etcdctl set /coreos.com/network/config '{ "Network": "172.17.0.0/16", "Backend": {"Type": "vxlan"}}'(2) stay master View the written on the node Flannel Subnet information , Carry out orders :
etcdctl get /coreos.com/network/configThe output information is as follows :
{ "Network": "172.17.0.0/16", "Backend": {"Type": "vxlan"}}(3) stay node1 Decompress flannel-v0.10.0-linux-amd64.tar.gz Installation package , Carry out orders :
tar -zxvf flannel-v0.10.0-linux-amd64.tar.gz(4) stay node1 To create a Kubernetes working directory .
mkdir -p /opt/kubernetes/{cfg,bin,ssl}
mv mk-docker-opts.sh flanneld /opt/kubernetes/bin/
(5) stay node1 Defined on the Flannel Script files “flannel.sh”, Enter the following :
#!/bin/bash
ETCD_ENDPOINTS=${1}

cat <<EOF >/opt/kubernetes/cfg/flanneld
FLANNEL_OPTIONS="--etcd-endpoints=${ETCD_ENDPOINTS} \
-etcd-cafile=/opt/ssl/etcd/etcd.pem \
-etcd-certfile=/opt/ssl/etcd/etcd.pem \
-etcd-keyfile=/opt/ssl/etcd/etcd-key.pem"
EOF

cat <<EOF >/usr/lib/systemd/system/flanneld.service
[Unit]
Description=Flanneld overlay address etcd agent
After=network-online.target network.target
Before=docker.service

[Service]
Type=notify
EnvironmentFile=/opt/kubernetes/cfg/flanneld
ExecStart=/opt/kubernetes/bin/flanneld --ip-masq \$FLANNEL_OPTIONS
ExecStartPost=/opt/kubernetes/bin/mk-docker-opts.sh -k DOCKER_NETWORK_OPTIONS -d /run/flannel/subnet.env
Restart=on-failure

[Install]
WantedBy=multi-user.target
EOF

systemctl daemon-reload
systemctl enable flanneld
systemctl restart flanneld
(6) stay node1 Turn on the node Flannel Network function , Carry out orders :
bash flannel.sh http://192.168.79.11:2379Tips : It is specified here that master Deployed on the node ETCD Address .
(7) stay node1 View on the node Flannel The state of the network , Carry out orders :
systemctl status flanneldThe output information is as follows :
flanneld.service - Flanneld overlay address etcd agent
 Loaded: loaded (/usr/lib/systemd/system/flanneld.service; enabled; vendor preset: disabled)
 Active: active (running) since Tue 2022-02-08 22:30:46 CST; 6s ago
(8) stay node1 Modify the file on the node “/usr/lib/systemd/system/docker.service” To configure node1 nodes Docker Connect Flannel The Internet , Add the following line to the file :
... ...
EnvironmentFile=/run/flannel/subnet.env
... ...
(9) stay node1 Restart on node Docker service .
systemctl daemon-reload
systemctl restart docker.service
(10) see node1 nodes Flannel Internet Information , Pictured 13-3 Shown :
ifconfig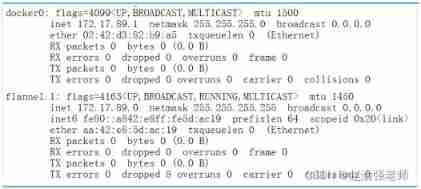
(11) stay node2 Configuration on node Flannel The Internet , Repeat the first 3 Step to step 10 Step .

3. Deploy Master node
(1) establish Kubernetes Cluster certificate Directory .
mkdir -p /opt/ssl/k8s
cd /opt/ssl/k8s
(2) Create script file “k8s-cert.sh” Used to generate Kubernetes Certificate of cluster , Enter the following in the script :
cat > ca-config.json <<EOF
{
  "signing": {
    "default": {
      "expiry": "87600h"
    },
    "profiles": {
      "kubernetes": {
        "usages": [
            "signing",
            "key encipherment",
            "server auth",
            "client auth"
        ],
        "expiry": "87600h"
      }
    }
  }
}
EOF

cat > ca-csr.json <<EOF
{
   "CN": "kubernetes",
   "key": {
     "algo": "rsa",
     "size": 2048
   },
   "names": [{
    "C": "CN",
    "ST": "BeiJing",
    "L": "BeiJing",
    "O": "k8s",
    "OU": "System"
   }]
   }
EOF

cfssl gencert -initca ca-csr.json | cfssljson -bare ca

cat >server-csr.json<<EOF
{
  "CN": "kubernetes",
  "hosts": [
     "192.168.79.11",
     "127.0.0.1",
     "kubernetes",
     "kubernetes.default",
     "kubernetes.default.svc",
     "kubernetes.default.svc.cluster",
     "kubernetes.default.svc.cluster.local"
  ],
  "key": {
    "algo": "rsa",
    "size": 2048
  },
  "names": [
    {
      "C": "CN",
      "L": "BeiJing",
      "ST": "BeiJing",
      "O": "system:masters",
      "OU": "System"
    }
  ]
}
EOF

cfssl gencert -ca=ca.pem -ca-key=ca-key.pem \
-config=ca-config.json -profile=kubernetes \
server-csr.json | cfssljson -bare server

cat >admin-csr.json <<EOF
{
  "CN": "admin",
  "hosts": [],
  "key": {
    "algo": "rsa",
    "size": 2048
  },
  "names": [
    {
      "C": "CN",
      "L": "BeiJing",
      "ST": "BeiJing",
      "O": "system:masters",
      "OU": "System"
    }
  ]
}
EOF
cfssl gencert -ca=ca.pem -ca-key=ca-key.pem \
-config=ca-config.json -profile=kubernetes \
admin-csr.json | cfssljson -bare admin

cat > kube-proxy-csr.json <<EOF
{
  "CN": "system:kube-proxy",
  "hosts": [],
  "key": {
    "algo": "rsa",
    "size": 2048
  },
  "names": [
    {
      "C": "CN",
      "L": "BeiJing",
      "ST": "BeiJing",
      "O": "k8s",
      "OU": "System"
    }
  ]
}
EOF

cfssl gencert -ca=ca.pem -ca-key=ca-key.pem \
-config=ca-config.json -profile=kubernetes \
kube-proxy-csr.json | cfssljson -bare kube-proxy
(3) Execute script file “k8s-cert.sh”.
bash k8s-cert.sh(4) Copy certificate .
mkdir -p /opt/kubernetes/ssl/
mkdir -p /opt/kubernetes/logs/
cp ca*pem server*pem /opt/kubernetes/ssl/
(5)) decompression kubernetes Compressed package
tar -zxvf kubernetes-server-linux-amd64.tar.gz (6) Copy key command file
mkdir -p /opt/kubernetes/bin/
cd kubernetes/server/bin/
cp kube-apiserver kube-scheduler kube-controller-manager \
   /opt/kubernetes/bin
cp kubectl /usr/local/bin/
(7) Randomly generated serial number .
mkdir -p /opt/kubernetes/cfg
head -c 16 /dev/urandom | od -An -t x | tr -d ' '
The output is as follows :
05cd8031b0c415de2f062503b0cd4ee6(8) establish “/opt/kubernetes/cfg/token.csv” file , Enter the following :
05cd8031b0c415de2f062503b0cd4ee6,kubelet-bootstrap,10001,"system:node-bootstrapper"(9) establish API Server Configuration file for “/opt/kubernetes/cfg/kube-apiserver.conf”, Enter the following :
KUBE_APISERVER_OPTS="--logtostderr=false \
--v=2 \
--log-dir=/opt/kubernetes/logs \
--etcd-servers=http://192.168.79.11:2379 \
--bind-address=192.168.79.11 \
--secure-port=6443 \
--advertise-address=192.168.79.11 \
--allow-privileged=true \
--service-cluster-ip-range=10.0.0.0/24 \
--enable-admission-plugins=NamespaceLifecycle,LimitRanger,ServiceAccount,ResourceQuota,NodeRestriction \
--authorization-mode=RBAC,Node \
--enable-bootstrap-token-auth=true \
--token-auth-file=/opt/kubernetes/cfg/token.csv \
--service-node-port-range=30000-32767 \
--kubelet-client-certificate=/opt/kubernetes/ssl/server.pem \
--kubelet-client-key=/opt/kubernetes/ssl/server-key.pem \
--tls-cert-file=/opt/kubernetes/ssl/server.pem \
--tls-private-key-file=/opt/kubernetes/ssl/server-key.pem \
--client-ca-file=/opt/kubernetes/ssl/ca.pem \
--service-account-key-file=/opt/kubernetes/ssl/ca-key.pem \
--etcd-cafile=/opt/ssl/etcd/etcd.pem \
--etcd-certfile=/opt/ssl/etcd/etcd.pem \
--etcd-keyfile=/opt/ssl/etcd/etcd-key.pem \
--audit-log-maxage=30 \
--audit-log-maxbackup=3 \
--audit-log-maxsize=100 \
--audit-log-path=/opt/kubernetes/logs/k8s-audit.log"
(10) Using the system's systemd To manage API Server, Carry out orders :
cat > /usr/lib/systemd/system/kube-apiserver.service << EOF
[Unit]
Description=Kubernetes API Server
Documentation=https://github.com/kubernetes/kubernetes
[Service]
EnvironmentFile=/opt/kubernetes/cfg/kube-apiserver.conf
ExecStart=/opt/kubernetes/bin/kube-apiserver \$KUBE_APISERVER_OPTS
Restart=on-failure
[Install]
WantedBy=multi-user.target
EOF
(11) start-up API Server.
systemctl daemon-reload
systemctl start kube-apiserver
systemctl enable kube-apiserver
(12) see API Server The state of .
systemctl status kube-apiserver.serviceThe output information is as follows :
kube-apiserver.service - Kubernetes API Server
Loaded: loaded (/usr/lib/systemd/system/kube-apiserver.service; enabled; vendor preset: disabled)
Active: active (running) since Tue 2022-02-08 21:11:47 CST; 24min ago
(13) View listening ports 6433 And port 8080 Information , Pictured 13-4 Shown .
netstat -ntap | grep 6443
netstat -ntap | grep 8080
(14) to grant authorization kubelet-bootstrap Users are allowed to request certificates .
kubectl create clusterrolebinding kubelet-bootstrap \
--clusterrole=system:node-bootstrapper \
--user=kubelet-bootstrap
(15) establish kube-controller-manager Configuration file for , Carry out orders :
cat > /opt/kubernetes/cfg/kube-controller-manager.conf << EOF
KUBE_CONTROLLER_MANAGER_OPTS="--logtostderr=false \
--v=2 \
--log-dir=/opt/kubernetes/logs \
--leader-elect=true \
--master=127.0.0.1:8080 \
--bind-address=127.0.0.1 \
--allocate-node-cidrs=true \
--cluster-cidr=10.244.0.0/16 \
--service-cluster-ip-range=10.0.0.0/24 \
--cluster-signing-cert-file=/opt/kubernetes/ssl/ca.pem \
--cluster-signing-key-file=/opt/kubernetes/ssl/ca-key.pem  \
--root-ca-file=/opt/kubernetes/ssl/ca.pem \
--service-account-private-key-file=/opt/kubernetes/ssl/ca-key.pem \
--experimental-cluster-signing-duration=87600h0m0s"
EOF
(16) Use systemd Service to manage kube-controller-manager, Carry out orders
cat > /usr/lib/systemd/system/kube-controller-manager.service << EOF
[Unit]
Description=Kubernetes Controller Manager
Documentation=https://github.com/kubernetes/kubernetes
[Service]
EnvironmentFile=/opt/kubernetes/cfg/kube-controller-manager.conf
ExecStart=/opt/kubernetes/bin/kube-controller-manager \$KUBE_CONTROLLER_MANAGER_OPTS
Restart=on-failure
[Install]
WantedBy=multi-user.target
EOF
(17) start-up kube-controller-manager.
systemctl daemon-reload
systemctl start kube-controller-manager
systemctl enable kube-controller-manager
(18) see kube-controller-manager The state of .
systemctl status kube-controller-managerThe output information is as follows :
kube-controller-manager.service - Kubernetes Controller Manager
Loaded: loaded (/usr/lib/systemd/system/kube-controller-manager.service; enabled; vendor preset: disabled)
Active: active (running) since Tue 2022-02-08 20:42:08 CST; 1h 2min ago
(19) establish kube-scheduler Configuration file for , Carry out orders :
cat > /opt/kubernetes/cfg/kube-scheduler.conf << EOF
KUBE_SCHEDULER_OPTS="--logtostderr=false \
--v=2 \
--log-dir=/opt/kubernetes/logs \
--leader-elect \
--master=127.0.0.1:8080 \
--bind-address=127.0.0.1"
EOF
(20) Use systemd Service to manage kube-scheduler, Carry out orders :
cat > /usr/lib/systemd/system/kube-scheduler.service << EOF
[Unit]
Description=Kubernetes Scheduler
Documentation=https://github.com/kubernetes/kubernetes
[Service]
EnvironmentFile=/opt/kubernetes/cfg/kube-scheduler.conf
ExecStart=/opt/kubernetes/bin/kube-scheduler \$KUBE_SCHEDULER_OPTS
Restart=on-failure
[Install]
WantedBy=multi-user.target
EOF
(21) start-up kube-scheduler.
systemctl daemon-reload
systemctl start kube-scheduler
systemctl enable kube-scheduler
(22) see kube-scheduler The state of .
systemctl status kube-scheduler.serviceThe output information is as follows :
kube-scheduler.service - Kubernetes Scheduler
 Loaded: loaded (/usr/lib/systemd/system/kube-scheduler.service; enabled; vendor preset: disabled)
 Active: active (running) since Tue 2022-02-08 20:43:01 CST; 1h 8min ago
(23) see master Status information of the node .
kubectl get csThe output information is as follows :
NAME                   STATUS    MESSAGE             ERROR
etcd-0                 Healthy   {"health":"true"}
controller-manager     Healthy   ok
scheduler              Healthy   ok
4. Deploy Node node
(1) stay master Create a script file on the node “kubeconfig”, Enter the following :
APISERVER=${1}
SSL_DIR=${2}

#  establish kubelet bootstrapping kubeconfig
export KUBE_APISERVER="https://$APISERVER:6443"

#  Set cluster parameters
kubectl config set-cluster kubernetes \
  --certificate-authority=$SSL_DIR/ca.pem \
  --embed-certs=true \
  --server=${KUBE_APISERVER} \
  --kubeconfig=bootstrap.kubeconfig

#  Set the client authentication parameters
#  Notice the token ID Need and token.csv In the document ID Agreement .
kubectl config set-credentials kubelet-bootstrap \
  --token=05cd8031b0c415de2f062503b0cd4ee6 \
  --kubeconfig=bootstrap.kubeconfig

#  Setting context parameters
kubectl config set-context default \
  --cluster=kubernetes \
  --user=kubelet-bootstrap \
  --kubeconfig=bootstrap.kubeconfig

#  Setting the default context
kubectl config use-context default --kubeconfig=bootstrap.kubeconfig

#----------------------

#  establish kube-proxy kubeconfig file

kubectl config set-cluster kubernetes \
  --certificate-authority=$SSL_DIR/ca.pem \
  --embed-certs=true \
  --server=${KUBE_APISERVER} \
  --kubeconfig=kube-proxy.kubeconfig

kubectl config set-credentials kube-proxy \
  --client-certificate=$SSL_DIR/kube-proxy.pem \
  --client-key=$SSL_DIR/kube-proxy-key.pem \
  --embed-certs=true \
  --kubeconfig=kube-proxy.kubeconfig

kubectl config set-context default \
  --cluster=kubernetes \
  --user=kube-proxy \
  --kubeconfig=kube-proxy.kubeconfig

kubectl config use-context default --kubeconfig=kube-proxy.kubeconfig
(2) Execute script file “kubeconfig”.
bash kubeconfig 192.168.79.11 /opt/ssl/k8s/The output information is as follows :
Cluster "kubernetes" set.
User "kubelet-bootstrap" set.
Context "default" created.
Switched to context "default".
Cluster "kubernetes" set.
User "kube-proxy" set.
Context "default" created.
Switched to context "default".
(3) take master Copy the configuration file generated on the node to node1 Nodes and node2 node .
scp bootstrap.kubeconfig kube-proxy.kubeconfig \
[email protected]:/opt/kubernetes/cfg/

scp bootstrap.kubeconfig kube-proxy.kubeconfig \
[email protected]:/opt/kubernetes/cfg/
(4) stay node1 Unzip the file on the node “kubernetes-node-linux-amd64.tar.gz”.
tar -zxvf kubernetes-node-linux-amd64.tar.gz(5) stay node1 The node will kubelet and kube-proxy Copy to directory “/opt/kubernetes/bin/” Next .
cd kubernetes/node/bin/
cp kubelet kube-proxy /opt/kubernetes/bin/
(6) stay node1 Create a script file on the node “kubelet.sh”, Enter the following :
#!/bin/bash

NODE_ADDRESS=$1
DNS_SERVER_IP=${2:-"10.0.0.2"}

cat <<EOF >/opt/kubernetes/cfg/kubelet

KUBELET_OPTS="--logtostderr=true \\
--v=4 \\
--hostname-override=${NODE_ADDRESS} \\
--kubeconfig=/opt/kubernetes/cfg/kubelet.kubeconfig \\
--bootstrap-kubeconfig=/opt/kubernetes/cfg/bootstrap.kubeconfig \\
--config=/opt/kubernetes/cfg/kubelet.config \\
--cert-dir=/opt/kubernetes/ssl \\
--pod-infra-container-image=registry.cn-hangzhou.aliyuncs.com/google-containers/pause-amd64:3.0"

EOF

cat <<EOF >/opt/kubernetes/cfg/kubelet.config

kind: KubeletConfiguration
apiVersion: kubelet.config.k8s.io/v1beta1
address: ${NODE_ADDRESS}
port: 10250
readOnlyPort: 10255
cgroupDriver: systemd
clusterDNS:
- ${DNS_SERVER_IP}
clusterDomain: cluster.local.
failSwapOn: false
authentication:
  anonymous:
    enabled: true
EOF

cat <<EOF >/usr/lib/systemd/system/kubelet.service
[Unit]
Description=Kubernetes Kubelet
After=docker.service
Requires=docker.service

[Service]
EnvironmentFile=/opt/kubernetes/cfg/kubelet
ExecStart=/opt/kubernetes/bin/kubelet \$KUBELET_OPTS
Restart=on-failure
KillMode=process

[Install]
WantedBy=multi-user.target
EOF

systemctl daemon-reload
systemctl enable kubelet
systemctl restart kubelet
(7) stay node1 Execute the script file on the node “kubelet.sh”.
bash kubelet.sh 192.168.79.12Tips : Specified here node1 Node IP Address .
(8) stay node1 View on the node Kubelet The state of .
systemctl status kubeletThe output information is as follows :
kubelet.service - Kubernetes Kubelet Loaded: loaded
(/usr/lib/systemd/system/kubelet.service; enabled; vendor preset:
disabled) Active: active (running) since Tue 2022-02-08 23:23:52 CST;
3min 18s ago
(9) stay node1 Create a script file on the node “proxy.sh”, Enter the following
#!/bin/bash

NODE_ADDRESS=$1

cat <<EOF >/opt/kubernetes/cfg/kube-proxy

KUBE_PROXY_OPTS="--logtostderr=true \\
--v=4 \\
--hostname-override=${NODE_ADDRESS} \\
--cluster-cidr=10.0.0.0/24 \\
--proxy-mode=ipvs \\
--kubeconfig=/opt/kubernetes/cfg/kube-proxy.kubeconfig"

EOF

cat <<EOF >/usr/lib/systemd/system/kube-proxy.service
[Unit]
Description=Kubernetes Proxy
After=network.target

[Service]
EnvironmentFile=-/opt/kubernetes/cfg/kube-proxy
ExecStart=/opt/kubernetes/bin/kube-proxy \$KUBE_PROXY_OPTS
Restart=on-failure

[Install]
WantedBy=multi-user.target
EOF

systemctl daemon-reload
systemctl enable kube-proxy
systemctl restart kube-proxy
(10) stay node1 Execute the script file on the node “proxy.sh”.
bash proxy.sh 192.168.79.12(11) stay node1 View on the node kube-proxy The state of .
systemctl status kube-proxy.serviceThe output information is as follows :
kube-proxy.service - Kubernetes Proxy
 Loaded: loaded (/usr/lib/systemd/system/kube-proxy.service; enabled; vendor preset: disabled)
 Active: active (running) since Tue 2022-02-08 23:30:51 CST; 9s ago
(12) stay master Check on the node node1 The request information of the node to join the cluster , Carry out orders :
kubectl get csrThe output information is as follows :
NAME                                                 ... CONDITION
node-csr-Qc2wKIo6AIWh6AXKW6tNwAvUqpxEIXFPHkkIe1jzSBE ... Pending
(13) stay master Approved on node node1 Node's request , Carry out orders :
kubectl certificate approve \
node-csr-Qc2wKIo6AIWh6AXKW6tNwAvUqpxEIXFPHkkIe1jzSBE
(14) stay master View on the node Kubernetes Node information in the cluster , Carry out orders :
kubectl get nodeThe output information is as follows :
NAME            STATUS   ROLES    AGE   VERSION
192.168.79.12   Ready    <none>   85s   v1.18.20
Tips : Now node1 The node has successfully joined Kubernetes In the cluster .
(15) stay node2 Repeat step 4 Step to step 14 Step , In the same way node2 Nodes join the cluster .
(16) stay master View on the node Kubernetes Node information in the cluster , Carry out orders :
kubectl get nodeThe output information is as follows :
NAME             STATUS   ROLES     AGE     VERSION
192.168.79.12   Ready    <none>   5m47s   v1.18.20
192.168.79.13   Ready    <none>   11s     v1.18.20
So far, we have successfully deployed three nodes using binary packages Kubernetes colony .



![[introduction to Django] 11 web page associated MySQL single field table (add, modify, delete)](/img/8a/068faf3e8de642c9e3c4118e6084aa.jpg)

![Mlapi series - 04 - network variables and network serialization [network synchronization]](/img/fc/aebbad5295481788de5c1fdb432a77.jpg)
![[adjustable delay network] development of FPGA based adjustable delay network system Verilog](/img/82/7ff7f99f5164f91fab7713978cf720.png)