当前位置:网站首页>numpy---基础学习笔记
numpy---基础学习笔记
2022-07-07 13:26:00 【madkeyboard】
Numpy和List
List能做的功能大致和Numpy是差不多的,但是Numpy的优势在于运算非常的快,因为Numpy在存储上是用电脑的一块连续的物理地址存储数据,这样在搜索数据上所花的时间更少,而List存储的数据都分散在不同的物理空间。
所以在处理大规模数据时,Numpy会比List效果好。

通过一个例子演示它们分别处理数据所花的时间,从结果可以看到,让随机的一个输递增10000次,Numpy的计算速度快了大约10倍,如果数据量更大,效果还要更好。
import time
import numpy as np

t0 = time.time()
# python list
l = list(range(100))
for _ in range(10000):
    for i in range(len(l)):
        l[i] += 1

t1 = time.time()
# numpy array
a = np.array(l)
for _ in range(10000):
    a += 1

print("Python list spend {:.3f}s".format(t1-t0))
print("Numpy array spend {:.3f}s".format(time.time()-t1))

维度
Numpy的一个优势是在于它可以处理多维的数据,在机器学习和人工智能中会经常出现多维数据的计算问题。
创建多维数据
比如我们要测试一辆车百里加速耗时,首先创建一个百里加速的列表
car = np.array([5,12,3,13])
print("耗时: ",car,"\n维度:",car.ndim)

可以看到输出的结果是一维的,那么如果多加几组数据表示多次测试,就创建了二维数据
car = np.array(
  [[5,12,3,13],
  [5.2,11,14,5],
  [6.1,6.6,4.3,6.5]])
print("耗时: ",car,"\n维度:",car.ndim)

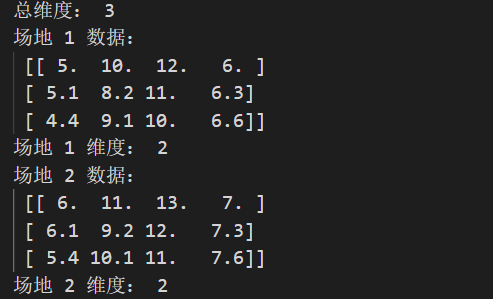
同理,创建三维表示在不同的场地对车辆进行测试。
car = np.array([
[
    [5, 10, 12, 6],
    [5.1, 8.2, 11, 6.3],
    [4.4, 9.1, 10, 6.6]
],
[
    [6, 11, 13, 7],
    [6.1, 9.2, 12, 7.3],
    [5.4, 10.1, 11, 7.6]
],
])
print("总维度:", car.ndim)
print("场地 1 数据:\n", car[0], "\n场地 1 维度:", car[0].ndim)
print("场地 2 数据:\n", car[1], "\n场地 2 维度:", car[1].ndim)
添加数据
添加一维数据。np.concatenate()
cars1 = np.array([5, 10, 12, 6])
cars2 = np.array([5.2, 4.2])
cars = np.concatenate([cars1, cars2])
print(cars) #[ 5. 10. 12. 6. 5.2 4.2]
添加二维数据
test1 = np.array([5, 10, 12, 6])
test2 = np.array([5.1, 8.2, 11, 6.3])

# 首先需要把它们都变成二维,下面这两种方法都可以加维度
test1 = np.expand_dims(test1, 0)
test2 = test2[np.newaxis, :]

print("test1加维度后 ", test1)
print("test2加维度后 ", test2)

# 然后再在第一个维度上叠加
all_tests = np.concatenate([test1, test2])
print("括展后\n", all_tests)

合并数据
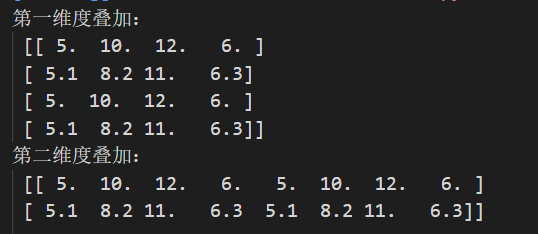
只要维度能够对齐,可以在任意维度上进行合并操作。
import time
import numpy as np

test1 = np.array([5, 10, 12, 6])
test2 = np.array([5.1, 8.2, 11, 6.3])

# 首先需要把它们都变成二维,下面这两种方法都可以加维度
test1 = np.expand_dims(test1, 0)
test2 = test2[np.newaxis, :]

all_tests = np.concatenate([test1, test2])

print("第一维度叠加:\n",np.concatenate([all_tests,all_tests],axis=0))
print("第二维度叠加:\n",np.concatenate([all_tests,all_tests],axis=1))
np.hstack()横向合并
np.vstach()竖向合并
- 观察形态
test1 = np.array([
[5, 10, 12, 6],
[5.1, 8.2, 11, 6.3],
[4.4, 9.1, 10, 6.6]
])

print("总数据:",test1.size)
print("第一个维度",test1.shape[0]) # 表示进行了多少次测试
print("第二个维度",test1.shape[1]) # 表示测试的车辆数量
print("所有维度",test1.shape)

#第一个维度: 3
#第二个维度: 4
#所有维度: (3, 4)
数据选择
- 单个选择
import numpy as np

b = np.array([
[1,2,3,4],
[5,6,7,8],
[9,10,11,12]
])

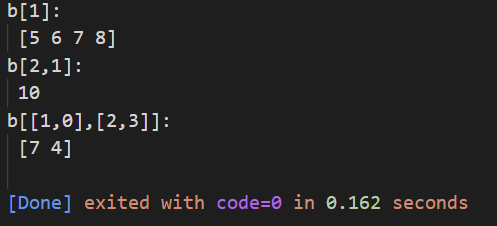
print("b[1]:\n",b[1]) # 选中第二行所有数
print("b[2,1]:\n",b[2,1]) # 选中第三行第二列的数
print("b[[1,0],[2,3]]:\n",
b[[1,0],
[2,3]]) # 拿的两个数是[1,2] 和 [0,3]
- 切片
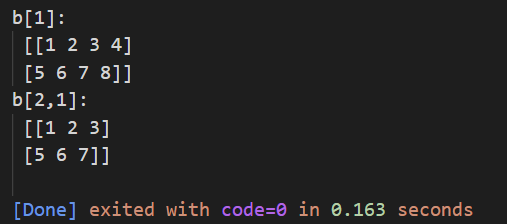
print("b[1]:\n",b[:2]) # 选中第一行和第二行行所有数
print("b[2,1]:\n",b[:2,:3]) # 选中第一行和第二行,前3列的数
- 条件选择
import numpy as np

b = np.array([
[1,2,3,4],
[5,6,7,8],
[9,10,11,12]
])

condition = (b < 5) & (b != 2)
print(b[condition]) # 1 3 4
print(np.where(condition,-2,b)) # 把满足条件的值替换为-2
print(np.where(condition,-2,-1)) # 把满足条件的值替换为-2,不满足替换为-1
基础运算
import numpy as np

a = np.array([
  [1,2],
  [3,4]
])
b = np.array([
  [5,6],
  [7,8]
])
print(a.dot(b)) # 矩阵点积 print(np.dot(a, b))

np.max() # 最大值
np.min() # 最小值
np.sum() # 求和
np.prod() # 累乘
np.size() # 总数
np.count_nonzero() # 非零总数
np.mean() # 平均数
np.median() # 中位数
np.std() # 标准差
np.argmax() # 最大值的下标
np.argmin() # 最小值的下标
np.ceil() # 向上取整
np.floor() # 向下取整
np.clip(a,b) # 定义一个取整的上、下界
a = np.array([150.1, 166.4, 183.7, 170.8])
print("clip:", a.clip(160, 180))
# clip: [160. 166.4 180. 170.8]

# 官方文档 https://numpy.org/devdocs/user/quickstart.html#basic-operations
改变数据形态
添加维度
a_2d = a[np.newaxis, :]
a_none = a[:, None]
a_expand = np.expand_dims(a, axis=1)
# 这三个方法都能达到同样的效果
减少维度
a_squeeze = np.squeeze(a_expand)
a_squeeze_axis = a_expand.squeeze(axis=1)
# squeeze 只能减少维度shape上为1的维度,保证数据结构不发生变化

# 如果要改变维度可以用到 reshape
a = np.array([1,2,3,4,5,6])
a1 = a.reshape([2, 3])
a2 = a.reshape([3,1,2]) # 这里没懂
#
a1 shape: (2, 3)
[[1 2 3]
 [4 5 6]]
a2 shape: (3, 1, 2)
[[[1 2]]
 [[3 4]]
 [[5 6]]]
#

# 矩阵转置
np.transpose()
np.T
合并
np.column_stack() # 列合并
np.row_stack() # 行合并

# 上面两个合并方法与 vstack和hstack的区别在于:使用vstack和hstack需要先处理维度信息,而column_stack和row_stack会自动处理
feature_a = np.array([1,2,3,4,5,6])[:, None]
feature_b = np.array([11,22,33,44,55,66])[:, None]
c_stack = np.hstack([feature_a, feature_b])

# np.concatenate() 适合处理不同情况的合并
np.concatenate([a, b], axis=0)
拆解
a = np.array(
[[ 1, 11, 2, 22],
 [ 3, 33, 4, 44],
 [ 5, 55, 6, 66],
 [ 7, 77, 8, 88]]
)
print(np.vsplit(a, indices_or_sections=2))  # 分成两段
print(np.vsplit(a, indices_or_sections=[2,3]))  # 分片成 [:2],[2:3], [3:]

np.hsplit() # 横切 功能类似
a = np.array(
[[ 1, 11, 2, 22],
 [ 3, 33, 4, 44],
 [ 5, 55, 6, 66],
 [ 7, 77, 8, 88]]
)
print(np.split(a, indices_or_sections=2, axis=0))  # 分成两段
print(np.split(a, indices_or_sections=[2,3], axis=1))  # 在第二维度,分片成 [:2],[2:3],[3:]

# 使用split 自定义切分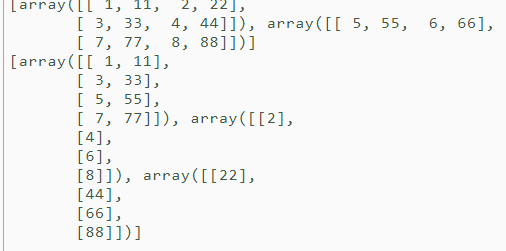
边栏推荐
- 【OBS】RTMPSockBuf_ Fill, remote host closed connection.
- Share the technical details of super signature system construction
- #HPDC智能基座人才发展峰会随笔
- Unity's ASE achieves full screen sand blowing effect
- Steps to create P8 certificate and warehousing account
- 大表delete删数据导致数据库异常解决
- 【数字IC验证快速入门】19、SystemVerilog学习之基本语法6(线程内部通信...内含实践练习)
- 【深度学习】图像超分实验:SRCNN/FSRCNN
- 【兰州大学】考研初试复试资料分享
- webgl_ Enter the three-dimensional world (2)
猜你喜欢
![[quickstart to Digital IC Validation] 20. Basic syntax for system verilog Learning 7 (Coverage Driven... Including practical exercises)](/img/d3/cab8a1cba3c8d8107ce4a95f328d36.png)
[quickstart to Digital IC Validation] 20. Basic syntax for system verilog Learning 7 (Coverage Driven... Including practical exercises)

How to create Apple Developer personal account P8 certificate
Ida Pro reverse tool finds the IP and port of the socket server

20th anniversary of agile: a failed uprising
The bank needs to build the middle office capability of the intelligent customer service module to drive the upgrade of the whole scene intelligent customer service

Iterator and for of.. loop

Typescript release 4.8 beta
【搞船日记】【Shapr3D的STL格式转Gcode】
15. Using the text editing tool VIM
Introduction of mongod management database method
随机推荐
避坑:Sql中 in 和not in中有null值的情况说明
Nacos一致性协议 CP/AP/JRaft/Distro协议
How to build your own super signature system (yunxiaoduo)?
Jacobo code coverage
webgl_ Enter the three-dimensional world (2)
Virtual memory, physical memory /ram what
Streaming end, server end, player end
Share the technical details of super signature system construction
OpenGL's distinction and understanding of VAO, VBO and EBO
Unity之ASE实现全屏风沙效果
unnamed prototyped parameters not allowed when body is present
STM32F103C8T6 PWM驱动舵机(SG90)
【原创】一切不谈考核的管理都是扯淡!
【數字IC驗證快速入門】26、SystemVerilog項目實踐之AHB-SRAMC(6)(APB協議基本要點)
15. Using the text editing tool VIM
Iterator and for of.. loop
Use of SVN
webgl_ Enter the three-dimensional world (1)
20th anniversary of agile: a failed uprising
Annexb and avcc are two methods of data segmentation in decoding
