当前位置:网站首页>Explain task scheduling based on Cortex-M3 in detail (Part 2)
Explain task scheduling based on Cortex-M3 in detail (Part 2)
2022-07-05 08:04:00 【Car chezi】
List of articles
stay The explanation is based on Cortex-M3 Task scheduling ( On )_ The car (chezi)-CSDN Blog In this article , We already have a theoretical basis , This article , Let's write code and practice .
The code is based on the project provided by netizens and the reference code in the book , Don't ask for everything , Just clarify the principle .
Project description
I use it STM32F103 This chip , The engineering structure is shown in the figure :
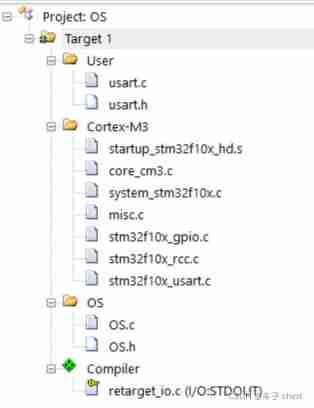
User The following is the bare board driver of the serial port , Call the official library function , Very routine ;
Cortex-M3 The following are the documents provided by the manufacturer , Generally, there is no need to modify ;
OS The following is the focus of this article , The essence of task scheduling is in it ;
Compiler Here are the components I added , from ARM Provide , You don't have to modify it . Convenient to use when there is no board PC Simulation run .
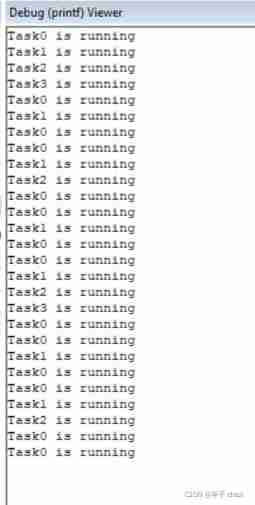
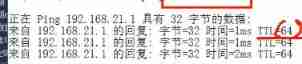
experimental result
The result is 4 Tasks are executed in turn . Although every task code has while(1), But it won't always occupy CPU, When its time slice arrives ,OS Will deprive it of CPU Right to use , Let the next task run .
If you have a board , Then use serial port output . Need to be in RTE_Components.h Comment out these two lines in the file
//#define RTE_Compiler_IO_STDOUT /* Compiler I/O: STDOUT */
//#define RTE_Compiler_IO_STDOUT_ITM /* Compiler I/O: STDOUT ITM */
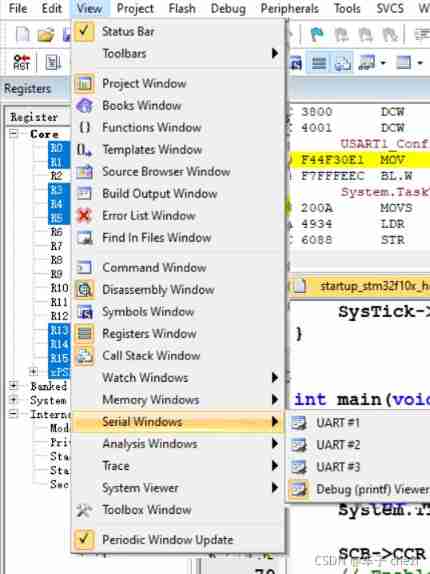
If there is no board , During the simulation , open Debug(printf) Viewer The window will do .
Code explanation
The beat of the clock
The last blog post said , System tick timer (SYSTICK) Interruption is necessary , Trigger task switching in this interrupt .
void OSSysTickInit(void)
{

	//Systick Timer initial
	char *Systick_priority = (char *)0xe000ed23;       //Systick Interrupt priority register
	SysTick->LOAD  = (SystemCoreClock/8/1000000)* 1000; //Systick Timer reload   Count 9000 Time =1ms
	*Systick_priority = 0x00;                           //Systick Timer interrupt priority
	SysTick->VAL   = 0;                                 //Systick Timer counter clear 0
	SysTick->CTRL = 0x3;//Systick Open and enable interrupt , And use an external crystal oscillator clock ,8 frequency division  72MHz/8=9MHz  Count 9000 Time =1ms  Count 9 Time =1us
}
To configure SYSTICK The counting frequency of , Then enable SYSTICK And interrupt .
If SystemCoreClock yes 72MHz, Namely 1ms An interruption .
void SysTick_Handler(void) // 1KHz
{

	System.TimeMS++;  // The system clock beats are accumulated

	if((--System.TaskTimeSlice) == 0)  {

		System.TaskTimeSlice = TASK_TIME_SLICE;// Reset the initial value of the time slice
		task_switch();
	}
}
That's all SYSTICK Interrupt handling function .System.TaskTimeSlice The initial value of 10;
stay main() There are initialization statements in :
	System.TaskTimeSlice = TASK_TIME_SLICE; // #define TASK_TIME_SLICE 10
	System.OSRunning = OS_TRUE;
	System.TimeMS = 0;
in other words 10ms Switch tasks once .
Be careful , This is task scheduling based on time slice , Not based on priority .
Task switching task_switch()
void task_switch(void)
{

	if(System.OSLockNesting != 0)
		return;

	switch(curr_task) {

		case(0):
			next_task=1;
			break;
		case(1):
			next_task=2;
			break;
		case(2):
			next_task=3;
			break;
		case(3):
			next_task=0;
			break;
		default:
			next_task=0;
			stop_cpu;
			break; // Should not be here
	}

	if (curr_task != next_task){
     // Context switching needed
		SCB->ICSR  |= SCB_ICSR_PENDSVSET_Msk; // Set PendSV to pending
	}

}
The first 3 That's ok : Determine whether the scheduler is locked , If it is , Prohibit task switching , Go straight back to .
The logic of switching is simple , Only 0-3 A mission , 0 Cut to 1,1 Cut to 2,….next_task It's a global variable , Record the next task number .
The first 26 OK, it's important , Set up PendSV Interruption hangs . When SYSTICK After service interruption and exit , We'll be in... Soon PendSV Interruption of service .
Although this function is called task_switch, But the real switch is in PendSV Interrupt service .
PendSV_Handler
__asm void PendSV_Handler(void)
{


// Simple version - assume No floating point support

// Save current context
	MRS R0, PSP // Get current process stack pointer value
	STMDB R0!,{
    R4-R11} // Save R4 to R11 in task stack (8 regs)
	LDR R1,=__cpp(&curr_task)
	LDR R2,[R1] // Get current task ID
	LDR R3,=__cpp(&PSP_array)
	STR R0,[R3, R2, LSL #2] // Save PSP value into PSP_array


// Load next context
	LDR R4,=__cpp(&next_task)
	LDR R4,[R4] // Get next task ID
	STR R4,[R1] // Set curr_task = next_task
	LDR R0,[R3, R4, LSL #2] // Load PSP value from PSP_array
	LDMIA R0!,{
    R4-R11} // Load R4 to R11 from taskstack (8 regs)
	MSR PSP, R0 // Set PSP to next task
	BX LR // Return
	ALIGN 4
}
This code is short , But it is the essence of task switching , In short, save the context of the current task , Load the context of the next task .
stay PendSV_Handler After occurrence , There will be 8 Registers are automatically stacked ,7-8 Line is used to manually press the stack in addition 8 A register .
We say it sentence by sentence .
The first 7 That's ok :MRS R0, PSP
Load stack pointer to R0, That is to find the stack of the current task
The first 8 That's ok :STMDB R0!,{R4-R11}
R0 = R0-4, hold R11 The value of the R0 Memory pointed to ; then R0 = R0-4, hold R10 The value of the R0 Memory pointed to ;…
To be more intuitive , I got a picture :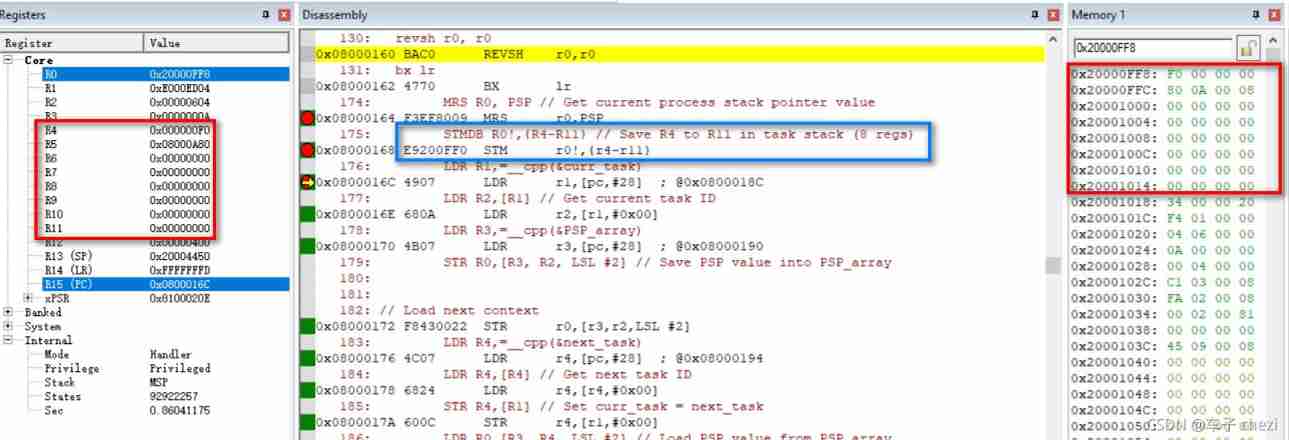
This picture is just after pressing the stack , You can see ,R4 It's the last one pressed in . The box on the right shows the stack of a task .
The first 9 That's ok :LDR R1,=__cpp(&curr_task)
This sentence means to put variables curr_task The address of is assigned to R1
The first 10 That's ok :LDR R2,[R1] // Get current task ID
take R1 Point to R2, That is, get the number of the current task
The first 11 That's ok :LDR R3,=__cpp(&PSP_array)
Take an array PSP_array[] The address to R3
The first 12 That's ok :STR R0,[R3, R2, LSL #2]
Equivalent to pseudo code STR R0,[R3, R2<<2], That is to say STR R0,[R3 + R2*4]
because R2 Inside is the number of the current task , therefore [R3 + R2*4] Is indexed by task number PSP_array Array ( Each element accounts for 4 Bytes ), Meaning is to put the R0 The value of is saved to PSP_array[R2] , combination R0 Point to the stack of the current task , That is to save the stack pointer of the current task to the array .
The above operation , In fact, it saves the context of the current task .
Let's continue to look at the code :
	LDR R4,=__cpp(&next_task)
	LDR R4,[R4] // Get next task ID
	STR R4,[R1] // Set curr_task = next_task
	LDR R0,[R3, R4, LSL #2] // Load PSP value from PSP_array
	LDMIA R0!,{
    R4-R11} // Load R4 to R11 from taskstack (8 regs)
	MSR PSP, R0 // Set PSP to next task
	BX LR // Return
1: Get variables next_task The address to R4
2: hold R4 Point to R4, That is to get the number of the next task
3: Storage R4 Value to R1 Memory pointed to ,R1 yes curr_task The pointer to , So it is to assign the number of the next task to the variable curr_task , use C Language expression is curr_task = next_task;
4: amount to LDR R0,[R3, R4*4], That is to R4 The value of is the subscript index PSP_array Array , Give the value inside R0, Connecting is to get the next task PSP To R0
5: Manually stack , Put the next task on the stack 8 Values are restored to the corresponding register . be left over 8 What can I do ? It will automatically stack when the interrupt returns .IA Indicates that the address increases after each transmission 4, The stack order is first R4, Again R5,…, Last R11
6: use R0 Adjust stack pointer PSP, Prepare for the automatic stack out later
7: Start the exception return process
After the above statement is executed , Will switch to the next task .
The code for the task
void task0(void) // Mission 0
{

	while(1)
	 {

		 OSprintf("Task0 is running\r\n");
		 OS_delayMs(500);	// Task delay
	 }
}

void task1(void)  // Mission 1
{

	while(1)
	 {

		 OSprintf("Task1 is running\r\n");
		 OS_delayMs(1000);  // Task delay
	 }
}
void task2(void)  // Mission 2
{

	while(1)
	{

		OSprintf("Task2 is running\r\n");
		OS_delayMs(2000);	// Task delay
	}
}

void task3(void) // Mission 3
{

	while(1)
	 {

		 OSprintf("Task3 is running\r\n");
		 OS_delayMs(4000);	// Task delay
	 }
}
Foolishly did four tasks , Each task outputs a sentence to the serial port .
OSprintf There is an operation to lock and unlock the scheduler , Prevent the printing of each task from being confused . The relevant code is :
#define OS_CORE_ENTER __disable_irq
#define OS_CORE_EXIT __enable_irq

#define OSprintf(fmt, ...) \ {
       OSSchedLock(); printf( fmt, ##__VA_ARGS__); OSSchedUnlock();}

// System Boolean
#define OS_FALSE 0
#define OS_TRUE 1

// System variable type definition
typedef struct
{

	INT8U OSRunning;    // Run flag variable
	INT8U OSLockNesting; // Task switching lock level statistical variable
	volatile INT32U TimeMS;      // Cumulative variable of system clock beat
	INT32U TaskTimeSlice; // Task time slice
}SYSTEM;

// System variables
SYSTEM System;

void OSSchedLock(void) // Task switching lock
{

	OS_CORE_ENTER(); //  Close the interrupt
	if(System.OSRunning == OS_TRUE)
	{

		if (System.OSLockNesting < 255u)  //  Task locking can be nested to the maximum  255  layer
			System.OSLockNesting++;
	}
	OS_CORE_EXIT(); //  Open the interrupt
}
void OSSchedUnlock(void) // Task switching unlock
{

	OS_CORE_ENTER();
	if(System.OSRunning == OS_TRUE)
	{

		if (System.OSLockNesting > 0)
			System.OSLockNesting--;
	}
	OS_CORE_EXIT();
}


INT32U GetTime(void)
{

    return System.TimeMS;
}

void OS_delayMs(INT32U ms)
{

    INT32U counter;
    counter = GetTime() + ms;
    while(1){

        if(counter < GetTime())
			break;
    }
}
OS_delayMs There is something wrong with this function , The overflow of timer is not considered . in addition ,OS_delayMs This function will not suspend the current task . A better way is when the task calls this function , Give up on your own initiative CPU, Now CPU You can choose other tasks to perform . When the delay time is up , The suspended task is restored to the ready state .
Important global variables
// Stack for each task (4K bytes each)
unsigned int 	task0_stack[1024],
				task1_stack[1024],
				task2_stack[1024],
				task3_stack[1024];


// Data use by OS
uint32_t curr_task = 0; // Current task
uint32_t next_task = 1; // Next task
uint32_t PSP_array[4]; // Process Stack Pointer for each task
2-5: Defined 4 An array , They correspond to each other 4 Stack of tasks
10-11:curr_task Record the number of the current task ,next_task Record the number of the next task
12: Array PSP_array Stack pointer used to save each task .
Actually, there should be a management task TCB( Task control block ), But our code is relatively crude ( Prevent the guest from dominating ), So we use these global variables to deal with .
main() function
So much bedding , Finally come to the main function .
#define HW32_REG(ADDRESS) (*((volatile unsigned long *)(ADDRESS)))


int main(void)
{

	USART1_Config(115200); // A serial port 1 Incipient application
	System.TaskTimeSlice = TASK_TIME_SLICE; //  Set time slice to  10ms
	System.OSRunning = OS_TRUE;
	System.TimeMS = 0;

	SCB->CCR  |= SCB_CCR_STKALIGN_Msk;
	// Enable double word stack alignment
	//(recommended in Cortex-M3 r1p1, default in Cortex-M3 r2px and Cortex-M4)


	// Create stack frame for task0
	PSP_array[0] = ((unsigned int) task0_stack) + (sizeof task0_stack) - 16*4;
	HW32_REG((PSP_array[0] + (14<<2))) = (unsigned long) task0;
	// initial Program Counter
	HW32_REG((PSP_array[0] + (15<<2))) = 0x01000000; // initial xPSR

	// Create stack frame for task1
	PSP_array[1] = ((unsigned int) task1_stack) + (sizeof task1_stack) - 16*4;
	HW32_REG((PSP_array[1] + (14<<2))) = (unsigned long) task1;
	// initial Program Counter
	HW32_REG((PSP_array[1] + (15<<2))) = 0x01000000; // initial xPSR

	// Create stack frame for task2
	PSP_array[2] = ((unsigned int) task2_stack) + (sizeof task2_stack) - 16*4;
	HW32_REG((PSP_array[2] + (14<<2))) = (unsigned long) task2;
	// initial Program Counter
	HW32_REG((PSP_array[2] + (15<<2))) = 0x01000000; // initial xPSR


	// Create stack frame for task3
	PSP_array[3] = ((unsigned int) task3_stack) + (sizeof task3_stack) - 16*4;
	HW32_REG((PSP_array[3] + (14<<2))) = (unsigned long) task3;
	// initial Program Counter
	HW32_REG((PSP_array[3] + (15<<2))) = 0x01000000; // initial xPSR

	curr_task = 0; // Switch to task #0 (Current task)
	__set_PSP((PSP_array[curr_task] + 16*4)); // Set PSP to top of task 0 stack
	NVIC_SetPriority(PendSV_IRQn, 0xFF); // Set PendSV to lowest possible priority
	OSSysTickInit();

	__set_CONTROL(0x3); // Switch to use Process Stack, unprivileged state
	__ISB(); // Execute ISB after changing CONTROL (architectural recommendation)
	task0(); // Start task 0
	while(1){

		stop_cpu;// Should not be here
	};

}
It is more important to create stack frames for each task , such as
	// Create stack frame for task0
	PSP_array[0] = ((unsigned int) task0_stack) + (sizeof task0_stack) - 16*4;
	HW32_REG((PSP_array[0] + (14<<2))) = (unsigned long) task0;
	// initial Program Counter

	HW32_REG((PSP_array[0] + (15<<2))) = 0x01000000; // initial xPSR
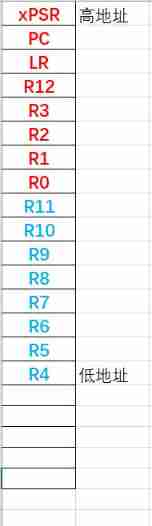
When in PendSV_Handler When switching in , To manually stack 8 A register ( Blue ), in addition 8 A register ( Red ) Will automatically stack , For the task to be switched ( Tasks to be run ), Its stack pointer should point to R4
So the first 2 That's ok :PSP_array[0] = ((unsigned int) task0_stack) + (sizeof task0_stack) - 16*4;
Subtract 16*4 It means to reserve this 16 Location of registers , hold PSP Point to R4
this 16 There are 2 Give the initial value , One is PC, To point to the entry function of the task ; The other one is xPSR
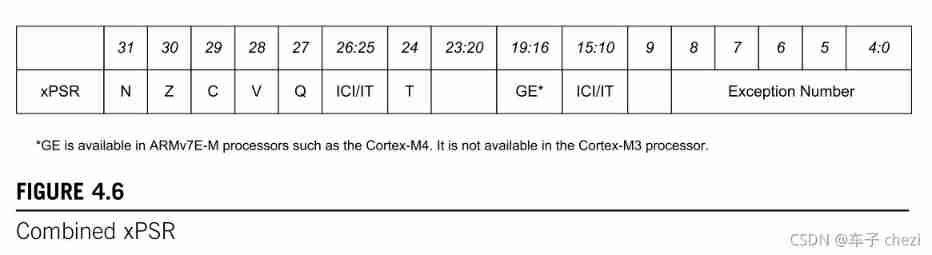
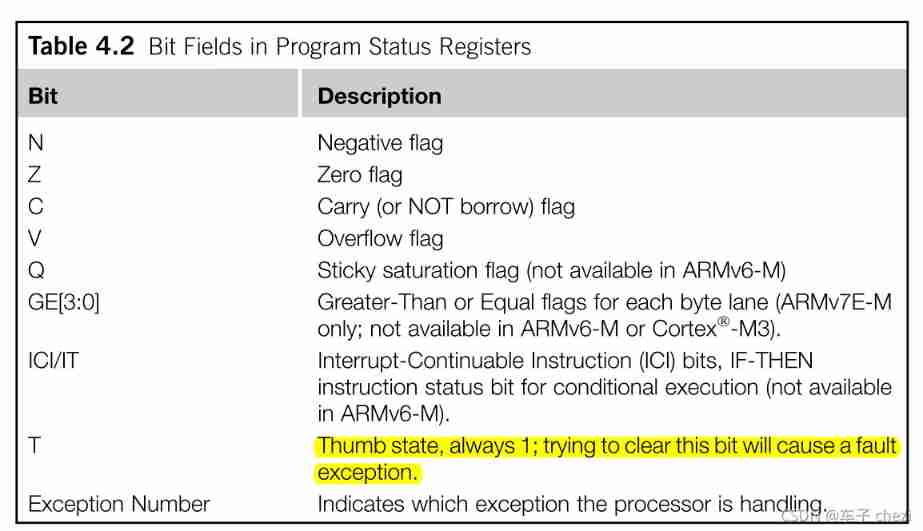
xPSR Of bit[24] Must be 1, Express Thumb state, So there will be code
HW32_REG((PSP_array[0] + (15<<2))) = 0x01000000; // initial xPSR
Continue to look at the code
	curr_task = 0; // Switch to task #0 (Current task)
	__set_PSP((PSP_array[curr_task] + 16*4)); // Set PSP to top of task 0 stack
	NVIC_SetPriority(PendSV_IRQn, 0xFF); // Set PendSV to lowest possible priority
	OSSysTickInit(); // SysTick  Initialize and enable

	__set_CONTROL(0x3); // Switch to use Process Stack, unprivileged state
	__ISB(); // Execute ISB after changing CONTROL (architectural recommendation)
	task0(); // Start task 0
The first 2 That's ok : Because the stack frame is set in front ,PSP_array[0] In fact, it points to task0 The stack ( In the picture above R4 The location of ), however task0 First run , It's not in PendSV_Handler Switch to the past , But by adjusting the function task0() To start execution , So its stack should be empty , That is to put its PSP Adjust to the highest , So add 16*4
The first 3 That's ok : hold PendSV_Handler Set to the lowest priority , Why do things turn out like this? , You can read my previous blog post : The explanation is based on Cortex-M3 Task scheduling ( On )_ The car (chezi)-CSDN Blog
The first 6 That's ok : Use PSP, And run at the non privileged level
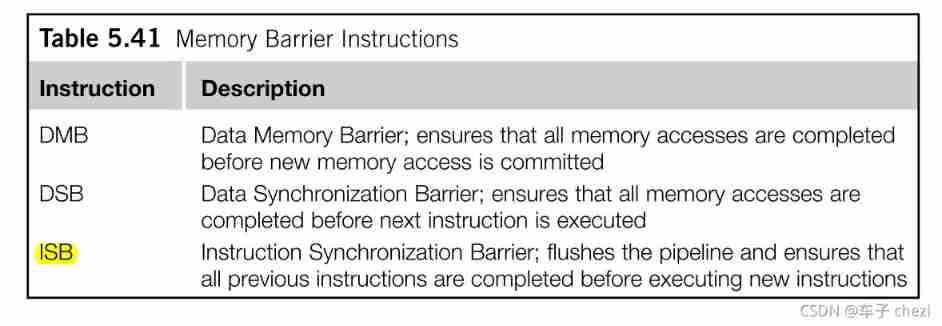
The first 7 That's ok : Command synchronization barrier . Used to empty the assembly line , Make sure that before executing new instructions , The previous instructions have been executed .
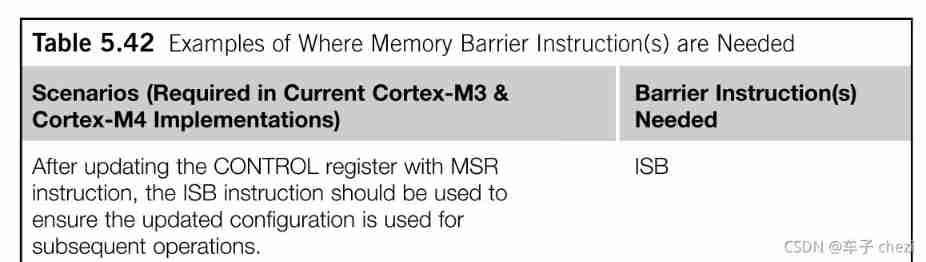
The first 8 That's ok : perform task0. In fact, there are other ways to perform the first task , Like triggering PendSV_Handler, In the interruption “ Switch ” To task0
The above is the whole content of this article , Readers are welcome to criticize and correct .
The code download
link :https://pan.baidu.com/s/1dnl7Cld97hujA3OoxGfd3Q
Extraction code :chez
Reference material
【1】《Cortex-M3 Authoritative guide 》
【2】《The Definitive Guide to ARM Cortex-M3 and Cortex-M4 Processors(Third Edition)》
边栏推荐
- IC software learning
- Connection mode - bridge and net
- Global and Chinese markets for medical oxygen machines 2022-2028: Research Report on technology, participants, trends, market size and share
- Gradle复合构建
- VESC Benjamin test motor parameters
- Global and Chinese market of urban rail connectors 2022-2028: Research Report on technology, participants, trends, market size and share
- General makefile (I) single C language compilation template
- 如何进行导电滑环选型
- C#,数值计算(Numerical Recipes in C#),线性代数方程的求解,LU分解(LU Decomposition)源程序
- The browser cannot access Baidu
猜你喜欢
![Measurement fitting based on Halcon learning [II] meaure_ pin. Hdev routine](/img/da/8c70699d2cd3ec5b36ec716b8f6bd1.jpg)
Measurement fitting based on Halcon learning [II] meaure_ pin. Hdev routine
Communication standard -- communication protocol
![[trio basic from introduction to mastery tutorial XIV] trio realizes unit axis multi-color code capture](/img/c5/22c6148873508b9205972e1ad970a3.jpg)
[trio basic from introduction to mastery tutorial XIV] trio realizes unit axis multi-color code capture
Volatile of C language
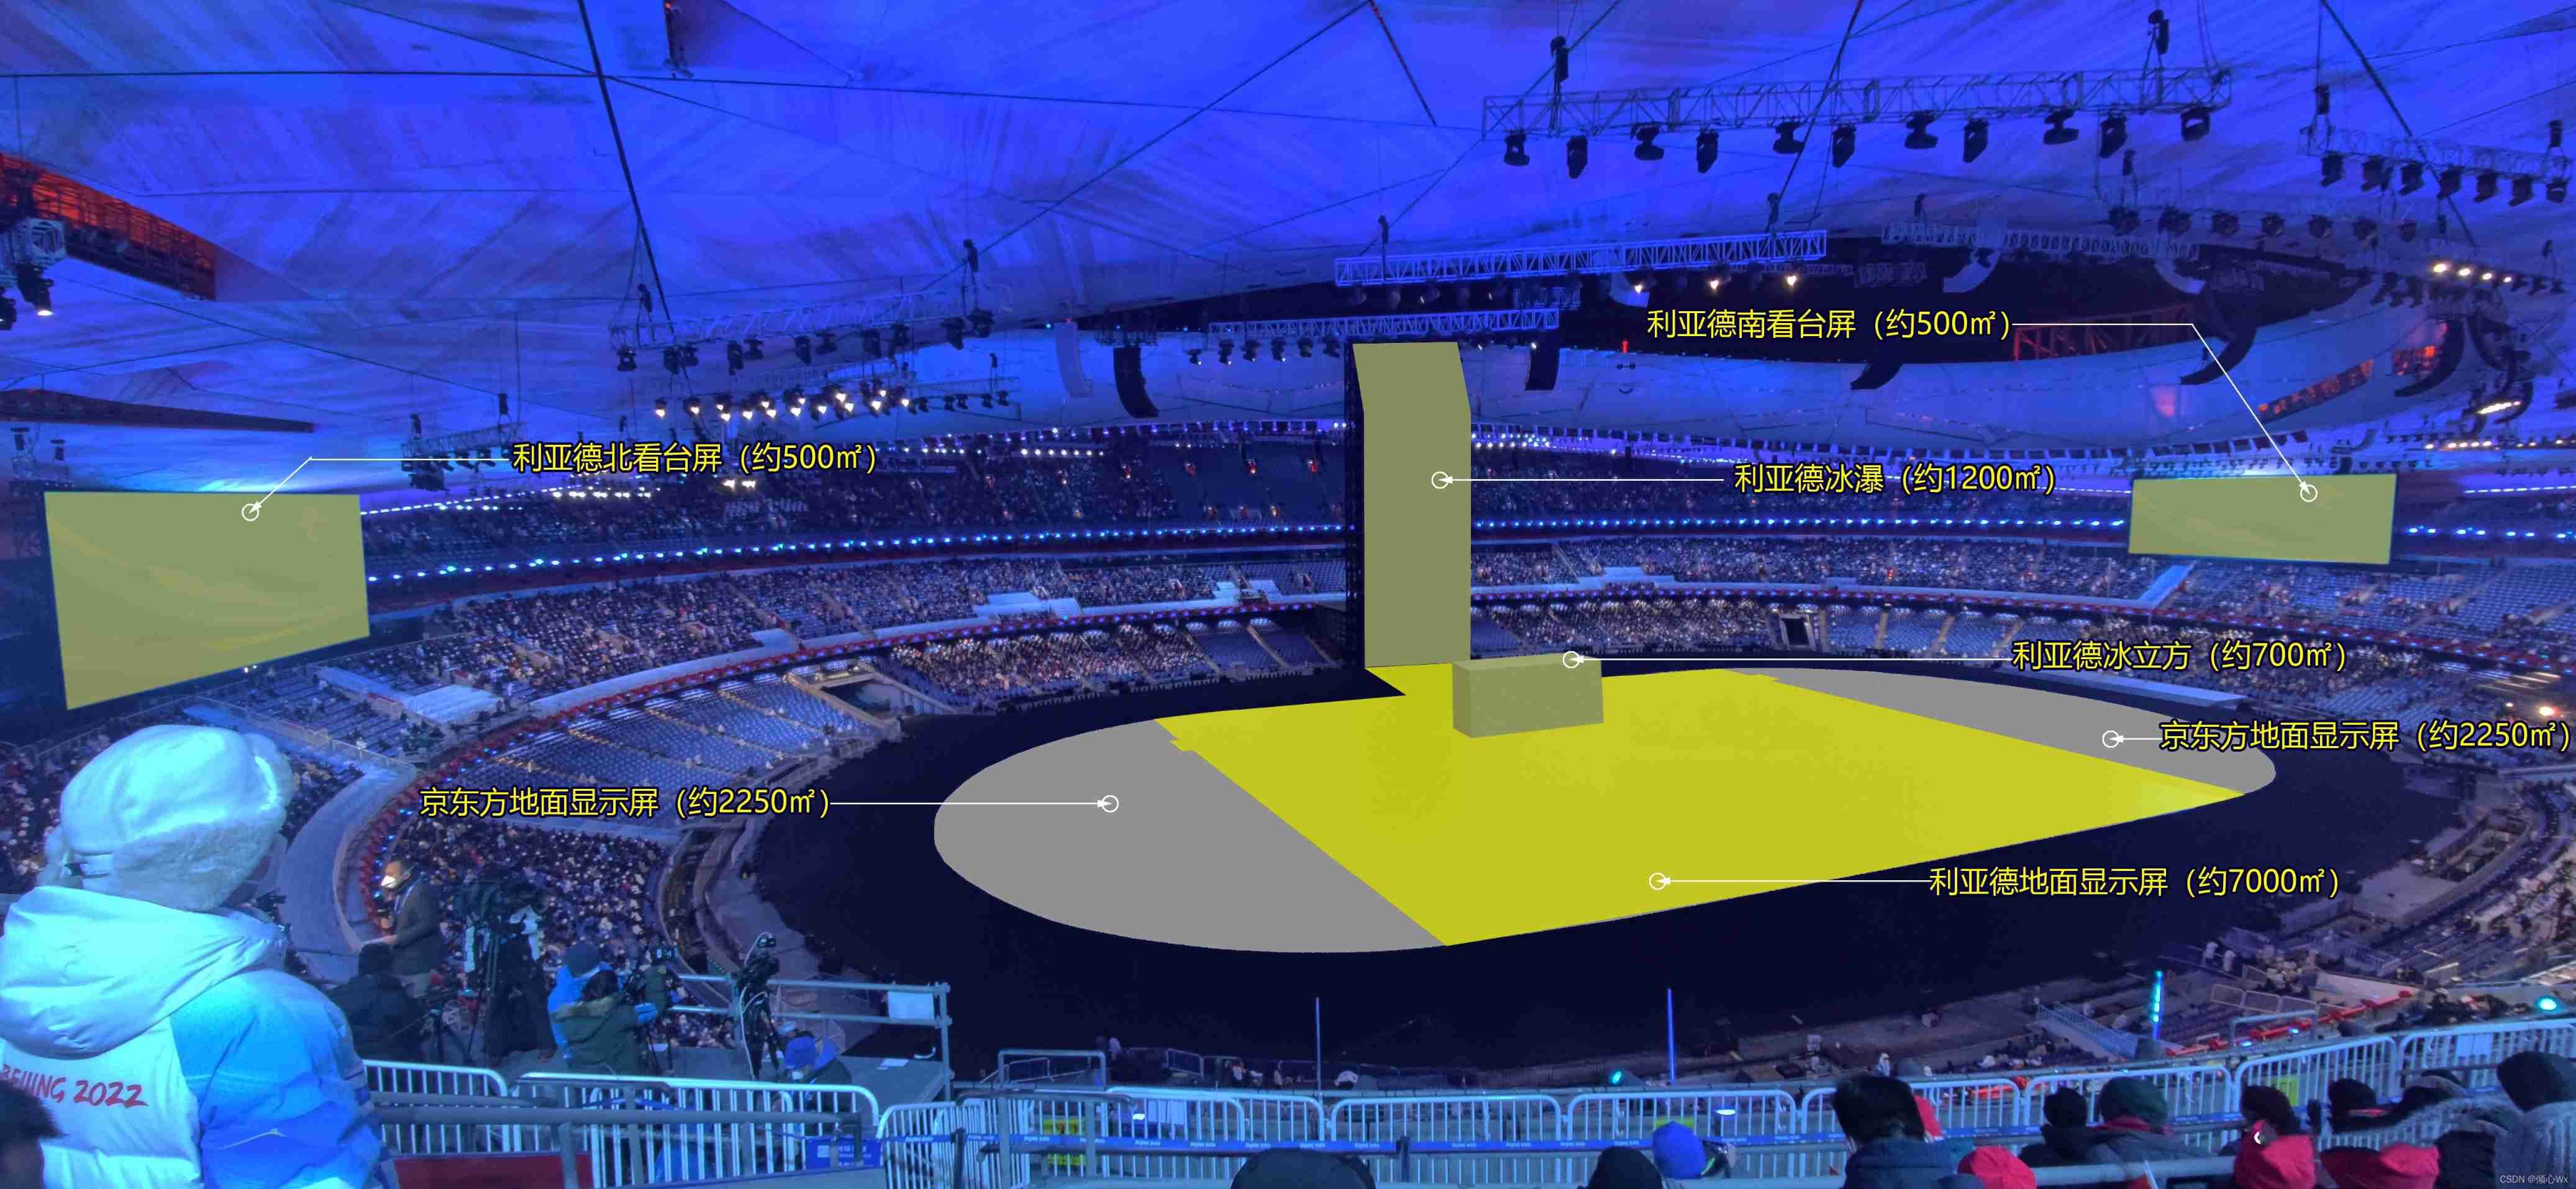
Record the visual shock of the Winter Olympics and the introduction of the screen 2
![[untitled] record the visual shock of the Winter Olympics and the introduction of the display screen](/img/43/7f8becc09c5ce7fe401bed140608f3.jpg)
[untitled] record the visual shock of the Winter Olympics and the introduction of the display screen

Can't find real-time chat software? Recommend to you what e-commerce enterprises are using!
Consul installation
Altium designer 19.1.18 - change the transparency of copper laying
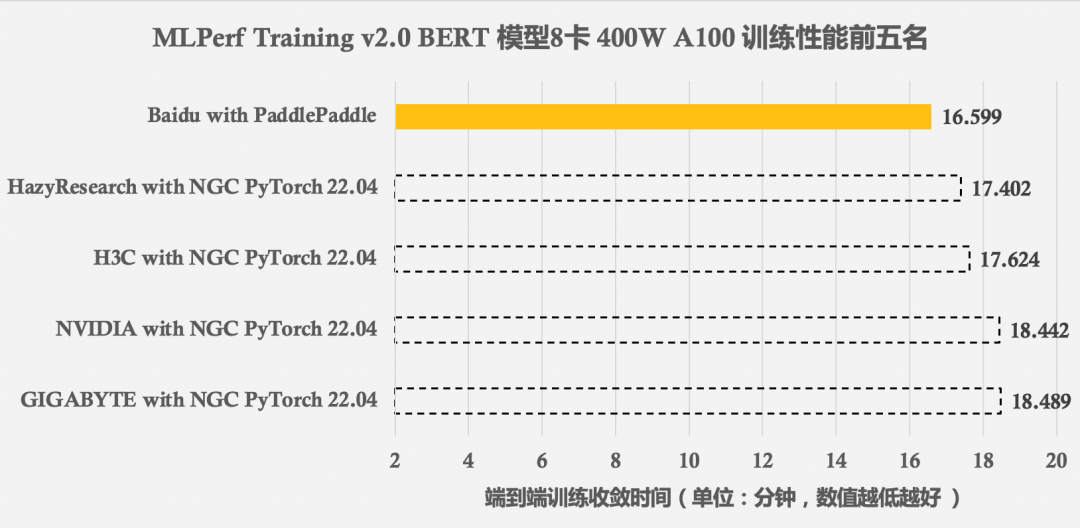
MLPerf Training v2.0 榜单发布,在同等GPU配置下百度飞桨性能世界第一
随机推荐
The research found that the cross-border e-commerce customer service system has these five functions!
1089 insert or merge, including test point 5
UEFI development learning 4 - getting to know variable services
How to define guid in AMI code
Drive LED -- GPIO control
C language # and #
Win10 shortcut key
Consul installation
如何将EasyCVR平台RTSP接入的设备数据迁移到EasyNVR中?
Cadence simulation encountered "input.scs": can not open input file change path problem
如何进行导电滑环选型
MLPerf Training v2.0 榜单发布,在同等GPU配置下百度飞桨性能世界第一
Programming knowledge -- basis of C language
Markdown tips
Random function usage notes
Network port usage
How to select conductive slip ring
Shape template matching based on Halcon learning [9] PM_ multiple_ dxf_ models. Hdev routine -- [read and write XLD from DXF file]
1089 Insert or Merge 含测试点5
About yolov3, conduct map test directly