当前位置:网站首页>Enterprise backup software Veritas NetBackup (NBU) 8.1.1 installation and deployment of server
Enterprise backup software Veritas NetBackup (NBU) 8.1.1 installation and deployment of server
2022-07-05 16:10:00 【yuanfan2012】
Enterprise backup software Veritas NetBackup(NBU) 8.1.1 Installation and deployment of the server
NetBackup: Number one enterprise backup and recovery solution
Veritas NetBackup It is a software suite for data backup and recovery designed for enterprise users .
During the backup process , Customers send data to NetBackup The server , The server selects the most appropriate storage media type for it by using relevant strategies . In the process of recovery , The administrator can browse to the data and directory that the user needs to recover
meanwhile ,NetBackup The server will find these data or directories and help customers recover .Veritas NetBackup Provide data De duplication 、 Replication and snapshot Services , It can also be accessed from tape in a physical or virtual environment 、 disk 、 Data recovery in snapshot and cloud .
The following is about RHEL7.9 Installation under system Veritas NetBackup(NBU) 8.1.1
( Click to enlarge the picture )
1、RHEL7 Prepare the basic environment of the operating system
RHEL7.9 The system is to minimize installation
( Click to enlarge the picture )
IP:192.168.31.160
( Click to enlarge the picture )
In the actual production environment, it is recommended to do port aggregation at the server port Bond
groupadd nbwebgrp
mkdir -p /usr/openv/wmc
useradd -g nbwebgrp -c 'NetBackup Web Services account' -d /usr/openv/wmc nbwebsvc

echo "kernel.sem = 300 307200 32 1024" >> /etc/sysctl.conf
sysctl -p

echo "* soft nproc 2047" >> /etc/security/limits.conf
echo "* hard nproc 16384"  >> /etc/security/limits.conf
echo "* soft nofile 8192 " >> /etc/security/limits.conf
echo "* hard nofile 65536 " >> /etc/security/limits.conf
hostnamectl set-hostname nbuserver
echo "192.168.31.160 nbuserver" >> /etc/hosts
sed -i 's/enforcing/disabled/g' /etc/selinux/config
setenforce 0

vi /etc/profile
 Add as follows
PATH=$PATH:$HOME/bin:/usr/openv/netbackup/bin/admincmd:/usr/openv/netbackup/bin:/usr/openv/netbackup/bin/goodies:/usr/openv/volmgr/bin
export PATH
then reboot Restart the server
( Click to enlarge the picture )
2、 Upload NetBackup_8.1.1_LinuxR_x86_64.tar.gz And unzip the installation
cd /soft/
tar -zxvf NetBackup_8.1.1_LinuxR_x86_64.tar.gz
 It is recommended to turn off the firewall before installation
systemctl stop firewalld.service
systemctl disable firewalld.service
cd NetBackup_8.1.1_LinuxR_x86_64
./install
( Click to enlarge the picture )
( Click to enlarge the picture )
( Click to enlarge the picture )
3、 setup script
[[email protected] NetBackup_8.1.1_LinuxR_x86_64]# ./install


Veritas Installation Script
Copyright (c) 2018 Veritas Technologies LLC. All rights reserved.


        Installing NetBackup Server Software


Please review the VERITAS SOFTWARE LICENSE AGREEMENT located on
the installation media before proceeding. The agreement includes
details on the NetBackup Product Improvement Program.

For NetBackup installation and upgrade information specific to your
platform and to find out if your installed EEBs or hot fixes are
contained in this release, check the Installation and Upgrade checklists
and the Hot Fix and EEB Release Auditor, both available on the Veritas
Services and Operations Readiness Tools (SORT) page:
https://sort.veritas.com/netbackup.

ATTENTION!  To help ensure a successful upgrade to NetBackup 8.1.1,
please visit the NetBackup 8.x Upgrade Portal:
https://www.veritas.com/docs/000115678.

Do you wish to continue? [y,n] (y) y
Starting NetBackup Deduplication installer
testing: /tmp/pdde_pkg_dir_2368
NetBackup Deduplication preinstall check passed

Is this host the master server? [y,n] (y) y
Are you currently performing a disaster recovery of a master server? [y,n] (n) n

Using nbwebsvc and nbwebgrp for the
NetBackup web service user and group.


Checking for required system conditions...

ok server_conf_settings_critical: Inapplicable for new NetBackup installation: skipping
ok media_server_cluster_upgrade: NetBackup is not installed: skipping
ok remote_emm: NetBackup is not installed: skipping
ok wsl_account: user [nbwebsvc] belongs to group [nbwebgrp]
ok unsupported_platform: Passed checks for unsupported platforms.
ok be_nb_same_host: inapplicable on linux: skipping
ok nbdb_ntfs_dir_symlink: inapplicable on linux: skipping
ok nbdb_maintenance_space: no NBDB maintenance required on new install: skipping

Checking for recommended system conditions...

ok os_update_level: inapplicable on linux: skipping
ok ulimit_nofiles: nofiles ulimit 8192 is high enough.
ok hotfix_auditor: NetBackup is not installed or there is no hotfix or EEB data present. Skipping HF/EEB Auditor check.
ok ephemeral_port_range: The ephemeral port range does not include ports used by NetBackup services.
ok port_availability_check: Inapplicable for upgrade from non - Master Server or cluster inactive node: skipping
ok server_conf_settings_noncritical: Inapplicable for new NetBackup installation: skipping
ok semaphore_limits: semaphore limits are high enough

The NetBackup and Media Manager software is built for use on LINUX_RH_X86 hardware.
Do you want to install NetBackup and Media Manager files? [y,n] (y) y

NetBackup and Media Manager are normally installed in /usr/openv.
The existing /usr/openv directory will be used for NetBackup and Media Manager.

Saving server binaries for LINUX_RH_X86.

Reading NetBackup files from /soft/NetBackup_8.1.1_LinuxR_x86_64/linuxR_x86/anb

Checking for pre-existing SYMCnetbp package.
package SYMCnetbp is not installed
Checking for pre-existing VRTSnetbp package.
Installing VRTSnetbp package.
Installation of VRTSnetbp was successful.
More details regarding VRTSnetbp can be found in file
/tmp/install_netbppkg_trace.2492 on nbuserver.

x openv/netbackup/client/Linux/
x openv/netbackup/client/Linux/Debian2.6.18/
x openv/netbackup/client/Linux/Debian2.6.18/client_bin.tar.gz
x openv/netbackup/client/Linux/Debian2.6.18/certcmdTool_for_UNIX.tar.gz
x openv/netbackup/client/Linux/Debian2.6.18/ssh_to_client
x openv/netbackup/client/Linux/Debian2.6.18/extract_java
x openv/netbackup/client/Linux/Debian2.6.18/cp_to_client
x openv/netbackup/client/Linux/Debian2.6.18/nbcheck
x openv/netbackup/client/Linux/Debian2.6.18/pddeagent.tar.gz
x openv/netbackup/client/Linux/Debian2.6.18/.sizes_JRE
x openv/netbackup/client/Linux/Debian2.6.18/nb_init_cfg
x openv/netbackup/client/Linux/Debian2.6.18/.sizes_NB-Java
x openv/netbackup/client/Linux/Debian2.6.18/nbbsdtar
x openv/netbackup/client/Linux/Debian2.6.18/client_config
x openv/netbackup/client/Linux/Debian2.6.18/.sizes_client_bin
x openv/netbackup/client/Linux/Debian2.6.18/PBX.tar.gz
x openv/netbackup/client/Linux/Debian2.6.18/nbj.conf
x openv/netbackup/client/Linux/Debian2.6.18/sftp_to_client
x openv/netbackup/client/Linux/Debian2.6.18/pdinstall
x openv/netbackup/client/Linux/Debian2.6.18/.sizes
x openv/netbackup/client/Linux/Debian2.6.18/installpbx
x openv/netbackup/client/Linux/Debian2.6.18/JRE.tar.gz
x openv/netbackup/client/Linux/Debian2.6.18/version
x openv/netbackup/client/Linux/Debian2.6.18/NB-Java.tar.gz
x openv/netbackup/client/Linux/SuSE3.0.76/
x openv/netbackup/client/Linux/SuSE3.0.76/VRTSpddea.rpm
x openv/netbackup/client/Linux/SuSE3.0.76/VRTSnbpck.rpm
x openv/netbackup/client/Linux/SuSE3.0.76/certcmdTool_for_UNIX.tar.gz
x openv/netbackup/client/Linux/SuSE3.0.76/ssh_to_client
x openv/netbackup/client/Linux/SuSE3.0.76/VRTSnbjre.rpm
x openv/netbackup/client/Linux/SuSE3.0.76/extract_java
x openv/netbackup/client/Linux/SuSE3.0.76/cp_to_client
x openv/netbackup/client/Linux/SuSE3.0.76/nbcheck
x openv/netbackup/client/Linux/SuSE3.0.76/nb_init_cfg
x openv/netbackup/client/Linux/SuSE3.0.76/VRTSnbjava.rpm
x openv/netbackup/client/Linux/SuSE3.0.76/VRTSnbcfg.rpm
x openv/netbackup/client/Linux/SuSE3.0.76/nbbsdtar
x openv/netbackup/client/Linux/SuSE3.0.76/VRTSpbx.rpm
x openv/netbackup/client/Linux/SuSE3.0.76/client_config
x openv/netbackup/client/Linux/SuSE3.0.76/VRTSnbclt.rpm
x openv/netbackup/client/Linux/SuSE3.0.76/nbj.conf
x openv/netbackup/client/Linux/SuSE3.0.76/sftp_to_client
x openv/netbackup/client/Linux/SuSE3.0.76/pdinstall
x openv/netbackup/client/Linux/SuSE3.0.76/.sizes
x openv/netbackup/client/Linux/SuSE3.0.76/version
x openv/netbackup/client/Linux/RedHat2.6.18/
x openv/netbackup/client/Linux/RedHat2.6.18/VRTSpddea.rpm
x openv/netbackup/client/Linux/RedHat2.6.18/VRTSnbpck.rpm
x openv/netbackup/client/Linux/RedHat2.6.18/certcmdTool_for_UNIX.tar.gz
x openv/netbackup/client/Linux/RedHat2.6.18/ssh_to_client
x openv/netbackup/client/Linux/RedHat2.6.18/VRTSnbjre.rpm
x openv/netbackup/client/Linux/RedHat2.6.18/extract_java
x openv/netbackup/client/Linux/RedHat2.6.18/cp_to_client
x openv/netbackup/client/Linux/RedHat2.6.18/nbcheck
x openv/netbackup/client/Linux/RedHat2.6.18/nb_init_cfg
x openv/netbackup/client/Linux/RedHat2.6.18/VRTSnbjava.rpm
x openv/netbackup/client/Linux/RedHat2.6.18/VRTSnbcfg.rpm
x openv/netbackup/client/Linux/RedHat2.6.18/nbbsdtar
x openv/netbackup/client/Linux/RedHat2.6.18/VRTSpbx.rpm
x openv/netbackup/client/Linux/RedHat2.6.18/client_config
x openv/netbackup/client/Linux/RedHat2.6.18/VRTSnbclt.rpm
x openv/netbackup/client/Linux/RedHat2.6.18/nbj.conf
x openv/netbackup/client/Linux/RedHat2.6.18/sftp_to_client
x openv/netbackup/client/Linux/RedHat2.6.18/pdinstall
x openv/netbackup/client/Linux/RedHat2.6.18/.sizes
x openv/netbackup/client/Linux/RedHat2.6.18/version

Copying RedHat2.6.18 Client Binaries
Installing VRTSnbpck ...
Installation of VRTSnbpck was successful. Check /tmp/install_VRTSnbpck.rpm_trace.2963 for details.
Installing VRTSpbx ...
Installation of VRTSpbx was successful. Check /tmp/install_VRTSpbx.rpm_trace.2963 for details.
Installing VRTSnbclt ...
Installation of VRTSnbclt was successful. Check /tmp/install_VRTSnbclt.rpm_trace.2963 for details.

Terminating NetBackup and/or Media Manager processes.

Installing NB-Java.
Installing VRTSnbjre ...

Installation of VRTSnbjre was successful.
More details regarding VRTSnbjre can be found in file
/tmp/install_VRTSnbjre.rpm_trace.3324 on nbuserver.
Installing VRTSnbjava ...

Installation of VRTSnbjava was successful.
More details regarding VRTSnbjava can be found in file
/tmp/install_VRTSnbjava.rpm_trace.3324 on nbuserver.

Migrating log files in /usr/openv/logs
Migration of log files complete.

No [x]inetd process found.
Installing VRTSpddea.rpm ...
Installation of VRTSpddea.rpm was successful. Check /tmp/install_VRTSpddea.rpm_trace.2963 for details.
Starting NetBackup Deduplication installer
testing: /tmp/pdde_pkg_dir_3934
Checking for SYMCpddea package...
Checking for VRTSpddea package...
   Package VRTSpddea found.

NetBackup Deduplication software is installed.

NetBackup Deduplication is not yet configured.
Checking for SYMCpddes package...
Checking for VRTSpddes package...
Checking for SYMCpddea package...
Installing NetBackup Deduplication server package (/usr/openv/pddeserver.tar.gz)...
Extracting package VRTSpddes in /tmp/pdde_pkg_dir_3934.
   Package VRTSpddes extracted to /tmp/pdde_pkg_dir_3934.
Installing package VRTSpddes.
   Package VRTSpddes installed.
Installing NetBackup Extendable Storage File System Service (VxESFS) ...
Running install_esfs script ...
Successfully installed NetBackup Extendable Storage File System Service (VxESFS)
Running NetBackup Deduplication upgrade script (server mode)...
NetBackup Deduplication install finished successfully.
Version now installed: 11.0101.0018.0202
Full NetBackup Deduplication installation log saved to: /var/log/puredisk/2022-06-11_20:19-pdde-install.log

Installing VRTSnbcfg.rpm ...
Installation of VRTSnbcfg.rpm was successful. Check /tmp/install_VRTSnbcfg.rpm_trace.2963 for details.

Done executing NB.inst.

If you ran NB.inst instead of <cdrom_path>/install, you must
run /usr/openv/netbackup/bin/install_bp to initiate NetBackup.
Running /usr/openv/netbackup/bin/install_bp


A NetBackup Server or Enterprise Server license key is needed
for installation to continue.

Enter license key: XXXX-XXXX-XXXX-XXXX-XXXX-XXXX-XXXX-XXXX-XXXX-XX

XXXX-XXXX-XXXX-XXXX-XXXX-XXXX-XXXX-XXXX-XXXX-XX:
        NetBackup Enterprise Server Base product with the following features enabled:
            Enterprise Vault Agent
            Open File Backup
            Remote Client Support
            Robotic Library Sharing Support
            Remote Media Server Support
            Microsoft RSM Robotic Libraries
            ADIC DAS/SDLC Robotic Libraries
            IBM ATL Robotic Libraries
            Fujitsu LMF Robotic Libraries
            StorageTek ACS Robotic Libraries
            Inline Tape Copy
            DataStore
        has been registered.


All additional keys should be added at this time.
Do you want to add additional license keys now? [y,n] (y) n

Use /usr/openv/netbackup/bin/admincmd/get_license_key
to add, delete or list license keys at a later time.

Installing NetBackup Enterprise Server version: 8.1.1


If this machine will be using a different network interface than the
default (nbuserver), the name of the preferred interface should be used
as the configured server name.  If this machine will be part of a
cluster, the virtual name should be used as the configured server name.

Would you like to use "nbuserver" as the configured
NetBackup server name of this machine? [y,n] (y) y


Media servers can be added during this installation or
to a NetBackup environment after installation completes.
Refer to the NetBackup Administrator's Guide, Volume I for
more information.

Do you want to add any media servers now? [y,n] (n) n

Checking network connections.
bp.conf: IP_ADDRESS_FAMILY = AF_INET: default value, no update needed

Successfully cleared host cache
Successfully cleared peer validation cache


Machine nbuserver is a master server, and it is the EMMSERVER.

Successfully updated the session cache parameters.
Creating /usr/openv/tmp/sqlany

Installed SQL Anywhere Version 16.0.0.2322
Installation completed successfully

set_value: Key "AZDBPasswordFilePath" successfully updated
AZ database setup complete.

Database server is NB_nbuserver
Creating the NetBackup database.
Creating NetBackup staging directory in: /usr/openv/db/staging
Starting the NetBackup database.
Authenticating the NetBackup database.
VXDBMS_NB_DATA entry in bp.conf updated successfully.
Setting of database authentication for NBDB successful.
Change of dba password for NBDB successful.
This will require restart of NetBackup Web Management Console service.
Creating the NetBackup database files.
The NetBackup database files creation complete.
Creating the NetBackup database schema.
Verifying the running version of NBDB ...
NBDB version 8.1.1.0 verified.
This will require restart of NetBackup Web Management Console service.
Upgrading NBDB (8.1.1.0) to (8.1.1.0) ...
NBDB version remains the same.
Starting NBDB database self-tuning. This may take some time...
        Found 0 fragmented records in database.
NBDB database self-tuning is complete.
Database [NBDB] validation successful.
The NetBackup database creation complete.
Database [NBDB] is alive and well on server [NB_nbuserver].
Creating the NetBackup Authorization database.
Creation of NetBackup Authorization database is complete.
Exiting from create_nbdb, status[0].
WEBSVC_USER 'nbwebsvc' and WEBSVC_GROUP 'nbwebgrp' were saved in bp.conf.
Starting the NetBackup Authentication daemon.
Starting the NetBackup network daemon.
Starting the NetBackup client daemon.

Configuring nbatd.
Gathering configuration information.
Waiting for the security services to start operation.
Generating identity for host 'nbuserver'
Setting up security on target host: nbuserver
nbatd is successfully configured on NetBackup Master Server.
Operation completed successfully.
Deploying AT certificate for web user.
Deploying AT certificate for web services.
Generating AT certificate for tomcat.

Starting the NetBackup Audit Manager.


x openv/wmc/
x openv/wmc/bin/
x openv/wmc/bin/install/
x openv/wmc/bin/install/configureWmc
x openv/wmc/bin/install/configurePorts
x openv/wmc/bin/install/setupWmc
x openv/wmc/bin/install/createSslStore
x openv/wmc/bin/install/configureCerts
x openv/wmc/bin/install/wmcUtils
x openv/wmc/bin/install/configureWsDefaults
x openv/wmc/bin/install/configureEnv
x openv/wmc/bin/install/manageClientCerts
x openv/wmc/webserver/
x openv/wmc/webserver/webapps/
x openv/wmc/webserver/temp/
x openv/wmc/webserver/temp/safeToDelete.tmp
x openv/wmc/webserver/bin/
x openv/wmc/webserver/bin/version.sh
x openv/wmc/webserver/bin/setclasspath.sh
x openv/wmc/webserver/bin/startup.sh
x openv/wmc/webserver/bin/bootstrap.jar
x openv/wmc/webserver/bin/daemon.sh
x openv/wmc/webserver/bin/catalina.sh
x openv/wmc/webserver/bin/commons-daemon-native.tar.gz
x openv/wmc/webserver/bin/shutdown.sh
x openv/wmc/webserver/bin/digest.sh
x openv/wmc/webserver/bin/tool-wrapper.sh
x openv/wmc/webserver/bin/configtest.sh
x openv/wmc/webserver/bin/tomcat-native.tar.gz
x openv/wmc/webserver/bin/commons-daemon.jar
x openv/wmc/webserver/bin/tomcat-juli.jar
x openv/wmc/webserver/bin/catalina-tasks.xml
x openv/wmc/webserver/RELEASE-NOTES
x openv/wmc/webserver/RUNNING.txt
x openv/wmc/webserver/conf/
x openv/wmc/webserver/conf/context.xml.template
x openv/wmc/webserver/conf/server.xml.template
x openv/wmc/webserver/conf/tomcat-users.xml
x openv/wmc/webserver/conf/tomcat-users.xsd
x openv/wmc/webserver/conf/catalina.properties
x openv/wmc/webserver/conf/jaspic-providers.xsd
x openv/wmc/webserver/conf/web.xml.template
x openv/wmc/webserver/conf/jaspic-providers.xml
x openv/wmc/webserver/conf/catalina.policy
x openv/wmc/webserver/LICENSE
x openv/wmc/webserver/lib/
x openv/wmc/webserver/lib/tomcat-jdbc.jar
x openv/wmc/webserver/lib/tomcat-i18n-es.jar
x openv/wmc/webserver/lib/el-api.jar
x openv/wmc/webserver/lib/tomcat-coyote.jar
x openv/wmc/webserver/lib/websocket-api.jar
x openv/wmc/webserver/lib/tomcat-util.jar
x openv/wmc/webserver/lib/tomcat-dbcp.jar
x openv/wmc/webserver/lib/tomcat-api.jar
x openv/wmc/webserver/lib/jaspic-api.jar
x openv/wmc/webserver/lib/tomcat-websocket.jar
x openv/wmc/webserver/lib/ecj-4.6.3.jar
x openv/wmc/webserver/lib/jasper-el.jar
x openv/wmc/webserver/lib/catalina-tribes.jar
x openv/wmc/webserver/lib/jsp-api.jar
x openv/wmc/webserver/lib/tomcat-util-scan.jar
x openv/wmc/webserver/lib/tomcat-i18n-ja.jar
x openv/wmc/webserver/lib/tomcat-jni.jar
x openv/wmc/webserver/lib/jasper.jar
x openv/wmc/webserver/lib/catalina.jar
x openv/wmc/webserver/lib/tomcat-i18n-fr.jar
x openv/wmc/webserver/lib/catalina-ha.jar
x openv/wmc/webserver/lib/catalina-ant.jar
x openv/wmc/webserver/lib/servlet-api.jar
x openv/wmc/webserver/lib/catalina-storeconfig.jar
x openv/wmc/webserver/lib/annotations-api.jar
x openv/wmc/webserver/NOTICE
x openv/wmc/config/
x openv/wmc/config/tomcat.logging.properties
x openv/wmc/config/log4j.properties
x openv/wmc/war/
x openv/wmc/war/nbwebservice.war
x openv/wmc/lib/
x openv/wmc/lib/commons-lang.jar
x openv/wmc/lib/spring-security-web-4.2.1.RELEASE.jar
x openv/wmc/lib/commons-collections.jar
x openv/wmc/lib/spring-core-4.3.5.RELEASE.jar
x openv/wmc/lib/goodies.jar
x openv/wmc/lib/nb_wsf.jar
x openv/wmc/lib/nbu_common.jar
x openv/wmc/lib/log4j.jar
x openv/wmc/lib/commons-logging.jar
x openv/wmc/lib/commons-configuration.jar

Starting the NetBackup Web Management Console.
Deploying Server Certificate. This may take a few minutes.
Done processing parameter files, no files found to convert

Starting the NetBackup SAN Client Fibre Transport daemon.
Starting the NetBackup Discovery Framework.

Starting the NetBackup Event Manager.

Starting the NetBackup Deduplication Manager.
Starting the NetBackup Deduplication Engine.

Starting the NetBackup database manager process (bpdbm).

Converting snapshot policies:

Policy conversion summary:
        Number of original policies:                    0
        Number of non-snapshot policies skipped:        0
        Number of policies not needing conversion:      0
        Number of policies converted to
          'auto' snapshot method:                       0
        Number of policies converted:                   0

Updating client hardware definitions:

Hardware update conversion summary:
        Number of policies processed:                         0
        Number of policies with affected clients:             0
        Number of clients processed:                          0
        Number of clients converted:                          0

Updating policy identifiers:

Policy identifier update summary:
        Number of policies processed:                                 0
        Number of policies with duplicate identifier:         0
        Number of policies with empty identifier:                     0
        Number of policies with affected identifier:          0

Starting the NetBackup compatibility daemon.
Starting the NetBackup Enterprise Media Manager.
Starting the NetBackup Resource Broker.

Populating the database tables.  This will take some time.

Starting the Media Manager device daemon processes.

Do you want to start the job-related NetBackup daemons
so backups and restores can be initiated? [y,n] (y) y
Starting the NetBackup request daemon process (bprd).
Starting the NetBackup Job Manager.
Starting the NetBackup Policy Execution Manager.
Starting the NetBackup Storage Lifecycle Manager.

Starting the NetBackup Remote Monitoring Management System.
Starting the NetBackup Key Management daemon.
Starting the NetBackup Service Layer.
Starting the NetBackup Indexing Manager.
Starting the NetBackup Agent Request Server.
Starting the NetBackup Bare Metal Restore daemon.
Starting the NetBackup Vault daemon.
Starting the NetBackup CloudStore Service Container.
Starting the NetBackup Service Monitor.
Starting the NetBackup Bare Metal Restore Boot Server daemon.


OpsCenter is the next-generation monitoring, reporting and
administrative solution designed to centrally manage one or
more NetBackup installations from a web browser.

If an OpsCenter server already exists in your environment
or you plan to install one, enter the real hostname of that
OpsCenter server here.  Do not use a virtual name.  If you
do not want this local machine to be an OpsCenter server,
enter NONE.

Enter the OpsCenter server (default: NONE):

WARNING: Catalog backups fail if the disaster recovery passphrase is not set.


NetBackup server installation complete.


File /usr/openv/tmp/install_trace.2326 contains a trace of this install.
That file can be deleted after you are sure the install was successful.
[[email protected] NetBackup_8.1.1_LinuxR_x86_64]# /usr/openv/netbackup/bin/nbcertcmd -displayCACertDetail -server nbuserver

CA Certificate received successfully from server nbuserver.

         Subject Name : /CN=nbatd/[email protected]/O=vx
           Start Date : Jun 11 11:05:00 2022 GMT
          Expiry Date : Jun 06 12:20:00 2042 GMT
     SHA1 Fingerprint : D0:34:C6:B8:55:D6:48:F8:3F:D0:A7:98:00:CF:1E:7B:D3:DD:CB:17
 CA Certificate State : Trusted

[[email protected] NetBackup_8.1.1_LinuxR_x86_64]#
4、Windows Install management tools on the operation and maintenance management machine
Netbackup Administration Console
( Click to enlarge the picture )
5、 Sign in Netbackup Administration Console
( Click to enlarge the picture )
Input RHEL Systematic root password
( Click to enlarge the picture )
( Click to enlarge the picture )
establish Token Subsequent installation NBU Client You need to use
( Click to enlarge the picture )
( Click to enlarge the picture )
The installation and deployment of the server will be introduced here first
边栏推荐
- vant tabbar遮挡内容的解决方式
- [brief notes] solve the problem of IDE golang code red and error reporting
- CISP-PTE之SQL注入(二次注入的应用)
- 超分辨率技术在实时音视频领域的研究与实践
- Quick completion guide for manipulator (IX): forward kinematics analysis
- Memo 00
- 抽象类和接口的区别
- 效果编辑器新版上线!3D渲染、加标注、设置动画,这次一个编辑器就够了
- Codasip为RISC-V处理器系列增加Veridify安全启动功能
- Data communication foundation NAT network address translation
猜你喜欢

Background system sending verification code function
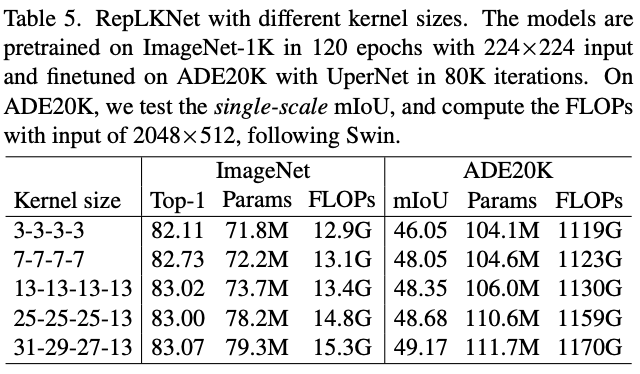
Replknet: it's not that large convolution is bad, but that convolution is not large enough. 31x31 convolution. Let's have a look at | CVPR 2022

【网易云信】超分辨率技术在实时音视频领域的研究与实践

Analytic hierarchy process of mathematical modeling (including Matlab code)

ES6 drill down - ES6 generator function
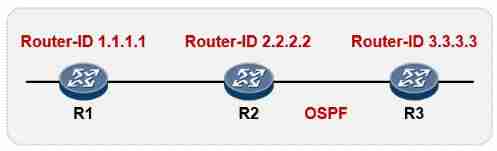
Data communication foundation OSPF Foundation

Batch update in the project
[Netease Yunxin] research and practice of super-resolution technology in the field of real-time audio and video
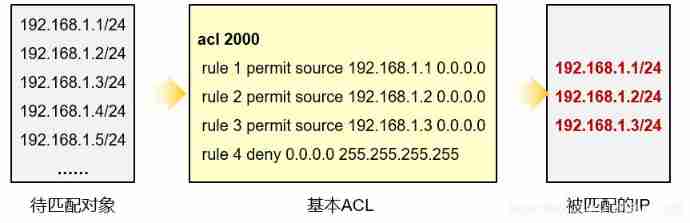
Data communication foundation ACL access control list
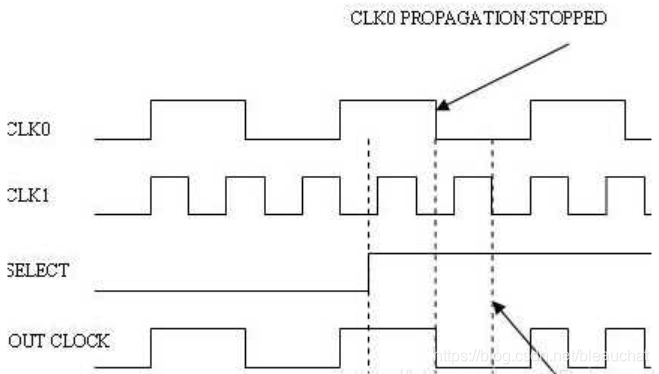
具有倍数关系的时钟切换
随机推荐
Replknet: it's not that large convolution is bad, but that convolution is not large enough. 31x31 convolution. Let's have a look at | CVPR 2022
Basic JSON operations of MySQL 5.7
21.[STM32]I2C协议弄不懂,深挖时序图带你编写底层驱动
Quick completion guide for manipulator (IX): forward kinematics analysis
漫画:什么是蓝绿部署?
Li Kou today's question -729 My schedule I
Cartoon: what is MapReduce?
记录一下树莓派搭建环境中遇到的坑。。。
ES6深入—async 函数 与 Symbol 类型
[graduation season] as a sophomore majoring in planning, I have something to say
Mistakes made when writing unit tests
Information collection of penetration test
vlunhub- BoredHackerBlog Social Network
Data communication foundation - routing communication between VLANs
【网易云信】超分辨率技术在实时音视频领域的研究与实践
Transaction rollback exception
降本40%!Redis多租户集群的容器化实践
Memo 00
【漏洞预警】CVE-2022-26134 Confluence 远程代码执行漏洞POC验证与修复过程
MySQL overview