当前位置:网站首页>Markdown tricks
Markdown tricks
2020-11-06 21:19:00 【itread01】
 Lorem ipsum dolor sit amet, consectetur adipisicing elit. Corporis error ipsam voluptatibus eius dolore maxime aperiam eveniet, autem laborum exercitationem recusandae nostrum, soluta praesentium vel sapiente. Natus, nobis molestiae. Repellat? ```
Lorem ipsum dolor sit amet, consectetur adipisicing elit. Corporis error ipsam voluptatibus eius dolore maxime aperiam eveniet, autem laborum exercitationem recusandae nostrum, soluta praesentium vel sapiente. Natus, nobis molestiae. Repellat? ### 程式碼塊摺疊 在部落格園的 TinyMCE 中您可以輕鬆插入能夠摺疊的程式碼塊,好在 Markdown 可以使用 HTML 的標籤功能。H5 提供了 `
Lorem ipsum dolor sit amet, consectetur adipisicing elit. Corporis error ipsam voluptatibus eius dolore maxime aperiam eveniet, autem laborum exercitationem recusandae nostrum, soluta praesentium vel sapiente. Natus, nobis molestiae. Repellat? ```
Lorem ipsum dolor sit amet, consectetur adipisicing elit. Corporis error ipsam voluptatibus eius dolore maxime aperiam eveniet, autem laborum exercitationem recusandae nostrum, soluta praesentium vel sapiente. Natus, nobis molestiae. Repellat? ### 程式碼塊摺疊 在部落格園的 TinyMCE 中您可以輕鬆插入能夠摺疊的程式碼塊,好在 Markdown 可以使用 HTML 的標籤功能。H5 提供了 `
` 標籤,使用它們很容易在 Markdown 中實現程式碼塊摺疊。 ````html
post-signature.js
```javascript // 構建隨筆簽名 import { pageName } from '@tools' import { getBlogname, getCurrentPostUrl } from '@cnblog' import { postSignatureConfig } from '@config/plugins' const containerId = 'post-signature' /** * 構建容器 */ const buildContainer = () => { const author = getBlogname() const href = getCurrentPostUrl() const el = `
本文作者:${author}
本文連結:${href}
` $('#cnblogs_post_body').append(el) } /** * 構建版權資訊 * @param {Boolean} enableLicense * @param {String} licenseName * @param {String} licenseLink */ const buildLicense = ( enableLicense, licenseName, licenseLink, ) => { if (!enableLicense) return const agreement = licenseName.length ? licenseName : '知識共享署名-非商業性使用-禁止演繹 2.5 中國大陸' const el = `
版權宣告:本作品採用${agreement}許可協議進行許可。
` $(`#${containerId}`).append(el) } /** * 構建自定義內容 * @param {Array} content */ function buildContent(content) { let el = '' for (let i = 0; i < content.length; i++) { el += '
' + content[i] + '
' } $(`#${containerId}`).append(el) } export default devOptions => { const { enable, enableLicense, content, licenseName, licenseLink, } = postSignatureConfig(devOptions) if (!enable) return if (pageName() !== 'post') return buildContainer() buildLicense(enableLicense, licenseName, licenseLink) buildContent(content) } ```
````
post-signature.js
```javascript // 構建隨筆簽名 import { pageName } from '@tools' import { getBlogname, getCurrentPostUrl } from '@cnblog' import { postSignatureConfig } from '@config/plugins' const containerId = 'post-signature' /** * 構建容器 */ const buildContainer = () => { const author = getBlogname() const href = getCurrentPostUrl() const el = `
本文作者:${author}
本文連結:${href}
` $('#cnblogs_post_body').append(el) } /** * 構建版權資訊 * @param {Boolean} enableLicense * @param {String} licenseName * @param {String} licenseLink */ const buildLicense = (enableLicense, licenseName, licenseLink) => { if (!enableLicense) return const agreement = licenseName.length ? licenseName : '知識共享署名-非商業性使用-禁止演繹 2.5 中國大陸' const el = `
版權宣告:本作品採用${agreement}許可協議進行許可。
` $(`#${containerId}`).append(el) } /** * 構建自定義內容 * @param {Array} content */ function buildContent(content) { let el = '' for (let i = 0; i < content.length; i++) { el += '
' + content[i] + '
' } $(`#${containerId}`).append(el) } export default devOptions => { const { enable, enableLicense, content, licenseName, licenseLink } = postSignatureConfig(devOptions) if (!enable) return if (pageName() !== 'post') return buildContainer() buildLicense(enableLicense, licenseName, licenseLink) buildContent(content) } ```
您甚至可以摺疊任何內容,只需要將 `` 標籤之間的內容替換為其他要摺疊的內容。 > 請注意,在 `` 標籤之間的內容上下各保留一條空行。 ### 引用塊 在 Markdown 中一般通過 `>` 來宣告一個 Markdown 引用塊: > 這是一個引用塊。 但它們的樣式都是固定的,我們常常需要一些帶有提示資訊的引用塊,像下面這樣: 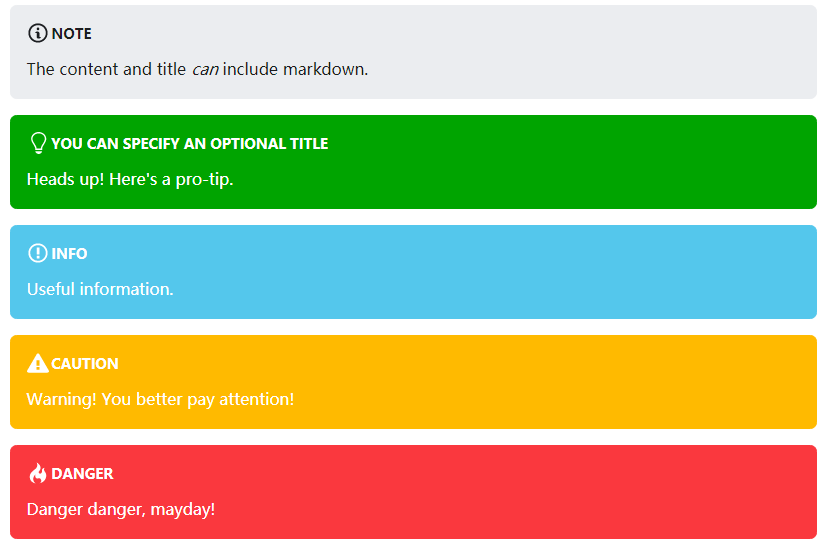 在 Markdown 中藉助 HTML 和 CSS 也能實現這一點。 ```html
《紅與黑》是19世紀法國乃至歐洲文學的一座豐碑。小說圍繞主人公於連的個人奮鬥及兩次愛情經歷的描寫,揭示了復辟王朝時期的波瀾的階級大博鬥,反映了政治黑暗、教會腐敗,貴族反動和資產階級利慾薰心的廣闊生活畫面。於連的兩次愛情動機都是以愛情佔有為出發點最終要達到自己的政治目的。
```
《紅與黑》是19世紀法國乃至歐洲文學的一座豐碑。小說圍繞主人公於連的個人奮鬥及兩次愛情經歷的描寫,揭示了復辟王朝時期的波瀾的階級大博鬥,反映了政治黑暗、教會腐敗,貴族反動和資產階級利慾薰心的廣闊生活畫面。於連的兩次愛情動機都是以愛情佔有為出發點最終要達到自己的政治目的。
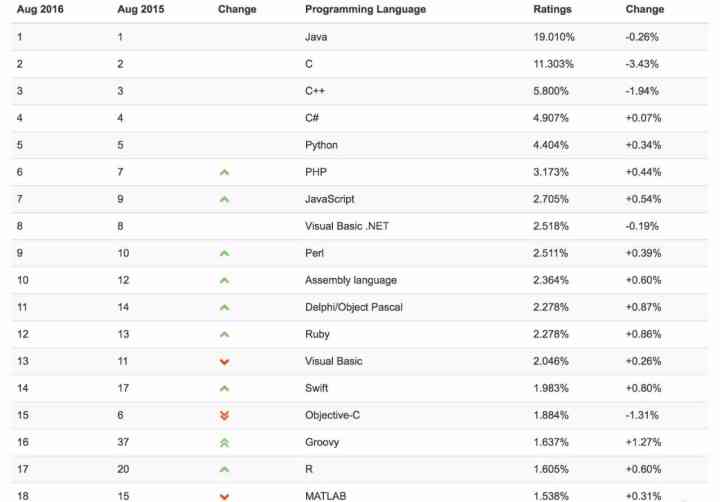
## 工具 我選擇語雀作為主力工具。 ### 插入圖片 使用語雀插入圖片非常簡單,Crtl+ c 複製圖片,Crtl + v 直接將圖片貼上到內容,就會自動幫您上傳到語雀的伺服器。或者您也可以使用工具欄的插圖圖片按鈕,選擇本地圖片插入。我通常使用 windows 自帶的截圖工具(快捷鍵:win+ shift+s)截圖並貼上,因為該截圖工具會自動幫您把圖片複製到剪下板。在 mac 下也有相似的解決方案。  ### 插入表格 在 markdown 中插入表格是十分繁瑣的,但在語雀中十分容易:點選插入按鈕,滑動滑鼠選擇需要的表格擁有的行數和列數,即可自動幫您生成。  您還可以在編輯表格的過程中隨時增刪列和行以及設定表格內容的對齊方式等。 ### 插入公式 數學公式對於一些人群是剛需,語雀支援插入 LaTeX 公式。重要的一點是,您的文章要釋出的平臺可能不支援渲染 markdown 數學公式。語雀支援在匯出 markdown 時勾選匯出 LaTeX 公式為圖片。 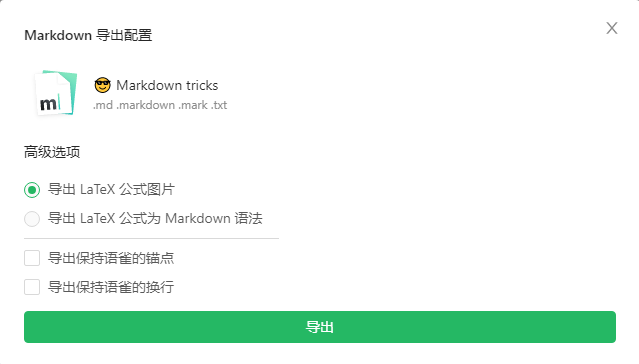 ### 製作思維導圖 通常,將張思維導圖嵌入 markdown 可能需要以下步驟: 1. 開啟思維導圖製作工具 xmind wps etc. 2. 開始製作思維導圖 3. 將成圖用截圖或者匯出為圖片 4. 將圖片上傳到圖床獲得圖片連結 5. 使用 markdown 語法插入圖片 使用語雀只需要: 1. 直接在 markdown 中製作思維導圖 1. 匯出時自動轉為圖片 > 如果想插入流程圖也是同樣輕而易舉。 ### 匯出 語雀能夠一鍵匯出內容為 Markdown 原始碼,無縫銜接到其他社群,我只將內容釋出到部落格園,目前沒發現什麼問題。您可以通過我的 [邀請連結](https://www.yuque.com/login?platform=wechat&inviteToken=d97efa6c62973d671ad88d38b9b4d9c9b62201921c22c6bfc60ec5889295e00d) 加入語雀或者直接 [加入](https://www.yuque.com/)。謝謝閱讀!
post-signature.js
```javascript // 構建隨筆簽名 import { pageName } from '@tools' import { getBlogname, getCurrentPostUrl } from '@cnblog' import { postSignatureConfig } from '@config/plugins' const containerId = 'post-signature' /** * 構建容器 */ const buildContainer = () => { const author = getBlogname() const href = getCurrentPostUrl() const el = `本文作者:${author}
本文連結:${href}
版權宣告:本作品採用${agreement}許可協議進行許可。
` $(`#${containerId}`).append(el) } /** * 構建自定義內容 * @param {Array} content */ function buildContent(content) { let el = '' for (let i = 0; i < content.length; i++) { el += '' + content[i] + '
' } $(`#${containerId}`).append(el) } export default devOptions => { const { enable, enableLicense, content, licenseName, licenseLink, } = postSignatureConfig(devOptions) if (!enable) return if (pageName() !== 'post') return buildContainer() buildLicense(enableLicense, licenseName, licenseLink) buildContent(content) } ```post-signature.js
```javascript // 構建隨筆簽名 import { pageName } from '@tools' import { getBlogname, getCurrentPostUrl } from '@cnblog' import { postSignatureConfig } from '@config/plugins' const containerId = 'post-signature' /** * 構建容器 */ const buildContainer = () => { const author = getBlogname() const href = getCurrentPostUrl() const el = `本文作者:${author}
本文連結:${href}
版權宣告:本作品採用${agreement}許可協議進行許可。
` $(`#${containerId}`).append(el) } /** * 構建自定義內容 * @param {Array} content */ function buildContent(content) { let el = '' for (let i = 0; i < content.length; i++) { el += '' + content[i] + '
' } $(`#${containerId}`).append(el) } export default devOptions => { const { enable, enableLicense, content, licenseName, licenseLink } = postSignatureConfig(devOptions) if (!enable) return if (pageName() !== 'post') return buildContainer() buildLicense(enableLicense, licenseName, licenseLink) buildContent(content) } ```` 標籤之間的內容上下各保留一條空行。 ### 引用塊 在 Markdown 中一般通過 `>` 來宣告一個 Markdown 引用塊: > 這是一個引用塊。 但它們的樣式都是固定的,我們常常需要一些帶有提示資訊的引用塊,像下面這樣:  在 Markdown 中藉助 HTML 和 CSS 也能實現這一點。 ```html
《紅與黑》是19世紀法國乃至歐洲文學的一座豐碑。小說圍繞主人公於連的個人奮鬥及兩次愛情經歷的描寫,揭示了復辟王朝時期的波瀾的階級大博鬥,反映了政治黑暗、教會腐敗,貴族反動和資產階級利慾薰心的廣闊生活畫面。於連的兩次愛情動機都是以愛情佔有為出發點最終要達到自己的政治目的。
```
《紅與黑》是19世紀法國乃至歐洲文學的一座豐碑。小說圍繞主人公於連的個人奮鬥及兩次愛情經歷的描寫,揭示了復辟王朝時期的波瀾的階級大博鬥,反映了政治黑暗、教會腐敗,貴族反動和資產階級利慾薰心的廣闊生活畫面。於連的兩次愛情動機都是以愛情佔有為出發點最終要達到自己的政治目的。
## 工具 我選擇語雀作為主力工具。 ### 插入圖片 使用語雀插入圖片非常簡單,Crtl+ c 複製圖片,Crtl + v 直接將圖片貼上到內容,就會自動幫您上傳到語雀的伺服器。或者您也可以使用工具欄的插圖圖片按鈕,選擇本地圖片插入。我通常使用 windows 自帶的截圖工具(快捷鍵:win+ shift+s)截圖並貼上,因為該截圖工具會自動幫您把圖片複製到剪下板。在 mac 下也有相似的解決方案。  ### 插入表格 在 markdown 中插入表格是十分繁瑣的,但在語雀中十分容易:點選插入按鈕,滑動滑鼠選擇需要的表格擁有的行數和列數,即可自動幫您生成。  您還可以在編輯表格的過程中隨時增刪列和行以及設定表格內容的對齊方式等。 ### 插入公式 數學公式對於一些人群是剛需,語雀支援插入 LaTeX 公式。重要的一點是,您的文章要釋出的平臺可能不支援渲染 markdown 數學公式。語雀支援在匯出 markdown 時勾選匯出 LaTeX 公式為圖片。  ### 製作思維導圖 通常,將張思維導圖嵌入 markdown 可能需要以下步驟: 1. 開啟思維導圖製作工具 xmind wps etc. 2. 開始製作思維導圖 3. 將成圖用截圖或者匯出為圖片 4. 將圖片上傳到圖床獲得圖片連結 5. 使用 markdown 語法插入圖片 使用語雀只需要: 1. 直接在 markdown 中製作思維導圖 1. 匯出時自動轉為圖片 > 如果想插入流程圖也是同樣輕而易舉。 ### 匯出 語雀能夠一鍵匯出內容為 Markdown 原始碼,無縫銜接到其他社群,我只將內容釋出到部落格園,目前沒發現什麼問題。您可以通過我的 [邀請連結](https://www.yuque.com/login?platform=wechat&inviteToken=d97efa6c62973d671ad88d38b9b4d9c9b62201921c22c6bfc60ec5889295e00d) 加入語雀或者直接 [加入](https://www.yuque.com/)。謝謝閱讀!
版权声明
本文为[itread01]所创,转载请带上原文链接,感谢
https://www.itread01.com/content/1604668443.html
边栏推荐
- C + + and C + + programmers are about to be eliminated from the market
- 前端未來趨勢之原生API:Web Components
- Natural language processing - wrong word recognition (based on Python) kenlm, pycorrector
- 一路踩坑,被迫聊聊 C# 代码调试技巧和远程调试
- Chainlink brings us election results into blockchain everipedia
- A course on word embedding
- WeihanLi.Npoi 1.11.0/1.12.0 Release Notes
- Basic usage of GDB debugging
- Python基础数据类型——tuple浅析
- Who says cat can't do link tracking? Stand up for me
猜你喜欢

【字节跳动 秋招岗位开放啦】Ohayoo!放学别走,我想约你做游戏!!!
一篇文章教会你使用Python网络爬虫下载酷狗音乐
【自学unity2d传奇游戏开发】地图编辑器
C + + and C + + programmers are about to be eliminated from the market
What are manufacturing and new automation technologies?
这个项目可以让你在几分钟快速了解某个编程语言
大道至简 html + js 实现最朴实的小游戏俄罗斯方块
vue-codemirror基本用法:实现搜索功能、代码折叠功能、获取编辑器值及时验证
What are the criteria for selecting a cluster server?

(1) ASP.NET Introduction to core3.1 Ocelot
随机推荐
Discussion on the development practice of aspnetcore, a cross platform framework
TensorFlow中的Tensor是什么?
5.4 static resource mapping
ES6学习笔记(二):教你玩转类的继承和类的对象
C#和C/C++混合编程系列5-内存管理之GC协同
keras model.compile Loss function and optimizer
Introduction to Google software testing
给字节的学姐讲如何准备“系统设计面试”
What if the front end doesn't use spa? - Hacker News
From zero learning artificial intelligence, open the road of career planning!
Three Python tips for reading, creating and running multiple files
How to turn data into assets? Attracting data scientists
Analysis of etcd core mechanism
一篇文章带你了解CSS 渐变知识
5.5 controlleradvice notes - SSM in depth analysis and project practice
前端未來趨勢之原生API:Web Components
Humor: hacker programming is actually similar to machine learning!
Introduction to X Window System
百万年薪,国内工作6年的前辈想和你分享这四点
一篇文章带你了解CSS3 背景知识