当前位置:网站首页>DOM basic syntax
DOM basic syntax
2022-07-05 01:11:00 【A-L-Kun】
List of articles
- DOM Basic grammar
- 1、 brief introduction
- 2、 Get elements
- 3、 The basis of the event
- 4、 Operational elements
- 5、 Node operation
- 6、 DOM The key point is
- 7、 Event advanced
DOM Basic grammar
1、 brief introduction
Document object model (DOM), yes W3C The Organization recommends dealing with extensible markup languages (HTML、XML) Standard programming interface
W3C A series of... Have been defined DOM Interface , Through these DOM Interface can change the content of a web page 、 Structure and pattern
1.1 DOM Trees
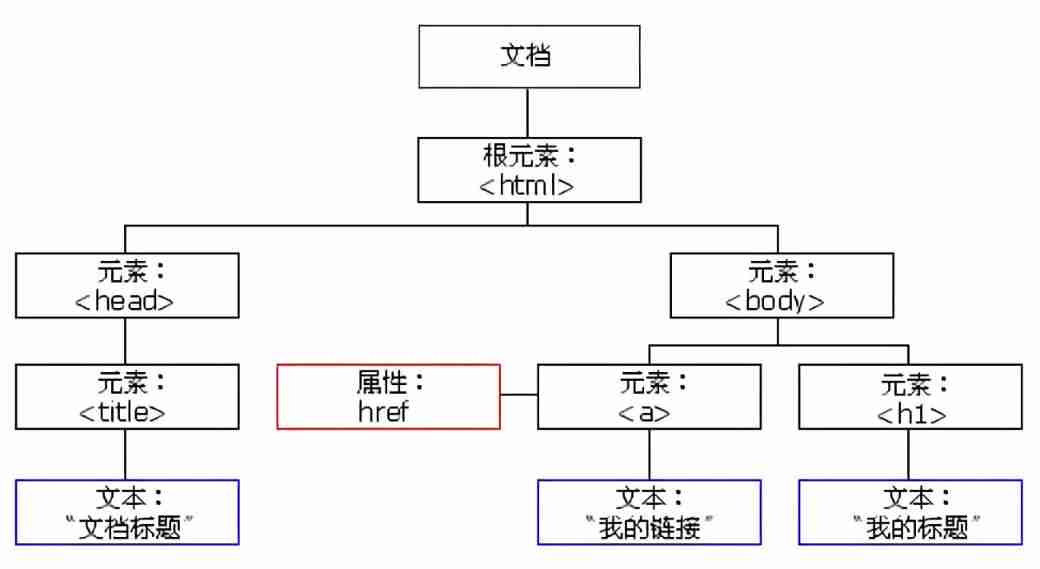
file : A page is a document ,DOM Use in document Express
Elements : All tags in the page are elements ,DOM Use in element Express
node : Everything in a web page is a node ( label 、 attribute 、 Text 、 Notes, etc. ),DOM Use in node Express
DOM Think of all the above as objects
2、 Get elements
There are several ways to get the elements in the page
- according to id obtain
- Get... According to the tag name
- adopt HTML5 New method to get
- Special element acquisition
2.1 according to id obtain
Use getElementById("id") Method can get the id The element object of
<!DOCTYPE html>
<html lang="en">

<head>
    <meta charset="UTF-8">
    <meta http-equiv="X-UA-Compatible" content="IE=edge">
    <meta name="viewport" content="width=device-width, initial-scale=1.0">
    <title>Document</title>
</head>

<body>
    <div id="time"> 2022-2-1</div>
    <script> var time = document.getElementById("time"); //  Case sensitive  console.log(typeof time); console.dir(time); console.log(time); // console.dir()  Print the element object we return , Better view the properties and methods inside  </script>
</body>

</html>
- Because our document page loads from top to bottom , So first you have to have a label , So we script Write it under the label
- get get element Elements by adopt Hump nomenclature
- Parameters id Is a case sensitive string
- It returns an element object
2.2 Get... According to the tag name
Use getElementsByTagName(" Tag name ") Method can return a collection of objects with the specified tag name
<!DOCTYPE html>
<html lang="en">

<head>
    <meta charset="UTF-8">
    <meta http-equiv="X-UA-Compatible" content="IE=edge">
    <meta name="viewport" content="width=device-width, initial-scale=1.0">
    <title>Document</title>
</head>

<body>
    <ul>
        <li>123 a</li>
        <li>123 b</li>
        <li>123 c</li>
        <li>123 d</li>
        <li>123 e</li>
    </ul>
    <script> var lis = document.getElementsByTagName("li"); console.log(lis); console.log(lis[0]); for (var i = 0; i < lis.length(); i++){
       console.log(lis[i]) } </script>
</body>

</html>
- What is returned is the collection of obtained element objects , Store... As a pseudo array , Traverse to get data
- The resulting elements are dynamic
- If there is no such element in the page , The pseudo array put back is an empty array
2.3 Get... According to the tag name
Use element.getElementByTagName(" Tag name ") Get an element ( Parent element ) All internal child elements with specified tag names
<!DOCTYPE html>
<html lang="en">

<head>
    <meta charset="UTF-8">
    <meta http-equiv="X-UA-Compatible" content="IE=edge">
    <meta name="viewport" content="width=device-width, initial-scale=1.0">
    <title>Document</title>
</head>

<body>
    <ul>
        <li>123 a</li>
        <li>123 b</li>
        <li>123 c</li>
        <li>123 d</li>
        <li>123 e</li>
    </ul>
    <ol id="first">
        <li>23 a</li>
        <li>23 b</li>
        <li>23 c</li>
        <li>23 d</li>
        <li>23 e</li>
    </ol>
    <script> var ol1 = document.getElementById("first"); // var ol1 = document.getElementsByTagName("ol")[0]  The effect is the same  var lis = ol1.getElementsByTagName("li"); //  Be sure to specify the parent element  console.log(lis); console.log(lis[0]); </script>
</body>

</html>
The parent element must be a single object ( You must specify which element object ) The parent element itself is not included in the acquisition
2.4 according to Class name to get
Use document.getElementsByClassName(" Class name ") To get a collection of element objects
<!DOCTYPE html>
<html lang="en">

<head>
    <meta charset="UTF-8">
    <meta http-equiv="X-UA-Compatible" content="IE=edge">
    <meta name="viewport" content="width=device-width, initial-scale=1.0">
    <title>Document</title>
</head>

<body>
    <div class="box"> The box 1</div>
    <div class="box"> The box 2</div>
    <script> var boxs = document.getElementsByClassName("box"); console.log(boxs); </script>
</body>

</html>
2.5 Get by specifying a selector
Use document.querySelector(" Selectors ") Specify selector , obtain first Element object
<!DOCTYPE html>
<html lang="en">

<head>
    <meta charset="UTF-8">
    <meta http-equiv="X-UA-Compatible" content="IE=edge">
    <meta name="viewport" content="width=device-width, initial-scale=1.0">
    <title>Document</title>
</head>

<body>
    <div class="box"> The box 1</div>
    <div class="box"> The box 2</div>
    <div id="f1"> The box 3</div>
    <script> var box = document.querySelector("div"); console.log(box); var id = document.querySelector("#f1"); //  Use id choice  //  If you use a class selector , be  (".box") console.log(id); </script>
</body>

</html>
Use document.querySelectorAll(" Selectors ") Specify selector , Get all the elements
<!DOCTYPE html>
<html lang="en">

<head>
    <meta charset="UTF-8">
    <meta http-equiv="X-UA-Compatible" content="IE=edge">
    <meta name="viewport" content="width=device-width, initial-scale=1.0">
    <title>Document</title>
</head>

<body>
    <div class="box"> The box 1</div>
    <div class="box"> The box 2</div>
    <div id="f1"> The box 3</div>
    <script> var boxs = document.querySelectorAll(".box"); console.log(boxs); </script>
</body>

</html>
2.6 obtain body and html Elements
<!DOCTYPE html>
<html lang="en">

<head>
    <meta charset="UTF-8">
    <meta http-equiv="X-UA-Compatible" content="IE=edge">
    <meta name="viewport" content="width=device-width, initial-scale=1.0">
    <title>Document</title>
</head>

<body>
    <script> // body var bodyEle = document.body; console.log(bodyEle); console.dir(bodyEle); // html var htmlEle = document.documentElement; console.log(htmlEle); </script>
</body>

</html>
3、 The basis of the event
3.1 summary
JS It gives us the ability to create dynamic pages , And events can be JS Detected behavior
Simple understanding : Trigger — Response mechanism
<!DOCTYPE html>
<html lang="en">

<head>
    <meta charset="UTF-8">
    <meta http-equiv="X-UA-Compatible" content="IE=edge">
    <meta name="viewport" content="width=device-width, initial-scale=1.0">
    <title>Document</title>
</head>

<body>
    <button id="btn">hello</button>
    <script> btn.onclick = function() {
       alert("hello world"); } </script>
</body>

</html>
- The event is made up of three parts : Event source 、 Event type 、 Event handler ; Also known as the three elements of events
- Event source : The event is triggered by
- Event type : How to trigger , What event , Such as : Mouse click 、 Whether the mouse passes or the keyboard presses
- Event handler : Through a function assignment
3.2 Event execution steps
- Get the event source
- Registration events ( The binding event )
- Add event handler ( Take the form of function assignment )
<!DOCTYPE html>
<html lang="en">

<head>
    <meta charset="UTF-8">
    <meta http-equiv="X-UA-Compatible" content="IE=edge">
    <meta name="viewport" content="width=device-width, initial-scale=1.0">
    <title>Document</title>
</head>

<body>
    <div> Am I </div>
    <script> //  Get the event source  var div = document.querySelector("div"); //  The binding event , And add event handlers  div.onclick = function(){
       alert(" How are you? !") } </script>
</body>

</html>
3.3 Common mouse events
| Mouse events | The trigger condition |
|---|---|
| onclick | single click |
| ondblclick | double-click |
| onmousedown | The event triggered by pressing a button on the mouse |
| onmouseup | After mouse down , Event triggered when releasing |
| onmouseover | Mouse hover |
| onmousemove | Mouse movement |
| onmouseenter | Mouse entry |
| onmouseleave | Mouse away |
| onfocus | Mouse focus |
| onblur | Loss of mouse focus |
4、 Operational elements
JS Of DOM Operation can change the content of the web page 、 Structure and pattern , We can use DOM Manipulate elements to change the contents of elements 、 Properties, etc
4.1 Change element content
element.innerText;  //  Content from start to end , When it does not include html label , At the same time, spaces and line breaks will be replaced
element.innerHTML;  //  Everything from the start position to the end position , Include html label , Keep spaces and line breaks at the same time
<!DOCTYPE html>
<html lang="en">

<head>
    <meta charset="UTF-8">
    <meta http-equiv="X-UA-Compatible" content="IE=edge">
    <meta name="viewport" content="width=device-width, initial-scale=1.0">
    <title>Document</title>
</head>

<body>
    <button> Display current time </button>
    <div> Time to show </div>
    <script> var btn = document.querySelector("button"); //  Get objects  var div = document.querySelector("div"); //  obtain div btn.onclick = function(){
       //  Defining events  var date = new Date(); var year = date.getFullYear(); var month = date.getMonth() + 1; var data = date.getDate(); var hour = date.getHours(); var mit = date.getMinutes(); var sec = date.getSeconds(); div.innerText = year.toString() + "-" + month.toString() + "-" + data.toString() + '\n' + hour.toString() + ":" + mit.toString() + ":" + sec.toString(); //  Modify the text  } </script>
</body>

</html>
- innerText and innerHTML The difference between
- innerText Don't recognize HTML label , and innerHTML Then identify
- innerText Will remove line breaks and spaces
4.2 Change element properties
Direct assignment
<!DOCTYPE html>
<html lang="en">

<head>
    <meta charset="UTF-8">
    <meta http-equiv="X-UA-Compatible" content="IE=edge">
    <meta name="viewport" content="width=device-width, initial-scale=1.0">
    <title>Document</title>
</head>

<body>
   <button id="btn1"> Baidu </button>
   <button id="btn2">qq</button>
   <a href="https://www.baidu.com"> Use baidu </a>
    <script> var btn1 = document.querySelector("#btn1"), //  Get button 1 btn2 = document.querySelector("#btn2"), link = document.querySelector("a"); btn1.onclick = function(){
       link.href = "https://www.baidu.com"; //  Modify properties  link.innerText = " Use baidu "; } btn2.onclick = function(){
       link.href = "https://www.qq.com"; link.innerText = " Use qq"; } </script>
</body>

</html>
4.3 Form element attribute action
utilize DOM You can manipulate the attributes of the following form elements
type / value / checked / selected / disabled
<!DOCTYPE html>
<html lang="en">

<head>
    <meta charset="UTF-8">
    <meta http-equiv="X-UA-Compatible" content="IE=edge">
    <meta name="viewport" content="width=device-width, initial-scale=1.0">
    <title>Document</title>
</head>

<body>
    <button> Button </button>
    <input type="text" placeholder=" Please enter the content ">
    <script> var btn = document.querySelector("button"); var ipt = document.querySelector("input"); //  Defining events  btn.onclick = function(){
       ipt.value = " How are you? !" // input  Forms are used exclusively  value  To modify the  btn.disabled = true; //  Click the button to disable , It can also be used to disable forms   //  You can also use  this.disabled = true;  To disable the button  this Point to the caller of the function  } </script>
</body>

</html>
Display password
- Click button , Change the type of password box to text box to see the code inside
<!DOCTYPE html>
<html lang="en">

<head>
    <meta charset="UTF-8">
    <meta http-equiv="X-UA-Compatible" content="IE=edge">
    <meta name="viewport" content="width=device-width, initial-scale=1.0">
    <title>Document</title>
</head>

<body>
    <button> Button </button>
    <input type="password" placeholder=" Please input a password ">
    <script> var btn = document.querySelector("button"); var ipt = document.querySelector("input"); //  Defining events  var flag = 0; btn.onclick = function(flag){
       flag++; if (flag % 2 === 0 ){
       ipt.type = "password"; } else{
       ipt.type = "text"; } } </script>
</body>

</html>
4.4 Style property operation
We can go through JS Change the size of the element 、 Color 、 Position, etc
element.style   In line style attribute operation
element.style.cssText   Modification of multiple inline styles

element.className   Class name style operation
4.4.1 Inline style
<!DOCTYPE html>
<html lang="en">

<head>
    <meta charset="UTF-8">
    <meta http-equiv="X-UA-Compatible" content="IE=edge">
    <meta name="viewport" content="width=device-width, initial-scale=1.0">
    <title>Document</title>
    <style> #div {
       width: 200px; height: 200px; background-color: pink; } </style>
</head>

<body>
    <div id="div"> Hello </div>
    <script> var div = document.querySelector("#div"); div.onclick = function() {
       //  inline  div.style.backgroundColor = "purple"; //  The attribute adopts hump naming  this.style.height = "100px"; } div.ondblclick = function() {
       //  Multiple modifications within the line  this.style.cssText = "background-color: red; height: 30px"; } </script>
</body>

</html>
Be careful
- JS The style inside adopts the hump naming method
- Use each word in multiple modifications
-separate- JS modify style Style operation , What's produced is the in line style ,CSS The weight is relatively high
- Use when there are few styles or simple functions
4.4.2 Class name style
<!DOCTYPE html>
<html lang="en">

<head>
    <meta charset="UTF-8">
    <meta http-equiv="X-UA-Compatible" content="IE=edge">
    <meta name="viewport" content="width=device-width, initial-scale=1.0">
    <title>Document</title>
    <style> #div {
       width: 200px; height: 200px; background-color: pink; } .change {
       background-color: purple; color: red; font-size: large; margin: 100px; } </style>
</head>

<body>
    <div id="div"> Text </div>
    <script> var div = document.querySelector("#div"); div.onclick = function() {
       this.className = 'change'; //  Let's change the class name of the current element to  change } </script>
</body>

</html>
Be careful
className Will directly change the class name of the element , Meeting Cover The original class name
You can modify the className Change the style of the element , Suitable for more styles or complex functions
If you want to keep the original class name , We can do that
this.className = " The original class name change";
4.5 Exclusive thoughts
If you have the same set of elements , We want an element to implement a style , Need to use the exclusive thought algorithm of the loop
- All elements clear the style
- Style the current element
- Note that the order cannot be reversed
4.6 Select all and deselect all forms
<!DOCTYPE html>
<html lang="en">

<head>
    <meta charset="UTF-8">
    <meta http-equiv="X-UA-Compatible" content="IE=edge">
    <meta name="viewport" content="width=device-width, initial-scale=1.0">
    <title>Document</title>
    <style> .wrap > table > thead {
       background-color: rgb(22, 99, 102); } .wrap > table{
       margin: 100px auto; } </style>
</head>

<body>
    <div class="wrap">
        <table border="1" cellspacing="0" cellpadding="3px">
            <thead>
                <tr>
                    <th>
                        <input type="checkbox" id="j_cbAll">
                    </th>
                    <th>goods</th>
                    <th>price</th>
                </tr>
            </thead>
            <tbody id="j_tb">
                <tr>
                    <td><input type="checkbox"></td>
                    <td>iPhone8</td>
                    <td>8000</td>
                </tr>
                <tr>
                    <td><input type="checkbox"></td>
                    <td>iPad Pro</td>
                    <td>5000</td>
                </tr>
                <tr>
                    <td><input type="checkbox"></td>
                    <td>iPad Air</td>
                    <td>2000</td>
                </tr>
                <tr>
                    <td><input type="checkbox"></td>
                    <td>Apple Watch</td>
                    <td>2000</td>
                </tr>
            </tbody>
        </table>
    </div>
    <script> var j_cbAll = document.getElementById("j_cbAll"); var j_tbs = document.getElementById("j_tb").getElementsByTagName("input"); j_cbAll.onclick = function(){
       for (var i = 0; i < j_tbs.length; i++){
       j_tbs[i].checked = this.checked; // this.checked  Indicated selection  } } for (var i = 0; i < j_tbs.length; i++){
       j_tbs[i].onclick = function(){
       // flag  Controls whether the select all button is selected  var flag = true; //  Cycle to check whether all buttons are selected  for (var j = 0; j < j_tbs.length; j++ ){
       if (!j_tbs[j].checked){
       //  If there is one selected  flag = false; break; } } j_cbAll.checked = flag; //  When it comes to false when , Will not check  } } </script>
</body>

</html>
4.7 Custom attribute operations
4.7.1 Get attribute value
element. attribute: Get attribute valueelement.getAttribute(" attribute "): Get attribute value
<div class="cls"></div>
<script> var div1 = document.querySelector("div"); console.log(div1.class); console.log(div1.getAttribute("class")); </script>
difference
element. attributeGet built-in property values ( The attribute of the element itself )element.getAttribute(" attribute ")Mainly get custom properties ( standard ) Our programmer defined properties
4.7.2 Setting property values
element. attribute = " value "Set built-in property valueselement.setAttribute(" attribute ", " value ")Setting property values
4.7.3 Remove properties
element.removeAttribute(" attribute ") Remove properties
4.8 H5 Custom elements
The purpose of the custom element : To save and use data . Some data can be saved to the page without saving to the database
Custom properties are obtained through getAttribute(" attribute ") obtain
However, some custom attributes are easy to cause ambiguity , It is not easy to determine whether it is a built-in attribute or a custom attribute of an element
H5 Added custom attributes to us
4.8.1 Set up H5 Custom properties
H5 Specify custom attributes , data Start as the property name and assign
such as :
<div data-index="1"></div>
4.8.2 obtain H5 Custom properties
Compatibility gains
element.getAttribute(" Property name ")The new method
element.dataset. attribute/element.dataset[" Property name "]var div1 = document.querySelector("div"); console.log(div1.dataset.index); console.log(div1.dataset["index"]); // dataset It's a collection , It's got everything in it for data Custom properties at the beginning
5、 Node operation
5.1 Why learn node operation
There are usually two ways to get elements
- utilize DOM The method provided gets the element
- The logic is not strong 、 tedious
- Get elements by using node hierarchy
- Use the parent-child sibling node relationship to obtain elements
- Strong logic , But compatibility is poor
5.2 Node Overview
Everything in a web page is a node ( label 、 attribute 、 Text 、 Notes, etc. ), stay DOM in , Node usage node Express
HTML DOM All nodes in the tree can pass through JS Visit , all HTML Elements ( node ) Can be modified , You can also create or delete
General , Nodes have at least nodeType( Node type )、nodeName( The name of the node ) and nodeValue( Node values ) These three basic attributes
- We're actually developing it , Node operations are mainly element nodes
5.3 Node level
utilize [DOM Trees ](#1.1 DOM Trees ) Nodes can be divided into different hierarchical relationships , Common is the hierarchical relationship between father, son and brother
5.3.1 Parent node
node.parentNode;
<div id="box">
    <span class="erweima"></span>
</div>
<script> var erweima = document.querySelector(".erweima"); var box = erweima.parentNode; //  Get the parent  </script>
The result is the parent node closest to the element
If the specified node has no parent node, return null
5.3.2 Child node
node.childNodes;  //  standard
//  The result refers to the set of sub nodes , This set is a set that is updated in time
node.firstChild;  //  First child node
node.lastChild;  //  The last child node
<body>
    <ul>
        <li> node 1</li>
        <li> node 2</li>
        <li> node 3</li>
        <li> node 4</li>
        <li> node 5</li>
    </ul>
    <script> var ul = document.querySelector("ul"); var lis = ul.childNodes; console.log(lis); console.log(lis[0].nodeType); console.log(lis[1].nodeType); </script>
</body>
Child node ,childNodes All child nodes , Contains element nodes 、 Text nodes, etc
If you just want to get the element nodes inside , It needs to be dealt with specially . Therefore, we generally do not advocate the use of childNodes
var ul = document.querySelector("ul");
for (var i = 0; i < ul.childNodes.length; i++) {

    if (ul.child[i].nodeType == 1) {

        //  It is the element node
        console.log(ul.childNodes[i]);
    }
}
node.children;  //  Nonstandard
//  It is a read-only attribute , The returned child element node . It returns the child element node , The remaining nodes do not return
node.firstElementChild;  //  The first child element node
node.lastElementChild;  //  The last child element node
//  No return found null
console.log(ul.children);
Return pseudo array
5.3.3 Brother node
node.nextSibling;
//  Returns the next sibling node of the current element , No return found null; It contains all nodes
node.previousSibling;
//  Returns the sibling node of the previous element of the current element , Return if not found null; Again , It also contains all nodes
node.nextElementSibling;
//  Returns the next sibling element node of the current element , No return found null
node.previousElementSibling;
//  Returns the previous sibling element node of the current element , No return found null
5.4 Create nodes
document.createElement("tagName"); // Create nodes
document.createElement()Method created by tagName designated HTML Elements . Because these elements didn't exist , It's dynamically generated according to our needs , So we also call it dynamic creation of element nodes
5.5 Add a node
node.appendChild(child);
node.appendChild() Method adds a node to the end of the child node list of the specified parent element . Be similar to CSS Inside after Pseudo elements
<body>
    <ul>
        <li>1</li>
    </ul>
    <script> //  Create nodes  var li1 = document.createElement("li"); //  Add a node  node  Parent  child  Sub level   Append element after  var ul = document.querySelector("ul"); ul.appendChild(li1); </script>
</body>
node.insertBefore(child, Specify elements );
Adds a node in front of the specified child node of the parent node , Be similar to css Inside before Pseudo elements
5.6 Post message cases
<!DOCTYPE html>
<html lang="en">
<head>
    <meta charset="UTF-8">
    <meta http-equiv="X-UA-Compatible" content="IE=edge">
    <meta name="viewport" content="width=device-width, initial-scale=1.0">
    <title>Document</title>
    <style> ul > li {
       background-color: rgb(18, 143, 160); /*  The background color  */ margin-top: 10px; /*  Margin  */ list-style-type: none; /*  Remove the dots  */ color: red; /*  text color  */ } </style>
</head>
<body>
    <textarea name="" id="" cols="30" rows="10"></textarea>
    <button> Release </button>
    <ul>
    </ul>
    <script> var btn = document.querySelector("button"); //  Get button  var tara = document.querySelector("textarea"); //  Get input box  var ul = document.querySelector("ul"); //  To obtain a list of  btn.onclick = function() {
       //  Registration events  console.log(tara.value); if (tara.value == "") {
       //  But when there is no content in the input box  alert(" Please enter the content !") } else {
       var lin = document.createElement("li"); //  Create nodes  lin.innerHTML = tara.value; //  Modify the content  ul.insertBefore(lin, ul.children[0]); //  Insert content  tara.value = ""; //  Clear the contents of the text box   } } </script>
</body>
</html>
5.7 Delete node
node.removeChild(child);
//  from  DOM  Delete a child node in the , Go back to delete
var btn = document.querySelector("button");  //  Get button
var ul = document.querySelector("ul");  //  To obtain a list of
btn.onclick = function() {
      //  Registration events
    if (ul.children.length === 0){

        alert(" There's nothing in it !");
        this.disabled = true;  //  The button is disabled
    } else {

        ul.removeChild(ul.children[(ul.children.length - 1)]);
        console.log(ul.removeChild(ul.children[(ul.children.length - 1)]));  //  Return the deleted content
    }
}
5.8 Create a comment box
<!DOCTYPE html>
<html lang="en">
<head>
    <meta charset="UTF-8">
    <meta http-equiv="X-UA-Compatible" content="IE=edge">
    <meta name="viewport" content="width=device-width, initial-scale=1.0">
    <title>Document</title>
    <style> ul > li {
       background-color: rgb(18, 143, 160); /*  The background color  */ margin-top: 10px; /*  Margin  */ list-style-type: none; /*  Remove the dots  */ color: red; /*  text color  */ width: 300px; } li > a {
       text-decoration: none; color: black; float: right; font-size: 12px; line-height: 20.8px; } </style>
</head>
<body>
    <textarea name="" id="" cols="30" rows="10" placeholder=" Please enter a comment "></textarea>
    <button> Post comments </button>
    <ul style="padding: 2px;">
    </ul>
    <script> var btn = document.querySelector("button"); //  Get button  var tara = document.querySelector("textarea"); //  Get input box  var ul = document.querySelector("ul"); //  To obtain a list of  btn.onclick = function() {
       //  Registration events  if (tara.value == "") {
       //  But when there is no content in the input box  alert(" Please enter the content !") } else {
       var lin = document.createElement("li"); //  Create nodes  lin.innerHTML = tara.value + "<a href='javascript:;'> Delete comments </a>"; // javascript:;  perhaps  javascript: void(0);  Stop link jump  ul.insertBefore(lin, ul.children[0]); //  Insert content  tara.value = ""; //  Clear the contents of the text box   //  Remove elements  var dul = document.querySelectorAll("a"); for (var i = 0; i < dul.length; i++) {
       dul[i].onclick = function() {
       ul.removeChild(this.parentNode); //  Delete li label  } } } } </script>
</body>
</html>
5.9 Replication node
node.cloneNode(): Replication node
It returns a copy of the method called , Also known as clone nodes / Copy node
<body>
    <ul>
        <li>1</li>
        <li>2</li>
        <li>3</li>
    </ul>
    <script> var ul = document.querySelector("ul"); var li = ul.children[0].cloneNode(); //  Only labels , No content  var lc = ul.children[0].cloneNode(true); //  Including content  ul.firstElementChild.appendChild(li); ul.firstElementChild.appendChild(lc); </script>
</body>
- If the parameter in brackets is empty or false, It is a shallow copy , That is, only clone the replication node itself , Don't clone the child nodes inside
- If the bracket parameter is true, Is a deep copy , It will copy the node itself and all its children
5.10 Dynamically generate tables
<!DOCTYPE html>
<html lang="en">

<head>
    <meta charset="UTF-8">
    <meta http-equiv="X-UA-Compatible" content="IE=edge">
    <meta name="viewport" content="width=device-width, initial-scale=1.0">
    <title>Document</title>
    <style> td > a {
       text-decoration: none; color: red; } table {
       width: 500px; margin: 100px auto; border-collapse: collapse; text-align: center; } td, th {
       border: 1px solid #333; } thead tr {
       height: 40px; background-color: #ccc; } </style>
</head>

<body>
    <table>
        <thead>
            <tr>
                <th> full name </th>
                <th> subject </th>
                <th> achievement </th>
                <th> operation </th>
            </tr>
        </thead>
        <tbody>
        </tbody>
    </table>
    <script> //  Prepare the data  var db = {
       name: " Li Hua ", subject: "JavaScript", score: 100 } var dbs = [ {
       name: " Li Si ", subject: "JavaScript", score: 20 } ]; //  Storing data  dbs[dbs.length] = db; //  Add data  var tbody = document.querySelector("tbody"); for (var i = 0; i < dbs.length; i++) {
       //  towards tbody Add data  //  Create elements  var tr = document.createElement("tr"); tbody.appendChild(tr); //  Create cells -- Cells related to data  for (var j in dbs[i]) {
       //  Traversing objects  var td = document.createElement("td"); tr.appendChild(td); td.innerText = dbs[i][j]; //  Property value  } //  Create cells with deletions  var td = document.createElement("td"); tr.appendChild(td); td.innerHTML = "<a href='javascript:;'>  Delete  </a>"; } //  Register delete event  var as = tbody.querySelectorAll("a"); for (var i = 0; i < as.length; i++) {
       as[i].onclick = function() {
       //  Click delete , Delete the entire line  tbody.removeChild(this.parentNode.parentNode); } } </script>
</body>

</html>
5.11 The difference between the three dynamic creation elements
document.write ( )
document.write("<div>123</div>");After the page document stream is loaded , Write content directly to the content stream of the page , Then it will overwrite the contents of the original page
element.innerHTML
- It is to write content to a DOM node , It doesn't cause the page to redraw completely
- It is more efficient to create multiple elements ( When using array splicing ), The structure is a little more complicated
document.createElement ( )
- Creating multiple elements is a little bit inefficient , But the structure is clearer
6、 DOM The key point is
Document object model , yes W3C Organization recommended standard programming interface for extensible markup language
W3C A series of DOM Interface , Through these DOM Interface can change the content of a web page 、 Structure and pattern
- about JS , In order to be able to make JS operation HTML ,JS I have a set of my own DOM Interface
- about HTML Come on ,DOM bring HTML Form a DOM Trees , Include documents 、 Elements 、 node
- We got it DOM Element is an object , So called Document object model
About DOM operation , We mainly focus on the operation of elements . It's mainly about creating 、 Delete 、 modify 、 lookup 、 increase 、 Event operations
6.1 establish
document.write();
innnerHTML;
document.createElement();
6.2 increase
node.appendChild();
node.insertBefore();
6.3 Delete
node.removeChild();
6.4 modify
Major changes DOM Element attributes ,DOM Content of element 、 attribute , Form values, etc
- Modify element properties :src、href、title etc.
- Modify the content of common elements ;innerHTML、innerText
- Modify form elements :value、type、disabled etc.
- Modify element styles :style、className、style.cssText etc.
6.5 lookup
Mainly get the query DOM The elements of
- DOM Provide API Method :getElementById、getElementsByTagName etc. , Old usage is not recommended
- H5 New methods provided :querySelector、querySelectorAll recommend
- Use node operations to get elements : Father (parentNode)、 Son (children)、 Brother (previousElementSibling / nextElementSiblling) recommend
6.6 Attribute operation
Mainly for custom attributes
- setAttribute: Set up DOM The attribute value
- getAttribute: obtain DOM The attribute value
- removeAttribute: Remove properties
6.7 Event operations
Register events for elements , Take the event source 、 Event type = Event handler
7、 Event advanced
7.1 Registration events
Add events to the element , It is called registration event or binding event
There are two ways to register Events : The traditional way and Method monitor note mode
7.1.1 Traditional registration
utilize on The first event onclick
<button onclick="alert('hello~')"></button>btn.onclick = function() { }characteristic
- The uniqueness of the registration event
- Only one processing function can be set for the same event of an element , The last registered processing function will overwrite the previously registered function
7.1.2 Event listening registration
W3C Standard recommended method
addEventListener()  //  It's a method
// IE9  Former IE This method is not supported , You can use  attachEvent()  Instead of
characteristic
- Multiple listeners can be registered for the same element and the same event
7.1.2.1 addEventListener
eventTarget.addEventListener(type, listener [, useCapture]);
//  This method registers the specified listener with  eventTarget  On , When the object triggers the specified event , The event handler is executed
Parameters
- type: Event type string , such as click、mouseover etc. , Be careful not to bring on
- listener: Event handler , Event time , The listener function will be called
- useCapture: Optional parameters , It's a Boolean value , The default is false
<body>
    <button id="eventLisetener"> Warning </button>
    <script> btn = document.getElementById("eventLisetener"); btn.addEventListener("click", function() {
       //  The event type inside is string , Must be in quotation marks , And without on alert("hi~"); }) btn.addEventListener("click", function() {
       //  You can register repeatedly  alert("hello~"); }) </script>
</body>
7.1.2.2 attachEvent
eventTarget.attachEvent(eventNameWithOn, callback);
//  This method registers the specified listener with  eventTarget  On , When the object triggers the specified event , The specified callback function will execute
Parameters
- eventNameWithOn: Event type string , such as onclick、onmouseover etc. , I'll take it here on
- callback: Event handler , When the target triggers an event, the callback function is called
<body>
    <button id="eventLisetener"> Warning </button>
    <script> btn = document.getElementById("eventLisetener"); btn.attachEvent("onclick", function() {
       alert(" I'm the old way !") // IE9  Only the previous version supports  }) </script>
</body>
7.2 Delete event
7.2.1 Traditional events
eventTarget.onclick = null;
//  Traditional binding events
// div[0].onclick = fn;
div[0].onclick = function() {

    alert(" Register events in the traditional way ");
    div[0].onclick = null;  //  Delete event
}
7.2.2 Event monitoring
7.2.2.1 removeEventListener
eventTarget.removeEventListener(type, listener [, useCapture]);
div[1].addEventListener("click", fn);  //  Inside fn You don't need to call with parentheses
function fn() {

    //  Define event functions
    alert(" This is an event function ");
    //  Remove events
    div[1].removeEventListener("click", fn);
}
7.2.2.2 detachEvent
eventTarget.detachEvent(eventNameWithOn, callbackk);
div[2].attachEvent("onclick", fn);
function fn() {

    alert(" I'm the old way !")  // IE9  Only the previous version supports
    //  Remove events
    div[2].detachEvent("onclick", fn);
}
7.3 DOM Flow of events
The event flow describes the order in which events are received from the page
Events are propagated between element nodes in a specific order when they occur , This communication process is DOM Flow of events
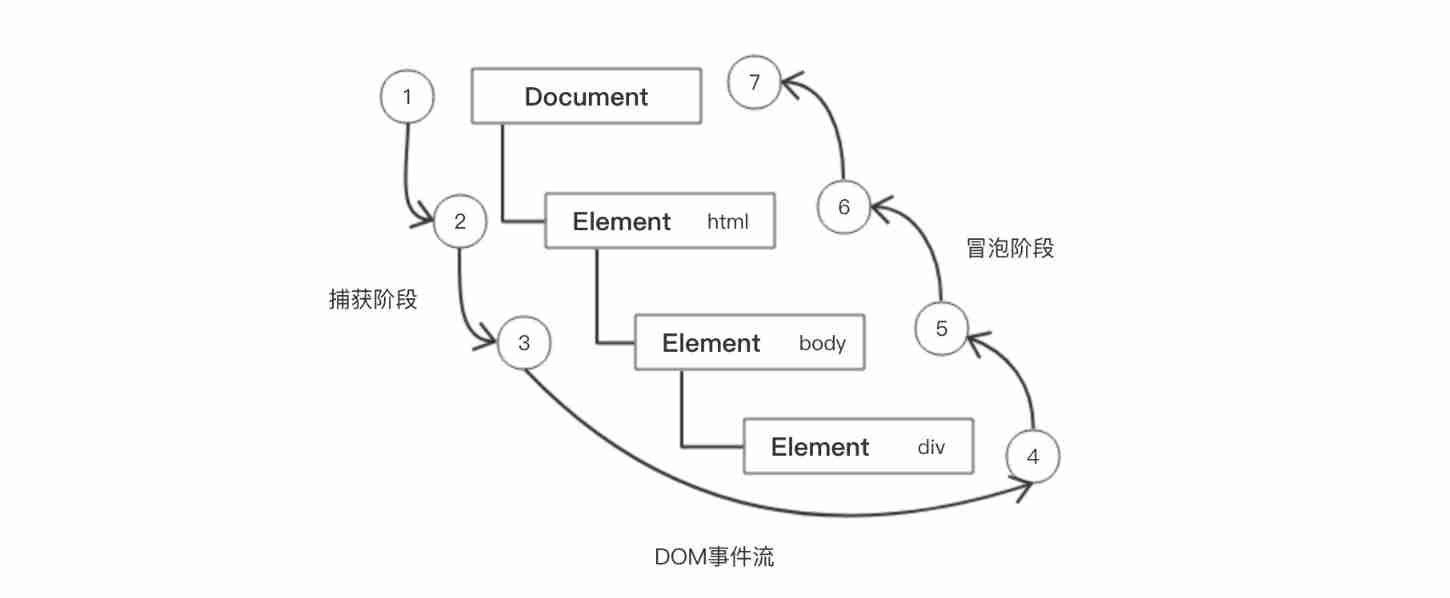
DOM The event flow is divided into three phases
- Event capture phase
- Netscape first proposed , from DOM The top node starts , Then it propagates down to the specific element receiving process
- Current target stage
- Event bubbling stage
- Event Bubbling :IE Put forward at the earliest , The event is received by the most specific element at the beginning , And then it goes up to DOM The process of the topmost node
Be careful
JS Only one stage of capture or bubbling can be performed in the code
Traditional events and attachEvent Only to the bubbling stage
addEventListener The third parameter is if true , Indicates that the event handler is called during the event capture phase ; If it is false ( The default is false), Indicates that the event handler is called during the event bubbling phase
Capture phase
<div class="father" style="width: 120px; height: 120px; background-color: blue;">
    <div class="son" style="width: 100px; height: 100px; background-color: red;"></div>
</div>
<script>
    //  Capture phase , If  addEventListener  The third parameter is  true , Then it's in the capture stage  document -> html -> body -> father -> son
    var son = document.querySelector(".son");
    son.addEventListener("click", function() {
        alert("son");  //  Execute first  father  Again  son
    }, true);
    son.parentElement.addEventListener("click", function() {
        alert("father");
    }, true)
bubbling phase
<div class="father" style="width: 120px; height: 120px; background-color: blue;">
    <div class="son" style="width: 100px; height: 100px; background-color: red;"></div>
</div>
<script>
    //  bubbling phase , If  addEventListener  The third parameter is  false , Then it is in the bubbling stage  son -> father -> body -> html -> document
    var son = document.querySelector(".son");
    son.addEventListener("click", function() {
        alert("son");  //  Execute first  son  Re execution  father
    });
    son.parentElement.addEventListener("click", function() {
     alert("father");
    });
In actual development , We rarely use event capture , We're more concerned about the bubbling of events
Some events are not bubbling , such as onblur、onfocus、onmouseenter、onmouseleave
7.4 Event object
<div style="border: 1px solid black; border-radius: 1px; width: 30px; height: 30px; background-color: aquamarine;">123</div>
<script> var div = document.querySelector("div"); div.onclick = function(event) {
       /* 1、 event  It is an event object written in the parentheses of our listening function , When it comes to formal parameters  2、  Event objects exist only when they have events , It is automatically created by the system , We don't need to pass parameters  3、  The event object is a collection of a series of related data of our event , Related to the event , For example, the mouse click event includes the relevant information of the mouse ( Mouse coordinates, etc ), Keyboard events contain information about keyboard events ( Which key does the user press ) 4、  We can name this event object ourselves  5、  There are also compatibility issues with event objects  ie9  adopt  window.event, Compatibility writing  event = event || window.event; */ console.log(event); } </script>
Simple understanding : After the event . A series of information data sets related to events are stored in this object , This object is the event object event , It has many properties and methods
This event It's a formal parameter , The system helps us set it as an event object , There is no need to pass arguments in the past
When we register Events ,event The object will be created automatically by the system , And pass it to the event listener in turn ( Event handler )
7.4.1 Properties and methods of event objects
| Event object property method | explain |
|---|---|
| event.target | Returns the object that triggered the event ( standard ) |
| event.srcElement | Put back the object that triggered the event ( Non-standard ) |
| event.type | Returns the type of the event |
| event.cancelBubble | This attribute prevents bubbling ( Non-standard ) |
| event.stopPropagation() | To prevent a bubble ( standard ) |
| event.returnValue | This property blocks default events ( Default behavior )( Non-standard ) For example, do not let the link jump |
| event.preventDefault() | This method blocks the default event ( Default behavior )( standard ) |
7.4.1.1 target and this The difference between
<div>123</div>
<ul>
    <li>abc</li>
    <li>abc</li>
    <li>abc</li>
</ul>
<script> var div = document.querySelector("div"); var ul = document.querySelector("ul"); div.addEventListener("click", function(event) {
       console.log(event.target); console.log(this); }) ul.addEventListener("click", function(event) {
       console.log(event.target); //  Return to the clicked element  li console.log(this); //  return  ul,this  Point to  ul }) </script>
target: Which element was clicked , Just return the element
this: Which element binds the click event , Which element is returned after so long
7.4.1.2 To prevent a bubble
Event Bubbling : It starts with the most specific element , And then it goes up to DOM Top node
The characteristics of event bubbling itself , It will do harm , It will also be good
To prevent a bubble
Standard writing :stopPropagation()
<div class="father" style="width: 120px; height: 120px; background-color: blue;">
    <div class="son" style="width: 100px; height: 100px; background-color: red;"></div>
</div>
<script> var son = document.querySelector(".son"); son.addEventListener("click", function(event) {
         alert("son"); event.stopPropagation(); }); son.parentElement.addEventListener("click", function() {
         alert("father"); }); </script>
Nonstandard writing :cancelBubble (IE9 following )
<div class="father" style="width: 120px; height: 120px; background-color: blue;">
    <div class="son" style="width: 100px; height: 100px; background-color: red;"></div>
</div>
<script> var son = document.querySelector(".son"); son.addEventListener("click", function(event) {
         alert("son"); event.cancelBubble = true; //  Stop bubbling  }); son.parentElement.addEventListener("click", function() {
         alert("father"); }); </script>
7.5 Event delegation
Event delegates are also called event proxies , stay jQuery It's called event delegation
principle
- Not every child node sets up an event listener alone , Instead, the event listener is set on its parent node , Then use the bubble principle to influence the setting of each child node
effect
- We only operated once DOM , Improve the performance of program execution
<ul>
    <li>234</li>
    <li>234</li>
    <li>234</li>
    <li>234</li>
    <li>234</li>
</ul>
<script> //  Event delegation  var ul = document.querySelector("ul"); ul.addEventListener("click", function(e) {
       alert("hello~~~"); for (var i = 0; i < ul.children.length; i++) {
       this.children[i].style.backgroundColor = ""; } e.target.style.backgroundColor = "pink"; }) </script>
7.6 Common mouse events
7.6.1 Do not select
No right mouse button
contextmenu It mainly controls when the context menu should be displayed , It is mainly used by programmers to cancel the default context menu
document.addEventListener("contextmenu", function(e) {

    e.preventDefault();  //  Block right-click menu
})
Disable mouse selection
selectstart Start selecting
document.addEventListener("selectstart", function(e) {

    e.preventDefault();  //  Block selected text
})
7.6.2 Mouse event object
event Object represents the state of the event , A collection of information related to an event
MouseEvent And keyboard event objects KeyboardEvent
| Mouse event object | explain |
|---|---|
| e.clientX | Returns the position of the mouse relative to the viewable area of the browser window X coordinate |
| e.clientY | Returns the position of the mouse relative to the viewable area of the browser window Y coordinate |
| e.pageX | Returns the mouse relative to the page document X coordinate IE9+ Support |
| e.pageY | Returns the mouse relative to the page document Y coordinate IE9+ Support |
| e.screenX | Returns the position of the mouse relative to the computer screen X coordinate |
| e.screenY | Returns the position of the mouse relative to the computer screen Y coordinate |
7.7 Common keyboard events
7.7.1 Keyboard events
Events are triggered in addition to using the mouse , You can also use the keyboard to trigger
| Keyboard events | The trigger condition |
|---|---|
| onkeyup | Triggered when a key is released |
| onkeydown | Triggered when a key is pressed |
| onkeypress | Triggered when a key is pressed , But it doesn't recognize function keys , Such as :Ctrl etc. |
document.addEventListener("keyup", function(e) {

    console.log(" I'm taking off ");
})
document.addEventListener("keydown", function() {

    console.log(" I landed ");
})
document.addEventListener("keypress", function() {

    console.log(" I landed again ");
})
The order of execution of the three events :keydown -> keypress -> keyup
7.7.2 Keyboard event object
keyCode: Returns the ASCII value
document.addEventListener("keyup", function(e) {

    console.log(e);
    console.log(e.keyCode);  //  Get the corresponding key ASCII Code value
    /*  meanwhile , our  keyup  and  keydown  Events are not case sensitive ,a  and  A  All for 65 keypress Events are case sensitive ,a  by  97、A  by  65 */
})
边栏推荐
- "Upside down salary", "equal replacement of graduates" these phenomena show that the testing industry has
- Playwright之录制
- Expose testing outsourcing companies. You may have heard such a voice about outsourcing
- 【海浪建模3】三维随机真实海浪建模以及海浪发电机建模matlab仿真
- SAP UI5 应用的主-从-从(Master-Detail-Detail)布局模式的实现步骤
- 无心剑英译席慕容《无怨的青春》
- The difference between string STR and new string
- Research Report on the overall scale, major producers, major regions, products and application segmentation of agricultural automatic steering system in the global market in 2022
- 微信小程序:最新wordpress黑金壁纸微信小程序 二开修复版源码下载支持流量主收益
- Four pits in reentrantlock!
猜你喜欢
Take you ten days to easily complete the go micro service series (IX. link tracking)
Pycharm professional download and installation tutorial
107. Some details of SAP ui5 overflow toolbar container control and resize event processing
Call Huawei order service to verify the purchase token interface and return connection reset
【大型电商项目开发】性能压测-性能监控-堆内存与垃圾回收-39
Several simplified forms of lambda expression
dotnet-exec 0.6.0 released
微信小程序:最新wordpress黑金壁纸微信小程序 二开修复版源码下载支持流量主收益
107. SAP UI5 OverflowToolbar 容器控件以及 resize 事件处理的一些细节介绍
![[STM32] (I) overview and GPIO introduction](/img/6e/421238a892b557721e85c919a4eeb1.jpg)
[STM32] (I) overview and GPIO introduction
随机推荐
【海浪建模1】海浪建模的理论分析和matlab仿真
Database postragesql client authentication
各大主流编程语言性能PK,结果出乎意料
What happened to those who focused on automated testing?
Async/await you can use it, but do you know how to deal with errors?
node工程中package.json文件作用是什么?里面的^尖括号和~波浪号是什么意思?
SAP UI5 应用的主-从-从(Master-Detail-Detail)布局模式的实现步骤
Pycharm professional download and installation tutorial
The difference between string STR and new string
那些一门心思研究自动化测试的人,最后都怎样了?
Hill sort of sorting
Basic operations of database and table ----- delete index
Global and Chinese markets for industrial X-ray testing equipment 2022-2028: Research Report on technology, participants, trends, market size and share
Research Report on the overall scale, major producers, major regions, products and application segmentation of agricultural automatic steering system in the global market in 2022
[untitled]
当产业互联网时代真正发展完善之后,将会在每一个场景见证巨头的诞生
Detailed explanation of multi-mode input event distribution mechanism
Discrete mathematics: propositional symbolization of predicate logic
6. Scala operator
The most complete regular practical guide of the whole network. You're welcome to take it away