当前位置:网站首页>7. Regularization application
7. Regularization application
2022-07-08 01:01:00 【booze-J】
One 、 Application of regularization
stay 6.Dropout application Unused in Dropout Add regularization to the network model construction of code .
take 6.Dropout In application
#  Creating models   Input 784 Neurons , Output 10 Neurons
model = Sequential([
        #  Define output yes 200  Input is 784, Set offset to 1, add to softmax Activation function   The first hidden layer has 200 Neurons
        Dense(units=200,input_dim=784,bias_initializer='one',activation="tanh"),
        #  The second hidden layer has  100 Neurons
        Dense(units=100,bias_initializer='one',activation="tanh"),
        Dense(units=10,bias_initializer='one',activation="softmax")
])
It is amended as follows
#  Creating models   Input 784 Neurons , Output 10 Neurons
model = Sequential([
        #  Define output yes 200  Input is 784, Set offset to 1, add to softmax Activation function   The first hidden layer has 200 Neurons
        Dense(units=200,input_dim=784,bias_initializer='one',activation="tanh",kernel_regularizer=l2(0.0003)),
        #  The second hidden layer has  100 Neurons
        Dense(units=100,bias_initializer='one',activation="tanh",kernel_regularizer=l2(0.0003)),
        Dense(units=10,bias_initializer='one',activation="softmax",kernel_regularizer=l2(0.0003))
])
Use l2 Before regularization, you need to import from keras.regularizers import l2.
Running results :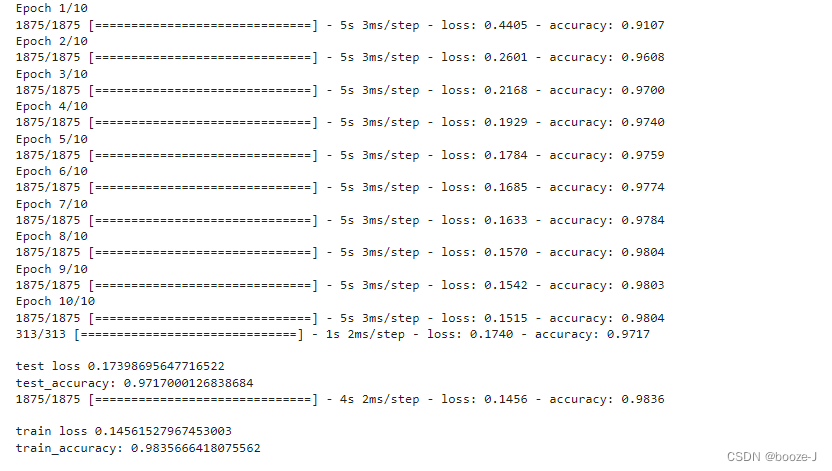
It can be seen from the running results that some over fitting conditions have been obviously overcome , The model is not very complex for data sets , With regularization , Its effect may not be very good .
Complete code
The code running platform is jupyter-notebook, Code blocks in the article , According to jupyter-notebook Written in the order of division in , Run article code , Glue directly into jupyter-notebook that will do .
1. Import third-party library
import numpy as np
from keras.datasets import mnist
from keras.utils import np_utils
from keras.models import Sequential
from keras.layers import Dense
from tensorflow.keras.optimizers import SGD
from keras.regularizers import l2
2. Loading data and data preprocessing
#  Load data
(x_train,y_train),(x_test,y_test) = mnist.load_data()
# (60000, 28, 28)
print("x_shape:\n",x_train.shape)
# (60000,)  Not yet one-hot code   You need to operate by yourself later
print("y_shape:\n",y_train.shape)
# (60000, 28, 28) -> (60000,784) reshape() Middle parameter filling -1 Parameter results can be calculated automatically   Divide 255.0 To normalize
x_train = x_train.reshape(x_train.shape[0],-1)/255.0
x_test = x_test.reshape(x_test.shape[0],-1)/255.0
#  in one hot Format
y_train = np_utils.to_categorical(y_train,num_classes=10)
y_test = np_utils.to_categorical(y_test,num_classes=10)
3. Training models
#  Creating models   Input 784 Neurons , Output 10 Neurons
model = Sequential([
        #  Define output yes 200  Input is 784, Set offset to 1, add to softmax Activation function   The first hidden layer has 200 Neurons
        Dense(units=200,input_dim=784,bias_initializer='one',activation="tanh",kernel_regularizer=l2(0.0003)),
        #  The second hidden layer has  100 Neurons
        Dense(units=100,bias_initializer='one',activation="tanh",kernel_regularizer=l2(0.0003)),
        Dense(units=10,bias_initializer='one',activation="softmax",kernel_regularizer=l2(0.0003))
])
#  Define optimizer
sgd = SGD(lr=0.2)

#  Define optimizer ,loss_function, The accuracy of calculation during training
model.compile(
    optimizer=sgd,
    loss="categorical_crossentropy",
    metrics=['accuracy']
)
#  Training models
model.fit(x_train,y_train,batch_size=32,epochs=10)

#  Evaluation model
#  Test set loss And accuracy
loss,accuracy = model.evaluate(x_test,y_test)
print("\ntest loss",loss)
print("test_accuracy:",accuracy)

#  Training set loss And accuracy
loss,accuracy = model.evaluate(x_train,y_train)
print("\ntrain loss",loss)
print("train_accuracy:",accuracy)
边栏推荐
- 1293_ Implementation analysis of xtask resumeall() interface in FreeRTOS
- 韦东山第二期课程内容概要
- Codeforces Round #804 (Div. 2)(A~D)
- C#中string用法
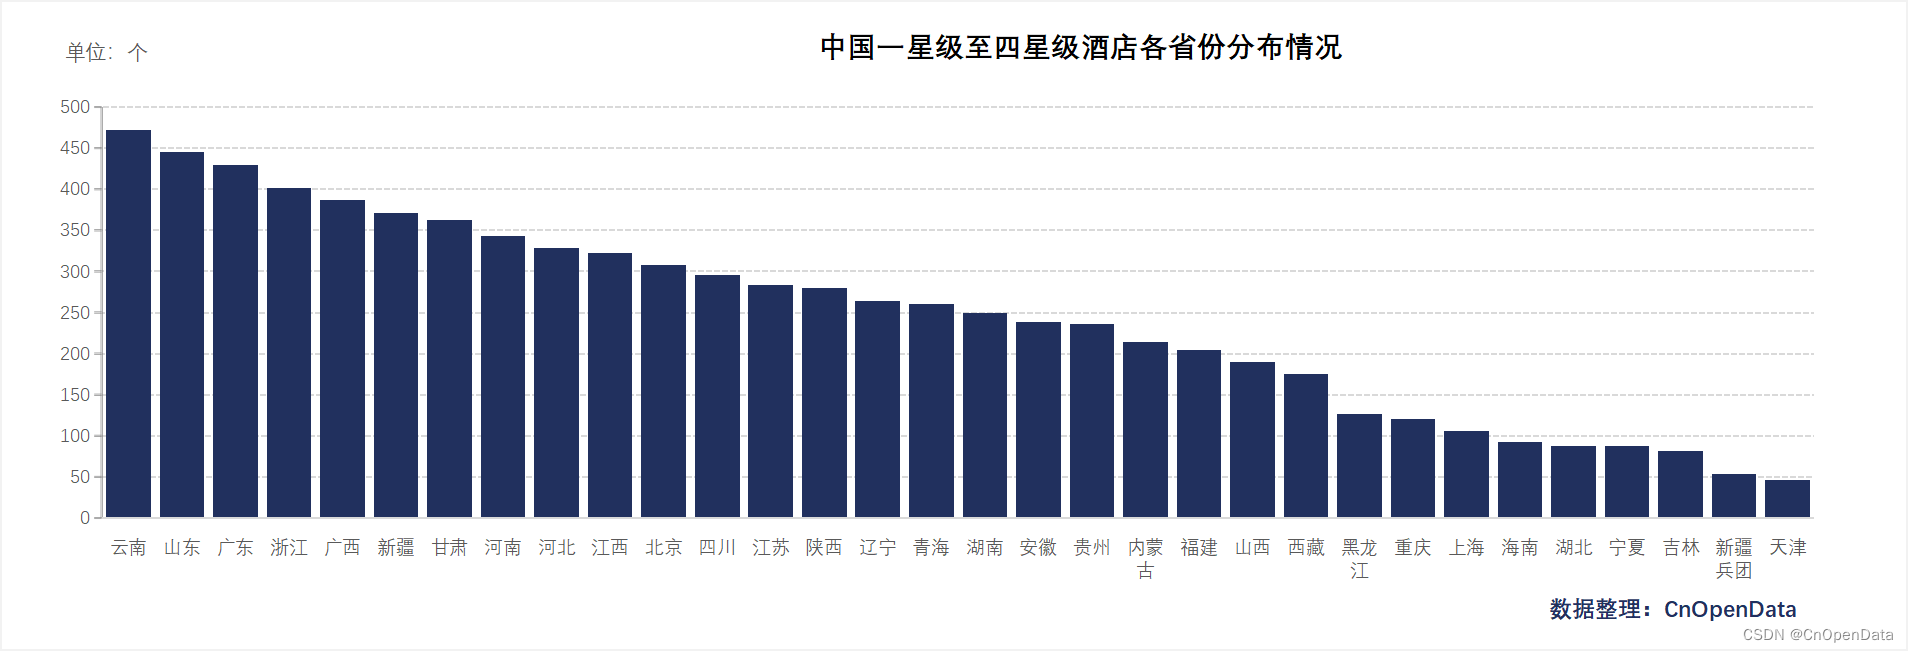
- New library online | cnopendata China Star Hotel data
- [note] common combined filter circuit
- [Yugong series] go teaching course 006 in July 2022 - automatic derivation of types and input and output
- 攻防演练中沙盘推演的4个阶段
- Summary of the third course of weidongshan
- Cve-2022-28346: Django SQL injection vulnerability
猜你喜欢


随机推荐
Semantic segmentation model base segmentation_ models_ Detailed introduction to pytorch
ThinkPHP kernel work order system source code commercial open source version multi user + multi customer service + SMS + email notification
13.模型的保存和載入
22年秋招心得
Cascade-LSTM: A Tree-Structured Neural Classifier for Detecting Misinformation Cascades(KDD20)
50Mhz产生时间
NVIDIA Jetson测试安装yolox过程记录
Malware detection method based on convolutional neural network
A network composed of three convolution layers completes the image classification task of cifar10 data set
【深度学习】AI一键换天
Lecture 1: the entry node of the link in the linked list
第四期SFO销毁,Starfish OS如何对SFO价值赋能?
Is it safe to speculate in stocks on mobile phones?
8道经典C语言指针笔试题解析
基于卷积神经网络的恶意软件检测方法
Su embedded training - Day7
Huawei switch s5735s-l24t4s-qa2 cannot be remotely accessed by telnet
Prediction of the victory or defeat of the League of heroes -- simple KFC Colonel
10.CNN应用于手写数字识别
Tapdata 的 2.0 版 ,开源的 Live Data Platform 现已发布