当前位置:网站首页>Qt插件之Qt Designer插件实现
Qt插件之Qt Designer插件实现
2022-07-02 03:44:00 【码农飞飞】
相比于通过控件提升来使用自定义控件,在Qt Designer中直接使用自定义控件更加方便和直观。这里就介绍一下如编写和注册Qt Designer插件。Qt Designer插件本质上来说就是一个动态库,和普通的动态库的区别是插件中导出了Qt Designer能识别的接口。
工程配置
编写Qt Designer插件,我们先新建一个动态库工程,然后在工程pro文件添加插件需要的模块,实现如下:
#指定插件对应的模块
QT += widgets uiplugin

TARGET = ColorCombox
TEMPLATE = lib
CONFIG += plugin
CONFIG += c++14

#设置导出宏
DEFINES += COLORCOMBOX_LIBRARY

#指定输出路径
debug:DESTDIR = $$PWD/../colorComboBox_output/debug/
release:DESTDIR =$$PWD/../colorComboBox_output/release/

#设置目标库的名称
TARGET = $$qtLibraryTarget($$TARGET)
INSTALLS += target

#指定安装路径
windows {
    target.path = $$(QTDIR)/../../Tools/QtCreator/bin/plugins/designer
    debug:target_lib.files = $$OUT_PWD/debug/$${TARGET}.lib
    release:target_lib.files = $$OUT_PWD/release/$${TARGET}.lib
    target_lib.path = $$(QTDIR)/../../Tools/QtCreator/bin/plugins/designer
    INSTALLS += target_lib
}

linux {
    target.path = $$(QTDIR)/../../Tools/QtCreator/lib/Qt/plugins/designer/
    CONFIG += link_pkgconfig
}

macx {
    target.path = "$$(QTDIR)/../../Qt Creator.app/Contents/PlugIns/designer/"
    target_lib.files = $$OUT_PWD/lib$${TARGET}.dylib
    target_lib.path = "$$(QTDIR)/../../Qt Creator.app/Contents/PlugIns/designer/"
    INSTALLS += target_lib
}
QT插件工程中需要导入widgets库和uiplugin库,同时为了插件的自动化部署,我们还添加了不同平台下插件的安装目录,这样插件安装之后会自动部署到QtCreator的对应的目录下。
添加自定义控件
配置完工程之后,我们向工程中添加一个自定义控件,这里以一个颜色下拉列表框为例进行说明。对应的实现如下所示:
#ifndef COLORCOMBOBOX_H
#define COLORCOMBOBOX_H
#include <QComboBox>
#include "colorcombox_global.h"
//颜色下拉框
class COLORCOMBOXSHARED_EXPORT ColorComboBox : public QComboBox
{

    Q_OBJECT
public:
    explicit ColorComboBox(QWidget *parent = 0);
private slots:
    void slot_currentIndexChanged(int index);

public:
    bool getShowColorName();
    QString getColorName();

public slots:
    void setShowColorName(bool showColorName);
    void setColorName(QString colorName);
    void initColorItems();

signals:
    //名称和颜色变化信号
    void colorChanged(QString colorName);
    void colorChanged(QColor color);

private:
    //是否显示英文名称
    bool menableColorName;
    //当前颜色名称
    QString mcolorName;
};

#endif // COLORCOMBOBOX_H
#include "colorcombox.h"

ColorComboBox::ColorComboBox(QWidget *parent) : QComboBox(parent),
  menableColorName(true)
{

    initColorItems();
    connect(this, SIGNAL(currentIndexChanged(int)), this, SLOT(slot_currentIndexChanged(int)));
}

void ColorComboBox::slot_currentIndexChanged(int index)
{

    if (index >= 0)
    {

        mcolorName = QColor::colorNames().at(index);
        emit colorChanged(mcolorName);
        emit colorChanged(QColor(mcolorName));
    }
}

bool ColorComboBox::getShowColorName()
{

    return menableColorName;
}

QString ColorComboBox::getColorName()
{

    return mcolorName;
}

void ColorComboBox::setShowColorName(bool showColorName)
{

    if (menableColorName != showColorName) {

        menableColorName = showColorName;
    }
}

void ColorComboBox::setColorName(QString colorName)
{

    if (mcolorName != colorName)
    {

        mcolorName = colorName;
        int index = QColor::colorNames().indexOf(colorName);
        this->setCurrentIndex(index);
    }
}

void ColorComboBox::initColorItems()
{

    clear();
    QStringList colorList = QColor::colorNames();
    for(QString strColor: colorList)
    {

        QPixmap pix(this->iconSize());
        pix.fill(strColor);
        this->addItem(QIcon(pix), menableColorName ? strColor : "");
    }
}
插件导出接口实现
通过下拉列表框,我们可以灵活的选取各种需要的颜色的色值。由于导出了对应的符号,我们可以以动态库的形式加载对应的自定义控件。但是这时候Qt Designer还是无法识别我们的自定义控件,为了让Qt Designer识别该插件,我们还需要在工程中添加插件信息描述类,该类继承自QDesignerCustomWidgetInterface,实现如下:
#ifndef COLORCOMBOXPLUGINDESIGNER_H
#define COLORCOMBOXPLUGINDESIGNER_H

#include <QtUiPlugin/QDesignerCustomWidgetInterface>

//通过继承实现QDesignerCustomWidgetInterface可以让QT的插件系统识别插件信息
class  ColorComboxPluginDesigner : public QObject, public QDesignerCustomWidgetInterface
{

    Q_OBJECT
    //声明QT识别的唯一标识符
    Q_PLUGIN_METADATA(IID "org.masteringqt.customWidget.ColorComboxPluginInterface")
    //声明实现的插件接口
    Q_INTERFACES(QDesignerCustomWidgetInterface)
public:
    ColorComboxPluginDesigner(QObject* parent = 0);
    //插件的名称
    QString name() const override;

    //插件属于哪个组
    QString group() const override;

    //插件的提示信息
    QString toolTip() const override;

    //插件的描述信息
    QString whatsThis() const override;

    //应该包含哪个文件
    QString includeFile() const override;

    //插件对应的图标
    QIcon icon() const override;

    //是否是一个容器
    bool isContainer() const override;

    //创建对应的widget
    QWidget* createWidget(QWidget* parent) override;

    //判断是否初始化了
    bool isInitialized() const override;
    void initialize(QDesignerFormEditorInterface* core) override;

private:
    bool mInitialized;
};

#endif // COLORCOMBOXPLUGINDESIGNER_H
#include "ColorComboxPluginDesigner.h"
#include "colorcombox.h"

ColorComboxPluginDesigner::ColorComboxPluginDesigner(QObject* parent) :
    QObject(parent),
    mInitialized(false)
{

}

QString ColorComboxPluginDesigner::name() const
{

    return "ColorComboBox";
}

QString ColorComboxPluginDesigner::group() const
{

    return "MyPlugin";
}

QString ColorComboxPluginDesigner::toolTip() const
{

    return "choose color from combobox";
}

QString ColorComboxPluginDesigner::whatsThis() const
{

    return "choose color value from combo";
}

QString ColorComboxPluginDesigner::includeFile() const
{

    return "colorcombox.h";
}

QIcon ColorComboxPluginDesigner::icon() const
{

    return QIcon(":/logo.png");
}

bool ColorComboxPluginDesigner::isContainer() const
{

    return false;
}

QWidget* ColorComboxPluginDesigner::createWidget(QWidget* parent)
{

    return new ColorComboBox(parent);
}

bool ColorComboxPluginDesigner::isInitialized() const
{

    return mInitialized;
}

void ColorComboxPluginDesigner::initialize(QDesignerFormEditorInterface* /*core*/)
{

    if (mInitialized)
        return;

    mInitialized = true;
}
ColorComboxPluginDesigner插件继承自两个类,QObject类允许插件使用Qt的对象系统,QDesignerCustomWidgetInterface类描述了插件的信息,并且允许Designer插件系统识别和加载该插件。
继承自QDesignerCustomWidgetInterface的插件需要声明两个宏:
Q_PLUGIN_METADATA声明了该插件在QT元对象系统中的唯一ID
Q_INTERFACES()声明了该插件实现了哪个接口,也就是定义插件的类型。
在ColorComboxPluginDesigner插件中我们描述了插件系统需要使用到的插件的各种显示信息,包括插件名称、分组、描述、图标等等。等这些都添加完成之后,我们就可以将编译好的插件部署到对应的目录一下了。其实本质上就是需要放到QtCreator的Designer插件目录下,供QtCreator加载。加载之后的效果图如下图所示:
之后我们就可以通过设计师自由的拖动和使用我们自定义的控件了,调用效果如下: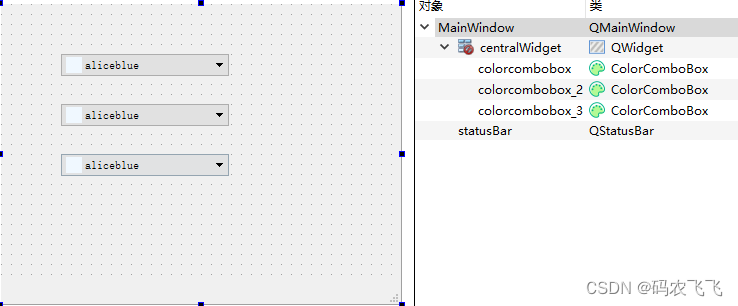
使用自定义插件
将插件部署到Deigner插件目录之后,我们只是让设计系统识别到了我们自定义的插件,在编译调用的时候我们还是需要像使用普通动态库那样加载和使用我们编译的动态库。首先在pro文件中导入对应的动态库文件
#添加包含目录
INCLUDEPATH += ../ColorCombox

#添加对应的动态库
win32 {
    debug:LIBS += -L$$PWD/../colorComboBox_output/debug/ -lColorComboxd
    release:LIBS += -L$$PWD/../colorComboBox_output/release/ -lColorCombox
}
之后对工程进行重新编译,这样我们就可以查看自定义控件的效果了,效果图如下:
这里还有一点需要注意,那就是在程序发布的时候,别忘了把自定义的插件库给打包到安装包里面,要不然会报动态库丢失的错误。
参考示例:
链接:https://pan.baidu.com/s/1BPeAXwXLYrSu7naPH6LpVQ
提取码:n88y
边栏推荐
- Kotlin 基础学习13
- 一天上手Aurora 8B/10B IP核(5)----从Framing接口的官方例程学起
- 蓝桥杯单片机第六届温度记录器
- 集成底座方案演示说明
- Network connection mode of QT
- Class design basis and advanced
- In wechat applet, the externally introduced JS is used in xwml for judgment and calculation
- Oracle viewing locked tables and unlocking
- 蓝桥杯单片机省赛第十一届第二场
- [untitled] basic operation of raspberry pie (2)
猜你喜欢

Lost a few hairs, and finally learned - graph traversal -dfs and BFS
![[yolo3d]: real time detection of end-to-end 3D point cloud input](/img/5e/f17960d302f663db75ad82ae0fd70f.jpg)
[yolo3d]: real time detection of end-to-end 3D point cloud input

微信小程序中 在xwml 中使用外部引入的 js进行判断计算
Blue Bridge Cup single chip microcomputer sixth temperature recorder
蓝桥杯单片机省赛第十一届

Vite: configure IP access
Haute performance et faible puissance Cortex - A53 Core Board | i.mx8m mini
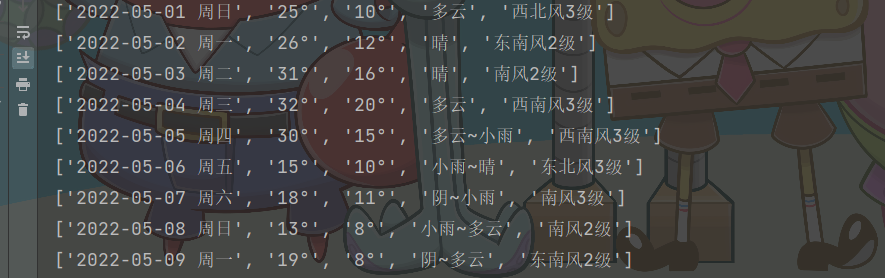
Recently, the weather has been extremely hot, so collect the weather data of Beijing, Shanghai, Guangzhou and Shenzhen last year, and make a visual map
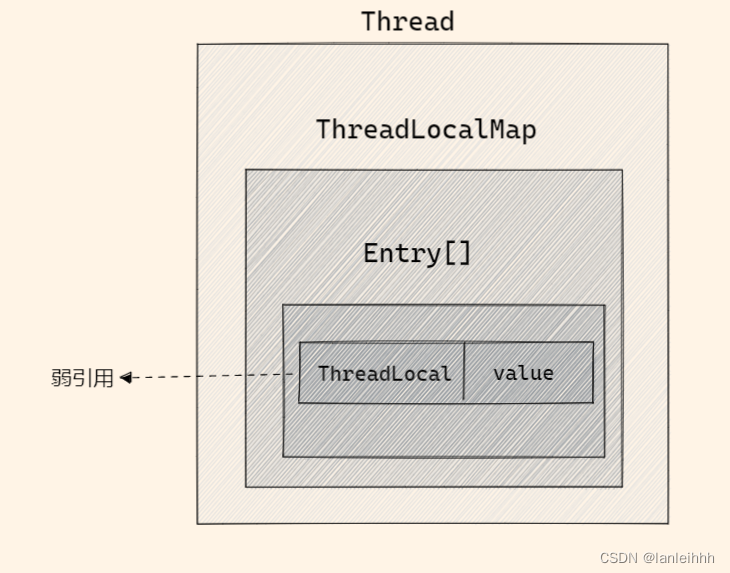
Detailed explanation of ThreadLocal
The 11th Blue Bridge Cup single chip microcomputer provincial competition
随机推荐
[personnel density detection] matlab simulation of personnel density detection based on morphological processing and GRNN network
【直播回顾】战码先锋首期8节直播完美落幕,下期敬请期待!
The 8th Blue Bridge Cup single chip microcomputer provincial competition
Getting started with MQ
"Analysis of 43 cases of MATLAB neural network": Chapter 42 parallel operation and neural network - parallel neural network operation based on cpu/gpu
How to do medium and long-term stocks, and what are the medium and long-term stock trading skills?
Xlwings drawing
Gradle foundation | customize the plug-in and upload it to jitpack
[tips] use Matlab GUI to read files in dialog mode
Get started with Aurora 8b/10b IP core in one day (5) -- learn from the official routine of framing interface
regular expression
Flutter中深入了解MaterialApp,常用属性解析
It took me only 3 months to jump out of the comfort zone and become an automated test engineer for 5 years
蓝桥杯单片机第四届省赛
一文彻底理解评分卡开发中——Y的确定(Vintage分析、滚动率分析等)
接口调试工具模拟Post上传文件——ApiPost
In the era of programmers' introspection, five-year-old programmers are afraid to go out for interviews
《西线无战事》我们才刚开始热爱生活,却不得不对一切开炮
The 6th Blue Bridge Cup single chip microcomputer provincial competition
【人员密度检测】基于形态学处理和GRNN网络的人员密度检测matlab仿真