当前位置:网站首页>Jetson TX2 brush machine
Jetson TX2 brush machine
2022-07-03 10:34:00 【-Plain heart to warm】
List of articles
preparation
1. host End (ubuntu) To configure
There should be one with ubuntu The host of the system , And there are 30GB More free space .
To configure USB start-up Ubuntu System
2. Connecting line
In the process of connecting the two machines TX2 The original wire in the packing box , Other wires may cause problems of not being connected .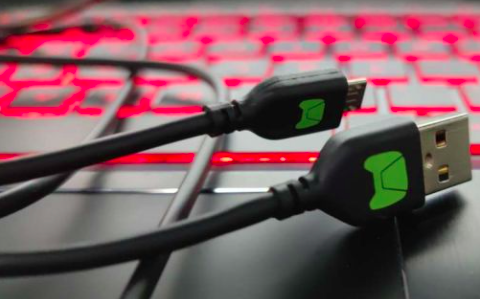
In fact, as long as it is a line with transmission function , It should be all right .
3. install NVIDIA SDK Manager
stay Host Terminal Download NVIDIA SDK Manager.
Official website
After entering the download interface, you need to select the corresponding version of the tool to download and install , Here's the picture :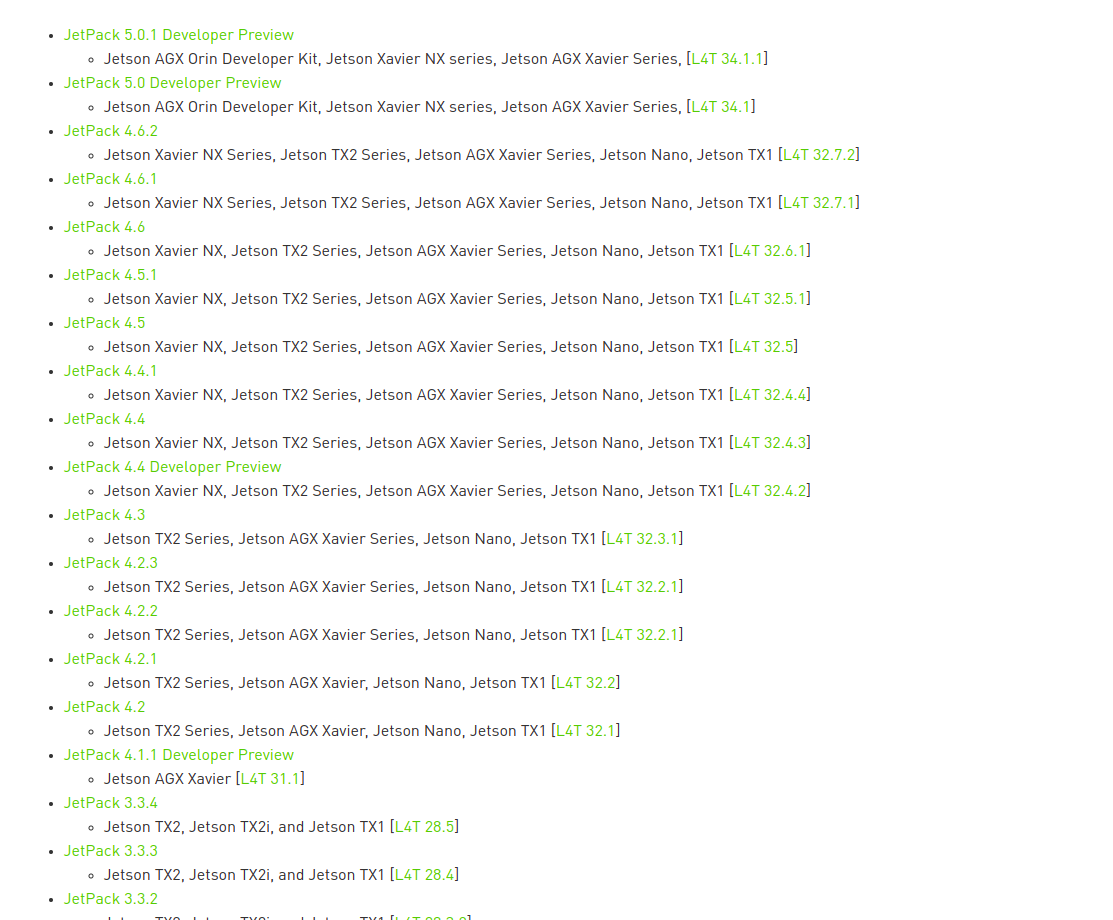
View historical version
So here's what I chose 4.6.2 edition
What we finally downloaded is a deb Installation package , Enter the directory where the installation package is located to install . The installation command is as follows :
sudo dpkg -i The installation package you got
Or open the downloaded file directly with the mouse , Just install it .
After installation, enter sdkmanager You can enter NVIDIA SDK Manager. ad locum , You need to have a NVIDIA Developer account and login , If you don't have one, it's very fast .
Start to brush the machine
STEP1

If the system is ubuntu20.04 , The recognition may fail .
It can be modified by /etc/os-release Medium VERSION_ID , Change it to 18.04, solve the problem .
STEP2
Make the first ditch ;
Second ditch , It depends on personal situation : If the network speed is fast enough , There is no need to divide into two stages , Don't choose directly Download now,install later, After downloading, install .
STEP3

STEP3 After a period of time, the window shown in the above figure will pop up , Represents the beginning of burning Jetson OS System ( It's the old yellow devil's revision ubuntu), choice Manual Setup.
adopt TX2 Available in black USB Line ( With green logo ) take TX2 and HOST Connect , And recovery mode TX2( Guarantee TX2 Power on but off ; Press down power Press the key quickly recovery key ; keep recovery Press while pressing RST Key and release RST key , Release recovery key ) Click on flash. After a period of time, the system burning is completed , hold TX2 Connect the display screen and the keyboard and mouse , Do some basic system settings to enter TX2 desktop , The next step is SDK Installation (CUDA, CUDNN, TensorRT, DeepStream etc. ), Don't rush back to host The next step of installation is on the host , Still focus on TX2 here , Carry out a wave of source switching , Otherwise, the download will fail .
TX2 End
sudo cp /etc/apt/sources.list /etc/apt/sources.list.bak    # To prevent failure to recover after misoperation , Back up the original file first sources.list
sudo gedit /etc/apt/sources.list # Delete or comment out the original Ubuntu Source   Replace it with Tsinghua's source , Close test available
Tsinghua source : Be careful TX2 yes arm The architecture , So it can't be used X86 Update source of , The following provides ubuntu18 Usable arm Update source :( There are some things in the source of USTC that cannot be downloaded , It is suggested to use Tsinghua source )
deb http://mirrors.tuna.tsinghua.edu.cn/ubuntu-ports/ bionic-updates main restricted universe multiverse
deb-src http://mirrors.tuna.tsinghua.edu.cn/ubuntu-ports/ bionic-updates main restricted universe multiverse
deb http://mirrors.tuna.tsinghua.edu.cn/ubuntu-ports/ bionic-security main restricted universe multiverse
deb-src http://mirrors.tuna.tsinghua.edu.cn/ubuntu-ports/ bionic-security main restricted universe multiverse
deb http://mirrors.tuna.tsinghua.edu.cn/ubuntu-ports/ bionic-backports main restricted universe multiverse
deb-src http://mirrors.tuna.tsinghua.edu.cn/ubuntu-ports/ bionic-backports main restricted universe multiverse
deb http://mirrors.tuna.tsinghua.edu.cn/ubuntu-ports/ bionic main universe restricted
deb-src http://mirrors.tuna.tsinghua.edu.cn/ubuntu-ports/ bionic main universe restricted
sudo apt-get update
sudo apt-get upgrade
Host End

here TX2 Will default to assign a ip Address 192.168.55.1( It could be different ), Don't change it anyway , The ip The address is that miniUSB After wired connection TX2 Generated , It can be used for subsequent operations . It's based on that ,TX2 and ubuntu Your system doesn't need to be connected to a mobile hotspot or router on the same LAN , Instead, it increases labor costs . Click on install The follow-up will begin SDK Installation , SDK The installation of depends on the network environment , It takes patience , It is also possible that the final installation fails , here SDK Will prompt you to return to STEP1, Then continue from STEP1 Go down , But it's time STEP2 There is no need to check Jetson OS 了 ( The system has been installed , Tick again is to install the system again ). Be patient , Try a few more times and you can finish the installation , The above steps have been tested in practice , Safe to use .
STEP4
Installation successful !
边栏推荐
- Model evaluation and selection
- 20220603 Mathematics: pow (x, n)
- Leetcode刷题---374
- 深度学习入门之线性代数(PyTorch)
- Notes - regular expressions
- 20220601 Mathematics: zero after factorial
- conda9.0+py2.7+tensorflow1.8.0
- Hands on deep learning pytorch version exercise solution - 3.1 linear regression
- 二分查找法
- Out of the box high color background system
猜你喜欢

Stroke prediction: Bayesian

Ut2014 learning notes
What did I read in order to understand the to do list

神经网络入门之矩阵计算(Pytorch)

Pytorch ADDA code learning notes

High imitation bosom friend manke comic app
mysql5.7安装和配置教程(图文超详细版)
Preliminary knowledge of Neural Network Introduction (pytorch)

Raspberry pie 4B deploys lnmp+tor and builds a website on dark web
![[LZY learning notes dive into deep learning] 3.1-3.3 principle and implementation of linear regression](/img/ce/8c2ede768c45ae6a3ceeab05e68e54.jpg)
[LZY learning notes dive into deep learning] 3.1-3.3 principle and implementation of linear regression
随机推荐
OpenCV Error: Assertion failed (size.width>0 && size.height>0) in imshow
Inverse code of string (Jilin University postgraduate entrance examination question)
Ut2017 learning notes
一步教你溯源【钓鱼邮件】的IP地址
R language classification
Hands on deep learning pytorch version exercise solution - 3.1 linear regression
20220603 Mathematics: pow (x, n)
Data classification: support vector machine
丢弃法Dropout(Pytorch)
GAOFAN Weibo app
Powshell's set location: unable to find a solution to the problem of accepting actual parameters
Advantageous distinctive domain adaptation reading notes (detailed)
mysql5.7安装和配置教程(图文超详细版)
Implementation of "quick start electronic" window dragging
Secure in mysql8.0 under Windows_ file_ Priv is null solution
Leetcode - 5 longest palindrome substring
八、MySQL之事务控制语言
What did I read in order to understand the to do list
Leetcode刷题---977
2018 y7000 upgrade hard disk + migrate and upgrade black apple