当前位置:网站首页>rsync远程同步
rsync远程同步
2022-07-05 23:23:00 【橘子超好吃】
文章目录
一、rsync
1、rsync简介
rsync(Remote Sync,远程同步)是一个开源的快速备份工具,可以在不同主机之间镜像同步整个目录树,支持增量备份,并保持链接和权限,且采用优化的同步算法,传输前执行压缩,因此非常适用于异地备份、镜像服务器等应用。
rsync 的官方站点的网址是 https://rsync.samba.org/,目前最新版本是 3.1.3,由 Wayne Davison 进行维护。作为一种最常用的文件备份工具,rsync 往往是 Linux 和 UNIX 系统默 认安装的基本组件之一。
2、rsync特性
- 支持拷贝特殊文件,如连接文件、设备等。
- 可以有排除指定文件或目录同步的功能,相当于打包命令tar的排除功能。
- 可以做到保持原文件或目录的权限、时间、软硬链接、属主、组等所有属性均不改变 –p。
- 可以实现增量同步,既只同步发生变化的数据,因此数据传输效率很高(tar-N)。
- 可以使用rcp、rsh、ssh等方式来配合传输文件(rsync本身不对数据加密)。
- 可以通过socket(进程方式)传输文件和数据(服务端和客户端)。
- 支持匿名的活认证(无需系统用户)的进程模式传输,可以实现方便安全的进行数据备份和镜像。
二、rsync同步源
在远程同步任务中,负责发起 rsync 同步操作的客户机称为发起端,而负责响应来自客户机的 rsync 同步操作的服务器称为同步源。
- 在下行同步(下载)中,同步源负责提供文档的原始位置,发起端应对该位置有读取权限。
- 在上行同步(上传)中,同步源负责提供文档的目标位置,发起端应对该位置具有写入权限。
三、配置rsync下行同步
1、 配置rsync源
源服务器:20.0.0.12
客户机(发起端):20.0.0.5
systemctl stop firewalld.service
setenforce 0
rpm -q rsync
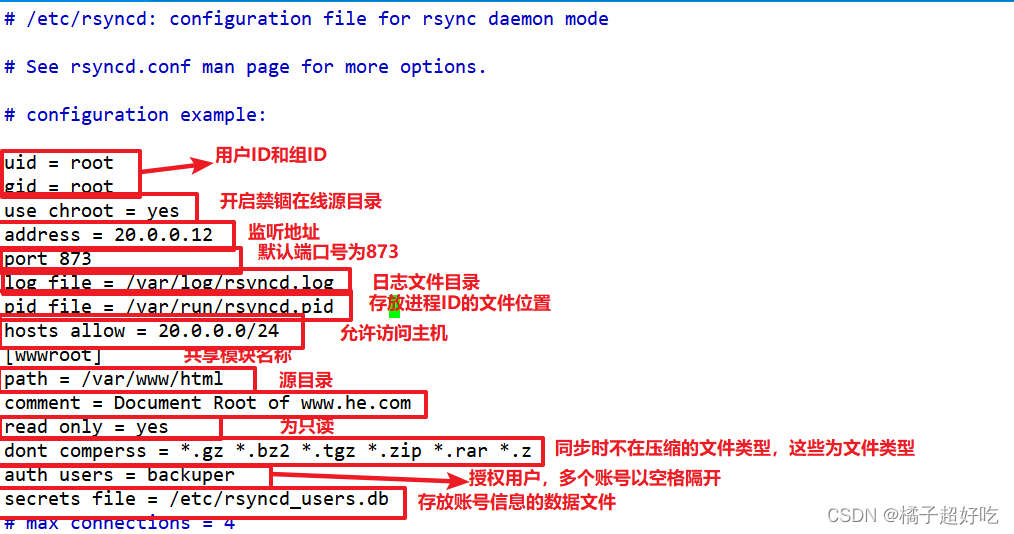
vim /etc/rsyncd.conf
uid = nobody
gid = nobody
use chroot = yes
address = 20.0.0.12
port 873
log file = /var/log/rsyncd.log
pid file = /var/run/rsyncd.pid
hosts allow = 20.0.0.0/24
[wwwroot]
path = /var/www/html
comment = Document Root of www.he.com
read only = yes
dont comperss = *.gz *.bz2 *.tgz *.zip *.rar *.z
auth users = backuper
secrets file = /etc/rsyncd_users.db
vim /etc/rsyncd_users.db
backuper:abc123

chmod 600 /etc/rsyncd_users.db
mkdir -p /var/www/html
chmod +r /var/www/html/
ls -ld /var/www/html/
rsync --daemon
netstat -natp | grep rsync


2、发起端配置
基本格式:rsync [选项] 原始位置 目标位置
常用选项
| 选项 | 说明 |
|---|---|
| -r | 递归模式,包含目录及子目录中的所有文件。 |
| -l | 对于符号链接文件仍然复制为符号链接文件。 |
| -v | 显示同步过程的详细(verbose)信息。 |
| -z | 在传输文件时进行压缩(compress)。 |
| -a | 归档模式,保留文件的权限、属性等信息,等同于组合选项“-rlptgop"。 |
| -p | 保留文件的权限标记。-t保留文件的时间标记。 |
| -g | 保留文件的属组标记(仅超级用户使用)。 |
| -o | 保留文件的属主标记(仅超级用户使用)。 |
| -H | 保留硬连接文件。 |
| -A | 保留ACL属性信息。 |
| -D | 保留设备文件及其他特殊文件。 |
| –delete | 删除目标位置有而原始位置没有的文件。 |
| –checksum | 根据校验和(而不是文件大小、修改时间)来决定是否跳过文件。 |
3、下载到本地的两种方法
格式一: 用户名@主机地址::共享模块名
rsync -avz [email protected]20.0.0.12::wwwroot /opt/
格式二: rsync:/用户名@主机地址/共享模块名
rsync -avz rsync://[email protected]/wwwroot /opt/
##免交互格式配置:
echo "abc123" > /etc/server.pass
chmod 600 /etc/server.pass
定时同步
crontab -e
30 22 * * * /usr/bin/rsync -az --delete --password-file=/etc/server.pass [email protected]20.0.0.12::wwwroot /opt/
#为了在同步过程中不用输入密码,需要创建一个密码文件,保存 backuper 用户的密码,如 /etc/server.pass。在执行 rsync 同步时使用选项 “--password-file=/etc/server.pass” 指定即可。
systemctl restart crond
systemctl enable crond
四、发起端配置
1、rsync+inotify
使用inotify通知接口,可以用来监控文件系统的各种变化情况,如文件存取、删除、移动、修改等。利用这一机制,可以非常方便地实现文件异动告警、增量备份,并针对目录或文件的变化及时作出响应。
将inotify机制与rsync工具相结合,可以实现触发式备份(实时同步),即只要原始位置的文档发生变化,则立即启动增量备份操作;否则处于静默等待状态。这样,就避免了按固定周期备份时存在的延迟性、周期过密等问题。
因为 inotify 通知机制由 Linux 内核提供,因此主要做本机监控,在触发式备份中应用时更适合上行同步。
2、配置rsync实时同步(上行同步)
##修改rsync源服务器配置文件
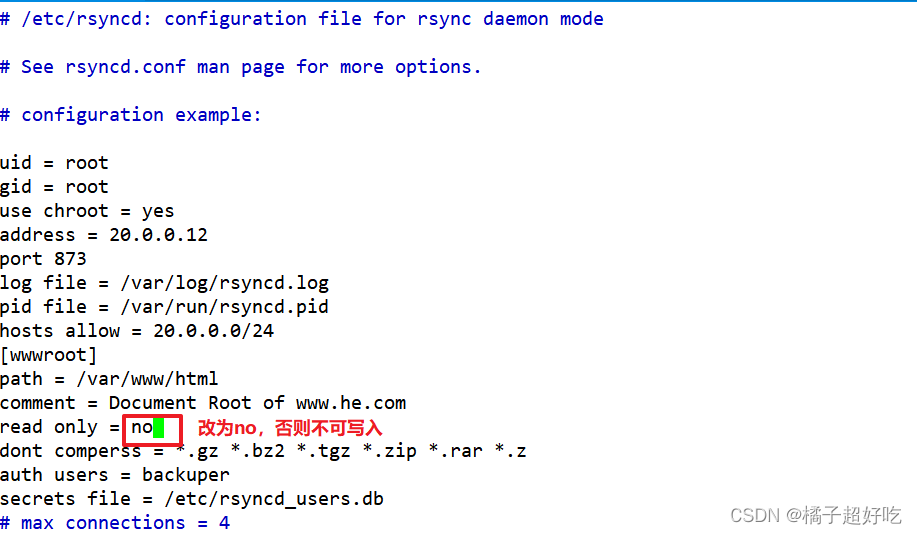
vim /etc/rsyncd.conf
......
read only = no											##关闭只读,上行同步需要可以写

kill $(cat /var/run/rsyncd.pid)
rm -rf /var/run/rsyncd.pid
rsync --daemon
netstat -anpt | grep rsync

chmod 777 /var/www/html/

调整 inotify 内核参数
在Linux内核中,默认的inotify机制提供了三个调控参数:
- max_queue_events(监控事件队列,默认值为16384)
- max_user_instances(最多监控实例数,默认值为128)
- max_user_watches(每个实例最多监控文件数,默认值为8192)。
当要监控的目录、文件数量较多或者变化较频繁时,建议加大这三个参数的值。
cat /proc/sys/fs/inotify/max_queued_events
cat /proc/sys/fs/inotify/max_user_instances
cat /proc/sys/fs/inotify/max_user_watches

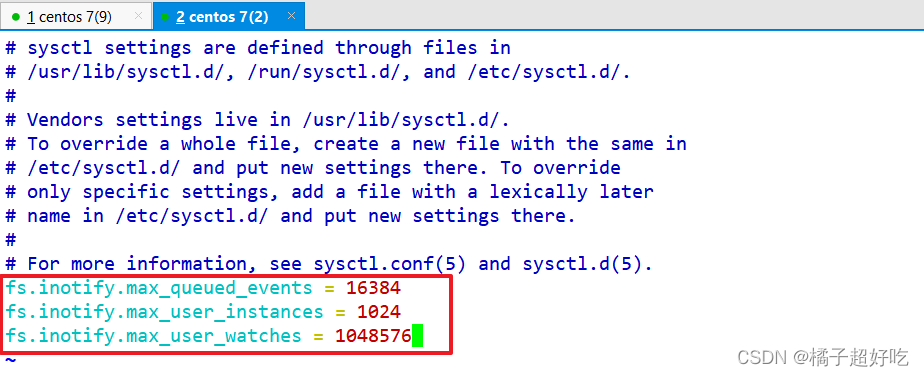
vim /etc/sysctl.conf
fs.inotify.max_queued_events = 16384
fs.inotify.max_user_instances = 1024
fs.inotify.max_user_watches = 1048576

sysctl -p

3、安装 inotify-tools
用 inotify 机制还需要安装 inotify-tools,以便提供 inotifywait、inotifywatch 辅助工具程序,用来监控、汇总改动情况。
inotifywait:可监控modify(修改)、create(创建)、move(移动)、delete(删除)、attrib(属性更改)等各种事件,一有变动立即输出结果。
inotifywatch:可用来收集文件系统变动情况,并在运行结束后输出汇总的变化情况。
tar zxvf inotify-tools-3.14.tar.gz -C /opt/
cd /opt/inotify-tools-3.14
./configure
make && make install

#可以先执行“inotifywait”命令,然后另外再开启一个新终端向 /var/www/html 目录下添加文件、移动文件,在原来的终端中跟踪屏幕输出结果。
inotifywait -mrq -e modify,create,move,delete /var/www/html

#选项“-e”:用来指定要监控哪些事件
#选项“-m”:表示持续监控
#选项“-r”:表示递归整个目录
#选项“-q”:简化输出信息

在另外一个终端编写触发式同步脚本(注意,脚本名不可包含 rsync 字符串,否则脚本可能不生效)
vim /opt/inotify.sh
#!/bin/bash
INOTIFY_CMD="inotifywait -mrq -e modify,create,attrib,move,delete /var/www/html/"
RSYNC_CMD="rsync -azH --delete --password-file=/etc/server.pass /var/www/html/ [email protected]::wwwroot/"
#使用while、read持续获取监控结果,根据结果可以作进一步判断是否读取到输出的监控记录
$INOTIFY_CMD | while read DIRECTORY EVENT FILE
do
    if [ $(pgrep rsync | wc -l) -le 0 ] ; then
	#如果rsync未在执行,则立即启动
        $RSYNC_CMD
    fi
done

chmod +x /opt/inotify.sh
chmod 777 /var/www/html/
chmod +x /etc/rc.d/rc.local
echo '/opt/inotify.sh' >> /etc/rc.d/rc.local				##加入开机自动执行


上述脚本用来检测本机/var/www/html 目录的变动情况,一旦有更新触发 rsync 同步操作,上传备份至服务器 20.0.0.12 的 wwwroot 共享目录下。
触发式上行同步的验证过程如下:
- (1)在本机运行 /opt/inotify.sh 脚本程序。
- (2)切换到本机的 /var/www/html 目录,执行增加、删除、修改文件等操作。
- (3)查看远端服务器中的 wwwroot 目录下的变化情况。
五、使用rsync来实现快速删除大量文件
假如要在linux下删除大量文件,比如100万、1000万,像/usr/local/nginx/proxy_temp的nginx缓存等,那么rm -rf * 可能就不好使了,因为要等待很长一段时间。在这种情况下我们可以使用rsync来巧妙处理。rsync实际用的是替换原理。

##先建立一个空的文件夹:
mkdir /home/blank

##用rsync删除目标目录:
rsync --delete-before -a -H -v --progress --stats /home/blank/ /usr/local/nginx/proxy_temp
这样目标目录很快就被清空了
选项说明:
--delete-before 接收者在传输进行删除操作
-a 归档模式,表示以递归方式传输文件,并保持所有文件属性
-H 保持硬连接的文件
-v 详细输出模式
--progress 在传输时显示传输过程
--stats 给出某些文件的传输状态
边栏推荐
- asp.net弹出层实例
- Dynamic planning: robbing families and houses
- CorelDRAW plug-in -- GMS plug-in development -- new project -- macro recording -- VBA editing -- debugging skills -- CDR plug-in (2)
- 11gR2 Database Services for "Policy" and "Administrator" Managed Databases (文件 I
- Golang code checking tool
- Solution to the packaging problem of asyncsocket long connecting rod
- Use the rewrite rule to rewrite all accesses to the a domain name to the B domain name
- 20.移植Freetype字体库
- Huawei simulator ENSP - hcip - MPLS experiment
- Realize reverse proxy client IP transparent transmission
猜你喜欢

Spire.PDF for NET 8.7.2

MySQL replace primary key delete primary key add primary key
Hcip course notes-16 VLAN, three-tier architecture, MPLS virtual private line configuration

保研笔记一 软件工程与计算卷二(1-7章)
Spécifications techniques et lignes directrices pour la sélection des tubes TVS et ESD - Recommandation de jialichuang

21.PWM应用编程
【经典控制理论】自控实验总结

Creative mode 1 - single case mode

Initial experience | purchase and activate typora software

LabVIEW打开PNG 图像正常而 Photoshop打开得到全黑的图像
随机推荐
698. Divided into k equal subsets ●●
Solution to the packaging problem of asyncsocket long connecting rod
ORB_ SLAM2/3
idea 连接mysql ,直接贴配置文件的url 比较方便
2:第一章:认识JVM规范1:JVM简介;
Scala concurrent programming (II) akka
Différence entre hors bande et en bande
判斷二叉樹是否為完全二叉樹
SpreadJS 15.1 CN 与 SpreadJS 15.1 EN
带外和带内的区别
Cwaitabletimer timer, used to create timer object access
Dynamic planning: robbing families and houses
(4)UART应用设计及仿真验证2 —— RX模块设计(无状态机)
并查集实践
MySQL (1) -- related concepts, SQL classification, and simple operations
yate.conf
STM32__06—单通道ADC
MySQL replace primary key delete primary key add primary key
asp.net弹出层实例
The PostgreSQL column reference 'ID' is ambiguous - PostgreSQL column reference'id'is ambiguous