当前位置:网站首页>Make DIY welding smoke extractor with lighting
Make DIY welding smoke extractor with lighting
2022-07-07 01:45:00 【acktomas】
Make illuminated DIY Welding smoke extractor
This can be changed to the ceiling fan and scattering light in the living room
Use Arduino,PC Fan and LED Light Bar , You can make a simple smoke extractor , To protect you from welding smoke .
step 1: Why do we need welding powder extractor
Excellent welding , Right ? Make your own for our project PCB Very interesting , But when welding parts , We need to pay attention to some things . When we weld , We are around lead . Besides , Inhaling smoke can cause long-term health problems , For example, stomach disease , Memory and attention problems , Muscle and joint pain, etc . Besides , It is difficult for your eyes to weld parts to the circuit board , Welding under weak light will eventually permanently damage your eyesight .
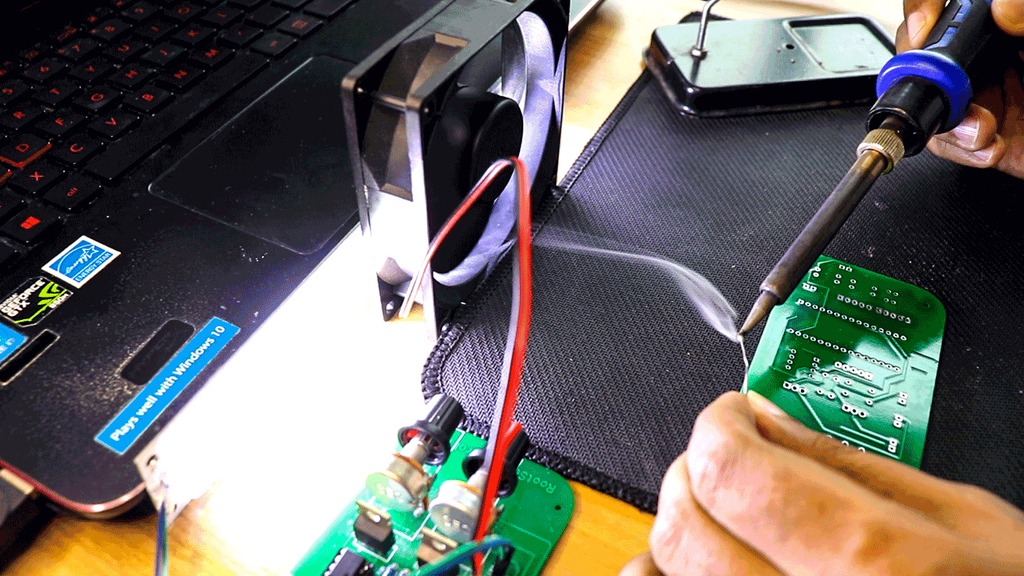
therefore , When welding , It is very important to have enough light and smoke extractors to remove smoke . By using smoke extractors , You and the people around you will be protected from potentially dangerous smoke . In this video , We will use the old PC Fan and can be used to replace the lamp 12V LED Lamp strip fabrication and welding smoke extractor .
step 2: circuit
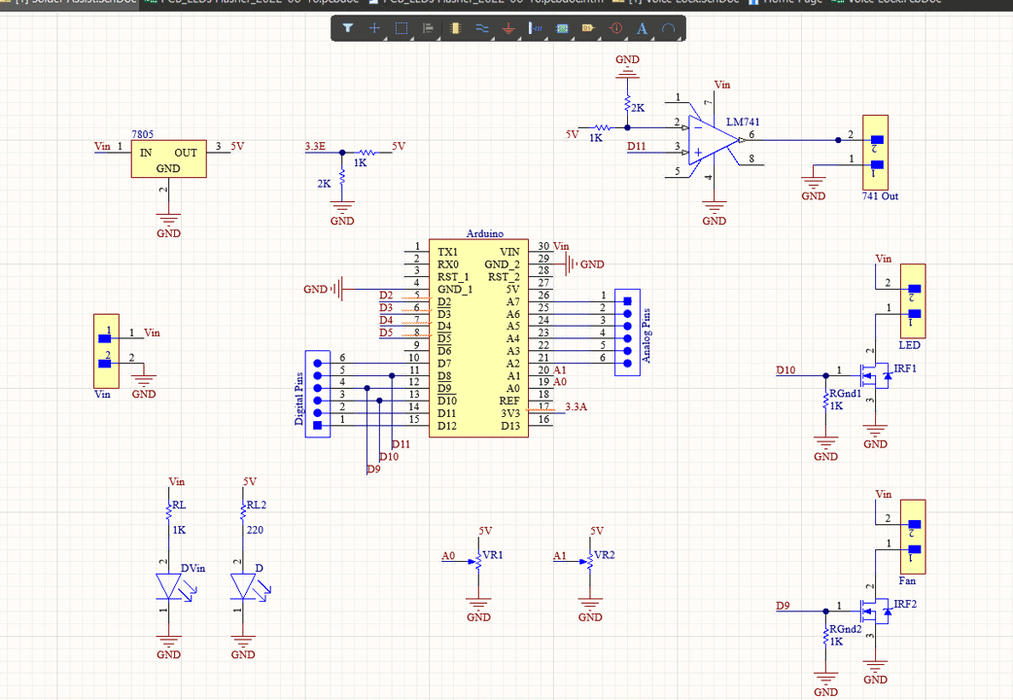
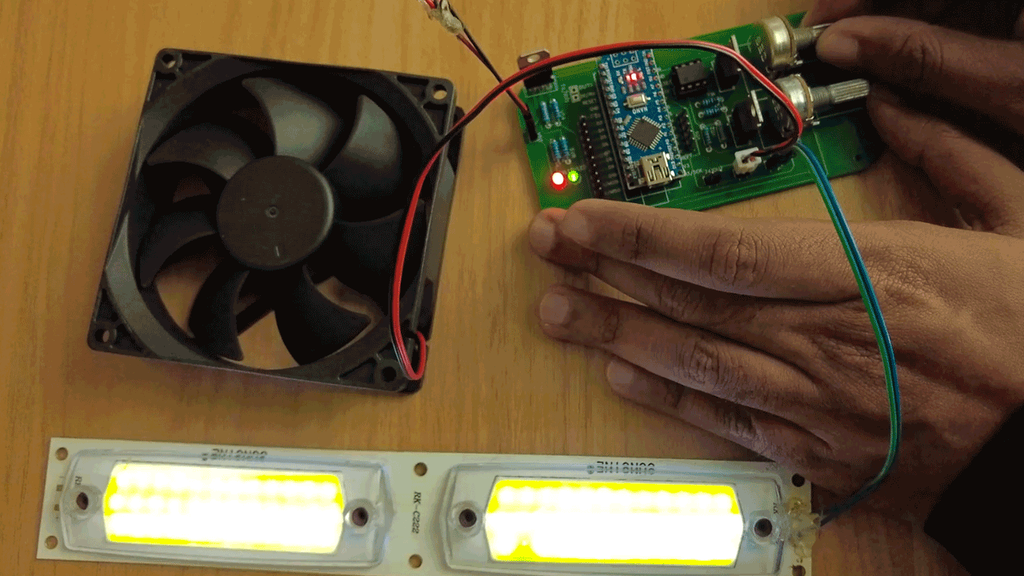
therefore ,Arduino Nano It's basically the brain of this project , But you can use anything Arduino plate . The input voltage is connected to a 7805 pressure regulator , The regulator will VIN Convert to stable 5V DC Power Supply . Here are two potentiometers connected to 5V, Will be used as a voltage divider . The output of the potentiometer is respectively connected to the analog pin A0 and A1.
The following are two that are set to act as switches MOSFET. You can open Arduino The pin of 9 And pins 10 To open them up . ad locum , I want to point out , Pin 9 and 10 yes PWM Pin , This means that we can go to MOSFET send out PWM The signal .
ad locum , You can see a LM 741 The comparator IC, It can be used to power any other device you want . This is almost the whole circuit .
step 3:PCB Layout

Once the circuit is completed and tested , I use it. Altium Designed a small PCB, Where I can place all the parts neatly . ad locum , You can see that the wiring is completed on both sides of the circuit board , This means that it is double PCB.
step 4: complete PCB
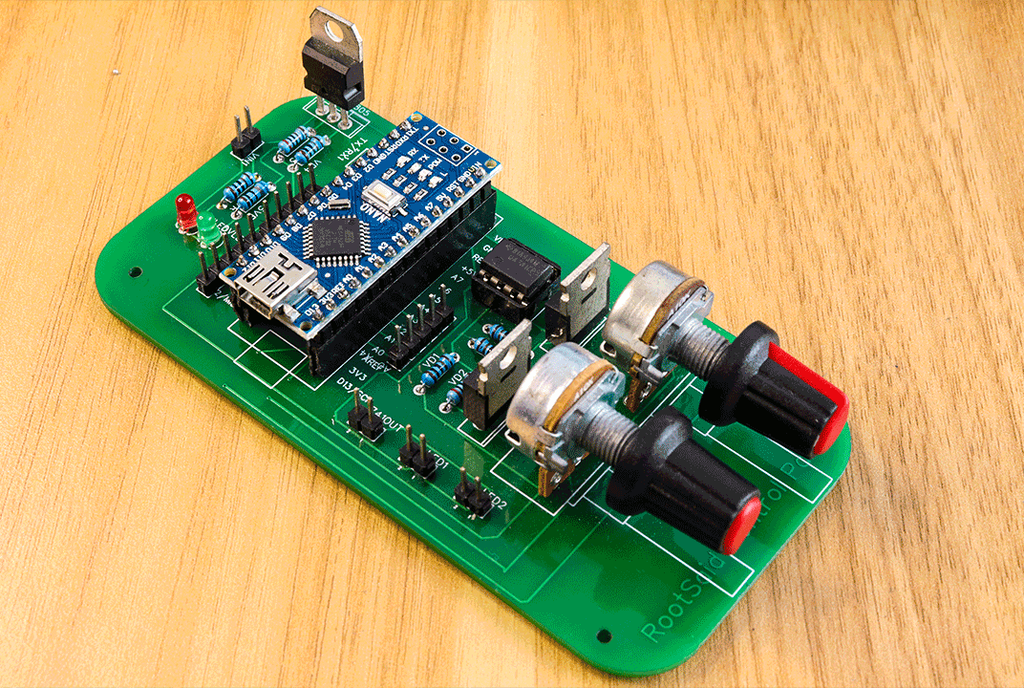
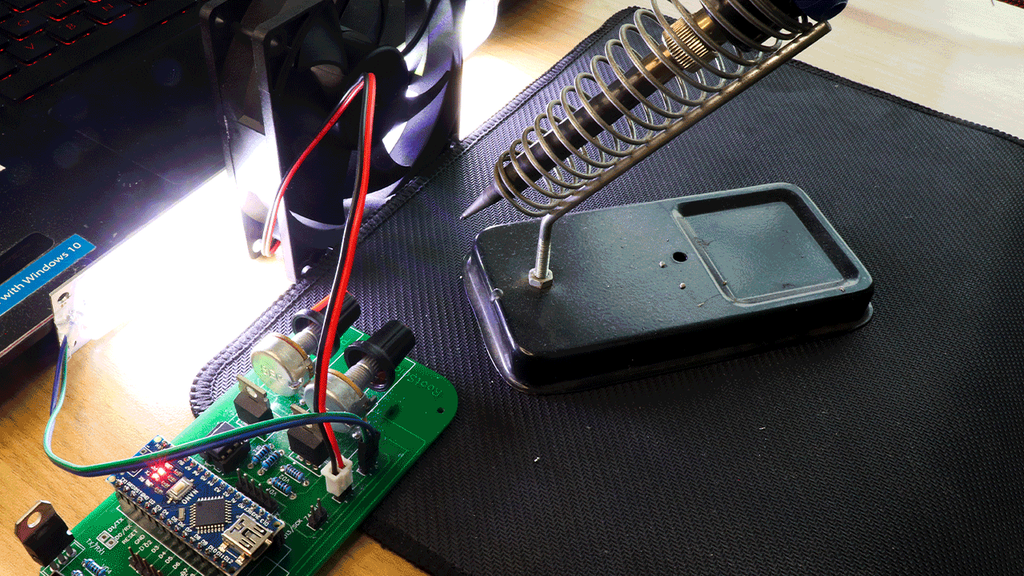
When you have all the parts and PCB when , They can be welded together . Weld all parts on the circuit board , And make sure to check the polarity of the parts . This is after welding PCB The appearance of the .
step 5: code
Let's start coding now . This will be uploaded to us when we finish the process Arduino Code for . It seems quite simple , isn't it? ? In short , This is easy. !
const int ledPin =  13;
const int light = 9;
const int fan = 10;
int pot1 = 0;
int pot2 = 0;

void setup()
{
pinMode(ledPin, OUTPUT);
pinMode(A0, INPUT);
pinMode(A1, INPUT);
Serial.begin(9600);
}

void loop()
{
pot1 = map(analogRead(A0),0,500,0,255);
pot2 = map(analogRead(A1),0,500,0,255);
analogWrite(light, pot1);
analogWrite(fan, pot2);
delay(50);
Serial.println(pot1);
Serial.println(pot2);
Serial.println("");
}
First , We will declare some variables , Then assign them to pins that are often used throughout the project . In the setting function , We will declare the pin pattern , It essentially tells Arduino Is the pin an input pin or an output pin .
We get analog readings from two potentiometers , In a loop function , We map these readings to fall on 0 To 255 Values in range . In the next line , We will open and close the connection to Arduino Pin 9 and 10 Of MOSFET. So , We will output PWM The signal , Its value is generated from the row before them .
Just turn the potentiometer , We can not only control LED The brightness level produced by the light bar , You can also control the speed of fan rotation . Pipes or outlets can be used , The fan can be connected to the pipe or outlet , To ensure that steam does not remain in the room .
边栏推荐
- 场景实践:基于函数计算快速搭建Wordpress博客系统
- Can't you understand the code of linked list in C language? An article allows you to grasp the secondary pointer and deeply understand the various forms of parameter passing in the function parameter
- Curl command
- AcWing 361. Sightseeing cow problem solution (SPFA seeking positive ring)
- Match VIM from zero (0) -- Introduction to vimscript
- 7.6 simulation summary
- golang 基础 —— 数据类型
- POJ 3177 Redundant Paths POJ 3352 Road Construction(双连接)
- 使用nodejs完成判断哪些项目打包+发版
- Baidu flying general BMN timing action positioning framework | data preparation and training guide (Part 2)
猜你喜欢
AcWing 345. Cattle station solution (nature and multiplication of Floyd)
New job insights ~ leave the old and welcome the new~
AI automatically generates annotation documents from code
一文带你走进【内存泄漏】

Reptile practice (VI): novel of climbing pen interesting Pavilion

Typical problems of subnet division and super network construction
制作带照明的DIY焊接排烟器

Yunna | work order management measures, how to carry out work order management
Baidu flying general BMN timing action positioning framework | data preparation and training guide (Part 2)
Appium automation test foundation uiautomatorviewer positioning tool
随机推荐
MySQL最基本的SELECT(查询)语句
Telnet,SSH1,SSH2,Telnet/SSL,Rlogin,Serial,TAPI,RAW
swiper组件中使用video导致全屏错位
Match VIM from zero (0) -- Introduction to vimscript
First experience of JSON learning - the third-party jar package realizes bean, list and map to create JSON format
JVM 内存模型
Appium自动化测试基础 — uiautomatorviewer定位工具
Mysqlbackup restores specific tables
各种语言,软件,系统的国内镜像,收藏这一个仓库就够了: Thanks-Mirror
DS-5/RVDS4.0变量初始化错误
Blue Bridge Cup 2022 13th provincial competition real topic - block painting
拖拽改变顺序
json学习初体验–第三者jar包实现bean、List、map创json格式
JS ES5也可以創建常量?
Image watermarking, scaling and conversion of an input stream
Box stretch and pull (left-right mode)
长按按钮执行函数
公钥\私人 ssh避password登陆
爬虫实战(六):爬笔趣阁小说
修改px4飞控的系统时间