当前位置:网站首页>FLIR blackfly s usb3 industrial camera: white balance setting method
FLIR blackfly s usb3 industrial camera: white balance setting method
2022-07-07 02:01:00 【The moon shines on the silver sea like a dragon】
Flir Blackfly S USB3 Industrial camera : White balance setting method
Basic concept of white balance
White balance is the basic color intensity of image ( Red 、 Green and blue channels ) Adjustment of .
White balance is also called color balance or gray balance , It is used to change the overall performance of the image according to various lighting conditions , To reflect what our eyes see .
Lighting conditions play an important role in the performance of images . White balance scales the three color components in the image (RGB) To adapt to lighting conditions .
White balance function
Generally, the original image is a monochrome image , By interpolating all colors, it becomes a color image
That is to say, it is converted into color image by interpolation , The image has color .
What is this interpolation method , Interpolation is a method of reconstructing color for the entire color image when a subset of pixel color values is not available .
The principle of interpolation is not described in detail here , Focus on white balance treatment ( interpolation ) What will the picture look like after .
The following example is in fluorescent lamp ( That is, fluorescent lamp ) Shot under . There is no white balance processing for the image above , The image below is white balanced , Adjust the color , Compensate for lighting conditions , Finally, the image results closer to human eyes are provided .
Unprocessed pictures :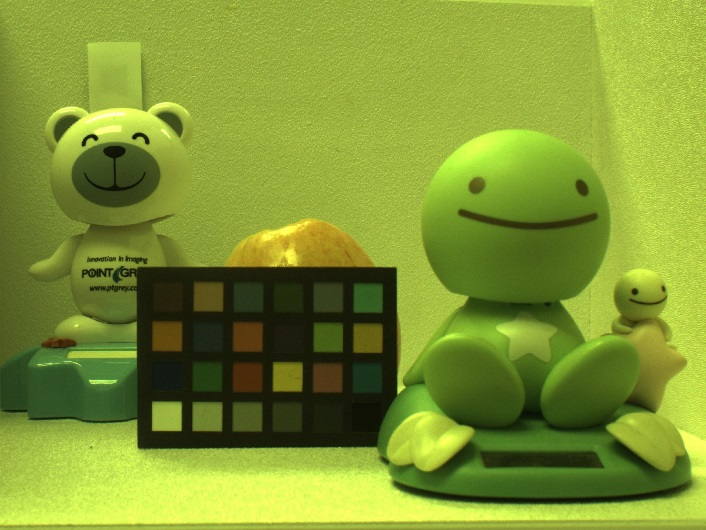
White balanced image :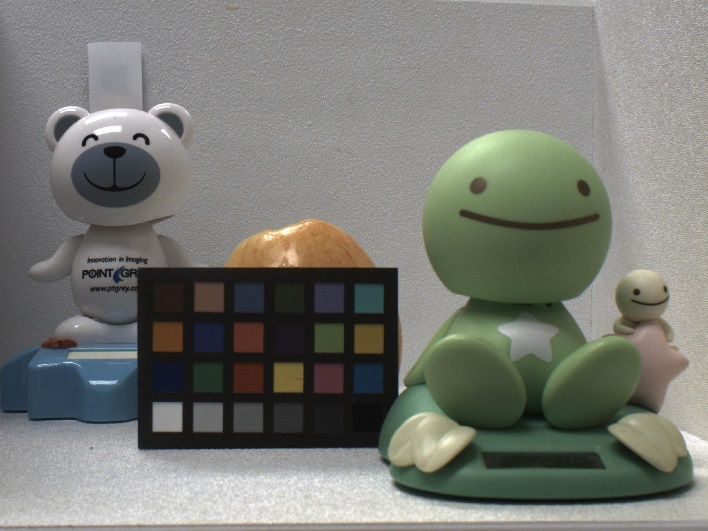
The theory of white balance is that the initial image collected by the sensor is “ gray ” Of , This means red 、 The intensity of green and blue channels should be roughly equal .
This type of color balance mentioned above is called the grey world theorem .
If the image is completely composed of green, red and blue , Then you can use white balance
Similar to whether the exposure value is appropriate , It can also be in the form of image histogram , To analyze whether the treatment of white balance is appropriate , Suitable means the color is closer to the human eye .
In the following example, the one above has not been treated with white balance , Below is the white balance treatment .
It can be clearly seen from the histogram , The image after white balance is red 、 The intensity distribution of green and blue channels is more uniform .
No white balance treatment :
After white balance treatment :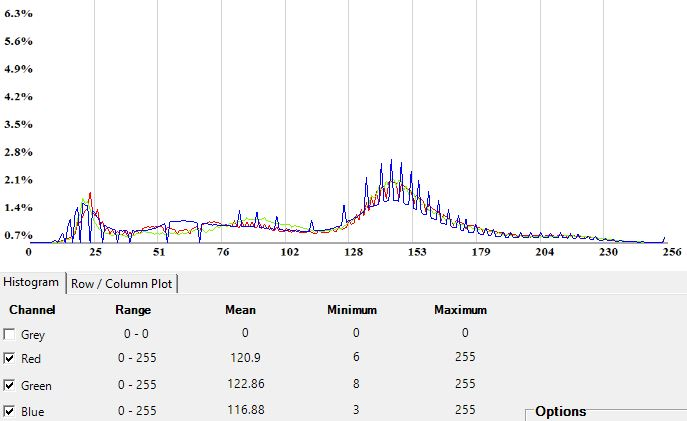
White balance method
There are two ways to scale each color channel :
- The first one is : All color channels have their own scaling factors
- The second kind : Two of these colors can be scaled
In the first way , To find the scaling factor for each color channel , The coefficient does not refer to the nominal brightness of the image .
This is why there is a second method , Most white balance scales two color channels according to the color reference . The typical reference color used is green .
The white balance coefficient can be calculated as follows :
Industrial camera Flir Blackfly S USB3 this is it Calculate the white balance coefficient
Automatic white balance
The grey world theorem can be realized as a linear function algorithm , This means that it does not require much computation , Therefore, on the camera, this definition is often used to calculate the white balance value .
Blackfly S The camera has made some modifications to the grey world theorem in the automatic white balance mode . The algorithm will be red 、 Add green and blue channels , Then calculate the appropriate a and b.
Automatic white balance can be set to run continuously during image capture , To adapt to different lighting conditions . Blackfly S Four parameters can be configured on the camera , Provide users with more control over dialogue balance .
Maximum and minimum target ratios
You can configure the a and b The maximum and minimum ratio of , To ensure that the automatic adjustment does not exceed the defined value .Damping constant
The larger the damping constant , The slower it takes for automatic white balance to reach a steady state . When you need to change the color target quickly , This feature is useful .Lighting profile
The illumination profile estimates the emission spectrum of the light source and adjusts the white balance in advance to ensure that the image tone is still representative of what the human eye sees .ROI Color balance
Color balance based on specific areas in the image , Can be in this ROI Perform window and color balance measurements , And apply the results to the whole image .
How to turn on automatic white balance
Automatic white balance can be turned on through Flir Host computer (SpinView) Or in Spinnaker API
adopt SpinView Set automatic white balance
Steps are as follows :
- 1 Open the setup menu
- 2 Set up Balance White Auto by Continuous
- 3 open Features menu
- 4 choice white balance auto profile by indoor perhaps outdoor
- 5 Set the upper and lower limits of automatic white balance
- 6 Set the damping constant
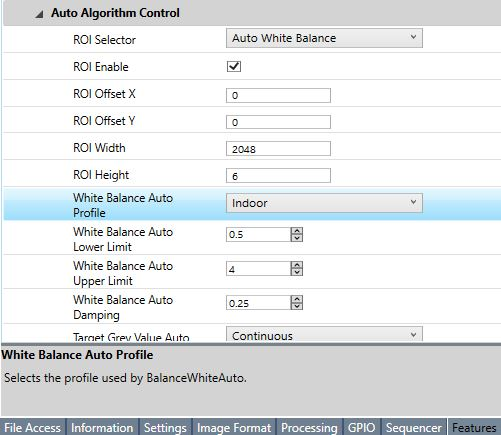
You can set ROI(region of interest) To white balance this area - 1 open Features menu , Can make ROI
- 2 Set up ROI by Auto White Balance
- 3 Set up ROI Height and width and offset
Use Spinnaker API C++ Realize automatic white balance configuration
Turn on automatic white balance :
// Turn on automatic white balance
CEnumerationPtr ptrBalanceWhiteAuto = nodeMap.GetNode("BalanceWhiteAuto");
CEnumEntryPtr ptrBalanceWhiteAutoCts = ptrBalanceWhiteAuto->GetEntryByName("Continuous");
ptrBalanceWhiteAuto->SetIntValue(ptrBalanceWhiteAutoCts->GetValue());
Set up white balance auto profile by indoor:
// Set up white balance auto profile  by  indoor
CEnumerationPtr ptrBalanceWhiteAutoProfile = nodeMap.GetNode("BalanceWhiteAutoProfile");
CEnumEntryPtr ptrBalanceWhiteAutoProfileIndoor = ptrBalanceWhiteAutoProfile->GetEntryByName("Indoor");
ptrBalanceWhiteAutoProfile->SetIntValue(ptrBalanceWhiteAutoProfileIndoor->GetValue());
Set the upper and lower limits and damping constants :
// Set the upper and lower limits and damping constants :
CFloatPtr ptrBalanceWhiteAutoLowerLimit = nodeMap.GetNode("BalanceWhiteAutoLowerLimit");
ptrBalanceWhiteAutoLowerLimit->SetValue(0.5);
CFloatPtr ptrBalanceWhiteAutoUpperLimit = nodeMap.GetNode("BalanceWhiteAutoUpperLimit");
ptrBalanceWhiteAutoUpperLimit->SetValue(4.0);
CFloatPtrptrBalanceWhiteAutoDamping = nodeMap.GetNode("BalanceWhiteAutoDamping");
ptrBalanceWhiteAutoDamping->SetValue(0.25);
Set up ROI Automatic white balance :
// Set up ROI  Automatic white balance   Set up ROI Height width translation
CBooleanPtr ptrRoiEnable = nodeMap.GetNode("RoiEnable");
ptrRoiEnable->SetValue(1);
CEnumerationPtr ptrAutoAlgorithmSelector = nodeMap.GetNode("AutoAlgorithmSelector");
CEnumEntryPtr ptrAutoAlgorithmSelectorWB= ptrAutoAlgorithmSelector->GetEntryByName("AutoWhiteBalance");
ptrAutoAlgorithmSelector->SetIntValue(ptrAutoAlgorithmSelectorWB->GetValue());
CFloatPtr ptrAasRoiOffsetX = nodeMap.GetNode("AasRoiOffsetX");
ptrAasRoiOffsetX->SetValue(0);
CFloatPtr ptrAasRoiOffsetY = nodeMap.GetNode("AasRoiOffsetY");
ptrAasRoiOffsetX->SetValue(0);
CFloatPtr ptrAasRoiWidth = nodeMap.GetNode("AasRoiWidth");
ptrAasRoiOffsetX->SetValue(2048);
CFloatPtr ptrAasRoiHeight = nodeMap.GetNode("AasRoiHeight");
ptrAasRoiOffsetX->SetValue(6);
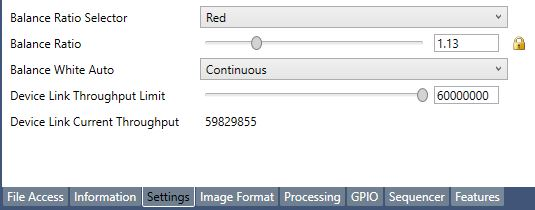
How to manually adjust the ratio of white balance
Again , Manually adjust the ratio of white balance through Flir Host computer (SpinView) Or in Spinnaker API
adopt SpinView
- 1 Open the setup menu
- 2 Turn off automatic white balance
- 3 Select the appropriate balance ratio selector and change the value in the balance ratio .
stay Balance Ratio Choosing red will change a, Choosing blue will change b.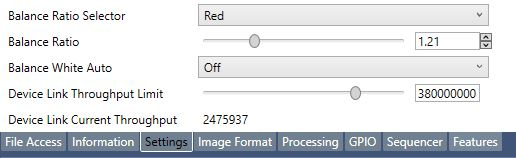
adopt Spinnaker API C++
Manually adjust the white balance ratio :
//  Manually adjust the white balance ratio
CEnumerationPtr ptrBalanceWhiteAuto = nodeMap.GetNode("BalanceWhiteAuto");
CEnumEntryPtr ptrBalanceWhiteAutoOff = ptrBalanceWhiteAuto->GetEntryByName("Off");
ptrBalanceWhiteAuto->SetIntValue(ptrBalanceWhiteAutoOff->GetValue());
CEnumerationPtr ptrBalanceRatioSelector = nodeMap.GetNode("BalanceRatioSelector");
CEnumEntryPtr ptrBalanceRatioSelectorRed = ptrBalanceRatioSelector->GetEntryByName("Red");
ptrBalanceRatioSelector->SetIntValue(ptrBalanceRatioSelectorRed->GetValue());
CFloatPtr ptrBalanceRatio = nodeMap.GetNode("BalanceRatio");
ptrBalanceRatio->SetValue(1.5);
边栏推荐
- 百度飞将BMN时序动作定位框架 | 数据准备与训练指南 (下)
- Flir Blackfly S 工业相机 介绍
- New job insights ~ leave the old and welcome the new~
- LeetCode. Sword finger offer 62 The last remaining number in the circle
- 3D激光SLAM:Livox激光雷达硬件时间同步
- Compile command line terminal swift
- Redis configuration class redisconfig
- Domestic images of various languages, software and systems. It is enough to collect this warehouse: Thanks mirror
- Today's question -2022/7/4 modify string reference type variables in lambda body
- 使用nodejs完成判断哪些项目打包+发版
猜你喜欢
ROS learning (23) action communication mechanism
The GPG keys listed for the "MySQL 8.0 community server" repository are already ins
ROS learning (21) robot slam function package -- installation and testing of orbslam

454 Baidu Mianjing 1
永久的摇篮
ROS学习(二十)机器人SLAM功能包——rgbdslam的安装与测试

一片叶子两三万?植物消费爆火背后的“阳谋”
鼠标右键 自定义
Flir Blackfly S USB3 工业相机:白平衡设置方法
Flir Blackfly S 工业相机:配置多个摄像头进行同步拍摄
随机推荐
糊涂工具类(hutool)post请求设置body参数为json数据
AcWing 1140. Shortest network (minimum spanning tree)
我如何编码8个小时而不会感到疲倦。
Get to know MySQL for the first time
Blue Bridge Cup 2022 13th provincial competition real topic - block painting
Baidu flying general BMN timing action positioning framework | data preparation and training guide (Part 1)
How can I code for 8 hours without getting tired.
Treadpoolconfig thread pool configuration in real projects
Right mouse button customization
AcWing 1142. Busy urban problem solving (minimum spanning tree)
Flir Blackfly S 工业相机 介绍
Livox激光雷达硬件时间同步---PPS方法
Mysqlbackup restores specific tables
Vingt - trois mille feuilles? "Yang mou" derrière l'explosion de la consommation végétale
Blackfly S USB3工业相机:缓冲区处理
ROS learning (23) action communication mechanism
454 Baidu Mianjing 1
ROS学习(23)action通信机制
ROS learning (24) plugin
Add PDF Title floating window