当前位置:网站首页>Chisel tutorial - 02 Chisel environment configuration and implementation and testing of the first chisel module
Chisel tutorial - 02 Chisel environment configuration and implementation and testing of the first chisel module
2022-07-07 23:41:00 【github-3rr0r】
Chisel Environment configuration and the first Chisel Module implementation and testing
motivation
Now it's right Scala Have a certain understanding of , It's time to start building some hardware .Chisel The full name is Constructing Hardware In a Scala Embedded Language, It's based on Scala Of DSL(Domain Specific Language, Domain specific languages ), Therefore, you can have both in the same string of code Scala and Chisel The advantages of programming .
Understand which code is Scala Which are Chisel That's important , But I'll talk about it later .
now , Should put the Chisel And the code in this chapter is written Verilog A better way . This chapter will show a complete Chisel Modules and test modules , For understanding relevant points , More sufficient examples will be given later .
Environment configuration ( Not included first Chisel)
install JDK、git、make and gtkwave And other basic environments :
sudo apt install openjdk-8-jdk git make gtkwaveinstall sbt
echo "deb https://repo.scala-sbt.org/scalasbt/debian all main" | sudo tee /etc/apt/sources.list.d/sbt.list
echo "deb https://repo.scala-sbt.org/scalasbt/debian /" | sudo tee /etc/apt/sources.list.d/sbt_old.list
curl -sL "https://keyserver.ubuntu.com/pks/lookup?op=get&search=0x2EE0EA64E40A89B84B2DF73499E82A75642AC823" | sudo apt-key add
sudo apt-get update
sudo apt-get install sbt
stay VS Code Install plug-ins in , Install first
Scala Syntax (official), Install againScala (Metals):

Scala test
New source file
test.scala:object HelloScala extends App { println("Hello Scala") }function :
sbt rungive the result as follows :

But the above steps only test Scala, Not at all Chisel, Further testing :
git clone https://github.com/schoeberl/chisel-examples.git
cd chisel-examples/hello-world
make
sbt test
give the result as follows :
Project file directory structure ( Include Chisel install )
Chisel The project and Java This is similar , Generally, there is a standard directory structure , about Chisel for , Use Scala Project building tools sbt It will be very convenient. .
Use sbt You need to have a... Under the project folder build.sbt file , This file is so long ( It's executing sbt run The corresponding dependencies will be downloaded and installed when , For example, there will be Chisel 3.5):
scalaVersion := "2.12.13"

scalacOptions ++= Seq(
  "-feature",
  "-language:reflectiveCalls",
)

resolvers ++= Seq(
  Resolver.sonatypeRepo("releases")
)

// Chisel 3.5
addCompilerPlugin("edu.berkeley.cs" % "chisel3-plugin" % "3.5.0" cross CrossVersion.full)
libraryDependencies += "edu.berkeley.cs" %% "chisel3" % "3.5.0"
libraryDependencies += "edu.berkeley.cs" %% "chiseltest" % "0.5.0"
This file will specify a lot of information , such as Scala Version of 、 Dependent libraries, etc .
Then under the project folder , Should have src/main/scala/ Path and src/test/scala, It is used to store the main program and test code respectively . such as :

Here we use the code in the previous test case , For now, no matter what the code means :
// Hello.scala
/* * This code is a minimal hardware described in Chisel. * * Blinking LED: the FPGA version of Hello World */

import chisel3._

/** * The blinking LED component. */

class Hello extends Module {

  val io = IO(new Bundle {

    val led = Output(UInt(1.W))
  })
  val CNT_MAX = (50000000 / 2 - 1).U

  val cntReg = RegInit(0.U(32.W))
  val blkReg = RegInit(0.U(1.W))

  cntReg := cntReg + 1.U
  when(cntReg === CNT_MAX) {

    cntReg := 0.U
    blkReg := ~blkReg
  }
  io.led := blkReg
}

/** * An object extending App to generate the Verilog code. */
object Hello extends App {

  (new chisel3.stage.ChiselStage).emitVerilog(new Hello())
}
and :
// HelloTest.scala
import chiseltest._
import org.scalatest.flatspec.AnyFlatSpec
class HelloTest extends AnyFlatSpec with ChiselScalatestTester {
behavior of "Hello"
it should "pass" in {
test(new Hello) {
c =>
c.clock.setTimeout(0)
var ledStatus = BigInt(-1)
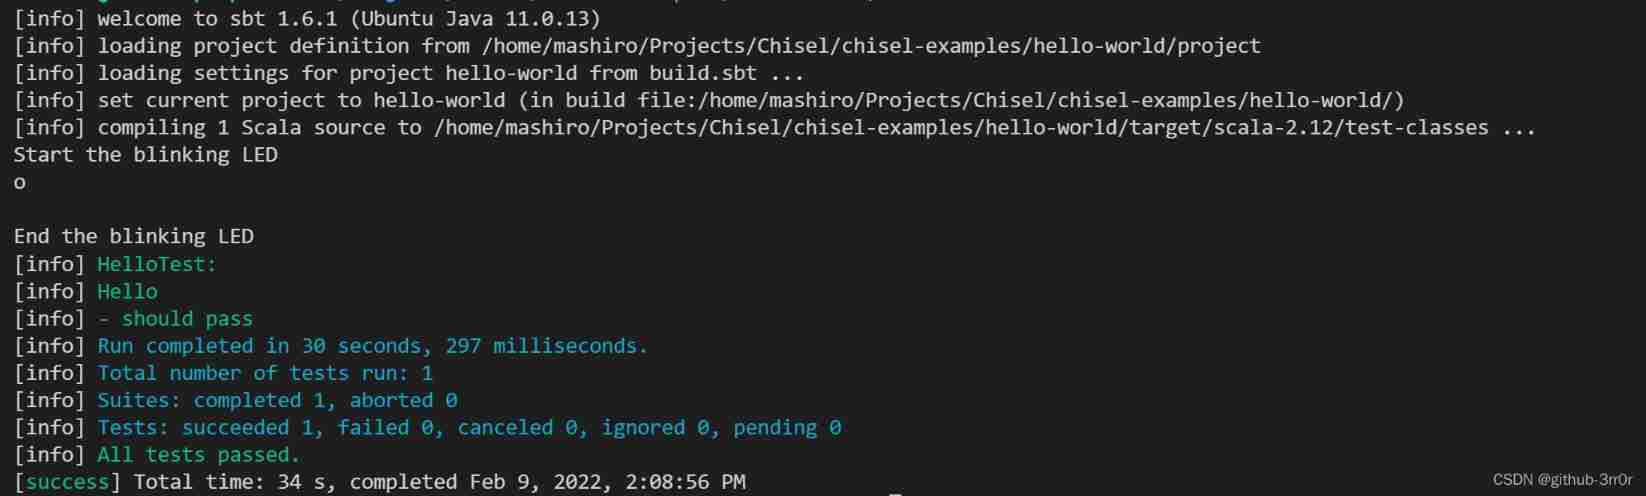
println("Start the blinking LED")
for (_ <- 0 until 100) {
c.clock.step(10000)
val ledNow = c.io.led.peek().litValue
val s = if (ledNow == 0) "o" else "*"
if (ledStatus != ledNow) {
System.out.println(s)
ledStatus = ledNow
}
}
println("\nEnd the blinking LED")
}
}
}
Save to the corresponding path respectively , Execute the following command under the root directory of the project to compile and run Hello.scala:
sbt run
give the result as follows :

Execute the following naming to compile and run HelloTest.scala:
sbt test
give the result as follows :
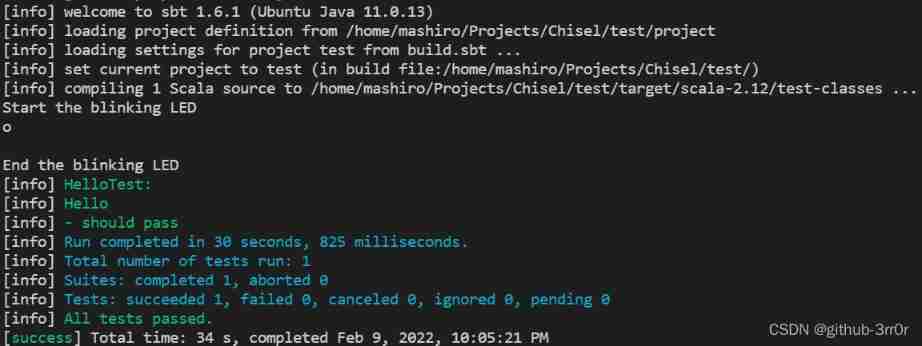
Similar results indicate that the code runs successfully and the test passes .
Yes, of course , The most recommended is to use the official template freechipsproject/chisel-template: A template project for beginning new Chisel work (github.com), Directly modify the source code file .
Create a Chisel modular
First, import. Chisel Classes in the library , No matter what it is :
import chisel3._
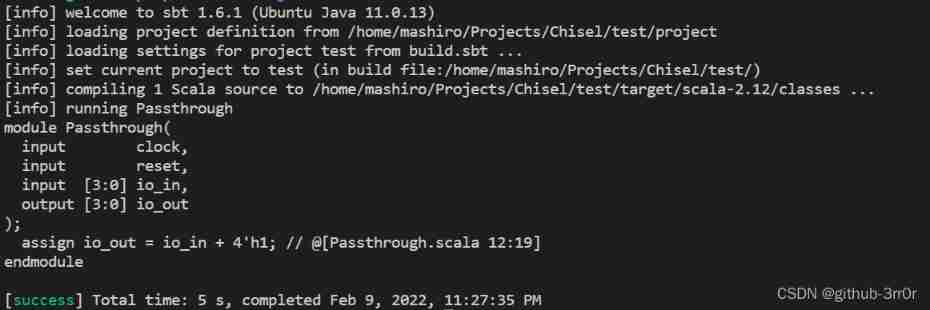
Then we write a Chisel Of Module, be known as Passthrough, The function is very simple ,4-bit The input of in,4-bit Output out, Then this module puts in and out Directly connected to each other , from in drive out, Simply put, you can output whatever you input :
// Chisel Code: Declare a new module definition
class Passthrough extends Module {

  val io = IO(new Bundle {

    val in = Input(UInt(4.W))
    val out = Output(UInt(4.W))
  })
  io.out := io.in
}
Line by line :
class Passthrough extends Module {…}: Create a new module calledPassthrough,Moduleyes Chisel Built in classes for , It is necessary to realize any hardware moduleextends;val io = IO(...): This sentence defines all input and output ports invalioin , This place, this variable must be calledioAnd it's a IO Object or instance , needIO(_instantiated_bundle_)Form like this ;new Bundle { val in = Input(...) val out = Output(...) }Here is the declaration of a new hardware structure type (Bundle), It contains named signals
inandout, The directions are input and output ;UInt(4.W): Declare the hardware type of the signal , Here is the width 4 Of unsigned integers ;io.out := io.in: Connect the input port to the output port , This is theio.indriveio.out了 . It should be noted that ,:=It's a Chisel Operator , The signal on the right drives the signal on the left , It's a directional operator .Hardware construction language (HCL,Hardware Construction Languages) The subtlety of is that the underlying programming language can be used as a scripting language , For example, it declares our Chisel After the module , We can use Scala call Chisel compiler , to Chisel Passthrough Translated into Verilog Passthrough, This process is called unfolding (elaboration):
object Passthrough extends App {

  println(getVerilogString(new Passthrough))
}
The operation results are as follows :
Create a Chisel Module Builder
Chisel Module is actually a Scala Class , So with others Scala Similar to class , You can give Chisel The module provides some construction parameters . Here we create a class PassthroughGenerator, This class accepts an integer parameter width, Used to specify the port width of input and output :
// Chisel Code, but pass in a parameter to set widths of ports
class PassthroughGenerator(width: Int) extends Module {

  val io = IO(new Bundle {

    val in = Input(UInt(width.W))
    val out = Output(UInt(width.W))
  })
  io.out := io.in
}

// Let's now generate modules with different widths
object Passthrough extends App {

  println(getVerilogString(new PassthroughGenerator(10)))
  println(getVerilogString(new PassthroughGenerator(20)))
}
perform sbt run give the result as follows :
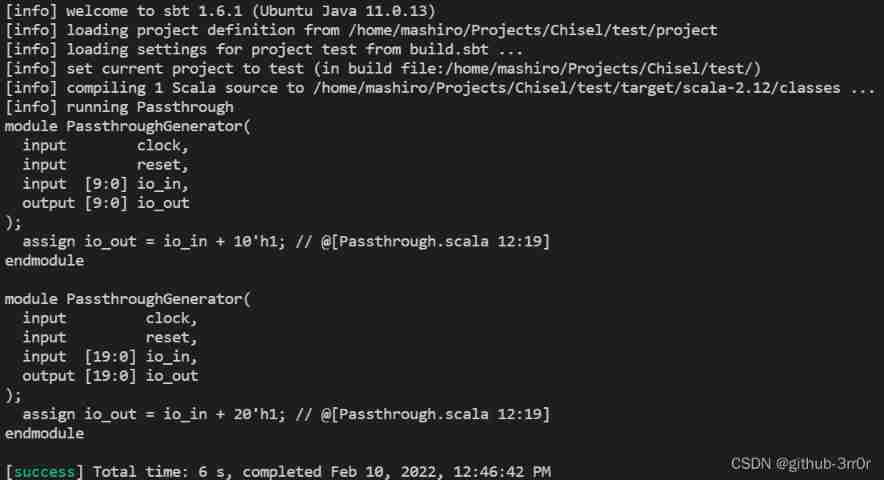
You can see , Generated Verilog The codes correspond to different width Parameter values , The parameterization of the class here is Scala Its own functions .
because PassthroughGenerator It is no longer a description of a single module , But through width A family of parameterized modules , So this class is called generator, That is, the generator .
Create a tester
It is definitely impossible to test hardware without a tester ,Chisel It has built-in test function , The following example is a Chisel Tester for , Pass value to Passthrough Input port of the instance of in, Check the output port out Whether the output signal is compound with the expectation .
Grammar is to use poke To set the input signal , use expect To check the output signal :
import chisel3._
import chiseltest._
import org.scalatest.flatspec.AnyFlatSpec

class PassthroughTest extends AnyFlatSpec with ChiselScalatestTester {

  behavior of "PassthroughGenerator"
  it should "pass through bits" in {

    test(new PassthroughGenerator(3)) {
     c =>
      c.io.in.poke(0.U)     // Set our input to value 0
      c.io.out.expect(0.U)  // Assert that the output correctly has 0
      c.io.in.poke(1.U)     // Set our input to value 1
      c.io.out.expect(1.U)  // Assert that the output correctly has 1
      c.io.in.poke(2.U)     // Set our input to value 2
      c.io.out.expect(2.U)  // Assert that the output correctly has 2
    }
    println("SUCCESS!!") // Scala Code: if we get here, our tests passed!
  }
}
among :
behavior of "PassthroughGenerator"
it should "pass through bits" in {

  test(...) {

      ...
  }
}
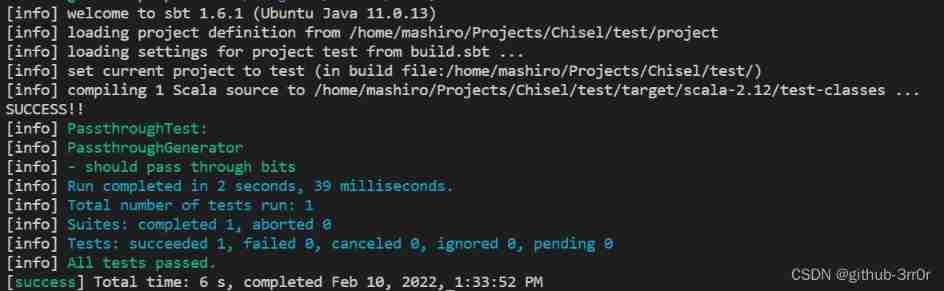
Medium behavior of "PassthroughGenerator" and it should "pass through bits" in The relevant information of the test will be output in the test .
Enter the command sbt test To test , give the result as follows :
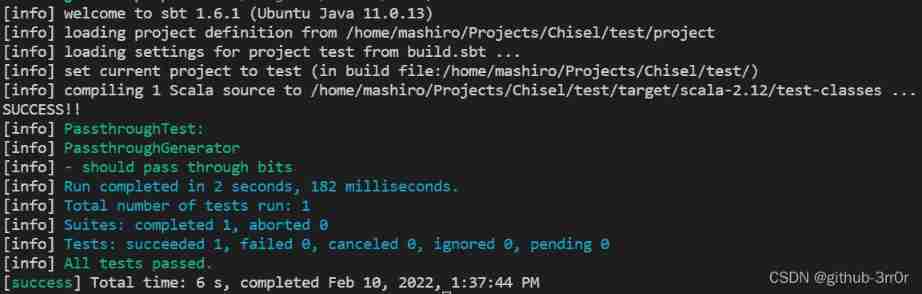
We can also test multiple instances , For example, separate tests width by 10 and 20 Of Passthrough The situation of the border :
import chisel3._
import chiseltest._
import org.scalatest.flatspec.AnyFlatSpec

class PassthroughTest extends AnyFlatSpec with ChiselScalatestTester {

  behavior of "PassthroughGenerator"
  it should "pass through bits" in {

    test(new PassthroughGenerator(10)) {
     c =>
      c.io.in.poke(0.U)
      c.io.out.expect(0.U)
      c.io.in.poke(1023.U)
      c.io.out.expect(1023.U)
    }
    test(new PassthroughGenerator(20)) {
     c =>
      c.io.in.poke(0.U)
      c.io.out.expect(0.U)
      c.io.in.poke(1048575.U)
      c.io.out.expect(1048575.U)
    }
    println("SUCCESS!!") // Scala Code: if we get here, our tests passed!
  }
}
give the result as follows :
About generating Verilog and FIRRTL
If you are not used to it for a while Chisel Description of the circuit , You can output the generated Verilog Code or FIRRTL:
Be careful , Used in this series Chisel 3.5 There are many API Different from the official tutorial , Pay special attention to , You can search through this link API:Chisel/FIRRTL: Chisel API Documentation (chisel-lang.org), Now it's up to 3.5.0.
The first is to generate Verilog Code , Interface for getVerilogString(),import chisel3._ You can use it :
println(getVerilogString(new PassthroughGenerator(10)))
give the result as follows :
module PassthroughGenerator(
  input        clock,
  input        reset,
  input  [9:0] io_in,
  output [9:0] io_out
);
  assign io_out = io_in; // @[Passthrough.scala 10:10]
endmodule
Then there is the generation Firrtl Code , This API need import chisel3.stage.ChiselStage.emitFirrtl, Use as follows :
println(emitFirrtl(new PassthroughGenerator(10)))
Output is as follows :

adopt printf debug
Although with print Statement debugging is not the best way , But it's really the easiest way .
because Chisel A generator is a program that generates hardware , So there are some details to pay attention to when outputting the generator and circuit state , The point is to be clear print When is the statement executed 、 What is printed .
There are three common scenarios that need to be distinguished :
- Chisel The generator prints out when generating the circuit ;
- The circuit prints out during simulation ;
- The tester prints out during the test ;
println yes Scala Built in functions for , Can output information to the console , But it cannot be used for output in circuit simulation , Because the generated circuit is not Scala Linguistic , It is Verilog perhaps FIRRTL Of .
For example, the following situation :
// Passthrough.scala
import chisel3._

class PassthroughGenerator(width: Int) extends Module {

  val io = IO(new Bundle {

    val in = Input(UInt(width.W))
    val out = Output(UInt(width.W))
  })
  io.out := io.in

  printf("Print during simulation: Input is %d\n", io.in)
  // chisel printf has its own string interpolator too
  printf(p"Print during simulation: IO is $io\n")

  println(s"Print during generation: Input is ${io.in}")
}

object Passthrough extends App {

  println(getVerilogString(new PassthroughGenerator(10)))
  println(getVerilogString(new PassthroughGenerator(20)))
}
// PassthroughTest.scala
import chisel3._
import chiseltest._
import chisel3.stage.ChiselStage.emitFirrtl
import org.scalatest.flatspec.AnyFlatSpec

class PassthroughTest extends AnyFlatSpec with ChiselScalatestTester {

  behavior of "PassthroughGenerator"
  it should "pass through bits" in {

    test(new PassthroughGenerator(10)) {
     c =>
      c.io.in.poke(3.U)
      c.clock.step(5) // circuit will print

      println(s"Print during testing: Input is ${c.io.in.peek()}")
    }
    println("SUCCESS!!") // Scala Code: if we get here, our tests passed!
  }
}
Output is as follows :
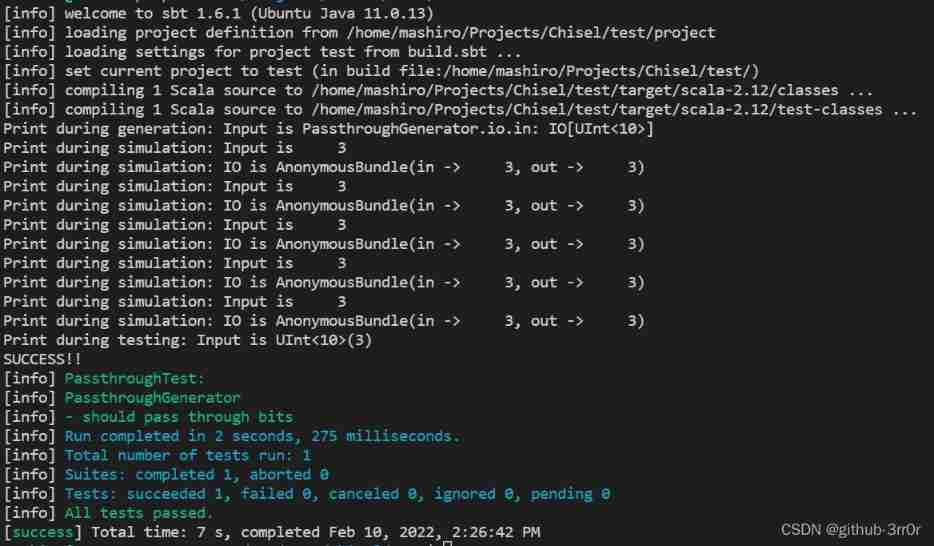
You can see ,println Only output when generating and testing ,printf Only output during simulation .
边栏推荐
- Sequence of entity layer, Dao layer, service layer and controller layer
- KeePass realizes automatic input of web pages
- AITM3.0005 烟雾毒性测试
- Oracle string sorting
- The for loop realizes 1-100 addition and eliminates the 4-digit tail number
- S2b2b mall solution of intelligent supply chain in packaging industry: opening up a new ecosystem of e-commerce consumption
- Have all the fresh students of 2022 found jobs? Is it OK to be we media?
- C simple question 2
- webflux - webclient Connect reset by peer Error
- Benchmarking Detection Transfer Learning with Vision Transformers(2021-11)
猜你喜欢

Lm12 rolling heikin Ashi double K-line filter
激光slam学习(2D/3D、偏实践)
Summary of SQL single table query 2020.7.27
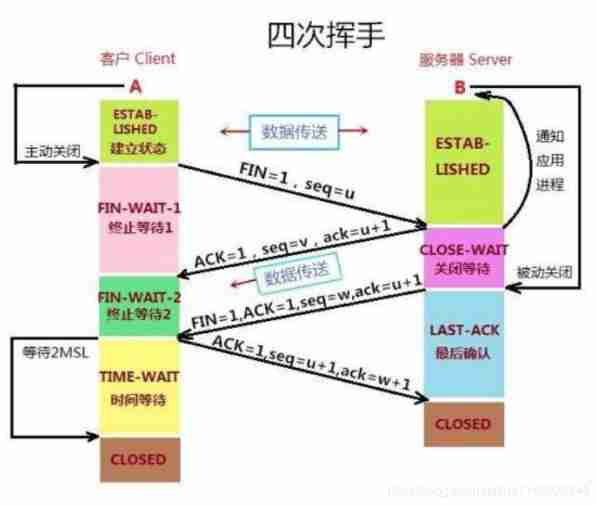
Understand TCP's three handshakes and four waves with love
archery安装测试
Live server usage

Solution of intelligent supply chain collaboration platform in electronic equipment industry: solve inefficiency and enable digital upgrading of industry
Anxinco esp32-a1s development board is adapted to Baidu dueros routine to realize online voice function
Anxin can internally test offline voice module vb-01 to communicate with esp-c3-12f
List. How to achieve ascending and descending sort() 2020.8.6
随机推荐
SAP HR labor contract information 0016
Display the server hard disk image to the browser through Servlet
Where are you going
【路径规划】使用垂距限值法与贝塞尔优化A星路径
Access database query all tables SQL
One of the anti climbing methods
Slam interview summary
B_ QuRT_ User_ Guide(38)
redis缓存工具类,值得拥有~
What if once again forgets the login password of raspberry pie? And you don't have a monitor yet! Today, I would like to introduce a method
0-1背包问题
Benchmarking Detection Transfer Learning with Vision Transformers(2021-11)
SAP memory parameter tuning process
B_QuRT_User_Guide(39)
[untitled]
Lm12 rolling heikin Ashi double K-line filter
Live server usage
2022 Season 6 perfect children's model Shaanxi finals came to a successful conclusion
B_QuRT_User_Guide(38)
B_ QuRT_ User_ Guide(36)