当前位置:网站首页>Mmclassification training custom data
Mmclassification training custom data
2022-07-05 11:56:00 【Coding leaves】
1 mmclassification install
If the environment is installed mmclassification, Please skip this step .mmclassification Please refer to the blog for framework installation and debugging verification :mmclassification Installation and commissioning _Coding Leaves blog -CSDN Blog _mmclassification install .
2 Data set preparation
mmclassification The data set directory of is mainly composed of annotation files and image samples , The annotation file is stored in meta In the folder , Image sample exists train、val、test Under the folder , That is, they are used for training 、 Image samples for verification and testing . Image sample files are stored in train、val、test Under the folder , Pictures of the same category are stored in the same subfolder , The name of the subfolder is the name of the category to which the picture belongs .
meta The folder mainly contains train.txt、val.txt and test.txt file .txt Each line in the file stores the image sample path and category id, As shown in the figure below .
without meta Mark the file , Please refer to the blog :mmclassification Annotation file generation _Coding Leaves blog -CSDN Blog , Generate meta Folder and under it txt file .
The sample data of this article comes from minist Handwritten font visualization dataset , According to train、test Folder for storage , Download at :minist Handwritten digital visualization data set - Deep learning document resources -CSDN download .
Rename the downloaded dataset folder to Minist, also mmclassification New under the project directory data Folder , Put the data set in data Under folder . The storage path of the dataset is unlimited , Need to be below 3.3 Configure the corresponding path in section .
3 Custom datasets
3.1 newly build MyDataset
stay mmclassification Under the project directory mmcls/datasets/ newly build mydataset.py file , Custom data loading class MyDataset, File name mydataset And class name MyDataset You can change .mydataset.py The contents of the document are as follows :
# -*- coding: utf-8 -*-
"""
The official account of Lele perception school
@author: https://blog.csdn.net/suiyingy
"""
import numpy as np
from .builder import DATASETS
from .base_dataset import BaseDataset
@DATASETS.register_module()
class MyDataset(BaseDataset):
def load_annotations(self):
assert isinstance(self.ann_file, str)
data_infos = []
with open(self.ann_file) as f:
samples = [x.strip().split(' ') for x in f.readlines()]
for filename, gt_label in samples:
info = {'img_prefix': self.data_prefix}
info['img_info'] = {'filename': filename}
info['gt_label'] = np.array(gt_label, dtype=np.int64)
data_infos.append(info)
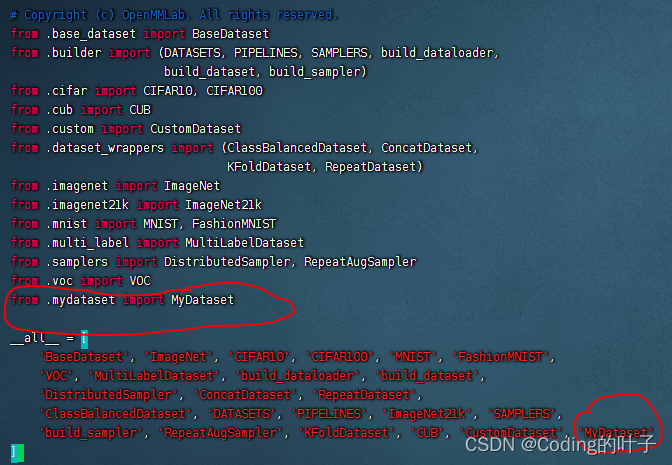
return data_infos3.2 take MyDataset Sign up to mmclassification frame
stay mmcls/datasets/__init__.py Add the class defined above to the file MyDataset, As shown in the figure below :
3.3 Create a new dataset Profile
stay mmclassification Project directory configs/_base_/datasets/ Under the folder , newly build mydataset.py file , It is mainly used to set the data set type 、 Data enhancement mode 、batch size (samples_per_gpu)、 Data set path and annotation file path 、 Model preservation cycle (interval). The contents of the document are as follows :
# -*- coding: utf-8 -*-
"""
 The official account of Lele perception school
@author: https://blog.csdn.net/suiyingy
"""
dataset_type = 'MyDataset'
classes = ['cat', 'bird', 'dog']  # The category names of your dataset

img_norm_cfg = dict(
    mean=[123.675, 116.28, 103.53], std=[58.395, 57.12, 57.375], to_rgb=True)

train_pipeline = [
    dict(type='LoadImageFromFile'),
    dict(type='RandomResizedCrop', size=224),
    dict(type='RandomFlip', flip_prob=0.5, direction='horizontal'),
    dict(type='Normalize', **img_norm_cfg),
    dict(type='ImageToTensor', keys=['img']),
    dict(type='ToTensor', keys=['gt_label']),
    dict(type='Collect', keys=['img', 'gt_label'])
]
test_pipeline = [
    dict(type='LoadImageFromFile'),
    dict(type='Resize', size=(256, -1)),
    dict(type='CenterCrop', crop_size=224),
    dict(type='Normalize', **img_norm_cfg),
    dict(type='ImageToTensor', keys=['img']),
    dict(type='Collect', keys=['img'])
]

data = dict(
    train=dict(
        type=dataset_type,
        data_prefix='data/Minist/train',
        ann_file='data/Minist/meta/train.txt',
        classes=classes,
        pipeline=train_pipeline
    ),
    val=dict(
        type=dataset_type,
        data_prefix='data/Minist/test',
        ann_file='data/Minist/meta/test.txt',
        classes=classes,
        pipeline=test_pipeline
    ),
    test=dict(
        type=dataset_type,
        data_prefix='data/Minist/test',
        ann_file='data/Minist/meta/test.txt',
        classes=classes,
        pipeline=test_pipeline
    )
)
evaluation = dict(interval=1, metric='accuracy')
4 modify configs Model configuration file
With configs/resnet/resnet18_8xb16_cifar10.py Configuration files, for example ,mmclassification The configuration file of usually contains the following 4 Parts of :
_base_ = [
    '../_base_/models/resnet18_cifar.py', '../_base_/datasets/cifar10_bs16.py',
    '../_base_/schedules/cifar10_bs128.py', '../_base_/default_runtime.py'
]../_base_/models/resnet18_cifar.py: Define model parameters , It mainly includes backbone network 、neck、head And number of categories .
../_base_/datasets/cifar10_bs16.py: Define data set enhancement methods and paths , That is to say 3.3 Section configuration file ,bs16 Express batch size by 16, namely samples_per_gpu=16.
../_base_/schedules/cifar10_bs128.py: Define training parameters , It mainly includes optimizer 、 Learning rate 、 Total training epoch Number .
../_base_/default_runtime.py: Define operating parameters , It mainly includes the model preservation cycle 、 Log output cycle, etc .
configs The main modification is the data configuration file , Namely the '../_base_/datasets/cifar10_bs16.py' Replace it with 3.3 Section '../_base_/datasets/mydataset.py'. namely :

5 Run the training program
mmcls The basic training command is :
python tools/train.py Model configuration file Example :
python tools/train.py configs/resnet/resnet18_8xb16_cifar10.pyHere we have put resnet18_8xb16_cifar10.py The document is in accordance with article 4 Section has been modified .
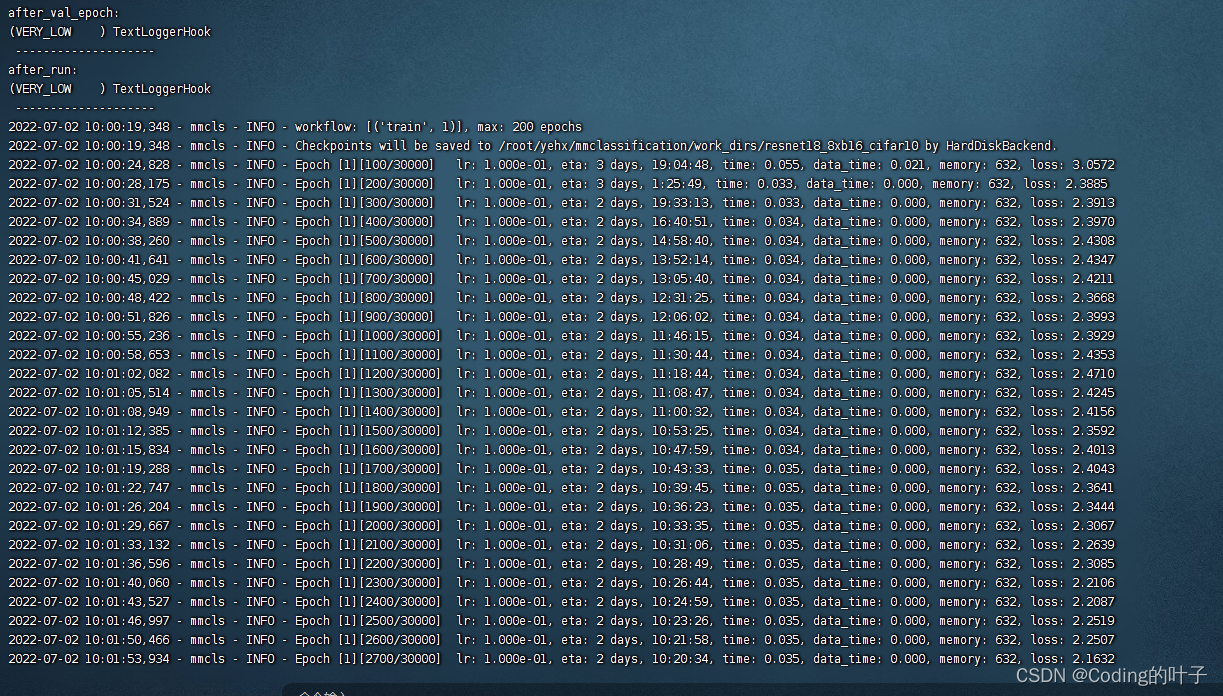
6 Running results
7 【python Three dimensional deep learning 】python 3D point cloud from basic to deep learning _Coding Leaves blog -CSDN Blog _python Three dimensional point cloud
More 3D 、 Please pay attention to two-dimensional perception algorithm and financial quantitative analysis algorithm “ Lele perception school ” WeChat official account , And will continue to update .
边栏推荐
猜你喜欢
Principle of redis cluster mode
全网最全的新型数据库、多维表格平台盘点 Notion、FlowUs、Airtable、SeaTable、维格表 Vika、飞书多维表格、黑帕云、织信 Informat、语雀
Codeworks 5 questions per day (1700 average) - day 5
How to protect user privacy without password authentication?
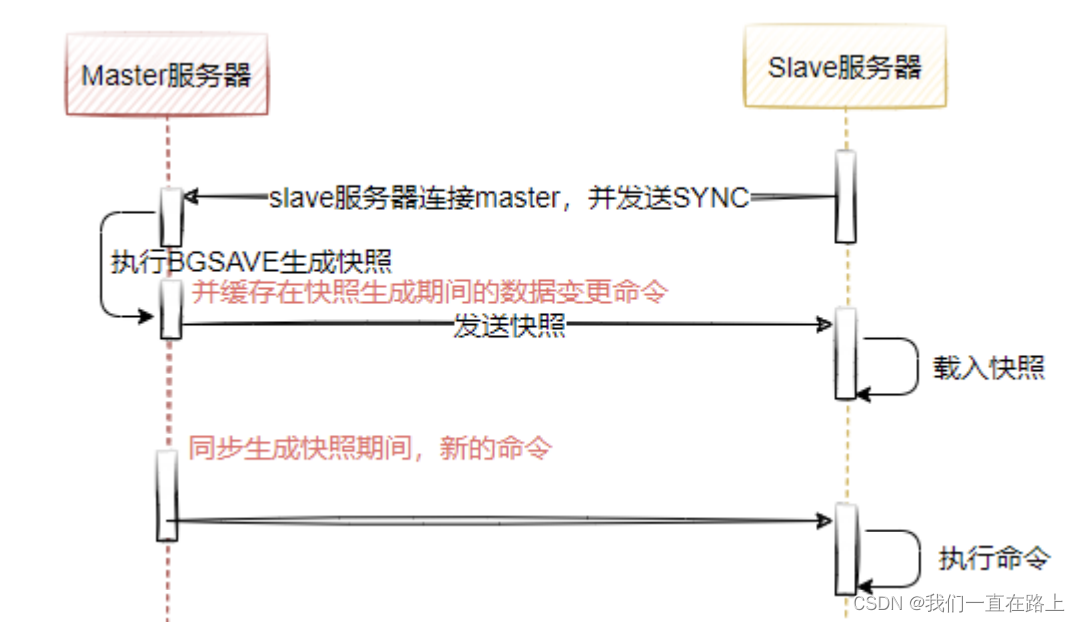
Redis master-slave mode
![[pytorch pre training model modification, addition and deletion of specific layers]](/img/cb/aa0b1116ec9b98e3ee5725aa58f4fe.png)
[pytorch pre training model modification, addition and deletion of specific layers]
pytorch-多层感知机MLP
![[deploy pytoch project through onnx using tensorrt]](/img/b6/ec95f028f749753666c7877134ad70.png)
[deploy pytoch project through onnx using tensorrt]
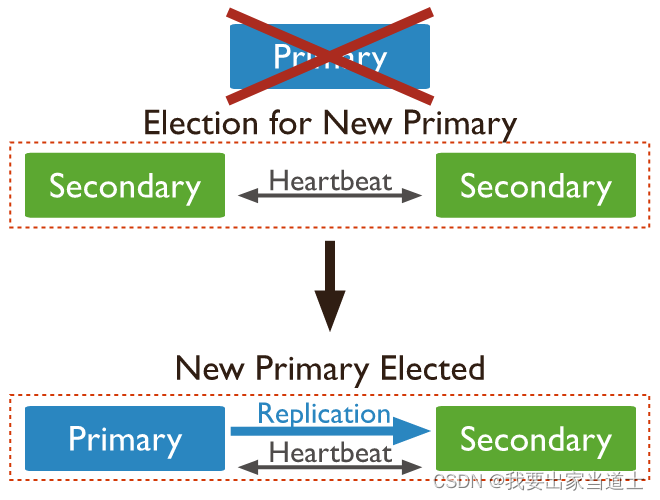
Mongodb replica set
Multi table operation - sub query
随机推荐
Multi table operation - sub query
mmclassification 训练自定义数据
c#操作xml文件
Liunx prohibit Ping explain the different usage of traceroute
【yolov3损失函数】
Hiengine: comparable to the local cloud native memory database engine
Redis集群(主从)脑裂及解决方案
splunk配置163邮箱告警
Open3d European clustering
2048 game logic
【yolov5.yaml解析】
[upsampling method opencv interpolation]
1 plug-in to handle advertisements in web pages
Cdga | six principles that data governance has to adhere to
pytorch-线性回归
[pytorch modifies the pre training model: there is little difference between the measured loading pre training model and the random initialization of the model]
[loss functions of L1, L2 and smooth L1]
调查显示传统数据安全工具在60%情况下无法抵御勒索软件攻击
多表操作-子查询
Proof of the thinking of Hanoi Tower problem