当前位置:网站首页>Clickhouse (03) how to install and deploy Clickhouse
Clickhouse (03) how to install and deploy Clickhouse
2022-07-07 13:54:00 【Zhang Fei's pig big data】
This article will introduce how to install and deploy ClickHouse, Several official recommended installation modes , And how to start after installation ,ClickHouse How to configure the cluster .
Simply speaking ,ClickHouse The construction process of is as follows :
- Environmental inspection , Environment dependent installation
- Download and install on the corresponding service Click House
- To configure config.xml and user.xml, If build Click House colony , To configure Host Document and FQDN:(Fully Qualified Domain Name) Fully qualified domain name
- start-up server
- Connect client
Here we first introduce the single machine Click House Construction and start-up of , The next article will introduce building Click House The cluster needs to be configured .
System requirements
ClickHouse It can be used anywhere with x86_64,AArch64 or PowerPC64LE CPU Architecturally Linux,FreeBSD or Mac OS X Up operation .
Official pre built binaries are usually for x86_64 Compile , And make use of SSE4.2 Instruction set , therefore , Unless otherwise stated , Support it CPU Use will become an additional system requirement .
The following is to check the current CPU Do you support SSE 4.2 The order of :
$ grep -q sse4_2 /proc/cpuinfo && echo "SSE 4.2 supported" || echo "SSE 4.2 not supported"
If you don't support SSE4.2 or AArch64,PowerPC64LE Architecture on the processor ClickHouse, The official introduction is to build from the source code through appropriate configuration adjustment ClickHouse, I won't go into details here , If you are interested, you can read the source code by yourself .
Installation package download
In the official documents , The following installation methods are introduced :DEB、RPM、Tgz、Docker、 Other environment installation and source code installation , It's essentially the same , We choose the right installation method , Follow the steps , Step by step .
Generally speaking , The installation package will contain the following :
- clickhouse-common-static — ClickHouse Compiled binaries .
- clickhouse-server — establish clickhouse-server Soft connection , And install the default configuration service
- clickhouse-client — establish clickhouse-client Client tool soft connection , And install the client configuration file .
- clickhouse-common-static-dbg — With debug information ClickHouse Binary .
DEB Installation package
It is recommended to use Debian or Ubuntu Official precompiled deb software package . Run the following command to install the package :
# Install environment configuration and install software updates
sudo apt-get install -y apt-transport-https ca-certificates dirmngr
sudo apt-key adv --keyserver hkp://keyserver.ubuntu.com:80 --recv 8919F6BD2B48D754

echo "deb https://packages.clickhouse.com/deb stable main" | sudo tee \
    /etc/apt/sources.list.d/clickhouse.list
sudo apt-get update

# install clickhouse
sudo apt-get install -y clickhouse-server clickhouse-client

# start-up clickhouse service
sudo service clickhouse-server start

# Start client
clickhouse-client # or "clickhouse-client --password" if you've set up a password.
If you want to use the latest version , Please use testing replace stable, Generally speaking, it is used in the test environment , The production environment should be mainly stable .
RPM Installation package
CentOS、RedHat And all other rpm Of Linux The release uses official precompiled rpm package .
First , You need to add an official repository :
$ sudo yum install -y yum-utils
$ sudo yum-config-manager --add-repo https://packages.clickhouse.com/rpm/clickhouse.repo
And then use yum install
$ sudo yum install -y clickhouse-server clickhouse-client
Then start clickhouse
sudo /etc/init.d/clickhouse-server start
clickhouse-client # or "clickhouse-client --password" if you set up a password.
and DEB The installation method is the same , If you want to use the latest version , Please use testing replace stable, Generally speaking, it is used in the test environment , The production environment should be mainly stable .
Tgz Installation package
If the operating system does not support installation deb or rpm package , You can use official precompiled tgz software package . Can pass curl or wget From the repository https://packages.clickhouse.com/tgz/ download .
After downloading, extract the download resource file and install it using the installation script . The following is an installation example of the latest stable version :
# Get the last version number
LATEST_VERSION=$(curl -s https://packages.clickhouse.com/tgz/stable/ | \ grep -Eo '[0-9]+\.[0-9]+\.[0-9]+\.[0-9]+' | sort -V -r | head -n 1)
export LATEST_VERSION

# Download the corresponding version number of tgz Installation package
curl -O "https://packages.clickhouse.com/tgz/stable/clickhouse-common-static-$LATEST_VERSION.tgz"
curl -O "https://packages.clickhouse.com/tgz/stable/clickhouse-common-static-dbg-$LATEST_VERSION.tgz"
curl -O "https://packages.clickhouse.com/tgz/stable/clickhouse-server-$LATEST_VERSION.tgz"
curl -O "https://packages.clickhouse.com/tgz/stable/clickhouse-client-$LATEST_VERSION.tgz"

# Unzip the package and execute the corresponding script
tar -xzvf "clickhouse-common-static-$LATEST_VERSION.tgz"
# Generate ClickHouse Compiled binaries
sudo "clickhouse-common-static-$LATEST_VERSION/install/doinst.sh"

tar -xzvf "clickhouse-common-static-dbg-$LATEST_VERSION.tgz"
# Generate a with debugging information ClickHouse Binary
sudo "clickhouse-common-static-dbg-$LATEST_VERSION/install/doinst.sh"

tar -xzvf "clickhouse-server-$LATEST_VERSION.tgz"
# establish clickhouse-server Soft connection , And install the default configuration service
sudo "clickhouse-server-$LATEST_VERSION/install/doinst.sh"
# Start the service
sudo /etc/init.d/clickhouse-server start

tar -xzvf "clickhouse-client-$LATEST_VERSION.tgz"
# establish clickhouse-client Client tool soft connection , And install the client configuration file
sudo "clickhouse-client-$LATEST_VERSION/install/doinst.sh"
Docker Installation package
adopt Docker install , Need you to build docker Environmental Science , It's just more about , By default you have installed docker, If not, you can search by yourself docker Installation , Set up well docker.
adopt docker install , It's very simple , You can run an instance using the official image , Just execute the following command .
#  Start the server instance
$ docker run -d --name some-clickhouse-server --ulimit nofile=262144:262144 clickhouse/clickhouse-server

#  Get into docker Inside and into clickhouse
$ docker run -it --rm --link some-clickhouse-server:clickhouse-server --entrypoint clickhouse-client clickhouse/clickhouse-server --host clickhouse-server
# OR
$ docker exec -it some-clickhouse-server clickhouse-client


#  adopt curl Connect to clickhouse, Output 'Hello, ClickHouse!'
$ echo "SELECT 'Hello, ClickHouse!'" | docker run -i --rm --link some-clickhouse-server:clickhouse-server curlimages/curl 'http://clickhouse-server:8123/?query=' -s --data-binary @-
ClickHouse Of docker Mirror image , Default can only be done by docker Network access .
If you need an external network , We can also map the specific port inside the container to the host port to expose it in Docker Running in ClickHouse Or by allowing containers to use host ports directly ( It also allows archiving for better network performance ).
# Map the specific port inside the container to the host port to expose in Docker Running in ClickHouse
$ docker run -d -p 18123:8123 -p19000:9000 --name some-clickhouse-server --ulimit nofile=262144:262144 clickhouse/clickhouse-server

$ echo 'SELECT version()' | curl 'http://localhost:18123/' --data-binary @-


# Allow containers to use host ports directly
$ docker run -d --network=host --name some-clickhouse-server --ulimit nofile=262144:262144 clickhouse/clickhouse-server
$ echo 'SELECT version()' | curl 'http://localhost:8123/' --data-binary @-
If you need to adjust config.xml, You can use the following command .
$ docker run -d --name some-clickhouse-server --ulimit nofile=262144:262144 -v /path/to/your/config.xml:/etc/clickhouse-server/config.xml clickhouse/clickhouse-server
Other installation methods
ClickHouse You can also use the source code to install , Or download the installation package and compile it manually , If necessary, you can go to ClickHouse Check the document on the official website , There is not much introduction here .
start-up
Run the following command to start the service in the background :
$ sudo /etc/init.d/clickhouse-server start
The log file will be output in /var/log/clickhouse-server/ Folder .
If the server doesn't start , Check /etc/clickhouse-server/config.xml Configuration in .
clickhouse The configuration parameters of are mainly divided into two files , One is config.xml Server configuration parameters in (Server Settings), The other is the general configuration parameters (setttings).
Start the server manually from the console :
$ clickhouse-server --config-file=/etc/clickhouse-server/config.xml
under these circumstances , The log will be printed to the console , This is very convenient in the development process .
If the configuration file is in the current directory , You don't need to specify ——config-file Parameters . By default , Its path is ./config.xml.
ClickHouse Support access restriction settings . They are in users.xml file ( And config.xml At the same directory ).
By default , allow default User access from anywhere , No password required . You can see user/default/networks. For more information , Please see the Configuration Files.
After starting the service , You can use the command line client to connect to it :
$ clickhouse-client
By default , Use default Users do not carry passwords to connect to localhost:9000. You can also use –host Parameter to connect to the specified server .
Example :
$ ./clickhouse-client
ClickHouse client version 0.0.18749.
Connecting to localhost:9000.
Connected to ClickHouse server version 0.0.18749.

:) SELECT 1

SELECT 1

┌─1─┐
│ 1 │
└───┘

1 rows in set. Elapsed: 0.003 sec.

:)
When we get here , You have successfully built a stand-alone version Click House 了 .
ClickHouse Share relevant information
ClickHouse Classic Chinese document sharing
Reference article :ClickHouse(03)ClickHouse How to install and deploy
边栏推荐
- Xshell connection server changes key login to password login
- 使用day.js让时间 (显示为几分钟前 几小时前 几天前 几个月前 )
- requires php ~7.1 -> your PHP version (7.0.18) does not satisfy that requirement
- 648. 单词替换 : 字典树的经典运用
- Introduction to database system - Chapter 1 introduction [conceptual model, hierarchical model and three-level mode (external mode, mode, internal mode)]
- 2022-7-7 Leetcode 34.在排序数组中查找元素的第一个和最后一个位置
- Is it safe to open an account online now? Which securities company should I choose to open an account online?
- Help tenants
- Getting started with MySQL
- Move base parameter analysis and experience summary
猜你喜欢

交付效率提升52倍,运营效率提升10倍,看《金融云原生技术实践案例汇编》(附下载)

QQ medicine, Tencent ticket
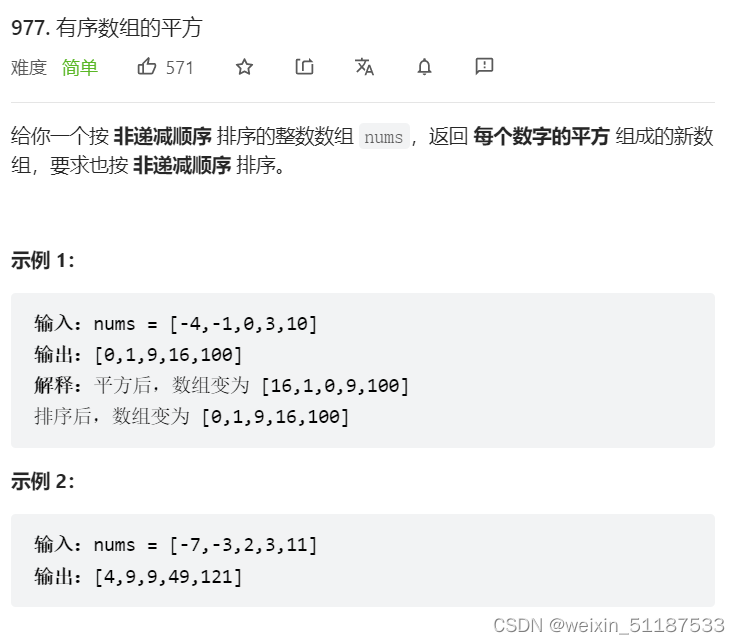
2022-7-6 Leetcode 977.有序数组的平方
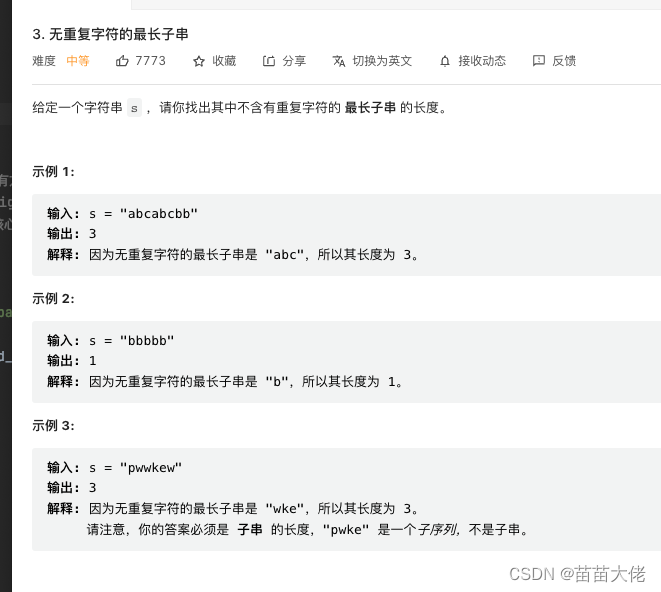
Leecode3. Longest substring without repeated characters
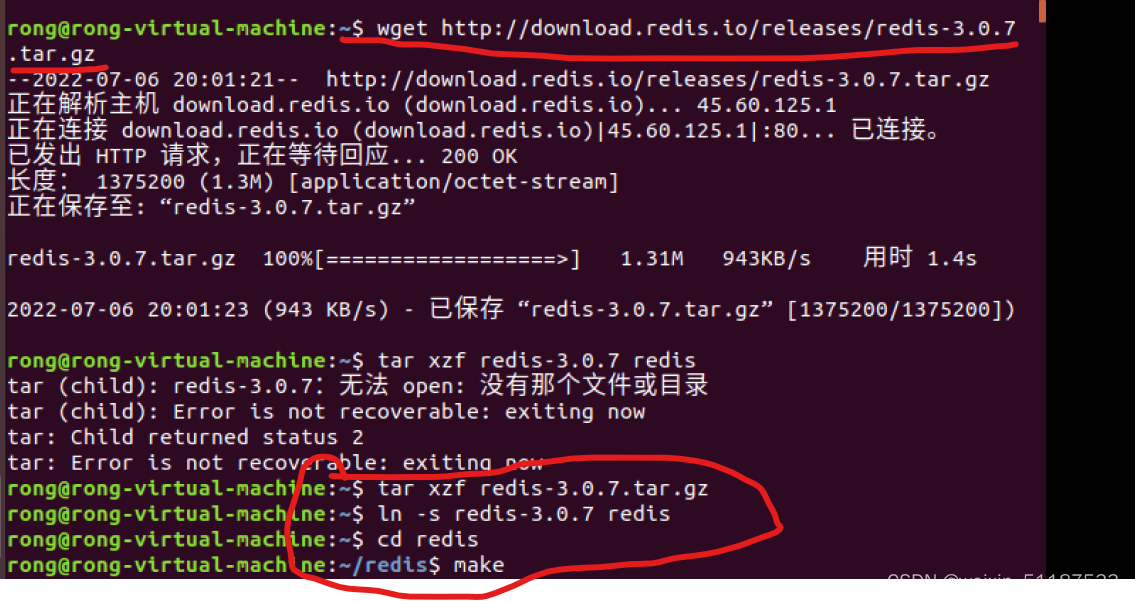
2022-7-6 beginner redis (I) download, install and run redis under Linux
Talk about pseudo sharing
1、深拷贝 2、call apply bind 3、for of for in 区别
Cinnamon taskbar speed
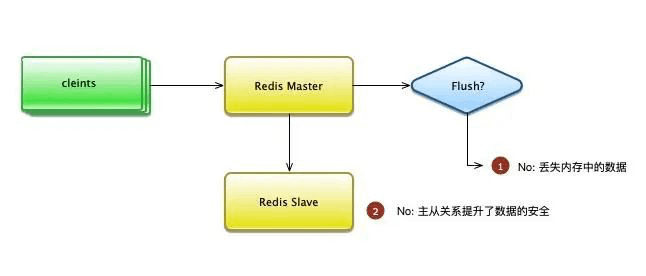
Redis can only cache? Too out!
Error lnk2019: unresolved external symbol
随机推荐
ROS机器人更换新雷达需要重新配置哪些参数
Best practice | using Tencent cloud AI willingness to audit as the escort of telephone compliance
What parameters need to be reconfigured to replace the new radar of ROS robot
Esp32 series column
Talk about pseudo sharing
最佳实践 | 用腾讯云AI意愿核身为电话合规保驾护航
LeetCode简单题分享(20)
The meaning of variables starting with underscores in PHP
call undefined function openssl_ cipher_ iv_ length
postgresql array类型,每一项拼接
"New red flag Cup" desktop application creativity competition 2022
Enregistrement de la navigation et de la mise en service du robot ROS intérieur (expérience de sélection du rayon de dilatation)
提升树莓派性能的方法
Detr introduction
内存溢出和内存泄漏的区别
华为镜像地址
118. 杨辉三角
.net core 关于redis的pipeline以及事务
flask session伪造之hctf admin
Battle Atlas: 12 scenarios detailing the requirements for container safety construction