当前位置:网站首页>Valentine's Day is coming, are you still worried about eating dog food? Teach you to make a confession wall hand in hand. Express your love to the person you want
Valentine's Day is coming, are you still worried about eating dog food? Teach you to make a confession wall hand in hand. Express your love to the person you want
2022-07-06 10:37:00 【Spring breeze ~ eleven years】
◕‿◕ Bloggers have written a confession wall page version before , The last one was relatively simple , It is only done by simply using front-end knowledge , If you are interested, please have a look at
Just because it is realized by using front-end knowledge , That is, all data will be lost after the browser is closed . This time, , We will lead you to realize a confession wall that can interact front and back , The data of this confession wall can be stored on the server , Therefore, persistent storage can be realized ~ below , Let's get started !
front End Jane easy real present surface white wall

To configure Maven project
1. establish Maven project
First, we need to build a new one Maven project , Save the path and set it according to your situation , Others don't need to be modified , This step is relatively simple , I won't go into details
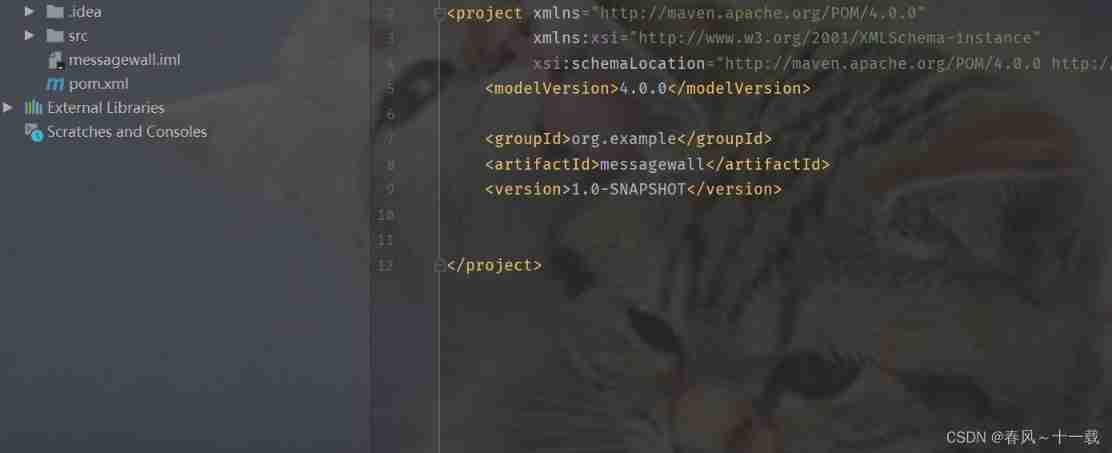
2. Introduce dependencies
We need to be in pom.xm Introduce two dependencies , One is Servlet rely on , One is Jackon rely on :
<?xml version="1.0" encoding="UTF-8"?>
<project xmlns="http://maven.apache.org/POM/4.0.0" xmlns:xsi="http://www.w3.org/2001/XMLSchema-instance" xsi:schemaLocation="http://maven.apache.org/POM/4.0.0 http://maven.apache.org/xsd/maven-4.0.0.xsd">
    <modelVersion>4.0.0</modelVersion>

    <groupId>org.example</groupId>
    <artifactId>messagewall</artifactId>
    <version>1.0-SNAPSHOT</version>
<dependencies>
    <!-- https://mvnrepository.com/artifact/javax.servlet/javax.servlet-api -->
    <dependency>
        <groupId>javax.servlet</groupId>
        <artifactId>javax.servlet-api</artifactId>
        <version>3.1.0</version>
        <scope>provided</scope>
    </dependency>
    <!-- https://mvnrepository.com/artifact/com.fasterxml.jackson.core/jackson-databind -->
    <dependency>
        <groupId>com.fasterxml.jackson.core</groupId>
        <artifactId>jackson-databind</artifactId>
        <version>2.13.1</version>
    </dependency>

</dependencies>

</project>
3. Construction directory
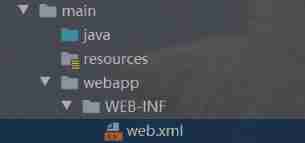
We can construct the directory structure of the version as shown in the figure , And then in web.xml Add the following to the :
<!DOCTYPE web-app PUBLIC "-//Sun Microsystems, Inc.//DTD Web Application 2.3//EN" "http://java.sun.com/dtd/web-app_2_3.dtd" >
<web-app>
    <display-name>Archetype Created Web Application</display-name>
</web-app>
Agree on the front and back-end interaction interface
So-called “ Front end and back end interface ” Carry out Web Key links in development , say concretely : That is, what pages are allowed to send to the server HTTP request , And what kind of... Each request is expected to get HTTP Respond to . This step is the most critical and difficult step in web page development , You need to study hard !
- The first interface : When the user clicks submit here , Just send a request to the server , Send the message to the server
- The second interface : When the page loads , You need to send a request to the server , Get the information that has been saved on the server before , Show on page
The interface format can be agreed as follows :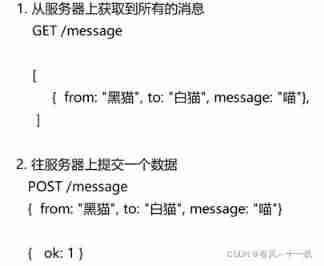
Implement server-side code
After agreeing on the interface of front-end and back-end interaction , We can create a class to implement the server-side code .
The relevant code is as follows ( Annotated )
import com.fasterxml.jackson.databind.ObjectMapper;
import javax.servlet.ServletException;
import javax.servlet.annotation.WebServlet;
import javax.servlet.http.HttpServlet;
import javax.servlet.http.HttpServletRequest;
import javax.servlet.http.HttpServletResponse;
import java.io.*;
import java.util.List;

class Message {
    // Representing one of the requests Jackon data format
    public String from;
    public String to;
    public String message;
}

@WebServlet("/message")
public class MessageServlet extends HttpServlet {

    private ObjectMapper objectMapper = new ObjectMapper();
    private List<Message> messageList = new ArrayList<>();

    //  This method is used to deal with ,  Get message data from the server
    @Override
    protected void doGet(HttpServletRequest req, HttpServletResponse resp) throws ServletException, IOException {

        resp.setContentType("application/json;charset=utf-8");
        objectMapper.writeValue(resp.getWriter(), messageList);
    }

    //  This method is used to deal with ,  Submit data from the client to the server
    @Override
    protected void doPost(HttpServletRequest req, HttpServletResponse resp) throws ServletException, IOException {

        Message message = objectMapper.readValue(req.getInputStream(), Message.class);
        messageList.add(message);
        resp.setContentType("application/json;charset=utf-8");
        resp.getWriter().write("{\"ok\": 1}");
    }
}
Adjust the front page code
The current server is ready to receive browser requests , Then we need to modify the front-end code to really construct the request .
Specific needs :
- When the page is loaded , Access server , Get the message list from the server , And show it
- When you click the submit button , Construct the current data into a HTTP request , Send to the server
Specific ideas :
To carry out this process of front-end and back-end interaction , We need to use it ajax, therefore , We need to introduce jQuery To ensure that it can be used ajax, Then we can write relevant code .
complete html The code is as follows :
<!DOCTYPE html>
<html lang="en">
<head>
<meta charset="UTF-8">
<meta http-equiv="X-UA-Compatible" content="IE=edge">
<meta name="viewport" content="width=device-width, initial-scale=1.0">
<title>Document</title>
</head>
<body>
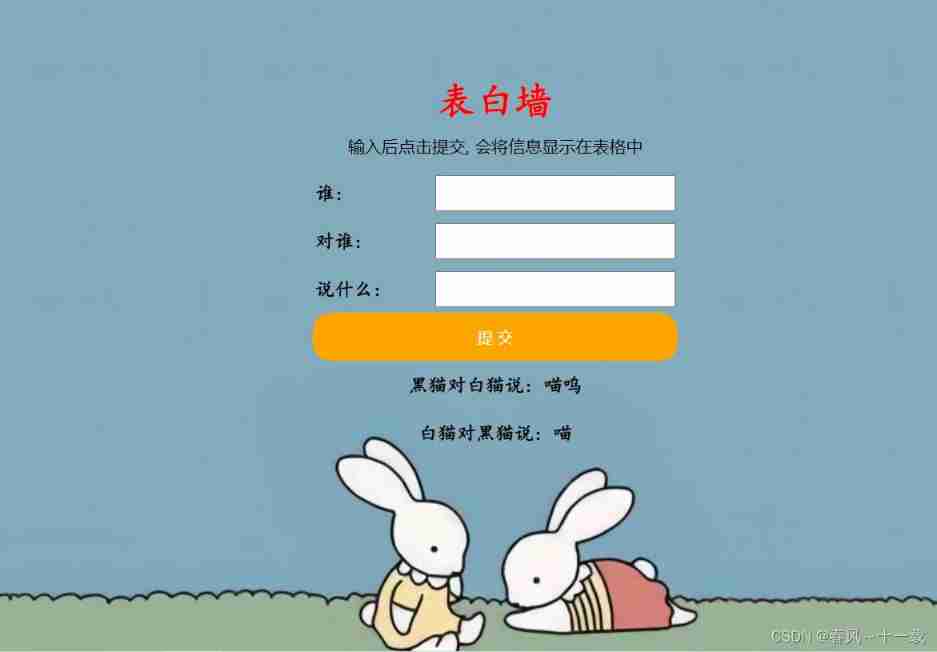
<div class="container">
<h1 class="title"> Confession wall </h1>
<p> Click Submit after entering , The information will be displayed in the table </p>
<div class="row">
<span> who : </span>
<input class="edit" type="text">
</div>
<div class="row">
<span> To whom : </span>
<input class="edit" type="text">
</div>
<div class="row">
<span> what did you say? : </span>
<input class="edit" type="text">
</div>
<div class="row">
<input type="button" value=" carry hand over " class="submit">
</div>
</div>
<style> * {
margin: 0;/* Set the outer margin to 0*/ padding: 0;/* Set the inside margin to 0*/ box-sizing: border-box;/* Setting the border will not support the big box */ } .title{
color:red; font-family:KaiTi; } .container {
width: 400px; margin: 0 auto;/* Set center alignment */ padding-top: 50px; } h1 {
text-align: center; padding-top: 50px; } p {
color:black; text-align: center; font-size: 14px; padding: 10px 0; } .row {
height: 40px; display: flex;/* Elastic layout */ justify-content: center; align-items: center; font-family: KaiTi; font-weight: 700; } span {
width: 100px; line-height: 40px; } .edit {
width: 200px; height: 30px; padding-left: 5px; } .submit {
width: 304px; height: 40px; color: white; background-color: orange; border: none;/* Remove the border */ border-radius: 15px; } .submit:active{
background-color:rgb(181, 184, 38); }/* Set the effect when clicking the submit button */ html, body {
height: 100%;/* Set the overall page height , Make the page as high as the browser window */ background-image: url(" Confession wall wallpaper .png");/* Set the background image */ background-position: center center; background-size:cover; background-repeat: no-repeat; } </style>
<script src="https://cdn.bootcdn.net/ajax/libs/jquery/3.6.0/jquery.min.js"></script>
<script> //1. When the page is loaded , Access server , Get the message list from the server , And show it function load() {
// Through this load function , Get the message from the server , And show $.ajax({
type: 'GET', url: 'message', success: function(data, status) {
// Construct a callback function // data It's responsive body, At this point, the response may be just a string format , You can manually perform a parsing , according to json Format parses into objects let container = document.querySelector('.container'); // let messages = JSON.parse(data); let messages = data; for (let message of messages) {
// After parsing the relevant response, a series of html assemble let row = document.createElement('div');// Construct a line row.className = 'row'; row.innerHTML = message.from + ' Yes ' + message.to + ' say : '+ message.message; container.appendChild(row);// Add every message to the parent element } } }); } load(); //2. When you click the submit button , Construct the current data into a HTTP request , Send to the server // Register click events for click buttons let submit = document.querySelector('.submit');// Get the submit button submit.onclick = function () {
// 1. Get the content of the edit box let edits = document.querySelectorAll('.edit'); let from = edits[0].value; let to = edits[1].value; let message = edits[2].value; console.log(from + "," + to + "," + message); // Check the content entered by the user , Ensure legal submission if (from == '' || to == '' || message == '') {
return; } // 2. structure html Elements let row = document.createElement('div'); row.className = 'row'; row.innerHTML = from + ' Yes ' + to + ' say : ' + message; // 3. Add the constructed element to DOM In the tree let container = document.querySelector('.container'); container.appendChild(row); // 4. At the same time, clear the contents of the previous input box for (let i = 0; i < 3; i++) {
edits[i].value = ''; } $.ajax({
type: "POST", url: "message", data: JSON.stringify({
from: from, to: to, message: message}), contentType: "application/json; charset=utf-8", success: function(data, status) {
if (data.ok == 1) {
console.log(' Message submitted successfully !'); } else {
console.log(' Failed to submit message !'); } } }) } </script>
</body>
</html>
Use... After writing Smart Tomcat After packaging and deployment , After we input the content in the confession wall, we can save it to the server , In this way, when the page is refreshed, it will not be lost :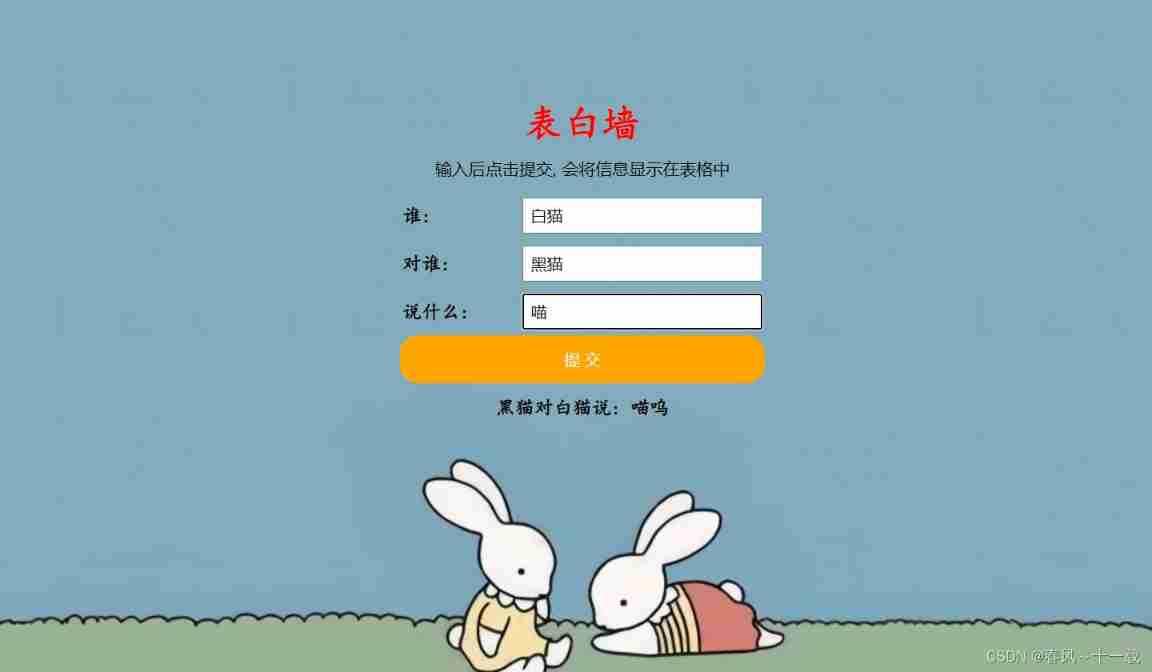
Currently, the server saves the data to messageList variable , Variables are located in memory , At the moment , Once the program is restarted ( Server restart ), Things in memory are gone , So how to make the data not lost after the server restarts ? At this moment, we need to store data persistently
Persistent storage of data
1. Write data to a file
There are two ways to make data persistent , One is to write data to a file , At this point, we will use the previous knowledge about file operation .
The relevant code is as follows ( Pay attention to changing the position )
class Message {
    // Representing one of the requests Jackon data format
    public String from;
    public String to;
    public String message;
}

@WebServlet("/message")
public class MessageServlet extends HttpServlet {

    private ObjectMapper objectMapper = new ObjectMapper();
    // Fill in the path to save the file here
    private String filePath = " Fill in the path of the location where you want to save the file here ";

    //  This method is used to deal with ,  Get message data from the server
    @Override
    protected void doGet(HttpServletRequest req, HttpServletResponse resp) throws ServletException, IOException {

        resp.setContentType("application/json;charset=utf-8");
    }

    //  This method is used to deal with ,  Submit data from the client to the server
    @Override
    protected void doPost(HttpServletRequest req, HttpServletResponse resp) throws ServletException, IOException {

        Message message = objectMapper.readValue(req.getInputStream(), Message.class);
        //  ad locum ,  To make a  " Writing documents "  operation
        save(message);
        resp.setContentType("application/json;charset=utf-8");
        resp.getWriter().write("{\"ok\": 1}");
    }

    private void save(Message message) {

        System.out.println(" Write data to file !");
        try (FileWriter fileWriter = new FileWriter(filePath, true)) {

            //  There are also many ways to write file formats .  You can write directly  json,  You can also use line text ( One line for each record ,  Use separators between fields to distinguish )
            fileWriter.write(message.from + "\t" + message.to + "\t" + message.message + "\n");
        } catch (IOException e) {

            e.printStackTrace();
        }
    }
}
Be careful :
among append The parameter in is set to true The function of is to set the opening mode of the file to the mode of additional writing ( When using output stream objects ), This will not empty the original contents of the file , But directly to the last splicing
Verification procedure :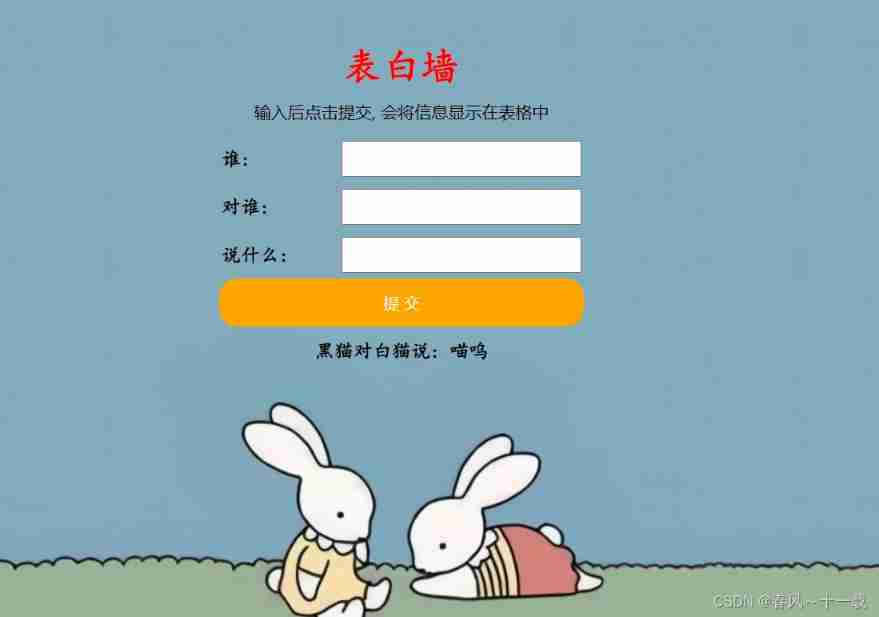
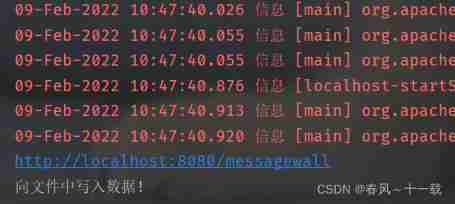
When we enter data in the page and submit , You can see that the compiler has prompted to write data to the file 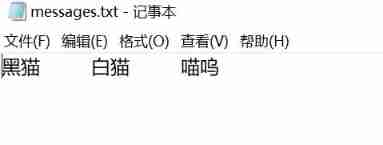
We open the file , You can also see the saved data , At this point, our data can be persisted , But when we refresh the page , You can see that there is still nothing on the page :
The reason is that at this time, we only save the data , There is no way to load the saved data after the page is refreshed , Then we just need to load the data in the file and display it in the response .
We need to build a load Method :
import com.fasterxml.jackson.databind.ObjectMapper;

import javax.servlet.ServletException;
import javax.servlet.annotation.WebServlet;
import javax.servlet.http.HttpServlet;
import javax.servlet.http.HttpServletRequest;
import javax.servlet.http.HttpServletResponse;
import java.io.*;
import java.sql.Connection;
import java.sql.PreparedStatement;
import java.sql.ResultSet;
import java.sql.SQLException;
import java.util.ArrayList;
import java.util.List;

class Message {
    // Representing one of the requests Jackon data format
    public String from;
    public String to;
    public String message;
}

@WebServlet("/message")
public class MessageServlet extends HttpServlet {

    private ObjectMapper objectMapper = new ObjectMapper();
    // Fill in the path to save the file here
    private String filePath = " Fill in the path of the location where you want to save the file here ";

    //  This method is used to deal with ,  Get message data from the server
    @Override
    protected void doGet(HttpServletRequest req, HttpServletResponse resp) throws ServletException, IOException {

        resp.setContentType("application/json;charset=utf-8");
        List<Message> messageList = load();
        objectMapper.writeValue(resp.getWriter(), messageList);
    }

    private List<Message> load() {

        //  This method is responsible for reading files ,  After getting the read data ,  Put it in  List<Message>  in
        List<Message> messageList = new ArrayList<>();
        System.out.println(" Load from file !");
        // Here we need to read by line . FileReader  Itself does not support .  It needs to be covered with a layer BufferedReader
        // Of course, we use  Scanner  It's OK
        try (BufferedReader bufferedReader = new BufferedReader(new FileReader(filePath))) {

            while (true) {

                String line = bufferedReader.readLine();
                if (line == null) {

                    break;
                }
                //  If you read  line  The content of ,  Just put  line  Resolve to a  Message  object
                String[] tokens = line.split("\t");
                Message message = new Message();
                message.from = tokens[0];
                message.to = tokens[1];
                message.message = tokens[2];
                messageList.add(message);
            }
        } catch (IOException e) {

            e.printStackTrace();
        }
        return messageList;
    }
    //  This method is used to deal with ,  Submit data from the client to the server
    @Override
    protected void doPost(HttpServletRequest req, HttpServletResponse resp) throws ServletException, IOException {

        Message message = objectMapper.readValue(req.getInputStream(), Message.class);
        //  ad locum ,  To make a  " Writing documents "  operation
        save(message);
        resp.setContentType("application/json;charset=utf-8");
        resp.getWriter().write("{\"ok\": 1}");
    }

    private void save(Message message) {

        System.out.println(" Write data to file !");
        try (FileWriter fileWriter = new FileWriter(filePath, true)) {

            //  There are also many ways to write file formats .  You can write directly  json,  You can also use line text ( One line for each record ,  Use separators between fields to distinguish )
            fileWriter.write(message.from + "\t" + message.to + "\t" + message.message + "\n");
        } catch (IOException e) {

            e.printStackTrace();
        }
    }
}
So let's use Smart Tomcat Repackage the deployment program , Refresh after opening the page , You can see the data previously saved in the file :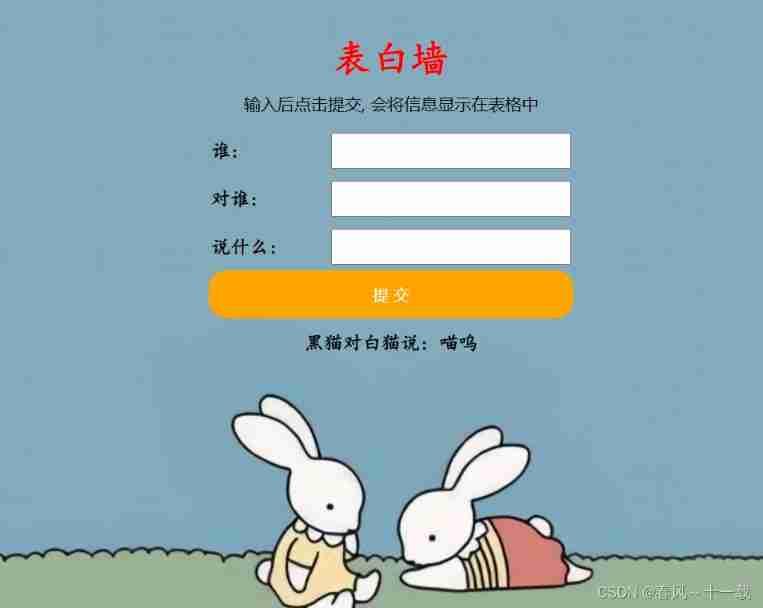
2. Save the data to the database
In addition to writing data to a file for saving , We can also save the data to the database .
(1) Import database jar package
When saving with a database , First of all, we need to introduce the database jar package , The method is from Maven In the central warehouse of
  <!-- https://mvnrepository.com/artifact/mysql/mysql-connector-java -->
    <dependency>
        <groupId>mysql</groupId>
        <artifactId>mysql-connector-java</artifactId>
        <version>5.1.47</version>
    </dependency>
(2) Building database and building tables
introduce jar After package , We can write relevant code , But before that , We should start with mysql Create relevant databases and data tables :
create table message(`from` varchar(1024),`to` varchar(1024),`message` varchar(1024));
Be careful , because from and to For keywords in the database , In order to prevent conflict , You should put back quotation marks
(3) Establish connection with database
With databases and tables , We can start writing relevant code , First of all, we should establish a connection with the database , At this point, we should first create a DBUtil class , Write relevant code :
import com.mysql.jdbc.jdbc2.optional.MysqlDataSource;

import javax.sql.DataSource;
import java.sql.Connection;
import java.sql.PreparedStatement;
import java.sql.ResultSet;
import java.sql.SQLException;

public class DBUtil {

    private static final String URL = " Fill in your own database path here ";
    private static final String USERNAME = " Fill in your database user name ";
    private static final String PASSWORD = " Fill in your own database password ";

    private static volatile DataSource dataSource = null;

    public static DataSource getDataSource() {

        if (dataSource == null) {

            synchronized (DBUtil.class) {

                if (dataSource == null) {

                    dataSource = new MysqlDataSource();
                    ((MysqlDataSource)dataSource).setURL(URL);
                    ((MysqlDataSource)dataSource).setUser(USERNAME);
                    ((MysqlDataSource)dataSource).setPassword(PASSWORD);
                }
            }
        }
        return dataSource;
    }

    public static Connection getConnection() throws SQLException {

        return getDataSource().getConnection();
    }

    public static void close(Connection connection, PreparedStatement statement, ResultSet resultSet) {

        if (resultSet != null) {

            try {

                resultSet.close();
            } catch (SQLException e) {

                e.printStackTrace();
            }
        }
        if (statement != null) {

            try {

                statement.close();
            } catch (SQLException e) {

                e.printStackTrace();
            }
        }
        if (connection != null) {

            try {

                connection.close();
            } catch (SQLException e) {

                e.printStackTrace();
            }
        }
    }
}
Then you can write related JDBC Code. ( Read and write relevant data from the database )
import com.fasterxml.jackson.databind.ObjectMapper;
import javax.servlet.ServletException;
import javax.servlet.annotation.WebServlet;
import javax.servlet.http.HttpServlet;
import javax.servlet.http.HttpServletRequest;
import javax.servlet.http.HttpServletResponse;
import java.io.*;
import java.sql.Connection;
import java.sql.PreparedStatement;
import java.sql.ResultSet;
import java.sql.SQLException;
import java.util.ArrayList;
import java.util.List;

class Message {

    public String from;
    public String to;
    public String message;
}

@WebServlet("/message")
public class MessageServlet extends HttpServlet {

    private ObjectMapper objectMapper = new ObjectMapper();
    @Override
    protected void doGet(HttpServletRequest req, HttpServletResponse resp) throws ServletException, IOException {

        resp.setContentType("application/json;charset=utf-8");
        List<Message> messageList = load();
        objectMapper.writeValue(resp.getWriter(), messageList);
    }

    private List<Message> load() {

        List<Message> messageList = new ArrayList<>();
        System.out.println(" Reading data from a database !");

        Connection connection = null;
        PreparedStatement statement = null;
        ResultSet resultSet = null;
        try {

            connection = DBUtil.getConnection();
            String sql = "select * from message";
            statement = connection.prepareStatement(sql);
            resultSet = statement.executeQuery();
            while (resultSet.next()) {

                Message message = new Message();
                message.from = resultSet.getString("from");
                message.to = resultSet.getString("to");
                message.message = resultSet.getString("message");
                messageList.add(message);
            }
        } catch (SQLException e) {

            e.printStackTrace();
        } finally {

            DBUtil.close(connection, statement, resultSet);
        }
        return messageList;
    }

    //  This method is used to deal with ,  Submit data from the client to the server
    @Override
    protected void doPost(HttpServletRequest req, HttpServletResponse resp) throws ServletException, IOException {

        Message message = objectMapper.readValue(req.getInputStream(), Message.class);

        //  ad locum ,  To make a  " Writing documents "  operation
        save(message);

        resp.setContentType("application/json;charset=utf-8");
        resp.getWriter().write("{\"ok\": 1}");
    }

    private void save(Message message) {

        System.out.println(" Write data to the database !");

        Connection connection = null;
        PreparedStatement statement = null;
        try {

            // 1.  First establish a connection with the database
            connection = DBUtil.getConnection();
            // 2.  Structural assembly  SQL
            String sql = "insert into message values (?, ?, ?)";
            statement = connection.prepareStatement(sql);
            statement.setString(1, message.from);
            statement.setString(2, message.to);
            statement.setString(3, message.message);
            // 3.  perform  SQL
            int ret = statement.executeUpdate();
            if (ret == 1) {

                System.out.println(" Insert the success !");
            } else {

                System.out.println(" Insert the failure !");
            }
        } catch (SQLException e) {

            e.printStackTrace();
        } finally {

            DBUtil.close(connection, statement, null);
        }
    }
}
Verification procedure 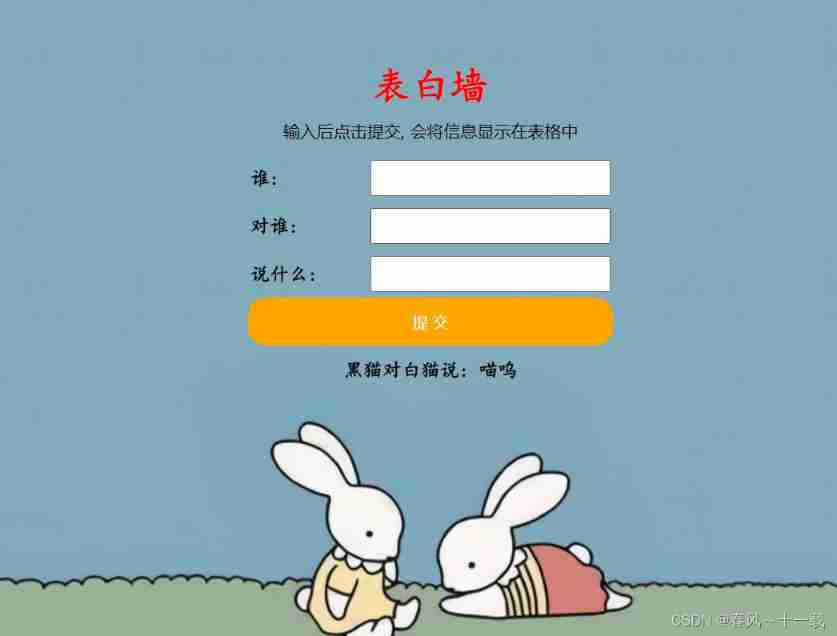
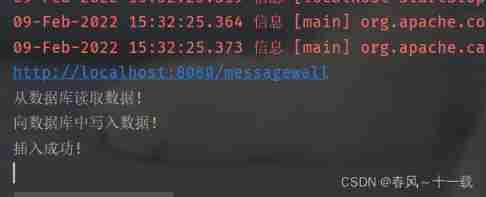
The compiler successfully shows that the data written to the database and inserted successfully !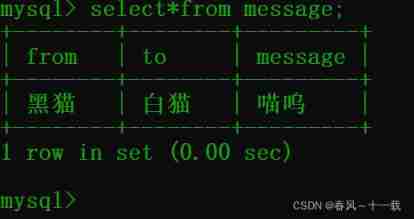
We can see that we have successfully inserted the data into the database !
3. summary
In our current scenario , Storing data by writing files is simpler than storing it in a database ; Persistent storage , It's not just a way to write databases , Writing documents is sometimes simple and effective ; Generally speaking , If the problem scenario itself is relatively simple , The data format is not complex , The amount of data is not large . This can be written directly in a file , If the problem scenario is complex ( Data needs a series of calculation and processing ), Writing a database is more appropriate ~
that , This blog is over ! Bloggers have given you the overall idea of implementing a front-end and back-end interactive confession wall , You can add various pictures according to your own needs , Let's try
边栏推荐
- How to make shell script executable
- MySQL combat optimization expert 04 uses the execution process of update statements in the InnoDB storage engine to talk about what binlog is?
- Unicode decodeerror: 'UTF-8' codec can't decode byte 0xd0 in position 0 successfully resolved
- Preliminary introduction to C miscellaneous lecture document
- February 13, 2022 - Maximum subarray and
- Emotional classification of 1.6 million comments on LSTM based on pytoch
- Software test engineer development planning route
- 保姆级手把手教你用C语言写三子棋
- 使用OVF Tool工具从Esxi 6.7中导出虚拟机
- Baidu Encyclopedia data crawling and content classification and recognition
猜你喜欢
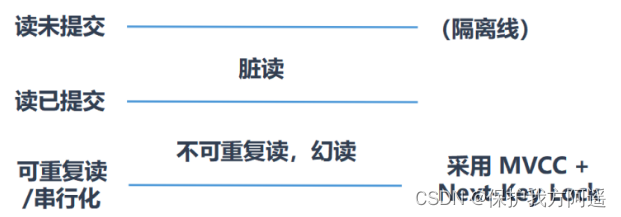
MySQL33-多版本并发控制
Solve the problem of remote connection to MySQL under Linux in Windows
Moteur de stockage mysql23
Preliminary introduction to C miscellaneous lecture document
Mysql35 master slave replication
What should the redis cluster solution do? What are the plans?
![14 medical registration system_ [Alibaba cloud OSS, user authentication and patient]](/img/c4/81f00c8b7037b5fb4c5df4d2aa7571.png)
14 medical registration system_ [Alibaba cloud OSS, user authentication and patient]
MySQL 29 other database tuning strategies
实现以form-data参数发送post请求

MySQL21-用户与权限管理
随机推荐
Mysql23 storage engine
[unity] simulate jelly effect (with collision) -- tutorial on using jellysprites plug-in
pytorch的Dataset的使用
Global and Chinese markets for aprotic solvents 2022-2028: Research Report on technology, participants, trends, market size and share
Just remember Balabala
Good blog good material record link
MySQL34-其他数据库日志
[paper reading notes] - cryptographic analysis of short RSA secret exponents
MySQL ERROR 1040: Too many connections
[paper reading notes] - cryptographic analysis of short RSA secret exponents
MySQL实战优化高手05 生产经验:真实生产环境下的数据库机器配置如何规划?
Record the first JDBC
Technology | diverse substrate formats
Unicode decodeerror: 'UTF-8' codec can't decode byte 0xd0 in position 0 successfully resolved
How to find the number of daffodils with simple and rough methods in C language
MySQL storage engine
Ueeditor internationalization configuration, supporting Chinese and English switching
MySQL real battle optimization expert 11 starts with the addition, deletion and modification of data. Review the status of buffer pool in the database
MySQL实战优化高手03 用一次数据更新流程,初步了解InnoDB存储引擎的架构设计
Mysql33 multi version concurrency control