当前位置:网站首页>测试老鸟浅谈unittest和pytest的区别
测试老鸟浅谈unittest和pytest的区别
2022-07-05 09:15:00 【软件测试呀】
一、unittest
# MyFunction.py

def add(a, b):
    return a + b
1.unittest单元测试
# 单元测试.py

"""
1、单元测试框架:自动校验结果
    python:unittest或者pytest、Java:Junit、TestNG
    怎么写用例:
        必须以test开头
    查找用例
    参数化
"""
import unittest
import myFunction
import HTMLTestRunner
import HTMLTestRunnerNew  # 测试报告丰富版本
import parameterized  # 参数化


class TestAdd(unittest.TestCase):
    '''测试add方法'''

    def testAddNormal1(self):
        """正常的测试加法,by huozi"""
        result = myFunction.add(1, 2)
        self.assertEqual(3, result, )

    def testAddNormal2(self):
        """正常的测试加法,带有msg返回信息"""
        result = myFunction.add(4, 2)
        self.assertEqual(6, result, '正常case通过')

    def testAddError1(self):
        """测试失败使用,by huozi"""
        result = myFunction.add(0, 2)
        self.assertEqual(4, result)

    def testAddError2(self):
        """测试失败使用带有msg返回信息的"""
        result = myFunction.add(1, 2)
        self.assertEqual(0, result, '正常整数加法,没有通过')

    @parameterized.parameterized.expand(  # 传参为二维数组
        [[1, 2, 3, '参数化1'],
         [-1, 2, 3, '参数化2'],
         [2, 4, 7, '参数化3']]
    )
    def testParamAdd(self, a, b, c, desc):
        self._testMethodDoc = desc  # 使用这个_testMethodDoc参数传递
        result = myFunction.add(a, b)
        self.assertEqual(c, result, '预期结果是%s,实际结果是%s' % (c, result))


if __name__ == '__main__':
    # 写法0:不产生测试报告
    # unittest.main()  # 执行所有用例

    # 写法1:运行单个测试用例
    testSuite1 = unittest.TestSuite()
    testSuite1.addTest(TestAdd('testAddNormal'))  # 运行单个测试用例
    # testSuite.addTest(TestAdd('testAddError1'))
    # testSuite.addTest(TestAdd('testAddError1'))

    # 写法2:运行某个类里面的测试用例
    testSuite2 = unittest.makeSuite(TestAdd)  # 运行某个类(如TestAdd)里面所有的测试用例

    # 写法3:查找某个目录下的测试用例(绝对路径),文件必须以test开头,所有文件就是:*.py
    testSuite3 = unittest.defaultTestLoader.discover('/Users/ray/PycharmProjects/tmz/day9/cases', 'test*.py')

    with open('report.html', 'wb') as fw:
        # runner = HTMLTestRunner.HTMLTestRunner(stream=fw, title='天马测试报告', description='天马测试',verbosity=3)
        runner = HTMLTestRunnerNew.HTMLTestRunner(stream=fw, title='天马测试报告', description='天马测试', verbosity=3)
        runner.run(testSuite2)
二、pytest
1.pytest单元测试
class TestClassOne(object):
    def test_one(self):
        x = "this"
        assert 't'in x

    def test_two(self):
        x = "hello"
        assert hasattr(x, 'check')


class TestClassTwo(object):
    def test_one(self):
        x = "iphone"
        assert 'p'in x

    def test_two(self):
        x = "apple"
        assert hasattr(x, 'check')
三、unittest和pytest的区别
3 用例编写规则
unittest提供了test cases、test suites、test fixtures、test runner相关的类,让测试更加明确、方便、可控。使用unittest编写用例,必须遵守以下规则:
1.测试文件必须先import unittest
2.测试类必须继承unittest.TestCase
3.测试方法必须以“test_”开头
4.测试类必须要有unittest.main()方法
pytest是python的第三方测试框架,是基于unittest的扩展框架,比unittest更简洁,更高效。使用pytest编写用例,必须遵守以下规则:
1.测试文件名必须以“test_”开头或者"test"结尾(如:test_ab.py)
2.测试方法必须以“test”开头。
3.测试类命名以"Test"开头。
总结: pytest可以执行unittest风格的测试用例,无须修改unittest用例的任何代码,有较好的兼容性。 pytest插件丰富,比如flask插件,可用于用例出错重跑;还有xdist插件,可用于设备并行执行。
2 用例前置和后置
1 用例编写规则提供了setUp/tearDown,每个用例运行前、结束后运行一次。setUpClass和tearDownClass,用例执行前、结束后,只运行一次。
# unittset前置条件.py
import unittest


class Test(unittest.TestCase):  # 继承unittest中的TestCase
    @classmethod
    def setUpClass(cls) -> None:  # setUpClass:所有用例执行之前会执行一次,如:打开文件,链接数据库
        print('setUpClass')

    @classmethod
    def tearDownClass(cls) -> None:  # tearDownClass:所有用例执行之后会执行一次,如:注册后删掉数据
        print('tearDownClass')

    @classmethod
    def setUp(self) -> None:  # setUp:每条用例执行前都会先执行setUp,如:
        print('setUp')

    @classmethod
    def tearDown(self) -> None:  # tearDown:每条用例执行后都会先执行tearDown,如:
        print('tearDown')

    def testB(self):  # 用例执行顺序:以test后字母开头排序
        print('testB')

    def testA(self):
        print('testA')

    def testZ(self):
        print('testZ')


if __name__ == "__main__":
    # unittest.main()  # 不产生测试报告
    pass
其执行结果如下:
Ran 3 tests in 0.003s
Launching unittests with arguments python -m unittest 用例前置条件.Test in /Users/ray/PycharmProjects/day10


OK
setUpClass
tearDownClass

Process finished with exit code 0
setUp
testA
tearDown
setUp
testB
tearDown
setUp
testZ
tearDown
pytest提供了模块级、函数级、类级、方法级的setup/teardown,比unittest的setUp/tearDown更灵活。
import pytest


# 模块中的方法
def setup_module():
    print("setup_module:整个.py模块只执行一次")


def teardown_module():
    print("teardown_module:整个test_module.py模块只执行一次")


def setup_function():
    print("setup_function:每个用例开始前都会执行")


def teardown_function():
    print("teardown_function:每个用例结束后都会执行")


# 测试模块中的用例1
def test_one():
    print("正在执行测试模块----test_one")
    x = "this"
    assert 'h' in x


# 测试模块中的用例2
def test_two():
    print("正在执行测试模块----test_two")
    x = "hello"
    assert hasattr(x, 'check')


# 测试类
class TestCase():

    def setup_class(self):
        print("setup_class:所有用例执行之前")

    def teardown_class(self):
        print("teardown_class:所有用例执行之后")

    def setup(self):
        print("setup:每个用例开始前都会执行")

    def teardown(self):
        print("teardown:每个用例结束后都会执行")

    def test_three(self):
        print("正在执行测试类----test_three")
        x = "this"
        assert 'h' in x

    def test_four(self):
        print("正在执行测试类----test_four")
        x = "hello"
        assert hasattr(x, 'check')


if __name__ == "__main__":
    pytest.main(["-s", "test_module.py"])
其执行结果如下:
collected 4 items

test_module.py setup_module:整个.py模块只执行一次
setup_function:每个用例开始前都会执行
正在执行测试模块----test_one
.teardown_function:每个用例结束后都会执行
setup_function:每个用例开始前都会执行
正在执行测试模块----test_two
Fteardown_function:每个用例结束后都会执行
setup_class:所有用例执行之前
setup:每个用例开始前都会执行
正在执行测试类----test_three
.teardown:每个用例结束后都会执行
setup:每个用例开始前都会执行
正在执行测试类----test_four
Fteardown:每个用例结束后都会执行
teardown_class:所有用例执行之后
teardown_module:整个test_module.py模块只执行一次
方法二:pytest的fixture方法
# conftest.py
# -*- coding: utf-8 -*-
import pytest


@pytest.fixture(scope="function")
def login():
    print("请先输入账号和密码,然后登陆")

    yield
    print("退出登陆")
# test_1.py
# -*- coding: utf-8 -*-
import pytest


def test_fix1(login):
    print("test_fix1 in test_1.py:需要登陆再执行操作")


def test_fix2():
    print("test_fix2 in test_1.py:不需要登陆再执行操作")


def test_fix3(login):
    print("test_fix3 in test_1.py:需要登陆再执行操作")


if __name__ == "__main__":
    pytest.main(['-s', 'test_1.py'])
# test_2.py
# -*- coding: utf-8 -*-
import pytest


def test_fix3():
    print("test_fix3 in test_2.py:不需要登陆再执行操作")


def test_fix4(login):
    print("test_fix4 in test_2.py:需要登陆再执行操作")


if __name__ == "__main__":
    pytest.main(['-s', 'test_2.py'])
其执行结果如下:
pytest -s test_1.py

collected 3 items

test_1.py 请先输入账号和密码,然后登陆
test_fix1 in test_1.py:需要登陆再执行操作
.退出登陆
test_fix2 in test_1.py:不需要登陆再执行操作
.请先输入账号和密码,然后登陆
test_fix3 in test_1.py:需要登陆再执行操作
.退出登陆
3 断言
unittest提供了assertEqual、assertIn、assertTrue、assertFalse。
assertEqual:判断断言第一个参数和第二个参数是否相等,如果不相等则测试失败
用法: assertIn(key, container, message)
key:在给定容器中检查其存在性的字符串
container:在其中搜索关键字符串的字符串
message:作为测试消息失败时显示的消息的字符串语句。
assertIn:用于单元测试中以检查字符串是否包含在其他字符串中。此函数将使用三个字符串参数作为输入,并根据断言条件返回一个布尔值。如果 key 包含在容器字符串中,它将返回true,否则返回false。
用法: assertIn(key, container, message)
参数:assertIn()接受以下三个参数的说明:
key:在给定容器中检查其存在性的字符串
container:在其中搜索关键字符串的字符串
message:作为测试消息失败时显示的消息的字符串语句。
assertTrue:判断是否为真
assertFalse:判断是否为假
pytest直接使用assert表达式。
assert:用于判断一个表达式,在表达式条件为 false 的时候触发异常。
4 报告
unittest使用HTMLTestRunnerNew库。
pytest有pytest-HTML、allure插件。
5 失败重跑
unittest无此功能。
pytest支持用例执行失败重跑,pytest-rerunfailures插件。
6 参数化
unittest需依赖ddt库或者parameterized库。
# 单元测试.py
import unittest
import myFunction
import HTMLTestRunner
import HTMLTestRunnerNew  # 测试报告丰富版本
import parameterized  # 参数化


class TestAdd(unittest.TestCase):
    '''测试add方法'''

    @parameterized.parameterized.expand(  # 传参为二维数组
        [[1, 2, 3, '参数化1'],
         [-1, 2, 3, '参数化2'],
         [2, 4, 7, '参数化3']]
    )

    def testParamAdd(self, a, b, c, desc):
        self._testMethodDoc = desc  # 使用这个_testMethodDoc参数传递
        result = myFunction.add(a, b)
        self.assertEqual(c, result, '预期结果是%s,实际结果是%s' % (c, result))
pytest直接使用@pytest.mark.parametrize装饰器
@allure.epic("SOS接口自动化测试")
class TestCaseRunner:
@allure.feature("过程管理/风险处理/干预任务报表(新)-查询")
@pytest.mark.parametrize("case", CaseExcuteUtils.get_case_list("soscases/progressManagement/taskreport", case_tag))
def test_task_report(self, case):
    """
    参数化执行测试用例
    :param case:
    :return:
    """
    print(case.description)
    allure.dynamic.title(case.description)
    CaseExcuteUtils.excute_case(case, data)
7 用例分类执行
1.unittest默认执行全部测试用例,可以通过加载testsuite执行部分模块测试用例;
2.pytest可以通过@pytest.mark来标记测试用例,执行命令加上参数“-m”即可运行标记的用例。
房子要一层一层盖,知识要一点一点学。大家在学习过程中要好基础,多上手实操,话不多说,这里狠狠上一次干货!我熬夜整理好的各阶段(功能、接口、自动化、性能、测开)技能学习资料+实操讲解,非常适合私下里学习,比找资料自学高效多了,分享给你们。
领取关 w/x/g/z/h:软件测试小dao
敲字不易,如果此文章对你有帮助的话,点个赞收个藏来个关注,给作者一个鼓励。也方便你下次能够快速查找。
边栏推荐
- Introduction Guide to stereo vision (7): stereo matching
- 顶会论文看图对比学习(GNN+CL)研究趋势
- L'information et l'entropie, tout ce que vous voulez savoir est ici.
- Nodemon installation and use
- 2020 "Lenovo Cup" National College programming online Invitational Competition and the third Shanghai University of technology programming competition
- c#比较两张图像的差异
- 2309. The best English letters with both upper and lower case
- asp. Net (c)
- Huber Loss
- Shutter uses overlay to realize global pop-up
猜你喜欢

Svg optimization by svgo
Understanding rotation matrix R from the perspective of base transformation
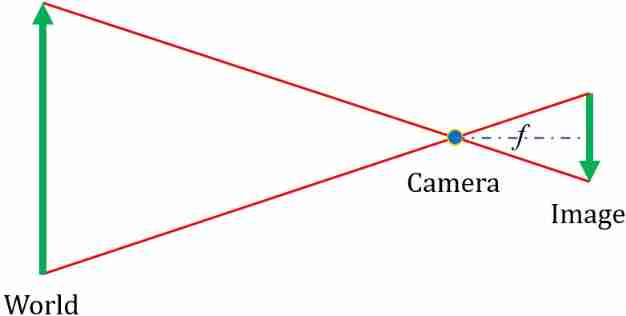
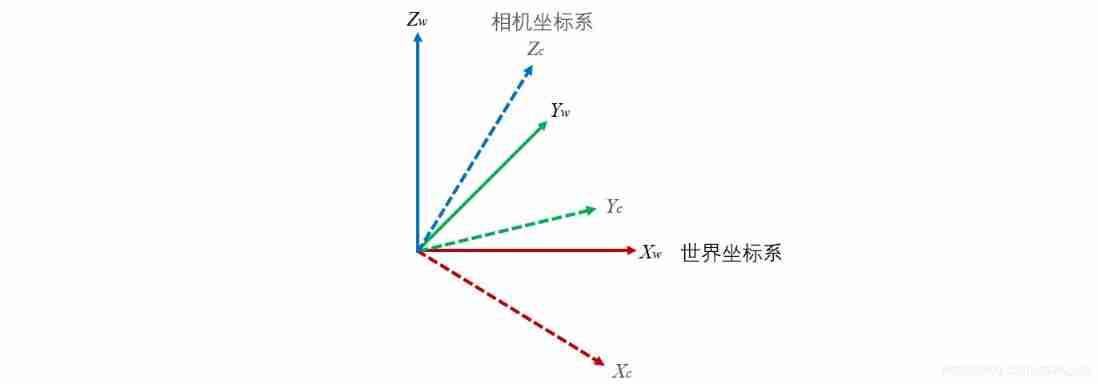
Introduction Guide to stereo vision (1): coordinate system and camera parameters
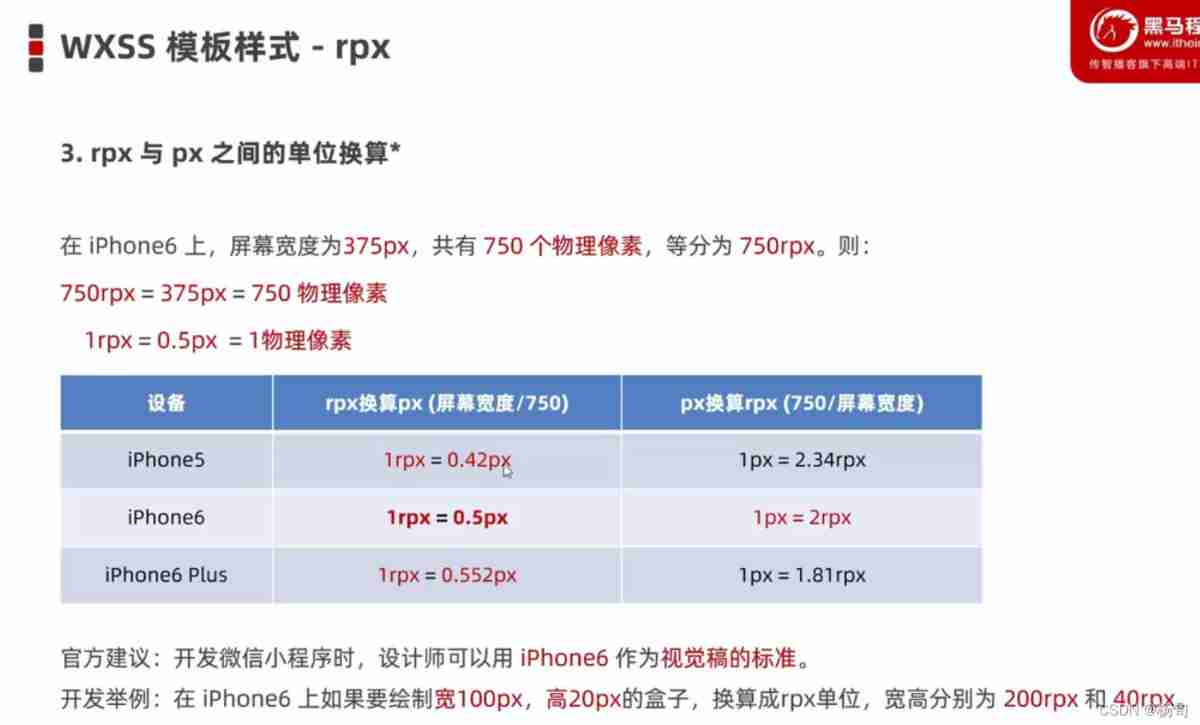
Wxss template syntax
Solution to the problems of the 17th Zhejiang University City College Program Design Competition (synchronized competition)
Huber Loss
Applet customization component
OpenGL - Model Loading
Using request headers to develop multi terminal applications
Hosting environment API
随机推荐
TF coordinate transformation of common components of ros-9 ROS
云计算技术热点
Ros-11 common visualization tools
notepad++
Kotlin introductory notes (II) a brief introduction to kotlin functions
Applet network data request
OpenGL - Coordinate Systems
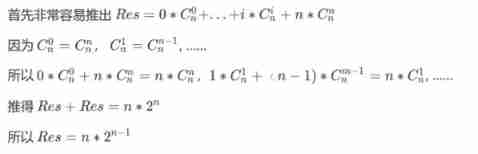
[beauty of algebra] solution method of linear equations ax=0
Newton iterative method (solving nonlinear equations)
Meta tag details
The location search property gets the login user name
C # draw Bezier curve with control points for lattice images and vector graphics
Oracle advanced (III) detailed explanation of data dictionary
nodejs_ fs. writeFile
Applet (use of NPM package)
[code practice] [stereo matching series] Classic ad census: (6) multi step parallax optimization
2311. 小于等于 K 的最长二进制子序列
The combination of deep learning model and wet experiment is expected to be used for metabolic flux analysis
Mengxin summary of LIS (longest ascending subsequence) topics
2310. 个位数字为 K 的整数之和